Page 116 of 418

115 Controls in detailSeats
Seat ventilation*
The switch is located on the door. Seat
ventilation can be activated manually with
the SmartKey in starter switch position 1
or 2. The driver’s seat ventilation can be
activated automatically by the summer
opening feature (
�page 189).
The blue indicator lamps on the switch
show the ventilation level selected:
1Seat ventilation switch
�
Switch on ignition.
Switching on seat ventilation
�
Press switch1.
Three blue indicator lamps above the
switch come on.
�
Continue pressing switch1 until the
desired seat ventilation level is
reached.Switching off seat ventilation
�
Press switch1 repeatedly until all in-
dicator lamps go out.
Level3
Three indicator lamps on
2
Two indicator lamps on
1
One indicator lamp on
off
No indicator lamp on
iThe seat ventilation for the driver’s seat
is automatically set to the highest level
if activated via summer opening fea-
ture (
�page 189).
!If one or all of the lamps on the seat
ventilation switch are flashing, there is
insufficient voltage due to too many
electrical consumers being switched
on. The seat ventilation switches off au-
tomatically.
The seat ventilation will switch back on
again automatically as soon as suffi-
cient voltage is available.
Page 117 of 418

116 Controls in detailMemory function
�Memory function
You can store up to three different settings
per SmartKey or SmartKey with
KEYLESS-GO*.
The following settings are saved for each
stored position:�
Driver’s seat and seat backrest posi-
tion
�
Settings for multicontour seat*
�
Steering wheel position
�
Exterior rear view mirror position
�
Automatic climate control
These key-dependent memory settings
can be deactivated if desired
(
�page 154).The memory button and stored position
switch are located on the door.
1Stored position button
2Memory button
�
Make sure the ignition is switched on
or the relevant door is open and the
SmartKey is inserted in the starter
switch.
!Prior to operating the vehicle, the driv-
er should check and adjust the seat
height, seat position fore and aft, and
seat backrest angle if necessary, to en-
sure adequate control, reach and com-
fort. The head restraint should also be
adjusted for proper height. See also the
section on airbags (
�page 61) for
proper seat positioning.
In addition, adjust the steering wheel to
ensure adequate control, reach, opera-
tion and comfort. Both the inside and
outside rear view mirrors should be ad-
justed for adequate rear vision.
Fasten seat belts. Infants and small
children should be seated in a properly
secured restraint system that complies
with U.S. Federal Motor Vehicle Safety
Standards 213 and 225 and Canadian
Motor Vehicle Safety Standards 213
and 210.2.
Warning!
G
Do not activate the memory function while
driving. Activating the memory function
while driving could cause the driver to lose
control of the vehicle.
Page 119 of 418
118 Controls in detailMemory functionThe buttons are located on the driver’s
door.
1Passenger-side exterior rear view mir-
ror button
2Adjustment button
MMemory button
�
Stop the vehicle.
�
Switch on ignition.
�
Press button1.
The passenger-side exterior rear view
mirror is selected.
�
Adjust the passenger-side exterior rear
view mirror with button2 so that you
see the rear wheel and the road curb.
�
Press memory button M.
�
Within three seconds, press bottom of
adjustment button2 on ƒ.
The parking position is stored if the
mirror does not move.iIf the mirror does move, repeat the
above steps. After the setting is stored,
you can move the mirror again.
Page 124 of 418
123 Controls in detail
Lighting
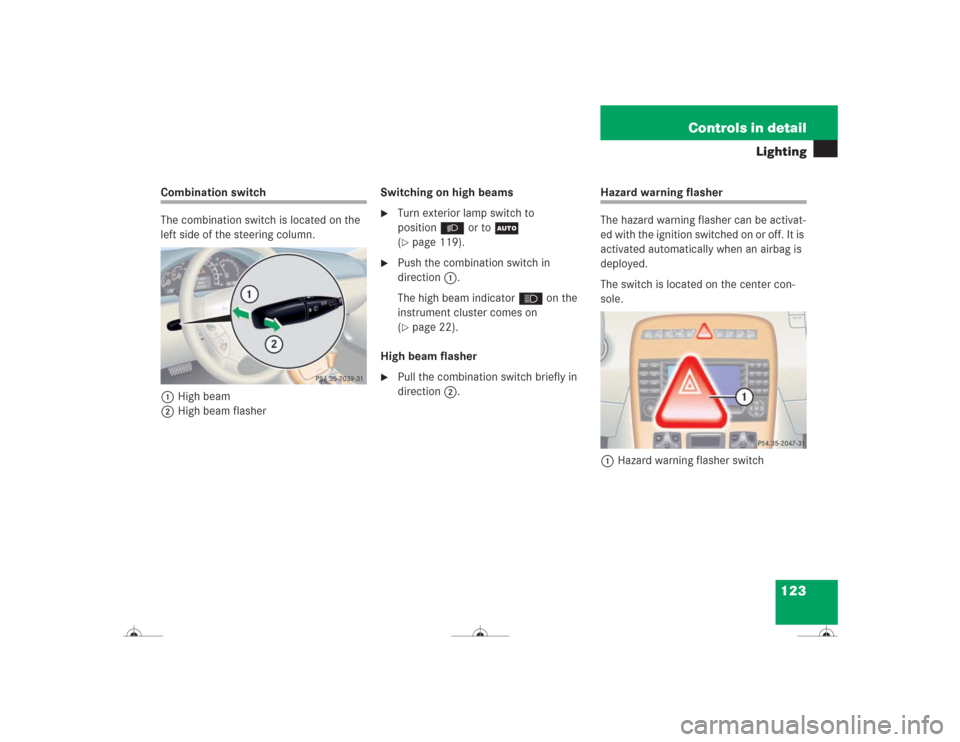
Combination switch
The combination switch is located on the
left side of the steering column.
1High beam
2High beam flasherSwitching on high beams
�
Turn exterior lamp switch to
positionB or toU
(�page 119).
�
Push the combination switch in
direction1.
The high beam indicatorA on the
instrument cluster comes on
(�page 22).
High beam flasher
�
Pull the combination switch briefly in
direction2.
Hazard warning flasher
The hazard warning flasher can be activat-
ed with the ignition switched on or off. It is
activated automatically when an airbag is
deployed.
The switch is located on the center con-
sole.
1Hazard warning flasher switch
Page 127 of 418
.
The instrumen")
126 Controls in detailInstrument cluster
�Instrument clusterA full view illustration of the instrument
cluster can be found in the “At a glance”
section of this manual (
�page 22).
The instrument cluster is activated when
you:
�
open a door
�
turn on the ignition
�
press the reset button (
�page 22)
�
switch on the exterior lamps
You can change the instrument cluster set-
tings in the Instrument cluster submenu of
the control system (
�page 148).
Instrument cluster illumination
1Knob for adjusting instrument cluster
illumination
Use knob1 to adjust the illumination
brightness for the instrument cluster.
�
Press knob1.
The knob will pop out.
To brighten illumination
�
Turn knob1 in the instrument cluster
clockwise.
The instrument cluster illumination will
brighten.
To dim illumination
�
Turn knob1 in the instrument cluster
counterclockwise.
The instrument cluster illumination will
dim.
iThe instrument cluster illumination is
dimmed or brightened automatically to
suit ambient light conditions.
The instrument cluster illumination will
also be adjusted automatically when
you switch on the vehicle’s exterior
lamps.
Page 168 of 418
 and
for setting the exterior rear view mirrors,
see “Exte")
167 Controls in detail
Good visibility
�Good visibility
For information on the windshield wipers,
see “Windshield wipers” (
�page 50) and
for setting the exterior rear view mirrors,
see “Exterior rear view mirror”
(
�page 40).
Rear view mirror
Automatic antiglare rear view mirror
The reflection brightness of the exterior
rear view mirrors on the driver’s side and
the interior rear view mirror will respond
automatically to glare when�
the ignition is switched on
and
�
incoming light from headlamps falls on
the sensor in the interior rear view
mirror.
The interior rear view mirror will not react if
�
reverse gear is engaged
�
the interior lighting is turned on
Warning!
G
The automatic antiglare function does not
react if incoming light is not aimed directly
at sensors in the interior rear view mirror.
The interior rear view mirror and the exterior
rear view mirror on the driver’s side do not
react, for example, if the rear window sun-
shade is in raised position.
Glare can endanger you and others.Warning!
G
In the case of an accident, liquid electrolyte
may escape from the mirror housing if the
mirror glass breaks.
Electrolyte has an irritating effect. Do not al-
low the liquid to come into contact with
eyes, skin, clothing, or respiratory system.
In case it does, immediately flush affected
area with water, and seek medical help if
necessary.
Warning!
G
Exercise care when using the passen-
ger-side exterior rear view mirror. The mirror
surface is convex (outwardly curved surface
for a wider field of view). Objects in mirror
are closer than they appear. Check your in-
side rear view mirror or glance over your
shoulder before changing lanes.!Electrolyte drops coming into contact
with the vehicle paint finish can be
completely removed only while in the
liquid state by applying plenty of water.
Page 169 of 418

168 Controls in detailGood visibilityActivating exterior rear view mirror
parking position
Follow these steps to activate the mirror
parking position so that the passen-
ger-side exterior rear view mirror will be
turned downward to the stored position.�
Make sure you have stored a parking
position for the passenger-side exterior
rear view mirror (
�page 117).
�
Make sure the
MIRROR SETTING WHEN
PARKING
function in the
CONVENIENCE
submenu of the control system is
switched to
ON (�page 156).
�
Switch on ignition (if not already on).
�
Press button2 for passenger-side ex-
terior rear view mirror.
�
Place the gear selector lever in reverse
gear R.
The passenger-side exterior rear view
mirror will be turned downward in the
stored position.1Driver’s side exterior rear view mirror
button
2Passenger-side exterior rear view
mirror buttonThe exterior rear view mirror returns to its
previously stored driving position:
�
ten seconds after you put the gear se-
lector lever out of position R
�
immediately once your vehicle exceeds
a speed of approximately 6 mph
(10 km/h)
�
immediately when you press button1
for driver’s side mirror
Page 170 of 418

169 Controls in detail
Good visibility
Electrically folding exterior rear view mirrors
Folding the exterior rear view mirrors
in and out automatically
When the corresponding function in the
control system is activated (
�page 156):
�
The exterior rear view mirrors
automatically fold in as soon as the ve-
hicle is locked from the outside.
�
The exterior rear view mirrors
automatically fold out as soon as the
vehicle is unlocked and the driver’s or
passenger door are subsequently
opened.Folding the exterior rear view mirrors
in and out manually
The exterior rear view mirrors can vibrate if
they are not folded out completely.
The buttons are located on the driver’s
door.
1Folds the exterior mirrors out
2Folds the exterior mirrors in
�
Switch on ignition.
Folding in
�
Press button 2 briefly.
Both mirrors fold in.
Folding out
�
Press button 1 briefly.
Both mirrors fold out.
!Before driving the vehicle through an
automatic car wash, fold the exterior
mirrors in. Otherwise they may get
damaged.
iIf you are driving at more than approxi-
mately 9 mph (15 km/h), you will not
be able to fold the exterior mirrors in.
!If an exterior rear view mirror housing
is forcibly pushed forward (hit from the
rear), reposition it manually by applying
firm pressure until it snaps back into
place.
If an exterior rear view mirror housing
is forcibly pushed rearward (hit from
the front), press button2 to fold mir-
rors in, then press button1 to fold
mirrors out. Do not force mirrors by
hand as it may damage the adjustment
mechanism.