Page 8 of 418

Contents
Maintenance ...................................... 282
Clearing the service indicator ...... 282
Service term exceeded ................ 282
Calling up the service indicator .... 283
Resetting the service indicator..... 283
Vehicle care ....................................... 284
Cleaning and care of vehicle ........ 284
Practical hints.................................. 291
What to do if …? ................................. 292
Lamps in instrument cluster ......... 292
Lamp in center console................. 298
Messages in the display ................ 299
Where will I find...? ............................. 329
First aid kit .................................... 329
Vehicle jack, vehicle tool kit,
luggage bowl, spare wheel ............ 329
Unlocking/locking in an emergency... 331
Unlocking the vehicle.................... 331
Locking the vehicle ....................... 332
Replacing batteries in
the SmartKey/ SmartKey with
KEYLESS-GO* ............................... 332
Fuel filler flap ................................ 334
Opening/closing in an emergency ..... 335
Sliding/pop-up roof ...................... 335
Replacing bulbs .................................. 336
Bulbs ............................................. 336
Replacing bulbs for front lamps .... 338
Replacing bulbs for rear lamps ..... 340Replacing wiper blades ...................... 341
Removing wiper blades ................. 341
Installing wiper blades .................. 342
Flat tire............................................... 343
Preparing the vehicle .................... 343
Mounting the spare wheel ............ 343
Battery ............................................... 348
Disconnecting the battery ............ 349
Removing the battery ................... 349
Charging and reinstalling the
battery .......................................... 349
Reconnecting the battery ............. 350
Jump starting...................................... 351
Towing the vehicle.............................. 353
Installing towing eye bolt .............. 355
Fuses.................................................. 356
Fuse boxes in passenger
compartment ................................ 356
Fuse boxes in engine
compartment ................................ 357
Emergency engine shut-down ....... 358
Page 51 of 418

50 Getting startedDrivingWindshield wipers
The combination switch is located on the
left of the steering column.Combination switch1Single wipe
2Switching on windshield wipers�
Make sure the ignition is switched on.
All the lamps in the instrument cluster
come on.Switching on windshield wipers
�
Turn the combination switch to the de-
sired position depending on the inten-
sity of the rain.
0Windshield wipers off
IIntermittent wiping (interval depen-
dent on wetness of windshield)
IINormal wiper speed
IIIFast wiper speed iThe intermittent wiping interval is de-
pendent on wetness of the windshield.
Wiping will not occur with a door open.
!Do not leave windshield wipers in inter-
mittent setting when vehicle is taken to
an automatic car wash or during wind-
shield cleaning. Wipers will operate in
the presence of water sprayed on the
windshield, and wipers may be dam-
aged as a result.
The switch should not be left in inter-
mittent setting as the wipers will wipe
the windshield once every time the en-
gine is started. Dust that accumulates
on the windshield might scratch the
glass and/or damage the wiper blades
when wiping occurs on a dry wind-
shield.
Page 171 of 418
.
A rain sensor automatically controls the
windshield wip")
170 Controls in detailGood visibilityWindshield wipers
For more information on the windshield
wipers, see “Windshield wipers”
(�page 50).
A rain sensor automatically controls the
windshield wipers depending on how wet
the windshield is.
�
Switch on ignition.
�
Set wiper switch to position I
(�page 50).
After the initial wipe, pauses between
wipes are automatically controlled by the
rain sensor.
Headlamp cleaning system
The switch is located on the left side of the
dashboard.
1Headlamp washer switch�
Switch on ignition.
�
Press switch1.
The headlamps are cleaned with a
high-pressure water jet.
For information on filling up the washer
reservoir, see “Windshield washer system
and headlamp cleaning system”
(
�page 269).
iIntermittent wiping is interrupted when
the vehicle is at a standstill and a door
is opened.
!Do not leave windshield wipers in inter-
mittent setting when vehicle is taken to
an automatic car wash or during wind-
shield cleaning. Wipers will operate in
the presence of water sprayed on the
windshield, and wipers may be dam-
aged as a result.
The switch should not be left in inter-
mittent setting as the wipers will wipe
the windshield once every time the en-
gine is started. Dust that accumulates
on the windshield might scratch the
glass and/or damage the wiper blades
when wiping occurs on a dry wind-
shield.
Page 261 of 418

260OperationEngine compartment
�Engine compartmentHood
Opening
The hood lock release lever is located in
the driver’s footwell to the left of the park-
ing brake pedal.
1Release lever
�
Pull release lever 1 in direction of ar-
row.
The hood is unlocked and handle 2
will extend out of the radiator grille.
2Handle for opening the hood
�
Pull handle 2 to its stop out of radiator
grille.
�
Pull up on the hood (do not pull up on
the handle) and then release it.
The hood will be automatically held
open at shoulder height.
Warning!
G
Do not pull the release lever while the vehi-
cle is in motion. Otherwise the hood could
be forced open by passing air flow.
!To avoid damage to the windshield wip-
ers or hood, never open the hood if the
wiper arms are folded forward away
from the windshield.
Warning!
G
To help prevent personal injury, stay clear of
moving parts when the hood is open and the
engine is running. Make sure the hood is
properly closed before driving. When closing
the hood, use extreme caution not to catch
hands or fingers.
The radiator fan may continue to run for ap-
proximately 30 seconds or even restart af-
ter the engine has been turned off. Stay
clear of fan blades.
Page 288 of 418

287 Operation
Vehicle care
Cleaning the Distronic* system sensor
cover
1Distronic* system sensor cover�
Use a mild car wash detergent, such as
Mercedes-Benz approved Car Sham-
poo, with plenty of water to clean sen-
sor cover1.
To prevent scratches, never apply strong
force and use only a soft, non-scratchy
cloth when cleaning the sensor cover. Do
not attempt to wipe dirty sensors with a
dry cloth or sponge.Cleaning the Parktronic system
sensors
1Parktronic* sensors
�
Use a mild car wash detergent, such as
Mercedes-Benz approved Car Sham-
poo with plenty of water to to clean
sensors1.
When using a steam cleaner or power
washer, aim nozzle only briefly from
a minimum distance of 4 in (10 cm) at
sensors1.To prevent scratches, never apply strong
force and use only a soft, non-scratchy
cloth when cleaning the sensor. Do not at-
tempt to wipe dirty sensors with a dry cloth
or sponge.
Wiper blades
�
Turn on the wipers and place it in a ver-
tical position.
For information on placing the wipers to a
vertical position, see “Replacing wiper
blades” (
�page 341).
!Fold the windshield wiper arms away
from the windshield to a vertical posi-
tion only. They could otherwise dam-
age the hood.
Page 289 of 418

288OperationVehicle care�
Clean the wiper blade inserts with a
clean cloth and detergent solution.Window cleaning
�
Turn on the wipers and place it in a ver-
tical position.
For information on placing the wipers to a
vertical position, see “Replacing wiper
blades” (
�page 341).
�
Use a window cleaning solution on all
glass surfaces.
An automotive glass cleaner is recom-
mended.
Warning!
G
For safety reasons, switch off wipers and re-
move SmartKey from starter switch before
cleaning the wiper blades, otherwise the
wiper motor might suddenly turn on and
cause injury.!Fold the windshield wiper arms back
onto the windshield before turning the
SmartKey in the starter switch.
Hold on to the wiper when folding the
wiper arm back. If released, the force
of the impact from the tensioning
spring could crack the windshield.
!Fold the windshield wiper arms away
from the windshield in a vertical posi-
tion only. They could otherwise dam-
age the hood. Warning!
G
For safety reasons, switch off wipers and re-
move SmartKey from starter switch before
cleaning the windshield, otherwise the wiper
motor might suddenly turn on and cause in-
jury.
!Fold the windshield wiper arms back
onto the windshield before turning the
SmartKey in the starter switch.
Hold on to the wiper when folding the
wiper arm back. If released, the force
of the impact from the tensioning
spring could crack the windshield.
Page 292 of 418
291 Practical hints
What to do if …?
Where will I find...?
Unlocking/locking in an emergency
Opening/closing in an emergency
Replacing bulbs
Replacing wiper blades
Flat tire
Battery
Jump starting
Towing the vehicle
Fuses
Page 342 of 418
341 Practical hints
Replacing wiper blades
�Replacing wiper blades
Wiper blades in vertcal position
Removing wiper blades�
Turn SmartKey in starter switch to
position1.
�
Turn combination switch to wiper
settingII (
�page 50).
�
With wiper arm in vertical position, turn
SmartKey in starter switch to
position0.
�
Fold the wiper arm forward until it
snaps into place.
�
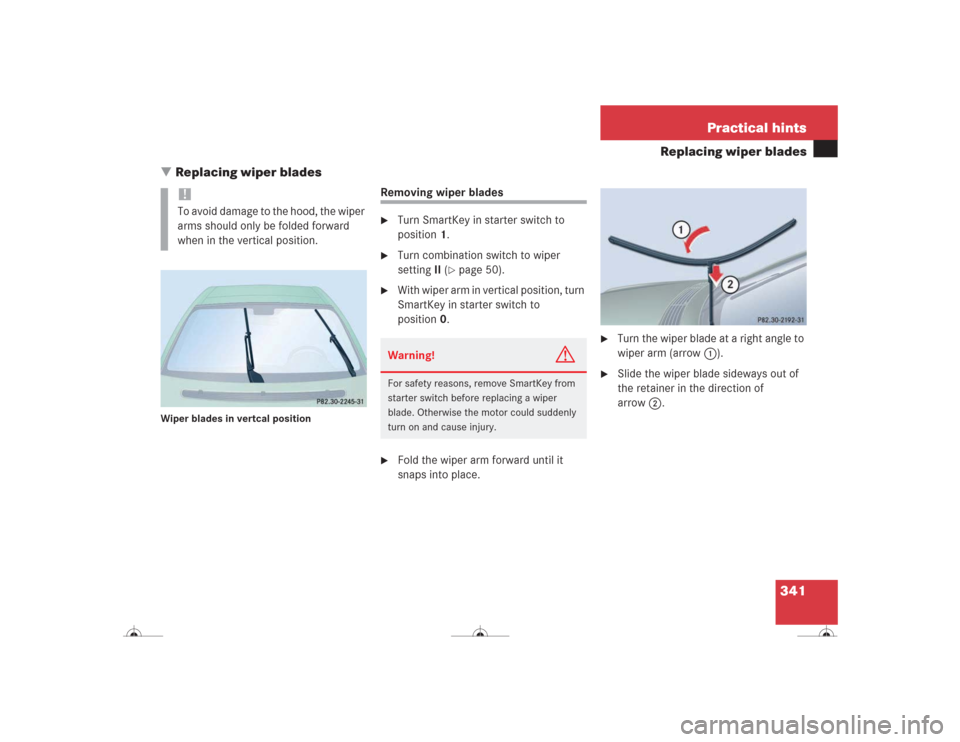
Turn the wiper blade at a right angle to
wiper arm (arrow 1).
�
Slide the wiper blade sideways out of
the retainer in the direction of
arrow2.
!To avoid damage to the hood, the wiper
arms should only be folded forward
when in the vertical position.
Warning!
G
For safety reasons, remove SmartKey from
starter switch before replacing a wiper
blade. Otherwise the motor could suddenly
turn on and cause injury.