Page 260 of 400

260 OperationTires and wheels
�Tires and wheelsSee your authorized Mercedes-Benz
Center for information on tested and
recommended rims and tires for summer
and winter operation. They can also offer
advice concerning tire service and
purchase.
Retreaded tires are not tested or recom-
mended by Mercedes-Benz, since previous
damage cannot always be recognized on
retreads. Mercedes-Benz can therefore
not assure the operating safety of the
vehicle when such tires are used.
See your authorized Mercedes-Benz
Center for information on tested and
recommended rims and tires for summer
and winter operation.
Important guidelines�
Only use sets of tires and rims of the
same type and make.
�
Tires must be of the correct size for the
rim.
�
Break in new tires for approximately
60 miles (100 km) at moderate
speeds.
�
Regularly check the tires and rims for
damage. Dented or bent rims can
cause tire pressure loss and damage to
the tire beads.
�
If vehicle is heavily loaded, check tire
pressure and correct as required.
�
Do not allow your tires to wear down
too far. Adhesion properties on wet
roads are sharply reduced at tread
depths under
1/8in (3 mm).
�
When replacing individual tires, you
should mount new tires on the front
wheels first (on vehicles with
same-sized wheels all around).
Warning!
G
Replace rims or tires with the same designa-
tion, manufacturer and type as shown on the
original part. See your authorized
Mercedes-Benz Center for further informa-
tion. If incorrectly sized rims and tires are
mounted:�
The wheel brakes or suspension
components can be damaged.
�
The correct operating clearance of the
wheels and the tires are no longer
guaranteed.
Warning!
G
Worn, old tires can cause accidents. If the
tire tread is badly worn, or if the tires have
sustained damage, replace them.
When replacing rims, only use genuine
Mercedes-Benz wheel bolts specified for the
particular rim type. Failure to do so can
result in the bolts loosening and possibly an
accident.
Page 304 of 400
304 Practical hintsWhere will I find ...?Minispare wheel bolts
1Wheel bolt for light alloy rims
2Wheel bolt for Minispare wheel or other
steel rims (located in vehicle tool kit)
!Wheel bolts2 must be used when
mounting the Minispare wheel or other
steel rims. The use of any wheel bolts
other than wheel bolts2 for the
Minispare wheel or other steel rims will
physically damage the vehicle’s
brakes.
Warning!
G
Make sure to use the original length wheel
bolts when remounting the original wheel
after it has been repaired.
Page 321 of 400

321 Practical hints
Flat tire
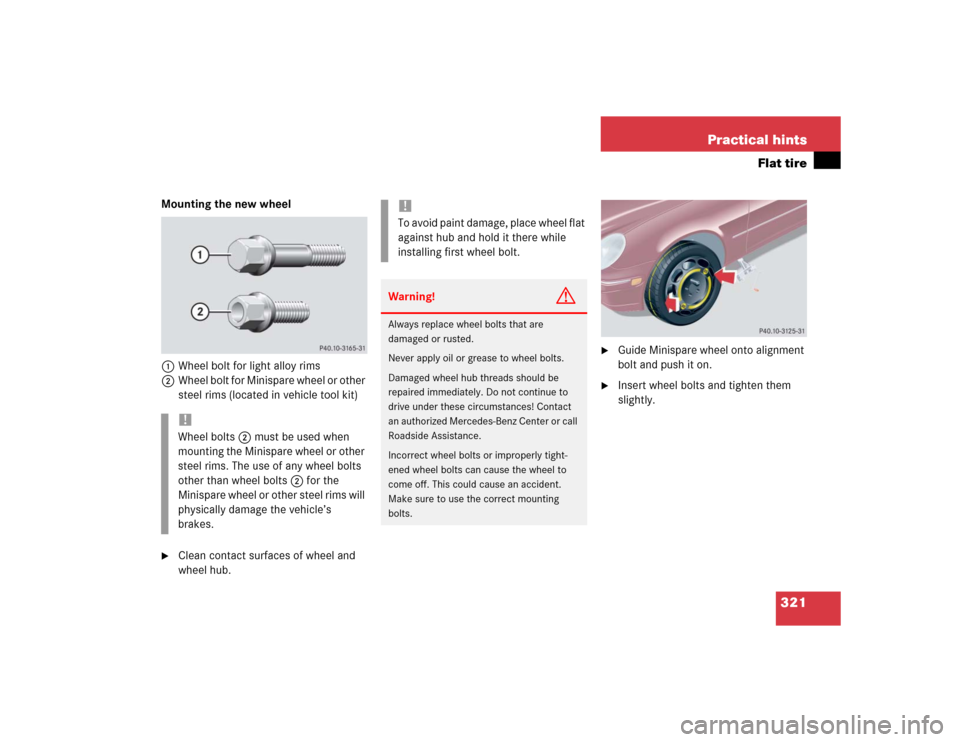
Mounting the new wheel
1Wheel bolt for light alloy rims
2Wheel bolt for Minispare wheel or other
steel rims (located in vehicle tool kit)�
Clean contact surfaces of wheel and
wheel hub.
�
Guide Minispare wheel onto alignment
bolt and push it on.
�
Insert wheel bolts and tighten them
slightly.
!Wheel bolts2 must be used when
mounting the Minispare wheel or other
steel rims. The use of any wheel bolts
other than wheel bolts2 for the
Minispare wheel or other steel rims will
physically damage the vehicle’s
brakes.
!To avoid paint damage, place wheel flat
against hub and hold it there while
installing first wheel bolt.Warning!
G
Always replace wheel bolts that are
damaged or rusted.
Never apply oil or grease to wheel bolts.
Damaged wheel hub threads should be
repaired immediately. Do not continue to
drive under these circumstances! Contact
an authorized Mercedes-Benz Center or call
Roadside Assistance.
Incorrect wheel bolts or improperly tight-
ened wheel bolts can cause the wheel to
come off. This could cause an accident.
Make sure to use the correct mounting
bolts.
Page 329 of 400

329 Practical hints
Towing the vehicle
�Towing the vehicle
Mercedes-Benz recommends that the
vehicle be transported with all wheels off
the ground using flatbed or appropriate
wheel lift/dolly equipment. This method is
preferable to other types of towing.When circumstances do not permit the
recommended towing methods, the
vehicle may be towed with all wheels on
the ground or front wheels raised (except
vehicles with 4MATIC) only so far as
necessary to have the vehicle moved to a
safe location where the recommended
towing methods can be employed.
!Use flatbed or wheel lift/dolly equip-
ment with SmartKey in starter switch
turned to position0.
Do not tow with sling-type equipment.
Towing with sling-type equipment over
bumpy roads will damage radiator and
supports.
To prevent damage during transport,
do not tie down vehicle by its chassis or
suspension parts.
Switch off the tow-away alarm
(�page 81) and deactivate the auto-
matic central locking (
�page 131).
!Do not tow-start the vehicle.!Vehicles with 4MATIC:
Do not tow with one axle raised. Doing
so could damage the transfer case,
which is not covered by the
Mercedes-Benz Limited Warranty.
All wheels must be on or off the ground.
Observe instructions for towing the
vehicle with all wheels on the ground.
!If the vehicle is towed with the front
axle raised (not permissible for vehicles
with 4MATIC), the engine must be shut
off (SmartKey in starter switch
position0 or1). Otherwise the ESP will
immediately be engaged and will apply
the rear wheel brakes.
When towing the vehicle with all wheels
on the ground, the gear selector lever
must be in positionN and the
SmartKey must be in starter switch
position2.
When towing the vehicle with all wheels
on the ground or the front axle raised,
the vehicle may be towed only for
distances up to 30 miles (50 km) and
at a speed not to exceed 30 mph
(50 km/h).
Page 366 of 400

366 IndexBattery discharged
Jump starting 327
Battery, vehicle 258, 324
Charging 325
Disconnecting 325
Messages in display 285
Reconnecting 326
Reinstalling 325
Removing 325
Bi-Xenon headlamps* 357
Bi-Xenon type
Front lamp bulbs 313
Block heater 264
Blocking
Rear door window operation 72
Bolts
For Minispare wheel 304
Brake assist system (BAS) 357
Brake fluid 251, 348Brake lamp bulbs 311
Brake lamp, high mounted 311
Brake pads
Message in display 286
Brakes 240
Warning lamp 275
Break-in period 238
Bulbs, replacing 310
Additional turn signals 310
Backup lamps 311
Brake lamps 311
Fog lamps 310
Front lamps 310
High beam 310
High mounted brake lamp 311
License plate lamps 311, 316
Low beam 310
Parking lamps 310, 311, 313, 314
Rear fog lamp 311
Rear fog lamps 315Side marker lamps 310, 315
Standing lamps 310, 311, 313, 314
Tail lamp assemblies 311, 315
Turn signal lamps 310, 311
Button
Audio system 172
C
CAC (Customer assistance center) 357
California
Important notice 11
Calling up
Range (distance to empty) 136
Service indicator 266
CAN system 357
Capacities
Fuels, coolants, lubricants, etc. 346
Cargo area see Cargo compartment
Cargo compartment
Auxiliary fuse box 334
Lighting 106
Parcel net 208
Page 376 of 400

376 IndexL
Labels, identification 338
Lamp bulbs, exterior 310
Lamps, exterior
Front 310
Light sensor 294
Messages in display 293–296
Rear 311
Lamps, indicator and warning
ABS 274
Airbag Off 61
Battery (SmartKey) 85
Brakes 275
CHECK ENGINE 276
Coolant 287
Engine diagnostics 276, 278
ESP 277
Fuel reserve 278
Instrument cluster 274–278
Seat belts 278
Service indicator 265
SRS 57
Turn signals 23Language
Multifunction display 126
Setting 126
LATCH-type child seat anchors 71
Folding back 71
Layout of poly-V-belt drive 339
Leather upholstery
Cleaning 271
License plate lamps
Messages in display 294
Replacing bulbs 311, 316
Light alloy wheels
Cleaning 270
Technical data 342
Light sensor 294
Lighter see Cigarette lighter
Lighting 100
Automatic headlamp mode 101
Cargo compartment 106
Combination switch 104
Daytime running lamp mode 102
Door entry lamps 106
Exterior lamp switch 100Front fog lamps 102
High beam flasher 104
High beams 104
Instrument cluster illumination 107
Interior 105
Locator lighting 102
Low beam 100
Manual headlamp mode 101
Night security illumination 102
Parking lamps 100
Rear fog lamp 103
Settings (control system) 127
Limiting the gear range 141
Limp Home Mode 144
Loading 205
Cargo tie-down rings 214
Instructions 213
Roof rack 205
Ski sack* 205
Split rear bench seat 211
Locator lighting 102
Setting 128