Page 273 of 400
273 Practical hints
What to do if …
Where will I find ...?
Unlocking/locking in an emergency
Opening/closing in an emergency
Replacing bulbs
Replacing wiper blades
Flat tire
Battery
Jump starting
Towing the vehicle
Fuses
Page 274 of 400

274 Practical hintsWhat to do if …
�What to do if …Lamps in instrument clusterGeneral information:
If a bulb in the instrument cluster fails to
come on during the bulb self-check when turning the SmartKey in the starter switch
to position2, have it checked and replaced
if necessary.Problem
Possible cause
Suggested solution
-
The yellow ABS malfunction
indicator lamp comes on while
driving.
The ABS has detected a malfunction and has
switched off. The BAS and the ESP are also
switched off (see messages in display).
The brake system is still functioning normally
but without the ABS available.
�
Continue driving with added caution.
Wheels may lock during hard braking,
reducing steering capability.
�
Have the system checked at an autho-
rized Mercedes-Benz Center as soon
as possible.
Failure to follow these instructions
increases the risk of an accident.
�
Read and observe messages in the
display (
�page 280).
The charging voltage has fallen below ten
volts. The ABS has switched off.
�
When the voltage is above this value
again, the ABS is operational again.
�
If necessary, have the generator
(alternator) and battery checked.
Page 284 of 400
284 Practical hintsWhat to do if …Symbol messagesDisplay symbol
Display message
Possible cause
Possible solution
-
ABS SYSTEM
VISIT WORKSHOP!
The ABS has detected a malfunction and
has switched off. The ESP and the BAS
are also deactivated.
The brake system is still functioning
normally but without the ABS available.
�
Continue driving with added caution.
Wheels may lock during hard braking,
reducing steering capability.
�
Have the system checked at an
authorized Mercedes-Benz Center as
soon as possible.
Failure to follow these instructions
increases the risk of an accident.
DISPLAY MALFUNCTION
VISIT WORKSHOP!
The ABS or the ABS display is
malfunctioning.
�
Continue driving with added caution.
Wheels may lock during hard braking,
reducing steering capability.
�
Have the system checked at an
authorized Mercedes-Benz Center as
soon as possible.
Failure to follow these instructions
increases the risk of an accident.
Page 298 of 400
298 Practical hintsWhat to do if …Display symbol
Display message
Possible cause
Possible solution
_
STEERING WHEEL ADJ.
LOCK!
The steering column is not properly
locked.
�
Lock steering column (
�page 37).
STEERING OIL
VISIT WORKSHOP!
The steering gear oil level is too low.
There is a danger of steering gear
damage.
�
Have the system checked by an
authorized Mercedes-Benz Center.
Warning!
G
If the level of steering gear oil in reservoir is
too low, the steering power assistance could
fail. Much greater effort will then be needed
to turn the steering wheel.
Do not add steering oil without checking the
steering system.
Do not drive the vehicle. Have the system
checked at your authorized Mercedes-Benz
Center as soon as possible.
Page 301 of 400

301 Practical hints
Where will I find ...?
3Vehicle tool kit
The following is included:�
Towing eye bolt
�
Wheel wrench
�
Alignment bolt
�
Vehicle jack
�
Wheel bolts
�
Special fuse puller
�
Spare fusesVehicle jackThe vehicle jack is located in the storage
compartment behind the left trim panel.
Storage position�
Remove vehicle jack from its
compartment.
�
Push crank handle up.
Warning!
G
The jack is designed exclusively for jacking
up the vehicle at the jack take-up brackets
built into both sides of the vehicle. To help
avoid personal injury, use the jack only to lift
the vehicle during a wheel change. Never
get beneath the vehicle while it is supported
by the jack. Keep hands and feet away from
the area under the lifted vehicle. Always
firmly set parking brake and block wheels
before raising vehicle with jack.
Do not disengage parking brake while the
vehicle is raised. Be certain that the jack is
always vertical (plumb line) when in use,
especially on hills. Always try to use the jack
on level surface. Make sure the jack arm is
fully seated in the jack take-up bracket. Al-
ways lower the vehicle onto sufficient ca-
pacity jackstands before working under the
vehicle.
Page 302 of 400
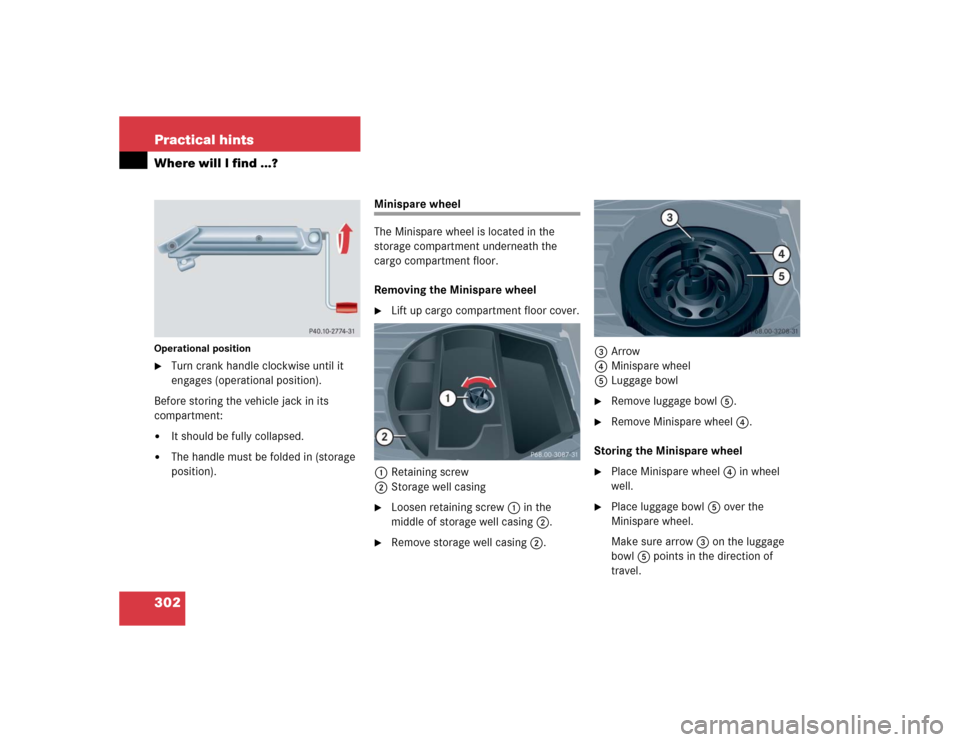
302 Practical hintsWhere will I find ...?Operational position�
Turn crank handle clockwise until it
engages (operational position).
Before storing the vehicle jack in its
compartment:
�
It should be fully collapsed.
�
The handle must be folded in (storage
position).
Minispare wheel
The Minispare wheel is located in the
storage compartment underneath the
cargo compartment floor.
Removing the Minispare wheel�
Lift up cargo compartment floor cover.
1Retaining screw
2Storage well casing
�
Loosen retaining screw1 in the
middle of storage well casing2.
�
Remove storage well casing2.3Arrow
4Minispare wheel
5Luggage bowl
�
Remove luggage bowl5.
�
Remove Minispare wheel4.
Storing the Minispare wheel
�
Place Minispare wheel4 in wheel
well.
�
Place luggage bowl5 over the
Minispare wheel.
Make sure arrow3 on the luggage
bowl5 points in the direction of
travel.
Page 303 of 400

303 Practical hints
Where will I find ...?
�
Place storage well casing2 over the
luggage bowl5 and turn retaining
screw1 clockwise as far as it will go
to secure the Minispare wheel.In the case of a flat tire, you may
temporarily use the Minispare wheel when
observing the following restrictions:
�
Do not exceed a vehicle speed of
50 mph (80 km/h).
�
Drive to the nearest tire repair facility
to have the flat tire repaired or
replaced as appropriate.
�
Do not operate vehicle with more than
one Minispare wheel mounted.
For more information, see “Rims and Tires”
(
�page 341).
iArrow3 on luggage bowl5 must
point in the direction of travel. Other-
wise you cannot place the storage well
casing2 on top and secure the
Minispare wheel with the retaining
screw1.
Warning!
G
The dimensions of the Minispare wheel are
different from those of the road wheels. As
a result, the vehicle handling characteristics
change when driving with a Minispare wheel
mounted.
The Minispare wheel should only be used
temporarily, and should be replaced with a
regular road wheel as quickly as possible.
Page 305 of 400
305 Practical hints
Unlocking/locking in an emergency
�Unlocking/locking in an emergency
Unlocking the vehicle
If you are unable to unlock the vehicle with
the SmartKey, open the driver’s door using
the mechanical key and the tailgate using
the emergency release.
The passenger door cannot be unlocked
manually.
1Mechanical key locking tab
2Mechanical key
�
Move locking tab1 in direction of
arrow and slide mechanical key2 out
of the housing.Unlocking the driver’s door
1Unlocked
2Locked
�
Unlock the door with the mechanical
key. To do so, push the mechanical key
in the lock until it stops and turn it to
the left1.
iUnlocking your vehicle with the
mechanical key will trigger the
anti-theft alarm system.
To cancel the alarm, do one of the
following:�
Press buttonŒ or‹ on the
SmartKey
�
Insert the SmartKey in the starter
switch