Page 196 of 243
 you can select another
COMAND system by pressing the corres-
ponding key.
The main menu of the selected au")
189 Navigation
Route guidance
During route guidance (you see either sym-
bol or map display) you can select another
COMAND system by pressing the corres-
ponding key.
The main menu of the selected audio sour-
ce will appear and you will e.g. hear the
radio.
Route guidance and the navigation’s voice
output remain active.
The voice output is added to the audio
playback.
You can individually adjust the volume le-
vels for voice output and audio playback
(�page 64).
�
Press c.
The main radio menu will appear.
The station last tuned to will begin to
play.
�
Selecting a station (
�page 30).
Returning to navigation system
�
Press b.During route guidance, you can operate an
audio source that is active in the back-
ground. Although the options are limited,
you can operate the audio source without
having to fully switch to the corresponding
system.
1A window is shown in the symbol or
map display, providing details about
the active audio source
Activating audio system
P82.85-9230-31
Activating audio functions
Page 198 of 243
191 Navigation
Route guidance
�
While the map or symbol display is ac-
tive, press b.
A query will appear.
�
Press the right-hand rotary/push-
button v and confirm “Yes”.
The main destination input menu will
appear.Continuing route guidance
�
Press *.
or
�
Turn the right-hand rotary/push-
button v to highlight “No” and press
to confirm.
The map or the symbol display will ap-
pear.
Canceling route guidance
Page 199 of 243
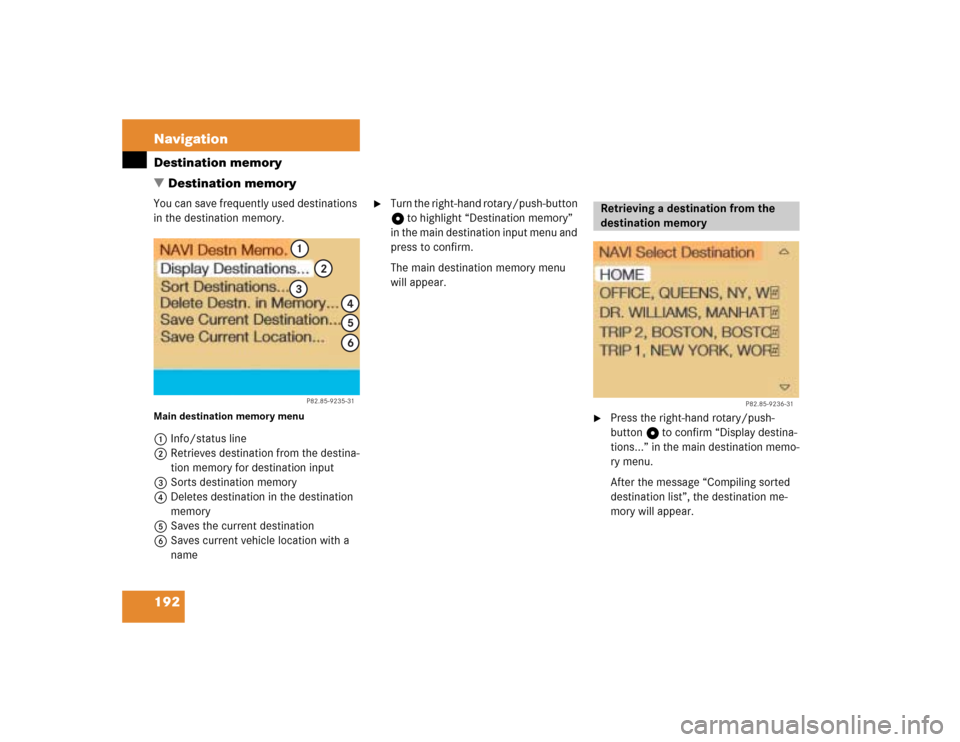
192 NavigationDestination memory
� Destination memoryYou can save frequently used destinations
in the destination memory.Main destination memory menu1Info/status line
2Retrieves destination from the destina-
tion memory for destination input
3Sorts destination memory
4Deletes destination in the destination
memory
5Saves the current destination
6Saves current vehicle location with a
name
�
Turn the right-hand rotary/push-button
v to highlight “Destination memory”
in the main destination input menu and
press to confirm.
The main destination memory menu
will appear.
�
Press the right-hand rotary/push-
button v to confirm “Display destina-
tions...” in the main destination memo-
ry menu.
After the message “Compiling sorted
destination list”, the destination me-
mory will appear.
P82.85-9235-311
56
2
3
4
Retrieving a destination from the
destination memory
P82.85-9236-31
Page 200 of 243
.When you have entered or rea")
193 Navigation
Destination memory
�
Turn the right-hand rotary/push-button
v to highlight the desired entry and
press to confirm.
�
Then calculate the route (
�page 159).When you have entered or reached the cur-
rent destination, you can save the destina-
tion in the destination memory.
Input menu1Name entered
2Saving the destination without entering
a name In the selection menu “Destination Entry”
(
�page 146)
�
Turn the right-hand rotary/push-button
v until “Save” is highlighted and press
to confirm.
In the main destination memory menu
�
Turn the right-hand rotary/push-button
v until “Save current destination...” is
highlighted and press to confirm.
An input menu will appear.
iDisplaying longer entries
(�page 183).
Saving the current destination
iIf all memory locations are used, the
message “Destination memory is full”
will appear. Press the right-hand rotary/
push-button v to remove the message.
The main destination memory menu will
appear.
Deleting a destination in destination
memory (
�page 197).
Page 209 of 243

202Info Services*/System settingsInfo Services*
� Info Services*In chapter “Info Services/System set-
tings” you will find detailed information on
the following topics:�
Requesting and displaying Info Services
�
Adjusting the brightness
�
Selecting the language for the menu
text displays and the voice output
�
Setting the date and time
�
Selecting beep tones
�
Setting the display dimming characteri-
stics (day and night display)
�
Resetting all settings to the factory set-
tings
�
Switching an auxiliary audio source on
and offIf you have not done so already, please fa-
miliarize yourself with these functions by
reading the chapter “At a glance”
(
�page 6).
When you subscribe to Info Services, you
can download information directly to your
COMAND. You can select from news, wea-
ther, sports, stocks, and calendar remin-
ders.
To personalize your selections, visit
�
www.MBUSA.com or call
�
1-800-FOR-MERCedes.
Main service menu1New information service is requested
from Response Center
2Shows date and time of the message
3The main settings menu will appear
(
�page 205)
iThis function is not available in some
countries.
Requesting and displaying
Info ServicesiBefore you can use Info Services, Tele
Aid must be activated at the Response
Center and Info Services selected.
Page 210 of 243
203
Info Services*/System settings
Info Services*
�
Press ( in any menu.
The main service menu will appear.
�
Press the right-hand rotary/push-
button v to confirm 1.
New information service is requested
from the Response Center.4This message appears
5Cancels the requestYou will hear a beep tone if there is a new
incoming message.
There are three ways to cancel the request
and switch to a main menu, e.g. radio main
menu:
�
Press the right-hand rotary/push-
button v and confirm “Cancel”.
�
Press *.
or
�
Automatically after 15 seconds.
iThe characters are displayed in light
grey
In 1 During an active request trans-
mission
In 2 If no information is available
Page 212 of 243
205
Info Services*/System settings
System settings
� System settings
6Displays the new message
7Switches back to the main menu
There is more than one message�
Press the right-hand rotary/push-
button v to move to the next page.
Activating the main service menu
�
Press *.
Switching back to e.g. radio main menu
�
Turn the right-hand rotary/push-button
v to highlight “No” and press to con-
firm.
Main system settings menu1Date and time
You can select the time format
(
�page 214)
2Adjusts the brightness
3Activates “Settings” menu
4Switches an auxiliary audio source on
(�page 218)
5Country setting, with a time zone
(�page 210)
�
Press (.
The main service menu will appear.
�
Turn the right-hand rotary/push-button
v to highlight “System Settings” and
press to confirm.
The main system settings menu will ap-
pear.
Activating the main settings menu
iYou will see information 5 if the clock
has been set to GPS reception and if a
country, e.g. USA and a time zone was
selected.
Page 213 of 243
206Info Services*/System settingsSystem settings1Previous settings
2Current settings�
Press the right-hand rotary/push-
button v to confirm “Brightness”.
The “Brightness” menu will appear.Darkening screen
�
Turn the right-hand rotary/push-button
v to the left.
The triangle 2 will move to the left.
Brightening screen
�
Turn the right-hand rotary/push-button
v to the right.
The triangle 2 will move to the right.
Confirming new settings
�
Press the right-hand rotary/push-
button v.
The main system settings menu will ap-
pear.
Settings menu 1Selecting the language
Navigation CD must be inserted
2Setting date and time (
�page 208)
3Switching beep tones on and off
(
�page 215)
4Setting the display dimming characteri-
stics (day and night display)
(�page 216)
5Resetting all settings to the factory set-
tings (
�page 217)
Adjusting the brightness
P82.85-7710-31
2
1
Activating settings menu