Page 101 of 304
MULTI-FUNCTION LEVER
Windshield wiper:Rotate the end
of the control away from you to
increase the speed of the wipers;
rotate towards you to decrease the
speed of the wipers.
Windshield washer:Push the end
of the stalk:
•briefly: causes a single swipe of
the wipers without washer fluid.
•a quick push and hold: the wipers
will swipe three times with
washer fluid.
•a long push and hold: the wipers and washer fluid will be activated for
up to ten seconds.
Windshield wiper/washer features
The exterior lamps will turn on with the ignition on, Headlamp control in
the Autolamp position and the windshield wipers are turned on.
The lights will remain on for 30 seconds after the wipers are turned off.
REVIEW COPY
2004 Town Car(tow), Owners Guide (post-2002-fmt)(own2002),
Market:USA_English(fus)
Driver Controls
Driver Controls
101
Page 104 of 304

Compass mode
The compass reading may be affected when you drive near large
buildings, bridges, power lines and powerful broadcast antenna. Magnetic
or metallic objects placed in, on or near the vehicle may also affect
compass accuracy.
1. Turn ignition to the ON position.
2. Start the engine.
3. From a blank display press and
release the MODE button once. The
directional heading will be
displayed.
Note:If the compass is
de-calibrated, CAL will be displayed
in the right corner of the display.
Refer to“Calibration mode”in this
section for more details.
4. The overhead console displays the compass heading in one of eight
directions: NORTH, NORTHEAST, EAST, SOUTHEAST, SOUTH,
SOUTHWEST, WEST, and NORTHWEST.
Zone variation mode
Most geographic areas (zones) have a magnetic north compass point that
varies slightly from the northerly direction on maps. A correct zone
setting will eliminate compass heading error.
To set the compass zone:
1. Press and release the MODE
button until the compass directional
heading is displayed.
REVIEW COPY
2004 Town Car(tow), Owners Guide (post-2002-fmt)(own2002),
Market:USA_English(fus)
Driver Controls
104
Page 110 of 304
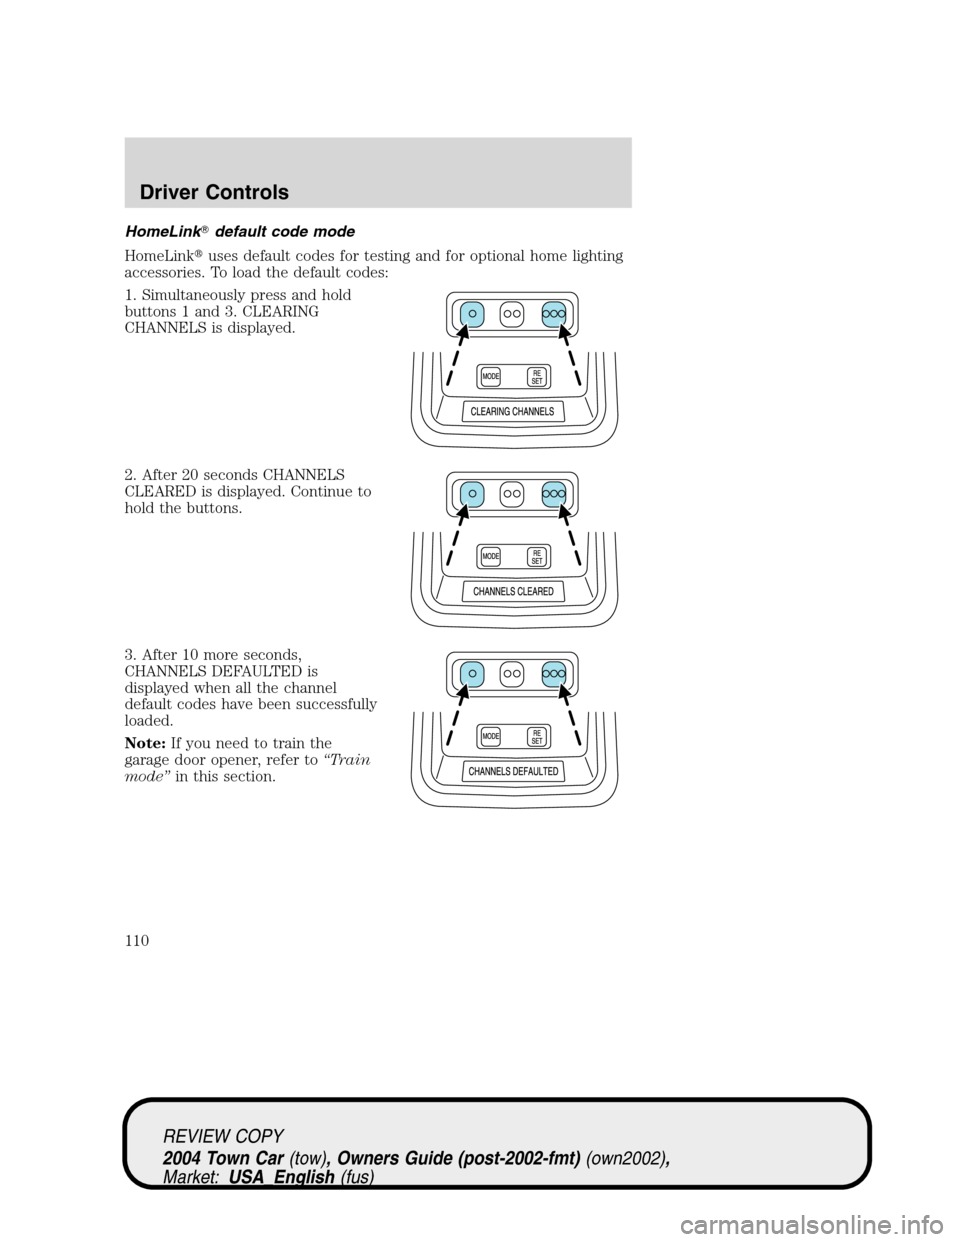
HomeLink�default code mode
HomeLink�uses default codes for testing and for optional home lighting
accessories. To load the default codes:
1. Simultaneously press and hold
buttons 1 and 3. CLEARING
CHANNELS is displayed.
2. After 20 seconds CHANNELS
CLEARED is displayed. Continue to
hold the buttons.
3. After 10 more seconds,
CHANNELS DEFAULTED is
displayed when all the channel
default codes have been successfully
loaded.
Note:If you need to train the
garage door opener, refer to“Train
mode”in this section.
REVIEW COPY
2004 Town Car(tow), Owners Guide (post-2002-fmt)(own2002),
Market:USA_English(fus)
Driver Controls
110
Page 113 of 304

CLOCK
Press the right control to move the
time display foward.
Press the left control to move the
time display backwards.
AUXILIARY POWER POINT
Power outlets are designed for
accessory plugs only. Do not
hang any type of accessory or
accessory bracket from the plug.
Improper use of the power
outlet can cause damage not
covered by your warranty.
Do not plug optional electrical
accessories into the cigarette lighter.
Use the power point.
Do not use the power point for operating the cigarette lighter element.
The Maximum power each power point can supply depends on the fuse
rating. For example: a 20A fuse should supply a maximum of 240 Watts,
a 15A fuse should supply a maximum of 180 Watts and a 10A fuse should
supply a maximum of 120 Watts. Exceeding these limits will result in a
blown fuse.
Always keep the power point caps closed when not being used.
The auxiliary power point is located under the instrument panel.
F
E1
2FILL ON
LEFT<
SHUF MUTE
SELBALBASS
FADETREB
SCAN CD
AM/FM
SEEKREWFF
COMP
56 34 12SIDE TUNETAPE
RDS
AUTO
SET
AUTO OFFDUAL A/C
R EXT
F/ CFF
REVIEW COPY
2004 Town Car(tow), Owners Guide (post-2002-fmt)(own2002),
Market:USA_English(fus)
Driver Controls
113
Page 115 of 304

Your vehicle is equipped with an inside rear view mirror which has an
auto-dimming function (available as an option on the outside drive")
MIRRORS
Automatic dimming inside rear view mirror (if equipped)
Your vehicle is equipped with an inside rear view mirror which has an
auto-dimming function (available as an option on the outside driver’s side
mirror). The electronic day/night mirror will change from the normal
state to the non-glare state when bright lights (glare) reach the mirror.
When the mirror detects bright light from behind the vehicle, it will
automatically adjust (darken) to minimize glare.
The mirror will automatically return to the normal state whenever the
vehicle is placed in R (Reverse)(when the mirror is on) to ensure a
bright clear view when backing up.
Do not block the sensor on the backside of the mirror since this may
impair proper mirror performance.
Without Navigation System
Press the control to turn the mirror
OFF or AUTO.
With Navigation System
The illuminated LED to the right of
the AUTO button indicates if the
mirror is in the auto-dimming
function. To turn the mirror off push
the OFF button until the LED goes
out.
Power side view mirrors
To adjust your mirrors:
1. SelectLto adjust the left mirror
orRto adjust the right mirror.
2. Move the control in the direction
you wish to tilt the mirror.
3. Return to the center position to
disable the adjust function.
OFF AUTO
REVIEW COPY
2004 Town Car(tow), Owners Guide (post-2002-fmt)(own2002),
Market:USA_English(fus)
Driver Controls
115
Page 119 of 304
•Depress the brake pedal until the
desired vehicle speed is reached,
press the SET ACCEL control.
Turning off speed control
There are two ways to turn off the speed control:
•Depress the brake pedal. This will not erase your vehicle’s previously
set speed.
•Press the speed control OFF
control.
Note:When you turn off the speed
control or the ignition, your speed
control set speed memory is erased.
Indicator light
Indicator message
This message is displayed in the
Message Center when either the
SET ACCEL or RES/RESUME
controls are pressed. It turns off when the speed control OFF is pressed,
the brake is applied or the ignition is turned to the OFF position.
RES
SET
ACCEL
COAST
ON
OFF
SPEED CONTROL
REVIEW COPY
2004 Town Car(tow), Owners Guide (post-2002-fmt)(own2002),
Market:USA_English(fus)
Driver Controls
119
Page 132 of 304

INTERIOR LUGGAGE COMPARTMENT RELEASE
Your vehicle is equipped with a mechanical interior luggage compartment
release handle that provides a means of escape for children and adults in
the event they become locked inside the luggage compartment.
Adults are advised to familiarize themselves with the operation and
location of the release handle.
To open the luggage compartment
door (lid) from within the luggage
compartment, pull the illuminated
“T”shaped handle and push up on
the trunk lid. The handle is
composed of a material that will
glow for hours in darkness following
brief exposure to ambient light.
The“T”shaped handle will be
located either on the luggage
compartment door (lid) or inside
the luggage compartment near the
tail lamps.
Keep vehicle doors and
luggage compartment
locked and keep keys and remote
transmitters out of a child’s reach.
Unsupervised children could lock
themselves in the trunk and risk
injury. Children should be taught
not to play in vehicles.
On hot days, the temperature in the trunk or vehicle interior can
rise very quickly. Exposure of people or animals to these high
temperatures for even a short time can cause death or serious
heat-related injuries, including brain damage. Small children are
particularly at risk.
REVIEW COPY
2004 Town Car(tow), Owners Guide (post-2002-fmt)(own2002),
Market:USA_English(fus)
Locks and Security
132
Page 133 of 304
 This device may not cause harmful i")
REMOTE ENTRY SYSTEM
This device complies with part 15 of the FCC rules and with RS-210 of
Industry Canada. Operation is subject to the following two conditions:
(1) This device may not cause harmful interference, and (2) This device
must accept any interference received, including interference that may
cause undesired operation.
Changes or modifications not expressly approved by the party
responsible for compliance could void the user’s authority to
operate the equipment.
The typical operating range for your remote entry transmitter is
approximately 33 feet (10 meters). A decrease in operating range could
be caused by:
•weather conditions,
•nearby radio towers,
•structures around the vehicle, or
•other vehicles parked next to your vehicle.
The remote entry system allows you
to lock or unlock all vehicle doors
without a key.Note:The remote
entry features operate with the
ignition in any position except in the
4 (ON) position, when the
transmission is in any gear other
than P (Park) or N (Neutral).
If there is a problem with the
remote entry system make sure to
takeALL remote entry
transmitterswith you to the dealership, this will aid in troubleshooting
the problem.
Unlocking the doors
1. Pressand release to unlock the driver’s door.Note:The interior
lamps will illuminate.
2. Press
and release again within five seconds to unlock all the doors.
Security lighting
Your vehicle’s headlamps and park lamps will illuminate if:
•it is dark outside (evening),
REVIEW COPY
2004 Town Car(tow), Owners Guide (post-2002-fmt)(own2002),
Market:USA_English(fus)
Locks and Security
133