Page 3483 of 4264

POWER-ASSISTED STEERING SYSTEM 3B-53
825RS048
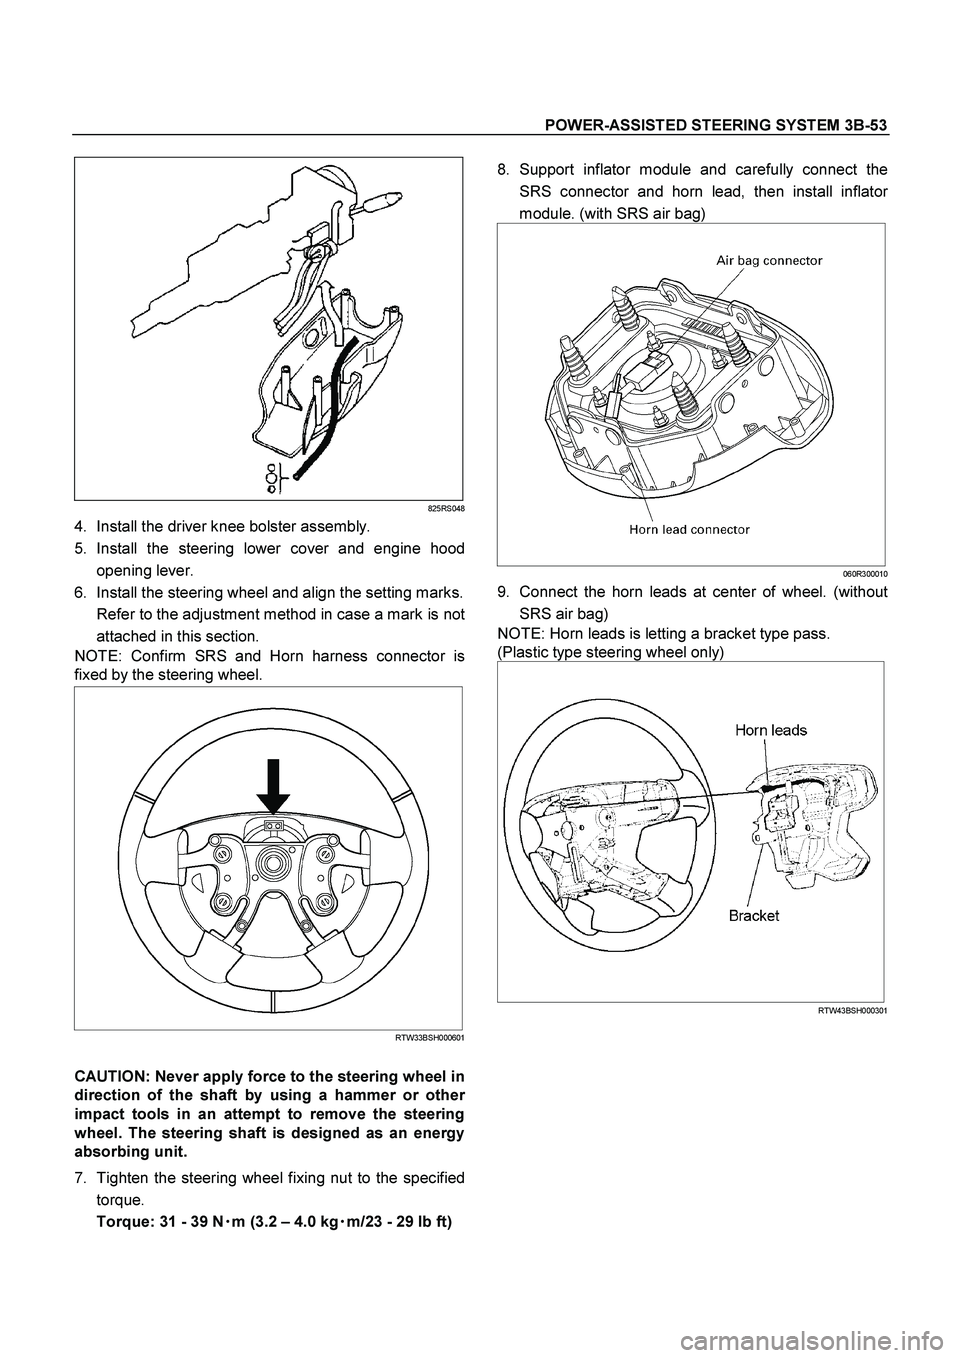
4. Install the driver knee bolster assembly.
5. Install the steering lower cover and engine hood
opening lever.
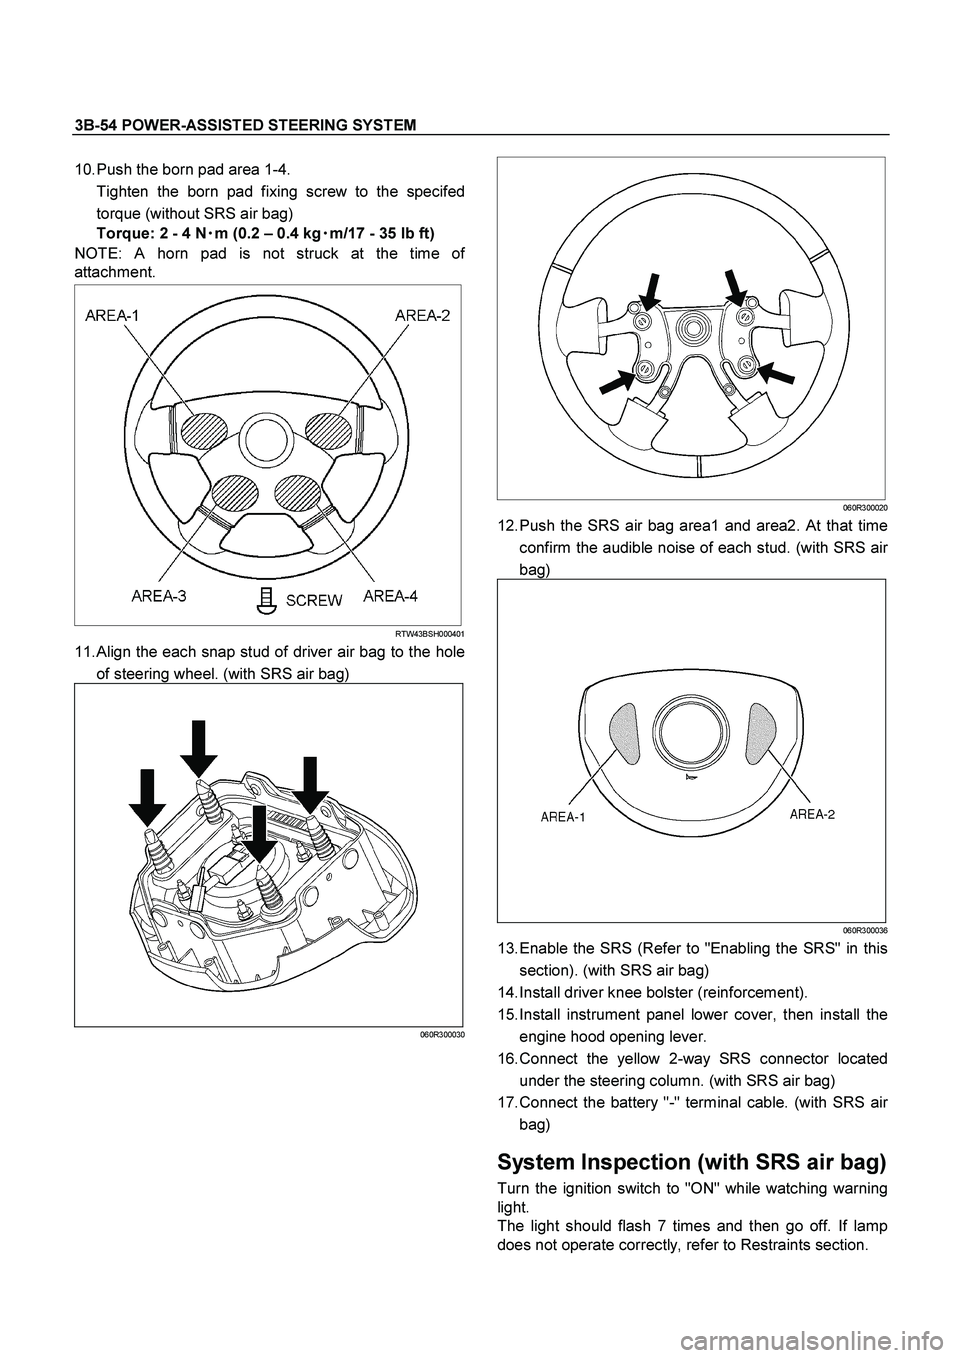
6. Install the steering wheel and align the setting marks.
Refer to the adjustment method in case a mark is no
t
attached in this section.
NOTE: Confirm SRS and Horn harness connector is
fixed by the steering wheel.
RTW33BSH000601
CAUTION: Never apply force to the steering wheel in
direction of the shaft by using a hammer or othe
r
impact tools in an attempt to remove the steering
wheel. The steering shaft is designed as an energy
absorbing unit.
7. Tighten the steering wheel fixing nut to the specified
torque.
Torque: 31 - 39 N�
�� �
m (3.2 – 4.0 kg�
�� �
m/23 - 29 lb ft)
8. Support inflator module and carefully connect the
SRS connector and horn lead, then install inflato
r
module. (with SRS air bag)
060R300010
9. Connect the horn leads at center of wheel. (without
SRS air bag)
NOTE: Horn leads is letting a bracket type pass.
(Plastic type steering wheel only)
RTW43BSH000301
Page 3484 of 4264

3B-54 POWER-ASSISTED STEERING SYSTEM
10. Push the born pad area 1-4.
Tighten the born pad fixing screw to the specifed
torque (without SRS air bag)
Torque: 2 - 4 N�
�� �m (0.2 – 0.4 kg�
�� �m/17 - 35 lb ft)
NOTE: A horn pad is not struck at the time o
f
attachment.
RTW43BSH000401
11. Align the each snap stud of driver air bag to the hole
of steering wheel. (with SRS air bag)
060R300030
060R300020
12. Push the SRS air bag area1 and area2. At that time
confirm the audible noise of each stud. (with SRS ai
r
bag)
060R300036
13. Enable the SRS (Refer to "Enabling the SRS" in this
section). (with SRS air bag)
14. Install driver knee bolster (reinforcement).
15. Install instrument panel lower cover, then install the
engine hood opening lever.
16. Connect the yellow 2-way SRS connector located
under the steering column. (with SRS air bag)
17. Connect the battery "-" terminal cable. (with SRS ai
r
bag)
System Inspection (with SRS air bag)
Turn the ignition switch to "ON" while watching warning
light.
The light should flash 7 times and then go off. If lamp
does not operate correctly, refer to Restraints section.
Page 3486 of 4264
3B-56 POWER-ASSISTED STEERING SYSTEM
CAUTION: The wheel of the vehicle must be straight
ahead and the steering column in the "LOCK"
position before disconnecting the steering column
from the steering gear. Failure to do so will cause
the SRS coil assembly to become uncentered which
will cause damage to the SRS coil assembly. (with
SRS air bag)
5. Remove the engine hood opening lever and
steering lower cover.
6. Remove the driver knee bolster (reinforcement).
7. Disable the SRS (Refer to "Disabling the SRS" in
this section). (with SRS air bag)
8. Check the both side hole of the steering cover. (with
SRS air bag)
060R300025
9. Check the position of the pins in a hole. Push the
pin in the direction of an arrow. (with SRS air bag)
060R300032
10. Push the four pins at �
5�
6 mm bar. (with SRS ai
r
bag)
060R300031
11. Cancel the lock four pins. (with SRS air bag)
12. Loosen the horn pad fixing screw at the rear of the
steering wheel (without SRS air bag).
430R300009
Page 3490 of 4264

3B-60 POWER-ASSISTED STEERING SYSTEM
9. Turn the SRS coil counter clockwise to full, return
about 3 turns and align the neutral mark. (with SRS
air bag)
CAUTION: When turning the SRS coil counte
r
clockwise to full, stop turning if resistance is felt.
Forced further turning may damage to the cable in
the SRS coil.
826RW014
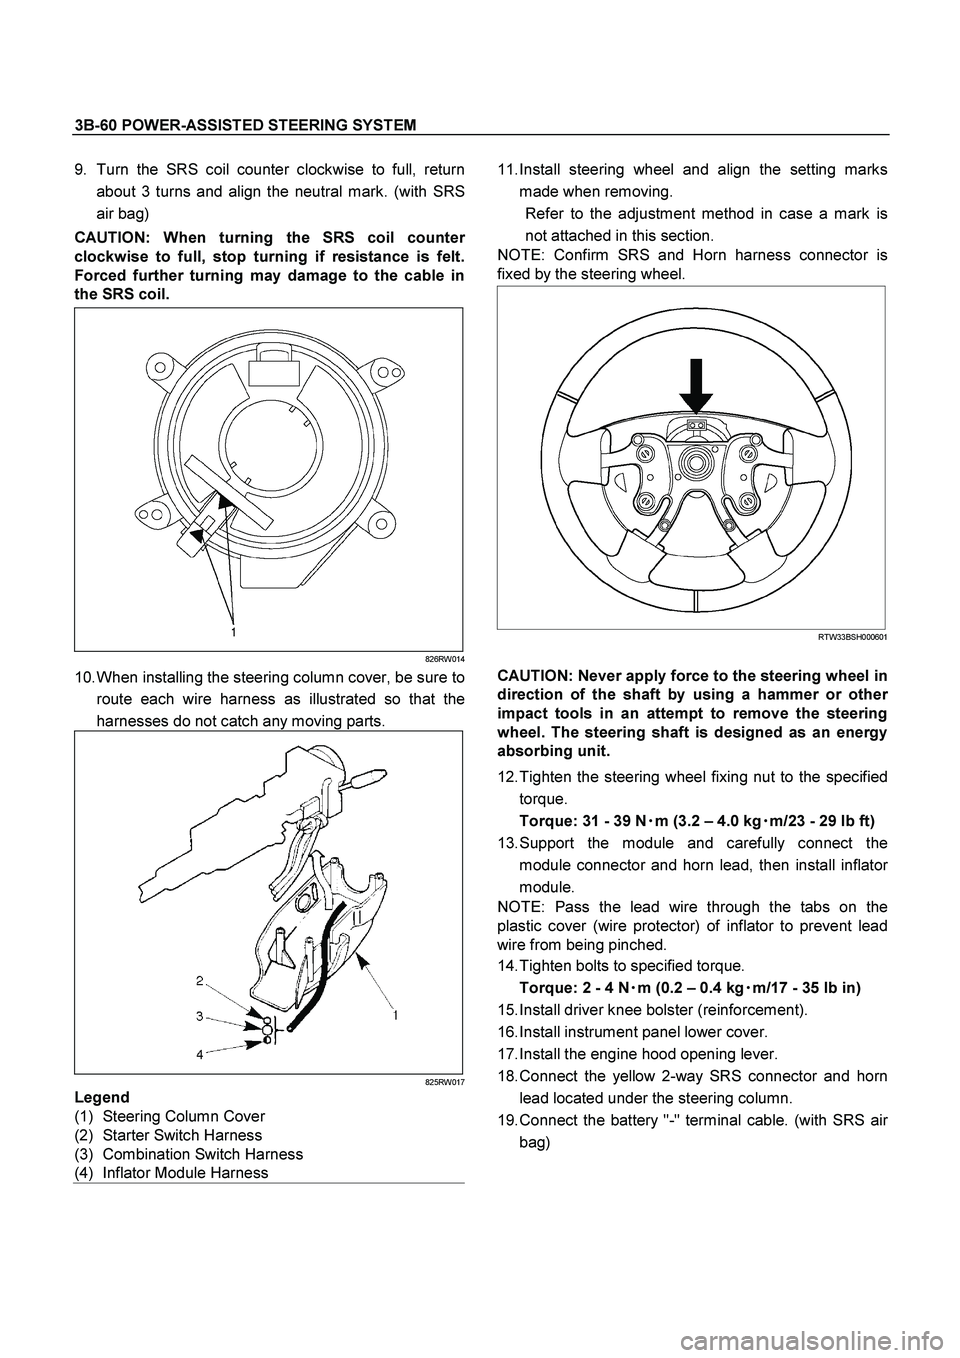
10. When installing the steering column cover, be sure to
route each wire harness as illustrated so that the
harnesses do not catch any moving parts.
825RW017
Legend
(1) Steering Column Cover
(2) Starter Switch Harness
(3) Combination Switch Harness
(4) Inflator Module Harness
11. Install steering wheel and align the setting marks
made when removing.
Refer to the adjustment method in case a mark is
not attached in this section.
NOTE: Confirm SRS and Horn harness connector is
fixed by the steering wheel.
RTW33BSH000601
CAUTION: Never apply force to the steering wheel in
direction of the shaft by using a hammer or othe
r
impact tools in an attempt to remove the steering
wheel. The steering shaft is designed as an energy
absorbing unit.
12. Tighten the steering wheel fixing nut to the specified
torque.
Torque: 31 - 39 N�
�� �m (3.2 – 4.0 kg�
�� �m/23 - 29 lb ft)
13. Support the module and carefully connect the
module connector and horn lead, then install inflato
r
module.
NOTE: Pass the lead wire through the tabs on the
plastic cover (wire protector) of inflator to prevent lead
wire from being pinched.
14. Tighten bolts to specified torque.
Torque: 2 - 4 N�
�� �m (0.2 – 0.4 kg�
�� �m/17 - 35 lb in)
15. Install driver knee bolster (reinforcement).
16. Install instrument panel lower cover.
17. Install the engine hood opening lever.
18. Connect the yellow 2-way SRS connector and horn
lead located under the steering column.
19. Connect the battery "-" terminal cable. (with SRS ai
r
bag)
Page 3494 of 4264

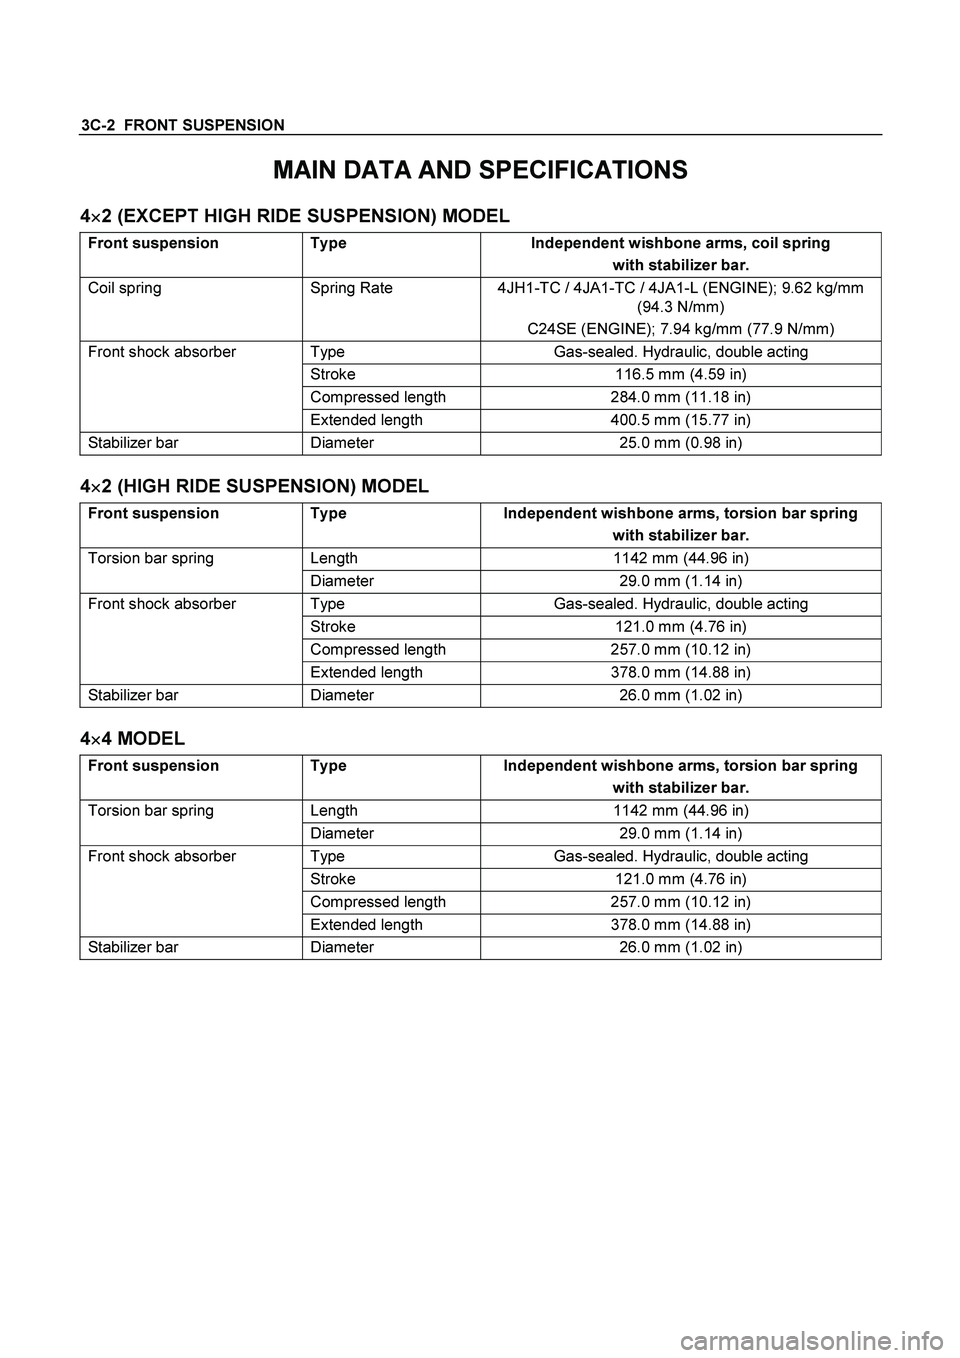
3C-2 FRONT SUSPENSION
MAIN DATA AND SPECIFICATIONS
4�
�� �2 (EXCEPT HIGH RIDE SUSPENSION) MODEL
Front suspension Type Independent wishbone arms, coil spring
with stabilizer bar.
Coil spring Spring Rate 4JH1-TC / 4JA1-TC / 4JA1-L (ENGINE); 9.62 kg/mm
(94.3 N/mm)
C24SE (ENGINE); 7.94 kg/mm (77.9 N/mm)
Type Gas-sealed. Hydraulic, double acting
Stroke 116.5 mm (4.59 in)
Compressed length 284.0 mm (11.18 in)
Front shock absorber
Extended length 400.5 mm (15.77 in)
Stabilizer bar Diameter 25.0 mm (0.98 in)
4�
�� �2 (HIGH RIDE SUSPENSION) MODEL
Front suspension Type Independent wishbone arms, torsion bar spring
with stabilizer bar.
Length 1142 mm (44.96 in) Torsion bar spring
Diameter 29.0 mm (1.14 in)
Type Gas-sealed. Hydraulic, double acting
Stroke 121.0 mm (4.76 in)
Compressed length 257.0 mm (10.12 in)
Front shock absorber
Extended length 378.0 mm (14.88 in)
Stabilizer bar Diameter 26.0 mm (1.02 in)
4�
�� �4 MODEL
Front suspension Type Independent wishbone arms, torsion bar spring
with stabilizer bar.
Length 1142 mm (44.96 in) Torsion bar spring
Diameter 29.0 mm (1.14 in)
Type Gas-sealed. Hydraulic, double acting
Stroke 121.0 mm (4.76 in)
Compressed length 257.0 mm (10.12 in)
Front shock absorber
Extended length 378.0 mm (14.88 in)
Stabilizer bar Diameter 26.0 mm (1.02 in)
Page 3592 of 4264
7D-4 TRANSFER CASE
Transfer Rear Oil Seal
Transfer Rear Oil Seal and Associated Parts
220R300018
Legend
(1) Rear Propeller Shaft
(2) Oil Seal
Removal
1.
Disconnect the rear propeller shaft (1) from the
transfer case side.
2.
Remove the oil seal from the transfer case.
Installation
1.
Install oil seal and apply engine oil to the oil seal
outer surfaces.
2.
Apply the recommended grease (BESCO L2) or
equivalent to the oil seal lip.
3.
Use the oil seal installer 5-8840-2786-0 to install the
rear seal (2) to the transfer rear case.
Page 3599 of 4264
TRANSFER CASE 7D-11
Transfer Disassembly
RTW47DLF000101
Legend
(7) Neutral Switch ASM
(1) Transfer Case
(8) Speedometer Bush, Plate and Driven Gear
(2) Companion Flange, O-ring and Nut
(9)Transfer Actuator
(3) Stoneguard
(10)Breather Hose
(4) Detent Plug, Spring and Detent Ball
(11) Heat Protector (Except Diesel Engine)
(5) 2-4 Switch ASM
(6) Switch Bracket
Removal
1.
Remove the stoneguard.
2.
Remove the drain plug from the transfer case to
drain the oil.
3.
Remove the parts listed below.
�
Speedometer bush, plate, and speedomete
r
driven gear
�
Breather hose (Between the transfer case and
the transfer actuator assembly)
�
Transfer actuator assembly
�
Switch bracket
Page 3619 of 4264
TRANSFER CASE 7D-31
226R300011
36.
Install the rear cover to the transfer case and tighten
the bolts to the specified torque.
Rear cover and transfer case bolt torque:
22 Nm (2.2 kgm/16 lbft)
37.
Apply engine oil to the companion flange O-ring.
38.
Install the O-ring to the front output shaft.
39.
Secure the front companion flange with the
companion flange holder (5-8840-0133-0).
40.
Install the end nuts and tighten them to the specified
torque.
Front companion flange end nut torque:
137 Nm (14 kgm/101 lbft)
41.
Use a cold chisel to caulk the front companion
flange end nuts.
226R300012
RUW34DSH000301
Legend
(1) MAX 26mm (1.02 in)
(2) MIN 4mm (0.16 in)
42.
Apply Loctite 575 to the threaded portion of the
detenteplugs.