Page 3096 of 4264

1-86 HEATER AND AIR CONDITIONING
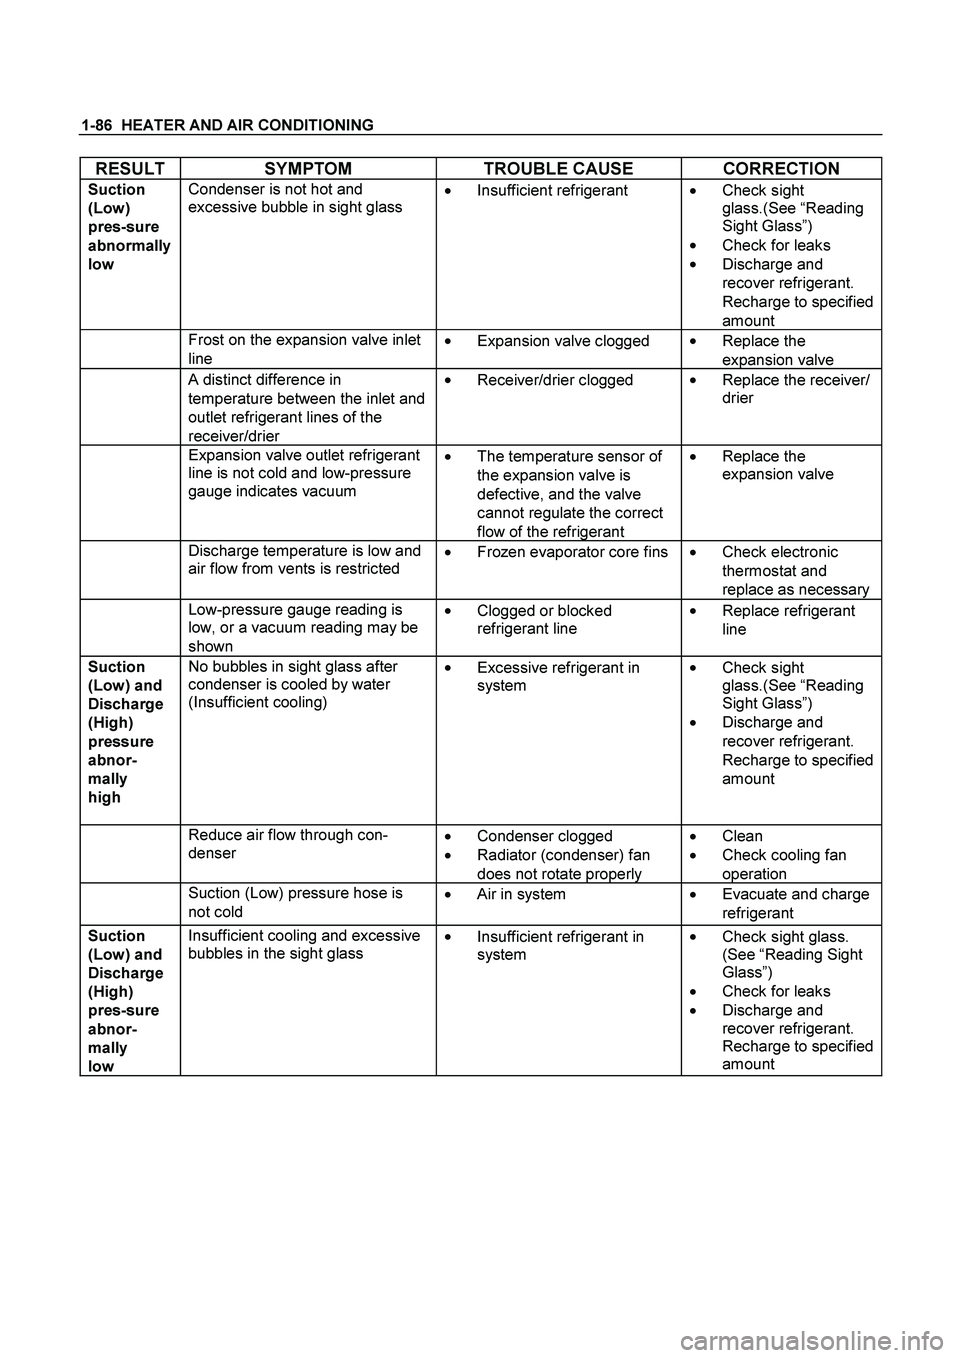
RESULT SYMPTOM TROUBLE CAUSE CORRECTION
Suction
(Low)
pres-sure
abnormally
low
Condenser is not hot and
excessive bubble in sight glass
��
Insufficient refrigerant
��
Check sight
glass.(See “Reading
Sight Glass”)
��
Check for leaks
��
Discharge and
recover refrigerant.
Recharge to specified
amount
Frost on the expansion valve inlet
line ��
Expansion valve clogged
��
Replace the
expansion valve
A distinct difference in
temperature between the inlet and
outlet refrigerant lines of the
receiver/drier ��
Receiver/drier clogged
��
Replace the receiver/
drier
Expansion valve outlet refrigerant
line is not cold and low-pressure
gauge indicates vacuum
��
The temperature sensor of
the expansion valve is
defective, and the valve
cannot regulate the correct
flow of the refrigerant ��
Replace the
expansion valve
Discharge temperature is low and
air flow from vents is restricted
��Frozen evaporator core fins
��Check electronic
thermostat and
replace as necessary
Low-pressure gauge reading is
low, or a vacuum reading may be
shown ��
Clogged or blocked
refrigerant line
��
Replace refrigerant
line
Suction
(Low) and
Discharge
(High)
pressure
abnor-
mally
high
No bubbles in sight glass after
condenser is cooled by water
(Insufficient cooling)
��
Excessive refrigerant in
system
��
Check sight
glass.(See “Reading
Sight Glass”)
��
Discharge and
recover refrigerant.
Recharge to specified
amount
Reduce air flow through con-
denser
��
Condenser clogged
��Radiator (condenser) fan
does not rotate properly ��
Clean
��Check cooling fan
operation
Suction (Low) pressure hose is
not cold ��
Air in system ��
Evacuate and charge
refrigerant
Suction
(Low) and
Discharge
(High)
pres-sure
abnor-
mally
low
Insufficient cooling and excessive
bubbles in the sight glass ��
Insufficient refrigerant in
system
��
Check sight glass.
(See “Reading Sight
Glass”)
��
Check for leaks
��Discharge and
recover refrigerant.
Recharge to specified
amount
Page 3950 of 4264
7A1-4 CONSTRUCTION AND FUNCTION
MAIN DATA AND SPECIFICATION
Model JR405E
Torque Converter Type Three Elements, One Stage & Two Phase Type
With Lock-up Function
Torque Converter Stall Torque Ratio 1.8
Name ATF DEXRON����
Quantity 9.2L-9.6L AT F
Cooling System Water Cooled Type (Radiator)
1st 2.786
2nd 1.546
3rd 1.000
4th (Over Drive) 0.694
Gear Ratio
Reverse 2.273
Low Clutch L/C 7
High Clutch H/C 5
Reverse Clutch R/C 2Number of Disc Clutch
Low One-way Clutch L/O.C 1 Set
Low & Reverse
Brake L&R/B 6
Brake
2-4 Brake 2-4/B 5Number of Disc
Sun Gear 33
Pinion
Gear 21Front Planetary
Ring Gear 75
Sun Gear 42
Pinion
Gear 17
Planetary Gear Unit
Rear Planetary
Ring Gear 75Number of Teeth
Page 4171 of 4264

ON-VEHICLE SERVICE (JR405E) 7A3-19
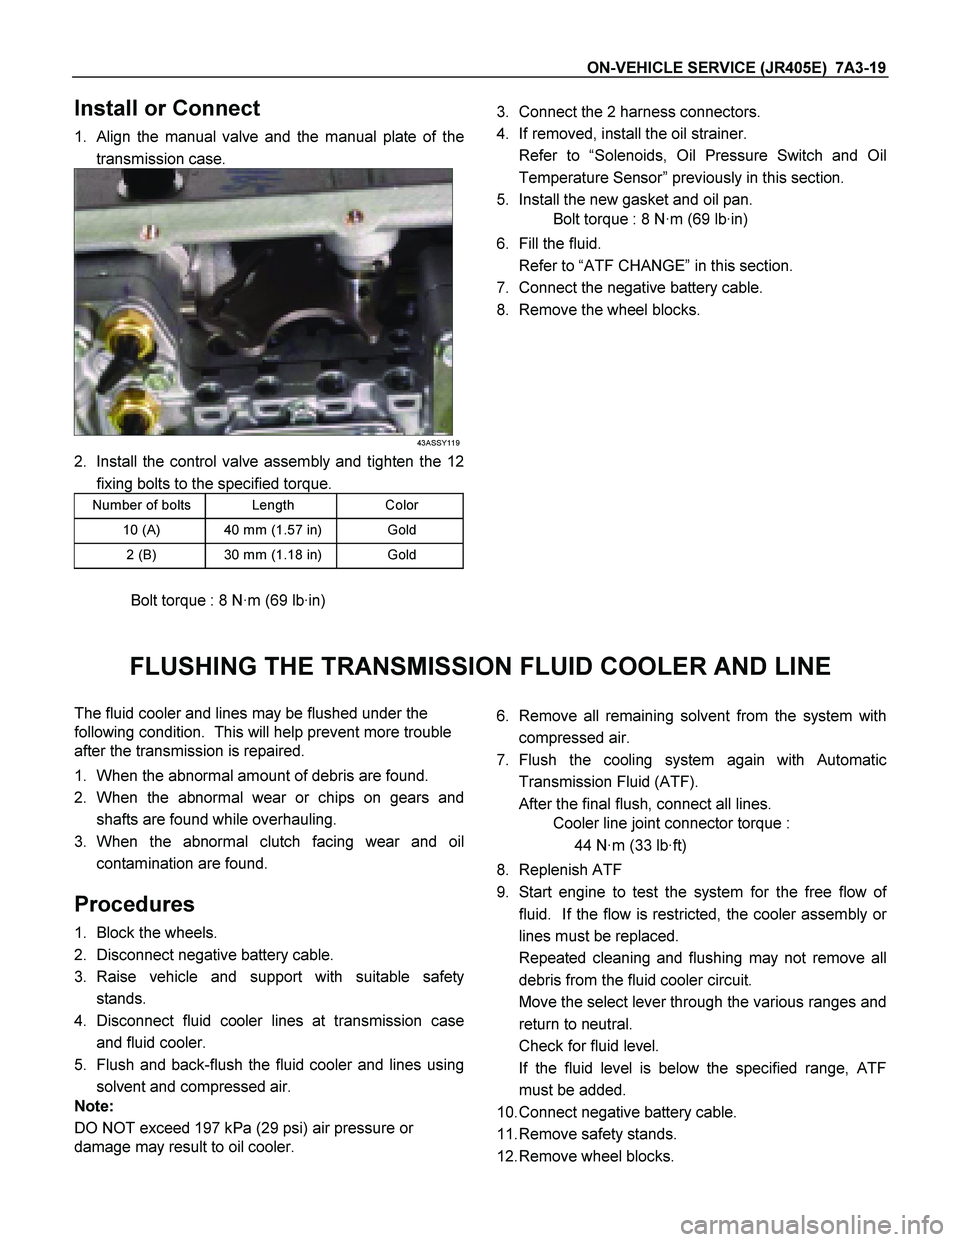
Install or Connect
1. Align the manual valve and the manual plate of the
transmission case.
43ASSY119
2. Install the control valve assembly and tighten the 12
fixing bolts to the specified torque.
Number of bolts Length Color
10 (A) 40 mm (1.57 in) Gold
2 (B) 30 mm (1.18 in) Gold
Bolt torque : 8 N·m (69 lb·in)
3. Connect the 2 harness connectors.
4. If removed, install the oil strainer.
Refer to “Solenoids, Oil Pressure Switch and Oil
Temperature Sensor” previously in this section.
5. Install the new gasket and oil pan.
Bolt torque : 8 N·m (69 lb·in)
6. Fill the fluid.
Refer to “ATF CHANGE” in this section.
7. Connect the negative battery cable.
8. Remove the wheel blocks.
FLUSHING THE TRANSMISSION FLUID COOLER AND LINE
The fluid cooler and lines may be flushed under the
following condition. This will help prevent more trouble
after the transmission is repaired.
1. When the abnormal amount of debris are found.
2. When the abnormal wear or chips on gears and
shafts are found while overhauling.
3. When the abnormal clutch facing wear and oil
contamination are found.
Procedures
1. Block the wheels.
2. Disconnect negative battery cable.
3. Raise vehicle and support with suitable safety
stands.
4. Disconnect fluid cooler lines at transmission case
and fluid cooler.
5. Flush and back-flush the fluid cooler and lines using
solvent and compressed air.
Note:
DO NOT exceed 197 kPa (29 psi) air pressure or
damage may result to oil cooler.
6. Remove all remaining solvent from the system with
compressed air.
7. Flush the cooling system again with Automatic
Transmission Fluid (ATF).
After the final flush, connect all lines.
Cooler line joint connector torque :
44 N·m (33 lb·ft)
8. Replenish ATF
9. Start engine to test the system for the free flow o
f
fluid. If the flow is restricted, the cooler assembly o
r
lines must be replaced.
Repeated cleaning and flushing may not remove all
debris from the fluid cooler circuit.
Move the select lever through the various ranges and
return to neutral.
Check for fluid level.
If the fluid level is below the specified range, ATF
must be added.
10. Connect negative battery cable.
11. Remove safety stands.
12. Remove wheel blocks.
Page 4173 of 4264

ON-VEHICLE SERVICE (JR405E) 7A3-21
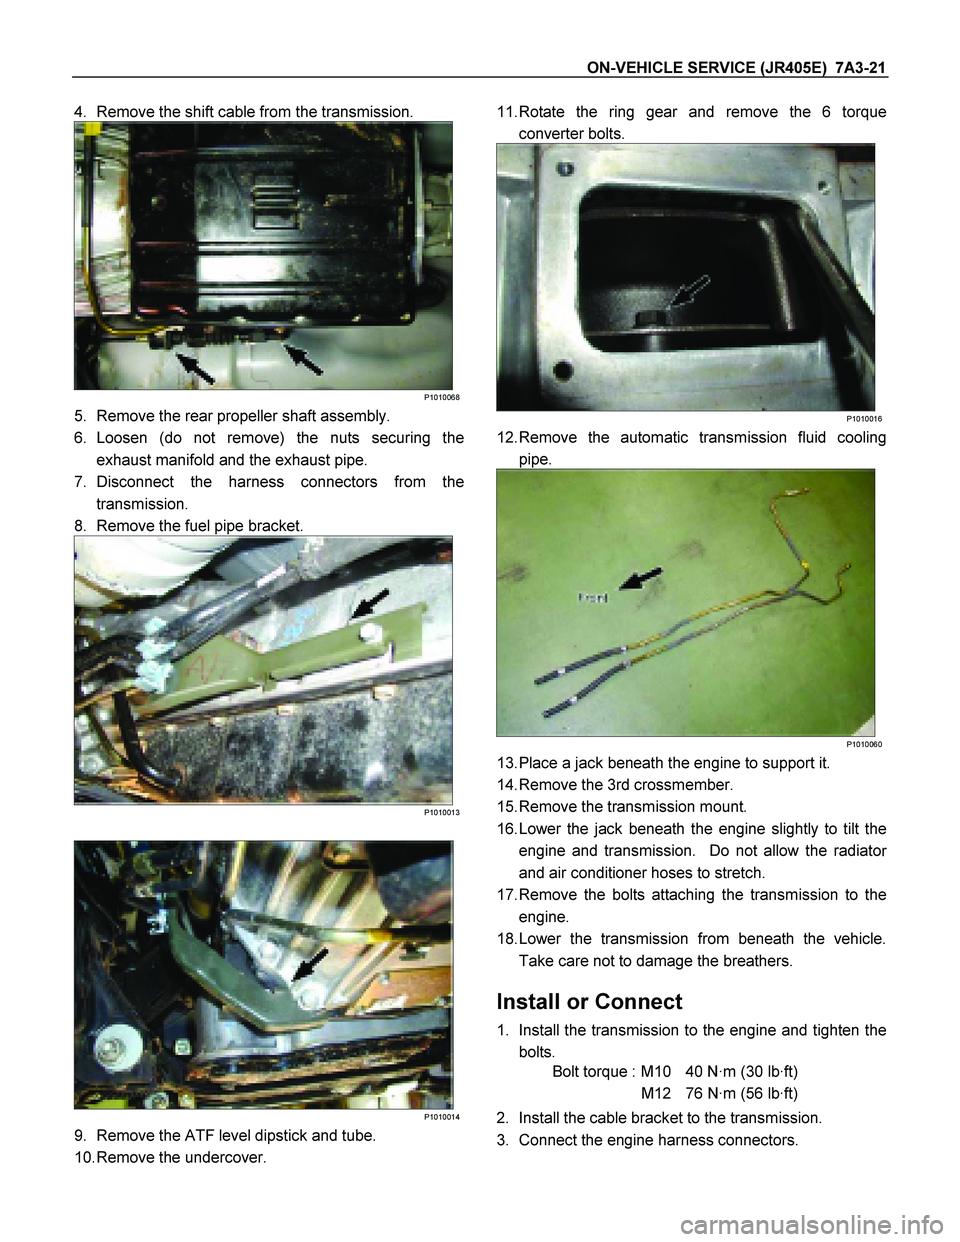
4. Remove the shift cable from the transmission.
P1010068
5. Remove the rear propeller shaft assembly.
6. Loosen (do not remove) the nuts securing the
exhaust manifold and the exhaust pipe.
7. Disconnect the harness connectors from the
transmission.
8. Remove the fuel pipe bracket.
P1010013
P1010014
9. Remove the ATF level dipstick and tube.
10. Remove the undercover.
11. Rotate the ring gear and remove the 6 torque
converter bolts.
P1010016
12. Remove the automatic transmission fluid cooling
pipe.
P1010060
13. Place a jack beneath the engine to support it.
14. Remove the 3rd crossmember.
15. Remove the transmission mount.
16. Lower the jack beneath the engine slightly to tilt the
engine and transmission. Do not allow the radiato
r
and air conditioner hoses to stretch.
17. Remove the bolts attaching the transmission to the
engine.
18. Lower the transmission from beneath the vehicle.
Take care not to damage the breathers.
Install or Connect
1. Install the transmission to the engine and tighten the
bolts.
Bolt torque : M10 40 N·m (30 lb·ft)
M12 76 N·m (56 lb·ft)
2. Install the cable bracket to the transmission.
3. Connect the engine harness connectors.
Page 4174 of 4264
7A3-22 ON-VEHICLE SERVICE (JR405E)
4. Install the 3rd crossmember.
Bolt and Nut torque : 67 N·m (49 lb·ft)
Bolt torque : 50 N·m (37 lb·ft)
5. Install the automatic transmission fluid cooling pipe.
6. Install the torque converter bolts.
Bolt torque : 29 N·m (22 lb·ft)
7. Install the undercover.
Bolt torque : 9 N·m (78 lb·in)
8. Install the ATF level dipstick and tube.
9. Install the fuel hose bracket.
Bolt torque : 6 N·m (52 lb·in)
10. Tighten the nuts securing the exhaust manifold and
the exhaust pipe.
Bolt torque : 43 N·m (32 lb·ft)
11. Install the rear propeller shaft assembly.
Flange bolt torque : 63 N·m (46 lb·ft)
Center bearing bracket bolt torque :
69 N·m (51 lb·ft)
12. Install the shift cable.
13. Connect the negative battery cable.
14. Remove the safety stands.
15. Remove the wheels blocks.
Torque Specifications
RTW37ALF001501