Page 2256 of 3371

INSTRUMENT PANEL ASSEMBLY
IP-11
C
D
E
F
G
H
J
K
L
MA
B
IP
Revision: August 20072004 QX56
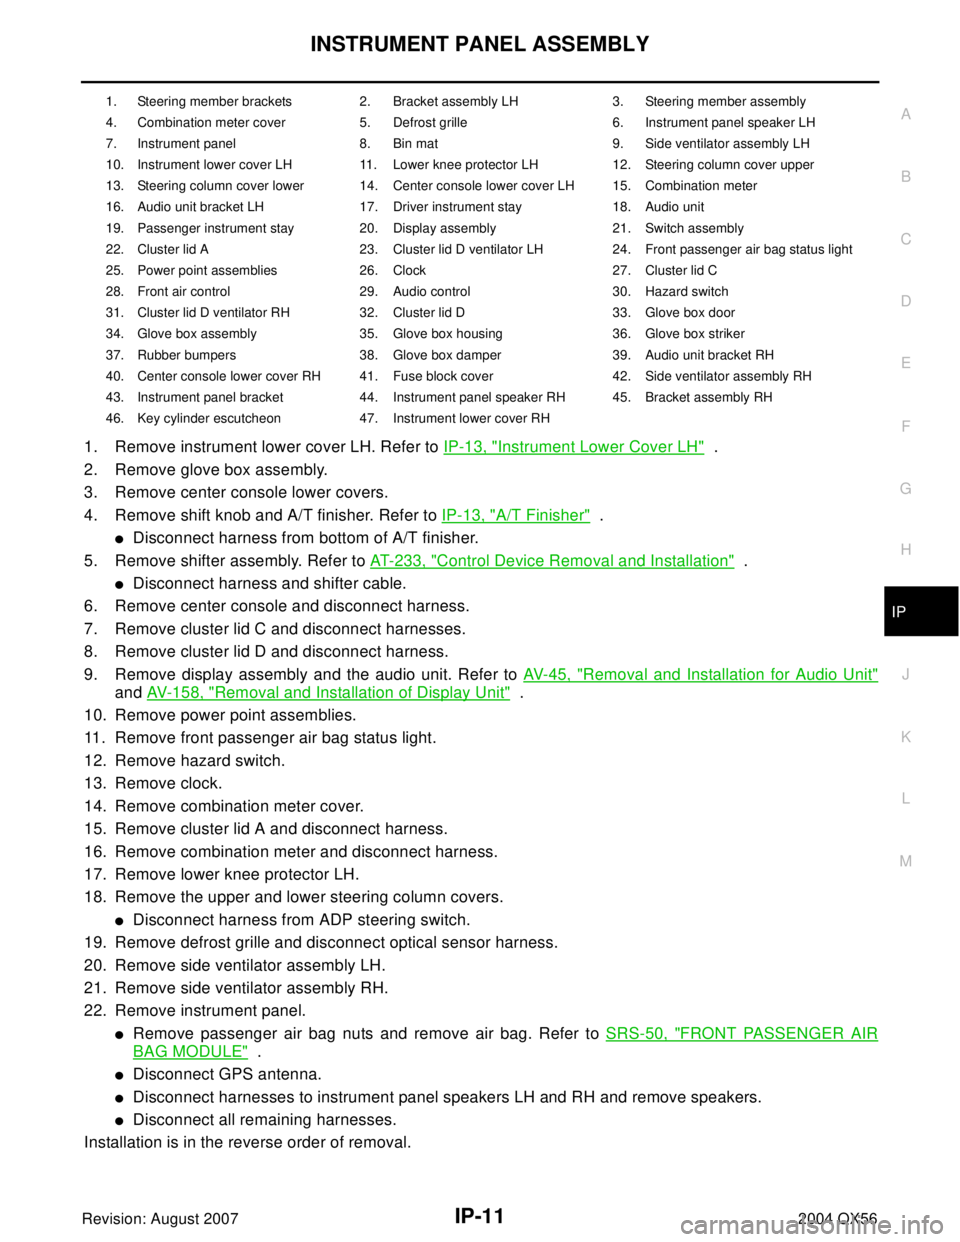
1. Remove instrument lower cover LH. Refer to IP-13, "Instrument Lower Cover LH" .
2. Remove glove box assembly.
3. Remove center console lower covers.
4. Remove shift knob and A/T finisher. Refer to IP-13, "
A/T Finisher" .
�Disconnect harness from bottom of A/T finisher.
5. Remove shifter assembly. Refer to AT-233, "
Control Device Removal and Installation" .
�Disconnect harness and shifter cable.
6. Remove center console and disconnect harness.
7. Remove cluster lid C and disconnect harnesses.
8. Remove cluster lid D and disconnect harness.
9. Remove display assembly and the audio unit. Refer to AV-45, "
Removal and Installation for Audio Unit"
and AV- 1 5 8 , "Removal and Installation of Display Unit" .
10. Remove power point assemblies.
11. Remove front passenger air bag status light.
12. Remove hazard switch.
13. Remove clock.
14. Remove combination meter cover.
15. Remove cluster lid A and disconnect harness.
16. Remove combination meter and disconnect harness.
17. Remove lower knee protector LH.
18. Remove the upper and lower steering column covers.
�Disconnect harness from ADP steering switch.
19. Remove defrost grille and disconnect optical sensor harness.
20. Remove side ventilator assembly LH.
21. Remove side ventilator assembly RH.
22. Remove instrument panel.
�Remove passenger air bag nuts and remove air bag. Refer to SRS-50, "FRONT PASSENGER AIR
BAG MODULE" .
�Disconnect GPS antenna.
�Disconnect harnesses to instrument panel speakers LH and RH and remove speakers.
�Disconnect all remaining harnesses.
Installation is in the reverse order of removal.
1. Steering member brackets 2. Bracket assembly LH 3. Steering member assembly
4. Combination meter cover 5. Defrost grille 6. Instrument panel speaker LH
7. Instrument panel 8. Bin mat 9. Side ventilator assembly LH
10. Instrument lower cover LH 11. Lower knee protector LH 12. Steering column cover upper
13. Steering column cover lower 14. Center console lower cover LH 15. Combination meter
16. Audio unit bracket LH 17. Driver instrument stay 18. Audio unit
19. Passenger instrument stay 20. Display assembly 21. Switch assembly
22. Cluster lid A 23. Cluster lid D ventilator LH 24. Front passenger air bag status light
25. Power point assemblies 26. Clock 27. Cluster lid C
28. Front air control 29. Audio control 30. Hazard switch
31. Cluster lid D ventilator RH 32. Cluster lid D 33. Glove box door
34. Glove box assembly 35. Glove box housing 36. Glove box striker
37. Rubber bumpers 38. Glove box damper 39. Audio unit bracket RH
40. Center console lower cover RH 41. Fuse block cover 42. Side ventilator assembly RH
43. Instrument panel bracket 44. Instrument panel speaker RH 45. Bracket assembly RH
46. Key cylinder escutcheon 47. Instrument lower cover RH
Page 2257 of 3371
IP-12
INSTRUMENT PANEL ASSEMBLY
Revision: August 20072004 QX56
REMOVAL AND INSTALLATION
Cluster Lid C
1. Remove center console. Refer to IP-10, "INSTRUMENT PANEL ASSEMBLY" .
2. Pull cluster lid C towards rear of vehicle to release clips.
3. Disconnect electrical connectors.
Installation is in the reverse order of removal.
CAUTION:
When removing and installing, place shop cloths onto surrounding parts to protect A/T finisher and
center console from damage.
Cluster Lid D
1. Remove cluster lid C. Refer to IP-12, "Cluster Lid C" .
2. Pull lid toward rear of vehicle to release clips, remove cluster lid D.
�Disconnect electrical connectors.
Installation is in the reverse order of removal.
CAUTION:
When removing and installing, place shop cloths onto surrounding parts to protect A/T finisher and
center console from damage.
LIIA1336E
LIIA1337E
Page 2258 of 3371

INSTRUMENT PANEL ASSEMBLY
IP-13
C
D
E
F
G
H
J
K
L
MA
B
IP
Revision: August 20072004 QX56
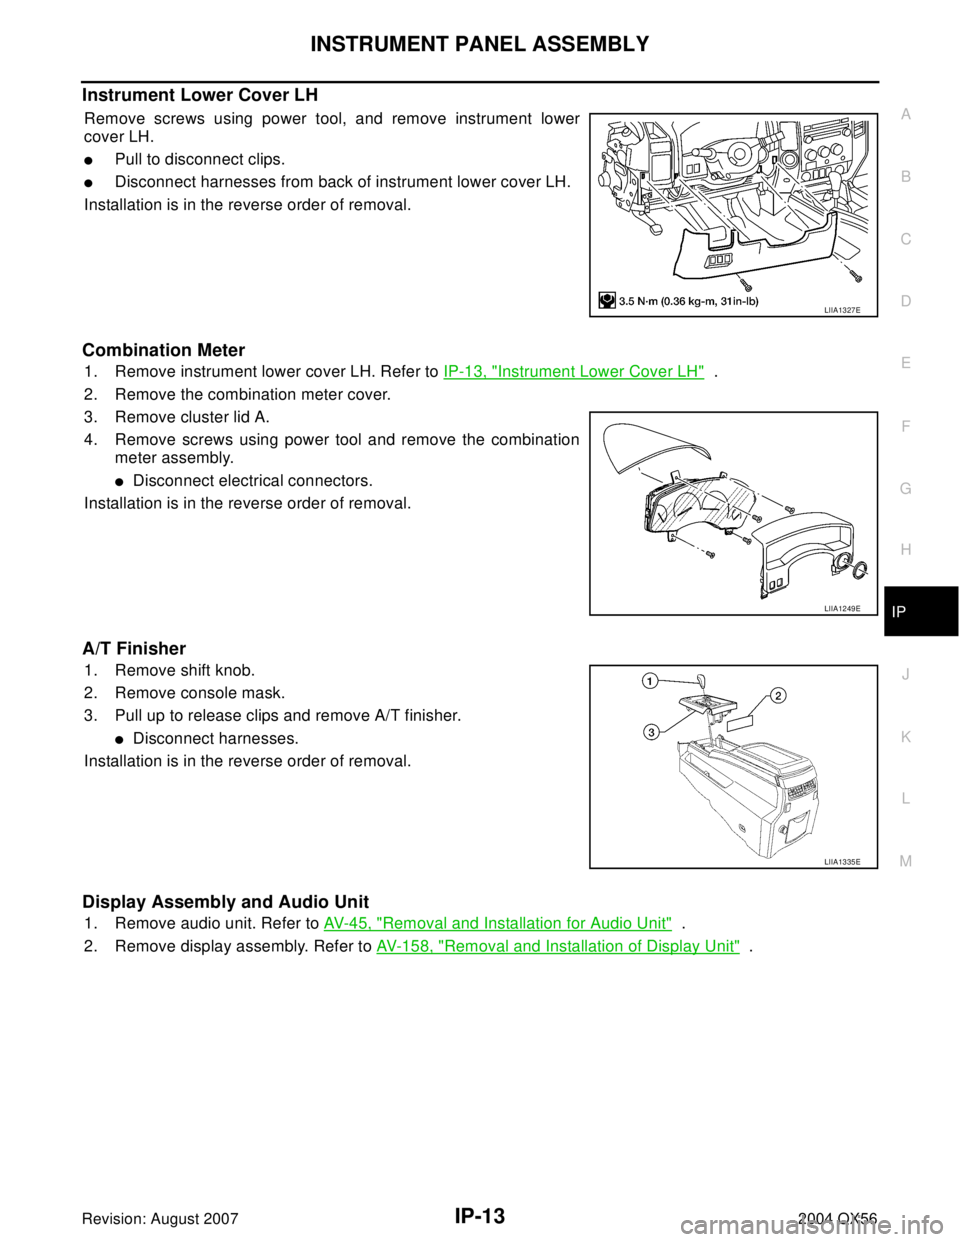
Instrument Lower Cover LH
Remove screws using power tool, and remove instrument lower
cover LH.
�Pull to disconnect clips.
�Disconnect harnesses from back of instrument lower cover LH.
Installation is in the reverse order of removal.
Combination Meter
1. Remove instrument lower cover LH. Refer to IP-13, "Instrument Lower Cover LH" .
2. Remove the combination meter cover.
3. Remove cluster lid A.
4. Remove screws using power tool and remove the combination
meter assembly.
�Disconnect electrical connectors.
Installation is in the reverse order of removal.
A/T Finisher
1. Remove shift knob.
2. Remove console mask.
3. Pull up to release clips and remove A/T finisher.
�Disconnect harnesses.
Installation is in the reverse order of removal.
Display Assembly and Audio Unit
1. Remove audio unit. Refer to AV- 4 5 , "Removal and Installation for Audio Unit" .
2. Remove display assembly. Refer to AV- 1 5 8 , "
Removal and Installation of Display Unit" .
LIIA1327E
LIIA1249E
LIIA1335E
Page 2259 of 3371
IP-14
INSTRUMENT PANEL ASSEMBLY
Revision: August 20072004 QX56
Instrument Lower Cover RH and Glove Box
1. Remove screws using power tool, release clips and remove
lower instrument panel RH and glove box as an assembly.
2. Remove damper clip from glove box.
3. Remove glove box pins and glove box.
4. Using power tool, remove screws and glove box striker.
5. Remove fuse block cover.
6. Remove screws and remove glove box damper.
Installation
Installation is in the reverse order of removal
1. Glove box damper 2. Lower instrument panel RH 3. Clips
4. Glove box pins 5. Glove box 6. Glove box striker
7. Fuse block cover 8. Glove box assembly
WIIA0666E
LLIA0072E
Page 2260 of 3371
INSTRUMENT PANEL ASSEMBLY
IP-15
C
D
E
F
G
H
J
K
L
MA
B
IP
Revision: August 20072004 QX56
Disassembly and AssemblyEIS002XV
CENTER CONSOLE
WIIA0329E
Page 2261 of 3371

IP-16
INSTRUMENT PANEL ASSEMBLY
Revision: August 20072004 QX56
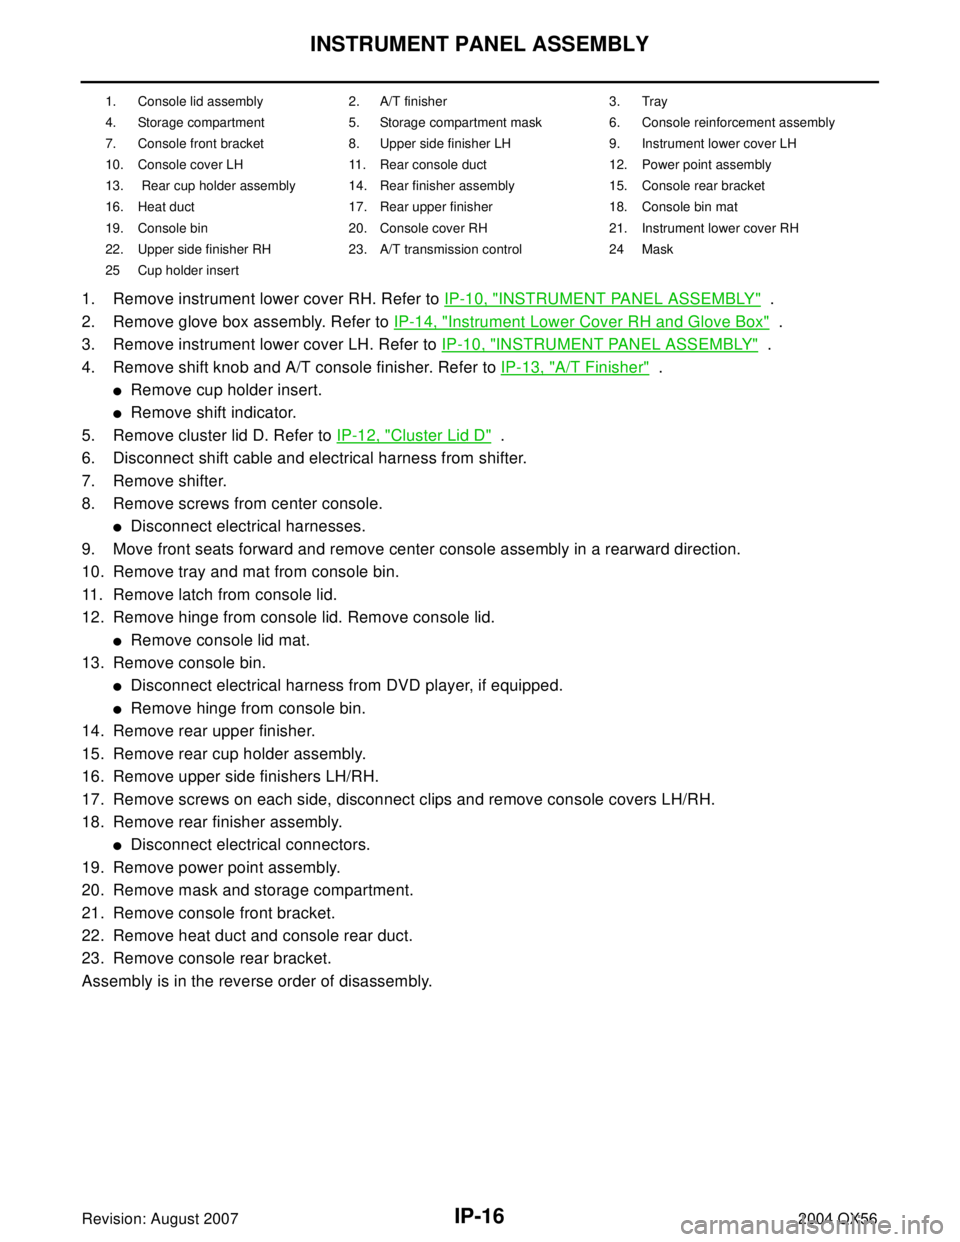
1. Remove instrument lower cover RH. Refer to IP-10, "INSTRUMENT PANEL ASSEMBLY" .
2. Remove glove box assembly. Refer to IP-14, "
Instrument Lower Cover RH and Glove Box" .
3. Remove instrument lower cover LH. Refer to IP-10, "
INSTRUMENT PANEL ASSEMBLY" .
4. Remove shift knob and A/T console finisher. Refer to IP-13, "
A/T Finisher" .
�Remove cup holder insert.
�Remove shift indicator.
5. Remove cluster lid D. Refer to IP-12, "
Cluster Lid D" .
6. Disconnect shift cable and electrical harness from shifter.
7. Remove shifter.
8. Remove screws from center console.
�Disconnect electrical harnesses.
9. Move front seats forward and remove center console assembly in a rearward direction.
10. Remove tray and mat from console bin.
11. Remove latch from console lid.
12. Remove hinge from console lid. Remove console lid.
�Remove console lid mat.
13. Remove console bin.
�Disconnect electrical harness from DVD player, if equipped.
�Remove hinge from console bin.
14. Remove rear upper finisher.
15. Remove rear cup holder assembly.
16. Remove upper side finishers LH/RH.
17. Remove screws on each side, disconnect clips and remove console covers LH/RH.
18. Remove rear finisher assembly.
�Disconnect electrical connectors.
19. Remove power point assembly.
20. Remove mask and storage compartment.
21. Remove console front bracket.
22. Remove heat duct and console rear duct.
23. Remove console rear bracket.
Assembly is in the reverse order of disassembly.
1. Console lid assembly 2. A/T finisher 3. Tray
4. Storage compartment 5. Storage compartment mask 6. Console reinforcement assembly
7. Console front bracket 8. Upper side finisher LH 9. Instrument lower cover LH
10. Console cover LH 11. Rear console duct 12. Power point assembly
13. Rear cup holder assembly 14. Rear finisher assembly 15. Console rear bracket
16. Heat duct 17. Rear upper finisher 18. Console bin mat
19. Console bin 20. Console cover RH 21. Instrument lower cover RH
22. Upper side finisher RH 23. A/T transmission control 24 Mask
25 Cup holder insert
Page 2262 of 3371
INSTRUMENT PANEL ASSEMBLY
IP-17
C
D
E
F
G
H
J
K
L
MA
B
IP
Revision: August 20072004 QX56
Disassembly and AssemblyEIS002XW
REAR CONSOLE
1. Lid assembly 2. Lid latch 3. Console bin
4. Cup holder insert 5. Rear upper console assembly 6. Rubber bumper
7. Floor latch 8. Rear console floor bracket 9. Rear console floor base
10. Hinge cover 11. Hinge 12. Base hook
13. Rear lower console assembly 14. Console bin mat
LIIA0938E
Page 2263 of 3371
IP-18
INSTRUMENT PANEL ASSEMBLY
Revision: August 20072004 QX56
1. Remove cup holder insert.
2. Release latch and remove rear console assembly.
3. Remove hinge cover.
4. Remove screws from hinge assembly and remove console lid assembly.
�Remove hinge from upper console assembly.
�Remove latch from lid assembly.
5. Remove screws and separate upper and lower console assemblies.
�Remove floor latch from upper console assembly.
6. Remove screws and remove bin from upper console assembly.
7. Remove screws and remove floor base.
8. Remove bolts and remove floor bracket.
Assembly is in the reverse order of disassembly.