Page 2061 of 3371
FSU-2
PRECAUTIONS
Revision: August 20072004 QX56
PRECAUTIONSPFP:00001
PrecautionsEES0010D
�When installing the rubber bushings, the final tightening must be done under unladen condition and with
the tires on level ground. Oil will shorten the life of the rubber bushings, so wipe off any spilled oil immedi-
ately.
�Unladen condition means the fuel tank, engine coolant and lubricants are at the full specification. The
spare tire, jack, hand tools, and mats are in their designated positions.
�After installing suspension components, check the wheel alignment.
�Lock nuts are not reusable. Always use new lock nuts for installation. New lock nuts are pre-oiled, do not
apply any additional lubrication.
Page 2063 of 3371

FSU-4
NOISE, VIBRATION, AND HARSHNESS (NVH) TROUBLESHOOTING
Revision: August 20072004 QX56
NOISE, VIBRATION, AND HARSHNESS (NVH) TROUBLESHOOTINGPFP:00003
NVH Troubleshooting ChartEES0010G
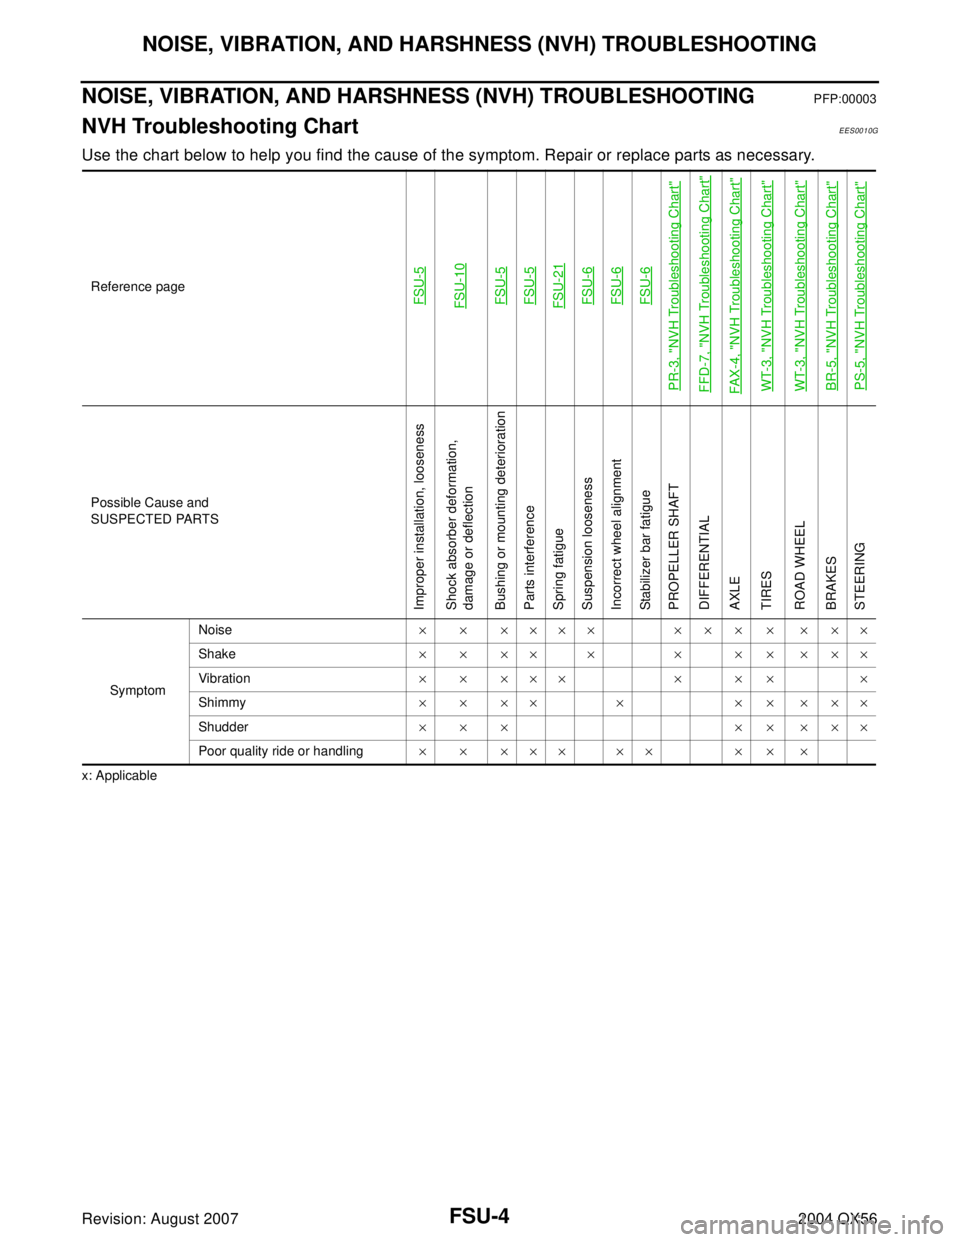
Use the chart below to help you find the cause of the symptom. Repair or replace parts as necessary.
x: ApplicableReference page
FSU-5FSU-10FSU-5FSU-5FSU-21FSU-6FSU-6FSU-6
PR-3, "
NVH Troubleshooting Chart
"
FFD-7, "
NVH Troubleshooting Chart
"
FAX -4, "
NVH Troubleshooting Chart
"
WT-3, "
NVH Troubleshooting Chart
"
WT-3, "
NVH Troubleshooting Chart
"
BR-5, "
NVH Troubleshooting Chart
"
PS-5, "
NVH Troubleshooting Chart
"
Possible Cause and
SUSPECTED PARTS
Improper installation, looseness
Shock absorber deformation,
damage or deflection
Bushing or mounting deterioration
Parts interference
Spring fatigue
Suspension looseness
Incorrect wheel alignment
Stabilizer bar fatigue
PROPELLER SHAFT
DIFFERENTIAL
AXLE
TIRES
ROAD WHEEL
BRAKES
STEERING
SymptomNoise× × ×××× × × × × × ××
Shake×××× × × ×××××
Vib ratio n××××× × ×× ×
Shimmy× × ×× × × × × ××
Shudder××× ×××××
Poor quality ride or handling××××× ×× ×××
Page 2065 of 3371

FSU-6
ON-VEHICLE SERVICE
Revision: August 20072004 QX56
ON-VEHICLE SERVICEPFP:00000
Front Suspension PartsEES0010I
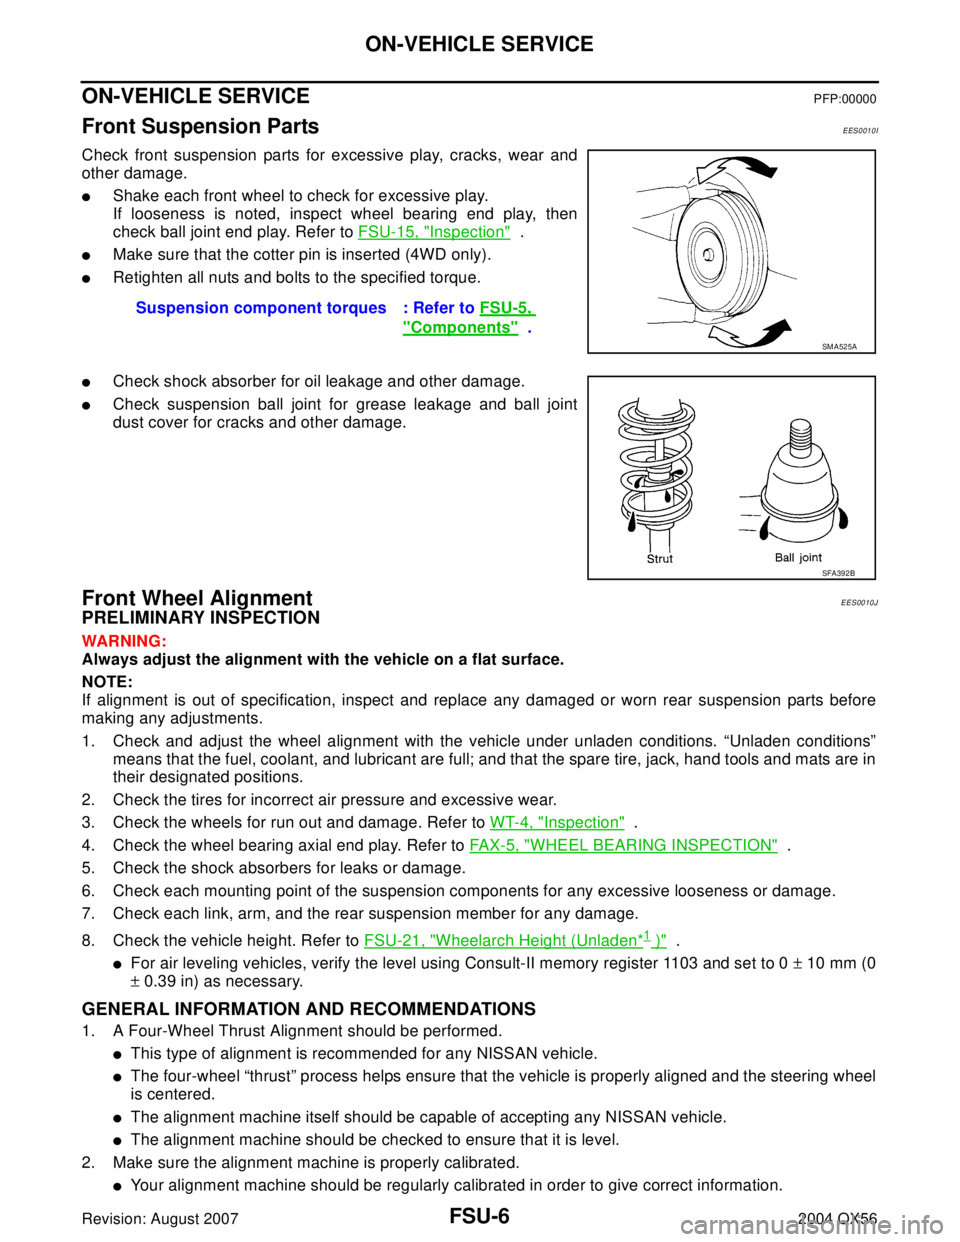
Check front suspension parts for excessive play, cracks, wear and
other damage.
�Shake each front wheel to check for excessive play.
If looseness is noted, inspect wheel bearing end play, then
check ball joint end play. Refer to FSU-15, "
Inspection" .
�Make sure that the cotter pin is inserted (4WD only).
�Retighten all nuts and bolts to the specified torque.
�Check shock absorber for oil leakage and other damage.
�Check suspension ball joint for grease leakage and ball joint
dust cover for cracks and other damage.
Front Wheel AlignmentEES0010J
PRELIMINARY INSPECTION
WAR NIN G:
Always adjust the alignment with the vehicle on a flat surface.
NOTE:
If alignment is out of specification, inspect and replace any damaged or worn rear suspension parts before
making any adjustments.
1. Check and adjust the wheel alignment with the vehicle under unladen conditions. “Unladen conditions”
means that the fuel, coolant, and lubricant are full; and that the spare tire, jack, hand tools and mats are in
their designated positions.
2. Check the tires for incorrect air pressure and excessive wear.
3. Check the wheels for run out and damage. Refer to WT-4, "
Inspection" .
4. Check the wheel bearing axial end play. Refer to FAX-5, "
WHEEL BEARING INSPECTION" .
5. Check the shock absorbers for leaks or damage.
6. Check each mounting point of the suspension components for any excessive looseness or damage.
7. Check each link, arm, and the rear suspension member for any damage.
8. Check the vehicle height. Refer to FSU-21, "
Wheelarch Height (Unladen*1 )" .
�For air leveling vehicles, verify the level using Consult-II memory register 1103 and set to 0 ± 10 mm (0
± 0.39 in) as necessary.
GENERAL INFORMATION AND RECOMMENDATIONS
1. A Four-Wheel Thrust Alignment should be performed.
�This type of alignment is recommended for any NISSAN vehicle.
�The four-wheel “thrust” process helps ensure that the vehicle is properly aligned and the steering wheel
is centered.
�The alignment machine itself should be capable of accepting any NISSAN vehicle.
�The alignment machine should be checked to ensure that it is level.
2. Make sure the alignment machine is properly calibrated.
�Your alignment machine should be regularly calibrated in order to give correct information.Suspension component torques : Refer to FSU-5,
"Components" .
SM A52 5A
SFA392B
Page 2067 of 3371

FSU-8
ON-VEHICLE SERVICE
Revision: August 20072004 QX56
TOE-IN
WAR NIN G:
�Always perform the following procedure on a flat surface.
�Make sure that no person is in front of the vehicle before pushing it.
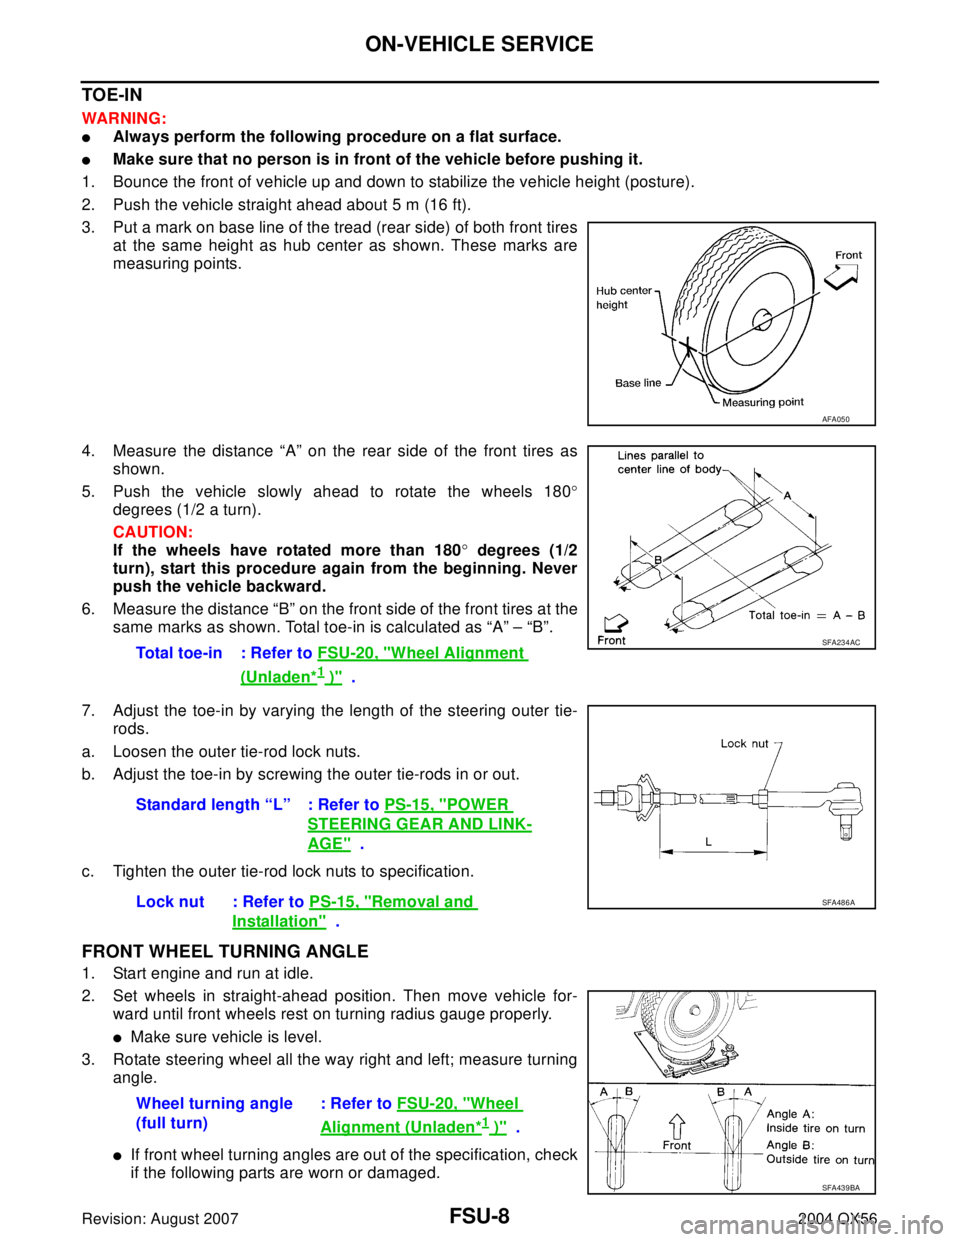
1. Bounce the front of vehicle up and down to stabilize the vehicle height (posture).
2. Push the vehicle straight ahead about 5 m (16 ft).
3. Put a mark on base line of the tread (rear side) of both front tires
at the same height as hub center as shown. These marks are
measuring points.
4. Measure the distance “A” on the rear side of the front tires as
shown.
5. Push the vehicle slowly ahead to rotate the wheels 180°
degrees (1/2 a turn).
CAUTION:
If the wheels have rotated more than 180° degrees (1/2
turn), start this procedure again from the beginning. Never
push the vehicle backward.
6. Measure the distance “B” on the front side of the front tires at the
same marks as shown. Total toe-in is calculated as “A” – “B”.
7. Adjust the toe-in by varying the length of the steering outer tie-
rods.
a. Loosen the outer tie-rod lock nuts.
b. Adjust the toe-in by screwing the outer tie-rods in or out.
c. Tighten the outer tie-rod lock nuts to specification.
FRONT WHEEL TURNING ANGLE
1. Start engine and run at idle.
2. Set wheels in straight-ahead position. Then move vehicle for-
ward until front wheels rest on turning radius gauge properly.
�Make sure vehicle is level.
3. Rotate steering wheel all the way right and left; measure turning
angle.
�If front wheel turning angles are out of the specification, check
if the following parts are worn or damaged.
AFA05 0
Total toe-in : Refer to FSU-20, "Wheel Alignment
(Unladen*1 )" .
SFA234AC
Standard length “L” : Refer to PS-15, "POWER
STEERING GEAR AND LINK-
AGE" .
Lock nut : Refer to PS-15, "
Removal and
Installation" .
SFA486A
Wheel turning angle
(full turn): Refer to FSU-20, "Wheel
Alignment (Unladen*1 )" .
SFA439BA
Page 2083 of 3371
GI-2Revision: August 20072004 QX56 VEHICLE IDENTIFICATION NUMBER
ARRANGEMENT ................................................. 47
ENGINE SERIAL NUMBER ................................ 48
TRANSFER SERIAL NUMBER ........................... 48
AUTOMATIC TRANSMISSION NUMBER ........... 48Dimensions .............................................................49
Wheels & Tires ........................................................49
TERMINOLOGY ........................................................50
SAE J1930 Terminology List ...................................50
Page 2124 of 3371

TOW TRUCK TOWING
GI-43
C
D
E
F
G
H
I
J
K
L
MB
GI
Revision: August 20072004 QX56
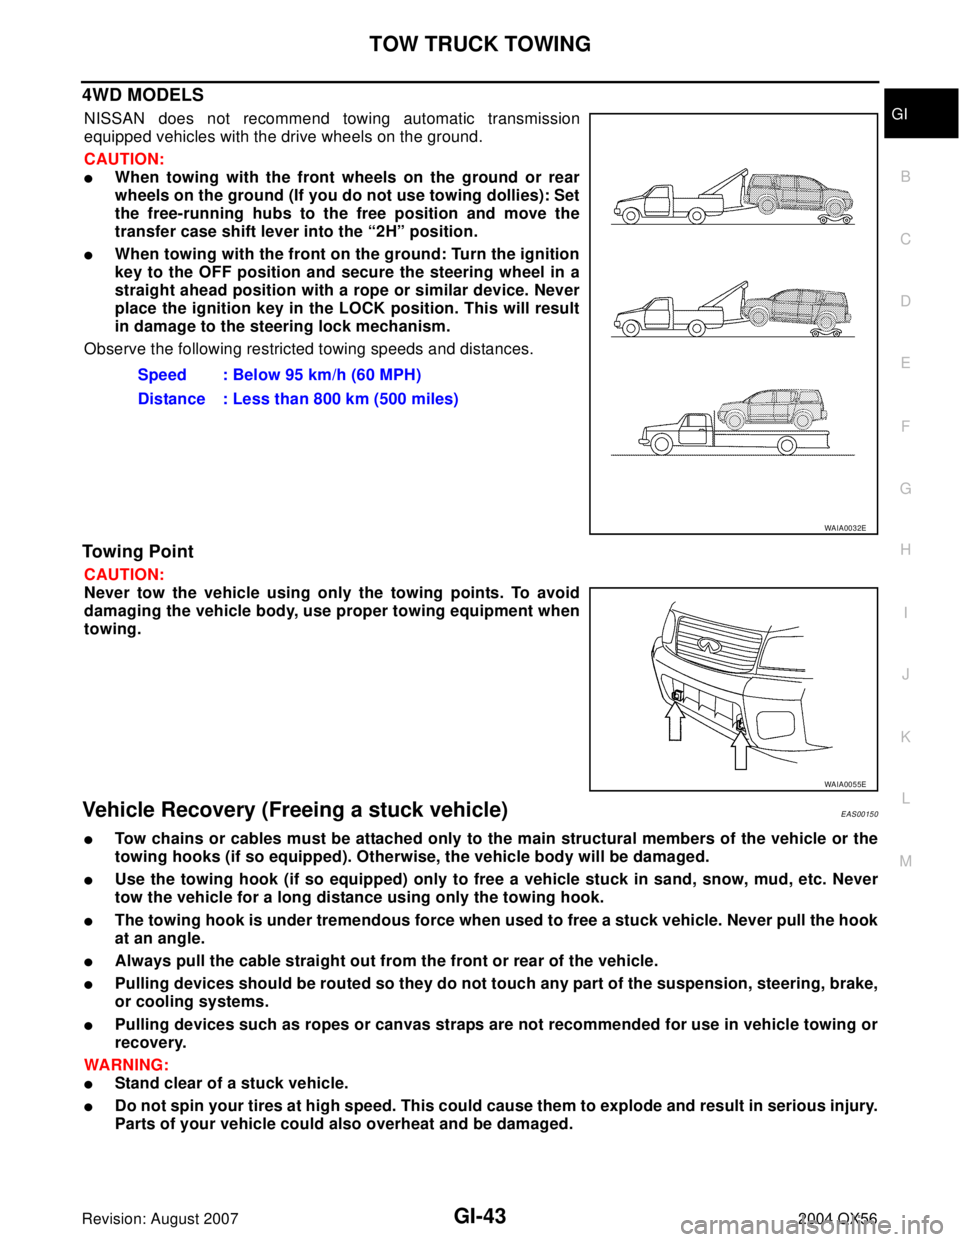
4WD MODELS
NISSAN does not recommend towing automatic transmission
equipped vehicles with the drive wheels on the ground.
CAUTION:
�When towing with the front wheels on the ground or rear
wheels on the ground (If you do not use towing dollies): Set
the free-running hubs to the free position and move the
transfer case shift lever into the “2H” position.
�When towing with the front on the ground: Turn the ignition
key to the OFF position and secure the steering wheel in a
straight ahead position with a rope or similar device. Never
place the ignition key in the LOCK position. This will result
in damage to the steering lock mechanism.
Observe the following restricted towing speeds and distances.
Towing Point
CAUTION:
Never tow the vehicle using only the towing points. To avoid
damaging the vehicle body, use proper towing equipment when
towing.
Vehicle Recovery (Freeing a stuck vehicle)EAS00150
�Tow chains or cables must be attached only to the main structural members of the vehicle or the
towing hooks (if so equipped). Otherwise, the vehicle body will be damaged.
�Use the towing hook (if so equipped) only to free a vehicle stuck in sand, snow, mud, etc. Never
tow the vehicle for a long distance using only the towing hook.
�The towing hook is under tremendous force when used to free a stuck vehicle. Never pull the hook
at an angle.
�Always pull the cable straight out from the front or rear of the vehicle.
�Pulling devices should be routed so they do not touch any part of the suspension, steering, brake,
or cooling systems.
�Pulling devices such as ropes or canvas straps are not recommended for use in vehicle towing or
recovery.
WA RN ING:
�Stand clear of a stuck vehicle.
�Do not spin your tires at high speed. This could cause them to explode and result in serious injury.
Parts of your vehicle could also overheat and be damaged.Speed : Below 95 km/h (60 MPH)
Distance : Less than 800 km (500 miles)
WAIA0032E
WAIA0055E
Page 2130 of 3371
IDENTIFICATION INFORMATION
GI-49
C
D
E
F
G
H
I
J
K
L
MB
GI
Revision: August 20072004 QX56
DimensionsEAS00155
Unit: mm (in)
Wheels & TiresEAS00156
Drive type4x2 4x4
Overall length 5255 (206.9) 5255 (206.9)
Overall width 2001 (78.8) 2001 (78.8)
Overall height (with roof rack) 1976.8 (77.8) 1997.7 (78.7)
Front tread width 1725 (67.9) 1725 (67.9)
Rear tread width 1725 (67.9) 1725 (67.9)
Wheelbase 3130 (123.2) 3130 (123.2)
Minimum Running Ground Clearance (at front sus-
pension)With standard
undercover254.8 (10.03) 273.7 (10.77)
With oil pan skid
plate250.5 (9.86) 269.5 (10.61)
Drive Type Grade Road wheel Tire Spare tire size
All LE7-Spoke 18x8J Chromium Aluminum
AlloyP265/70R18 P265/70R18
Page 2462 of 3371
HEADLAMP (FOR USA)
LT-31
C
D
E
F
G
H
I
J
L
MA
B
LT
Revision: August 20072004 QX56
Aiming AdjustmentEKS007A6
For details, refer to the regulations in your state.
Before performing aiming adjustment, check the following.
1. Ensure all tires are inflated to correct pressure.
2. Place vehicle and screen on level surface.
3. Ensure there is no load in vehicle other than the driver (or equivalent weight placed in driver's position).
Coolant and engine oil filled to correct level, and fuel tank full.
4. Confirm spare tire, jack and tools are properly stowed.
5. Confirm headlamp aiming switch is set to "0" (zero) position.
LOW BEAM AND HIGH BEAM
NOTE:
Aim each headlamp individually and ensure other headlamp beam pattern is blocked from screen.
1. Turn headlamp low beam on.
2. Use adjusting screw to perform aiming adjustment.
WKIA1859E