2004 INFINITI QX56 Air
[x] Cancel search: AirPage 2522 of 3371
TURN SIGNAL AND HAZARD WARNING LAMPS
LT-91
C
D
E
F
G
H
I
J
L
MA
B
LT
Revision: August 20072004 QX56
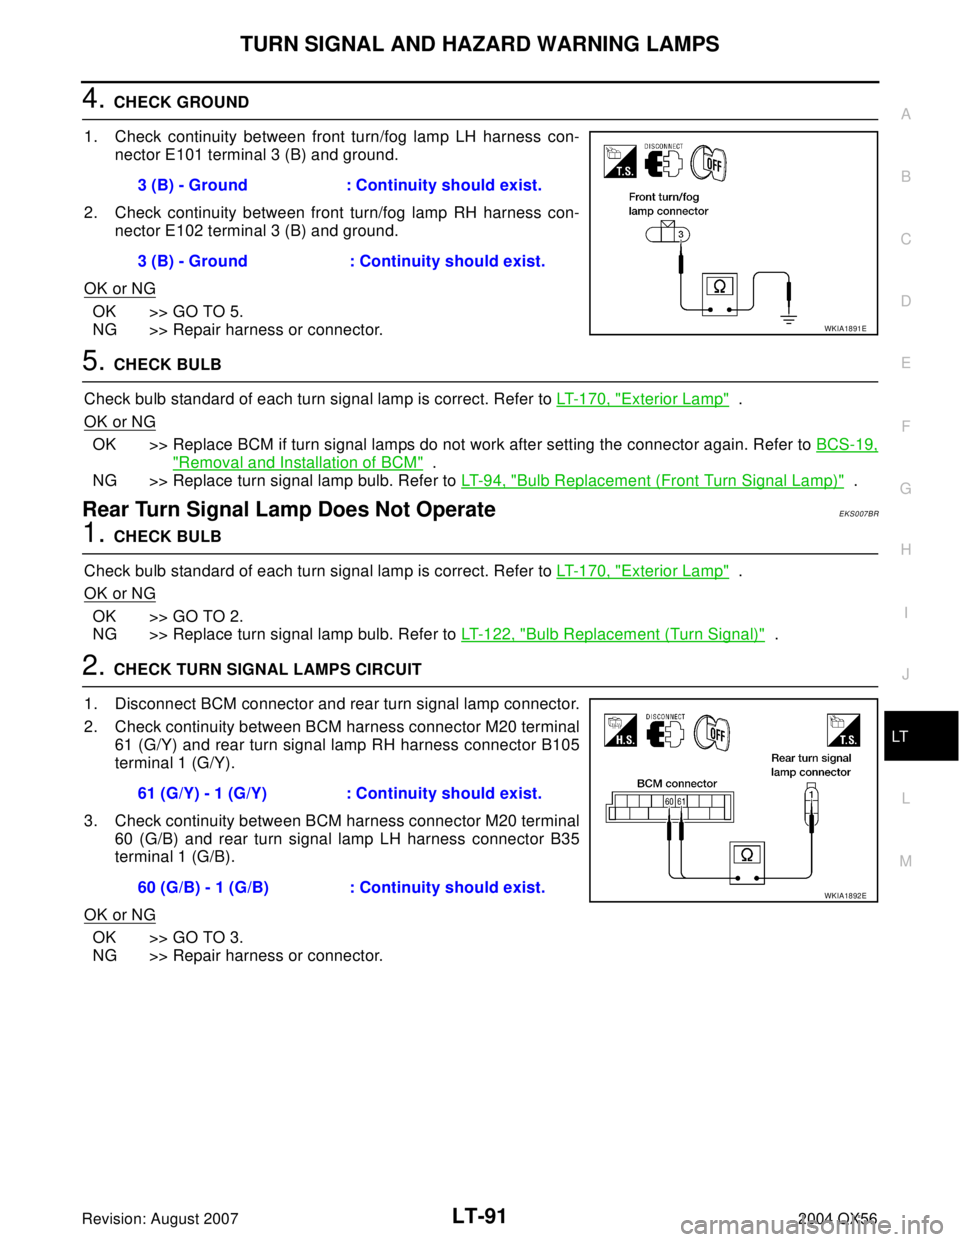
4. CHECK GROUND
1. Check continuity between front turn/fog lamp LH harness con-
nector E101 terminal 3 (B) and ground.
2. Check continuity between front turn/fog lamp RH harness con-
nector E102 terminal 3 (B) and ground.
OK or NG
OK >> GO TO 5.
NG >> Repair harness or connector.
5. CHECK BULB
Check bulb standard of each turn signal lamp is correct. Refer to LT-170, "
Exterior Lamp" .
OK or NG
OK >> Replace BCM if turn signal lamps do not work after setting the connector again. Refer to BCS-19,
"Removal and Installation of BCM" .
NG >> Replace turn signal lamp bulb. Refer to LT- 9 4 , "
Bulb Replacement (Front Turn Signal Lamp)" .
Rear Turn Signal Lamp Does Not OperateEKS007BR
1. CHECK BULB
Check bulb standard of each turn signal lamp is correct. Refer to LT-170, "
Exterior Lamp" .
OK or NG
OK >> GO TO 2.
NG >> Replace turn signal lamp bulb. Refer to LT-122, "
Bulb Replacement (Turn Signal)" .
2. CHECK TURN SIGNAL LAMPS CIRCUIT
1. Disconnect BCM connector and rear turn signal lamp connector.
2. Check continuity between BCM harness connector M20 terminal
61 (G/Y) and rear turn signal lamp RH harness connector B105
terminal 1 (G/Y).
3. Check continuity between BCM harness connector M20 terminal
60 (G/B) and rear turn signal lamp LH harness connector B35
terminal 1 (G/B).
OK or NG
OK >> GO TO 3.
NG >> Repair harness or connector.3 (B) - Ground : Continuity should exist.
3 (B) - Ground : Continuity should exist.
WKIA1891E
61 (G/Y) - 1 (G/Y) : Continuity should exist.
60 (G/B) - 1 (G/B) : Continuity should exist.
WKIA1892E
Page 2523 of 3371
LT-92
TURN SIGNAL AND HAZARD WARNING LAMPS
Revision: August 20072004 QX56
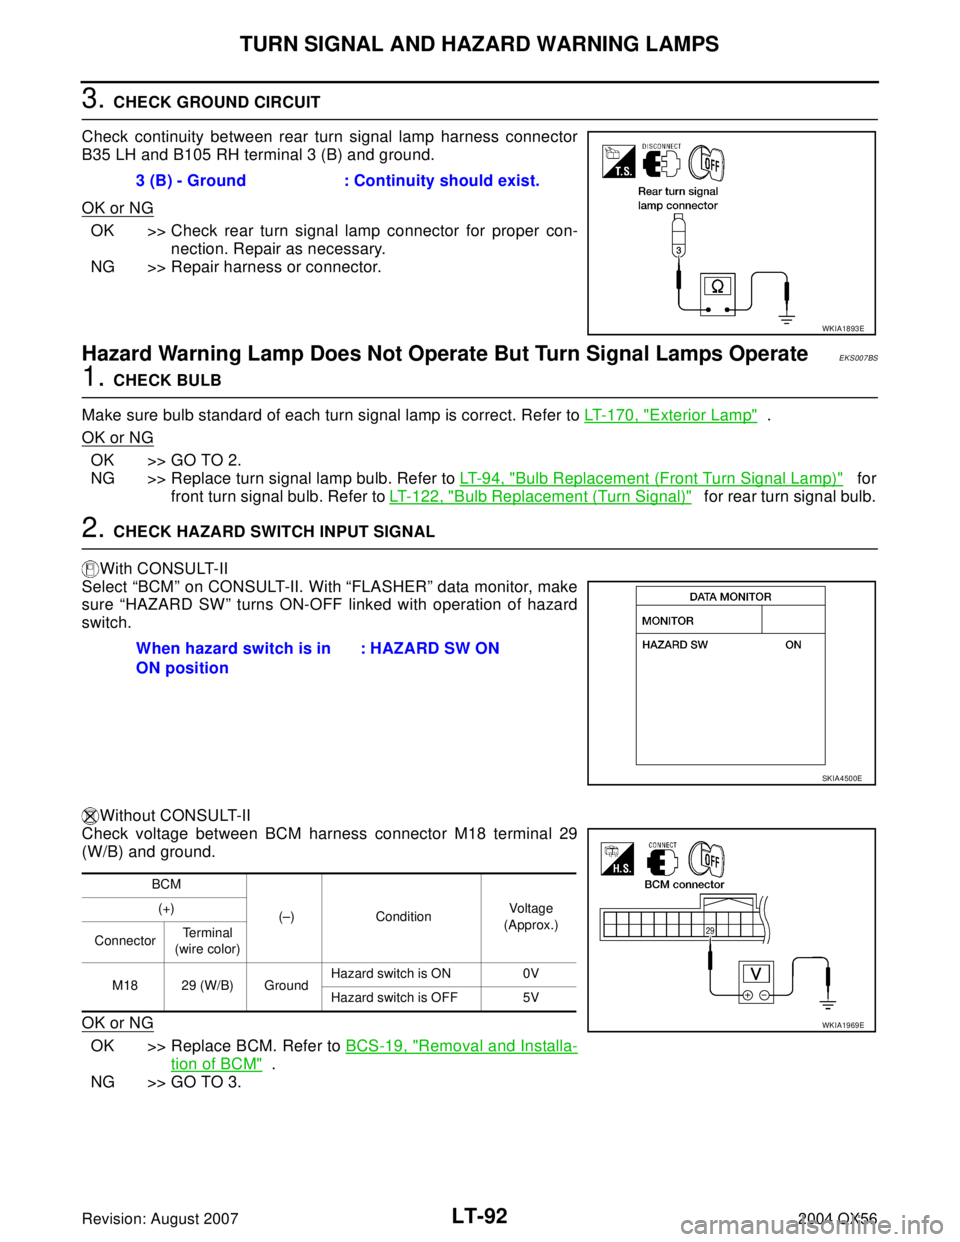
3. CHECK GROUND CIRCUIT
Check continuity between rear turn signal lamp harness connector
B35 LH and B105 RH terminal 3 (B) and ground.
OK or NG
OK >> Check rear turn signal lamp connector for proper con-
nection. Repair as necessary.
NG >> Repair harness or connector.
Hazard Warning Lamp Does Not Operate But Turn Signal Lamps OperateEKS007BS
1. CHECK BULB
Make sure bulb standard of each turn signal lamp is correct. Refer to LT-170, "
Exterior Lamp" .
OK or NG
OK >> GO TO 2.
NG >> Replace turn signal lamp bulb. Refer to LT- 9 4 , "
Bulb Replacement (Front Turn Signal Lamp)" for
front turn signal bulb. Refer to LT-122, "
Bulb Replacement (Turn Signal)" for rear turn signal bulb.
2. CHECK HAZARD SWITCH INPUT SIGNAL
With CONSULT-II
Select “BCM” on CONSULT-II. With “FLASHER” data monitor, make
sure “HAZARD SW” turns ON-OFF linked with operation of hazard
switch.
Without CONSULT-II
Check voltage between BCM harness connector M18 terminal 29
(W/B) and ground.
OK or NG
OK >> Replace BCM. Refer to BCS-19, "Removal and Installa-
tion of BCM" .
NG >> GO TO 3.3 (B) - Ground : Continuity should exist.
WKIA1893E
When hazard switch is in
ON position : HAZARD SW ON
SKIA4500E
BCM
(–) ConditionVo ltag e
(Approx.) (+)
ConnectorTe r m i n a l
(wire color)
M18 29 (W/B) GroundHazard switch is ON 0V
Hazard switch is OFF 5V
WKIA1969E
Page 2524 of 3371
TURN SIGNAL AND HAZARD WARNING LAMPS
LT-93
C
D
E
F
G
H
I
J
L
MA
B
LT
Revision: August 20072004 QX56
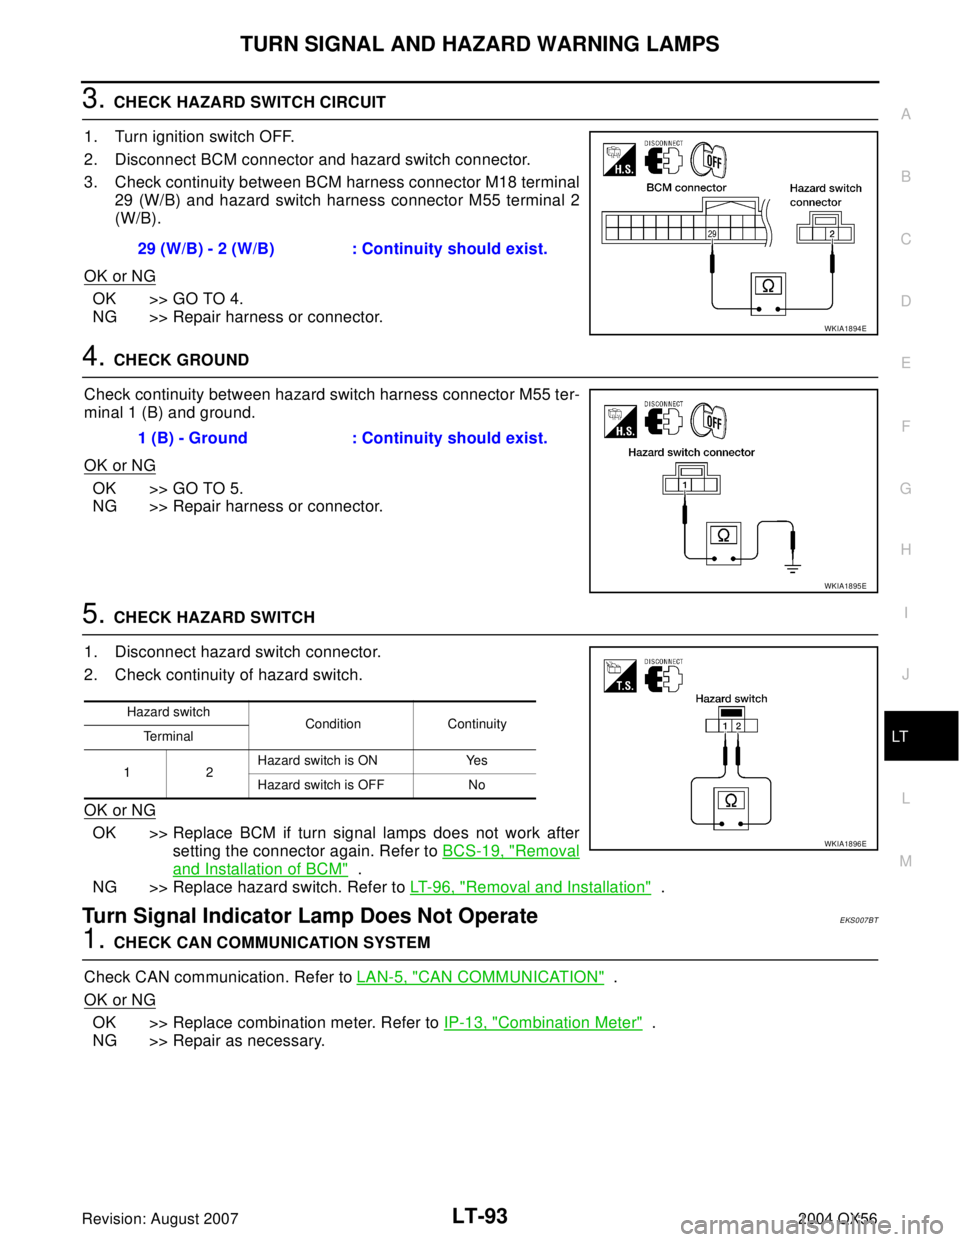
3. CHECK HAZARD SWITCH CIRCUIT
1. Turn ignition switch OFF.
2. Disconnect BCM connector and hazard switch connector.
3. Check continuity between BCM harness connector M18 terminal
29 (W/B) and hazard switch harness connector M55 terminal 2
(W/B).
OK or NG
OK >> GO TO 4.
NG >> Repair harness or connector.
4. CHECK GROUND
Check continuity between hazard switch harness connector M55 ter-
minal 1 (B) and ground.
OK or NG
OK >> GO TO 5.
NG >> Repair harness or connector.
5. CHECK HAZARD SWITCH
1. Disconnect hazard switch connector.
2. Check continuity of hazard switch.
OK or NG
OK >> Replace BCM if turn signal lamps does not work after
setting the connector again. Refer to BCS-19, "
Removal
and Installation of BCM" .
NG >> Replace hazard switch. Refer to LT-96, "
Removal and Installation" .
Turn Signal Indicator Lamp Does Not OperateEKS007BT
1. CHECK CAN COMMUNICATION SYSTEM
Check CAN communication. Refer to LAN-5, "
CAN COMMUNICATION" .
OK or NG
OK >> Replace combination meter. Refer to IP-13, "Combination Meter" .
NG >> Repair as necessary.29 (W/B) - 2 (W/B) : Continuity should exist.
WKIA1894E
1 (B) - Ground : Continuity should exist.
WKIA1895E
Hazard switch
Condition Continuity
Te r m i n a l
12Hazard switch is ON Yes
Hazard switch is OFF No
WKIA1896E
Page 2546 of 3371
PARKING, LICENSE PLATE AND TAIL LAMPS
LT-115
C
D
E
F
G
H
I
J
L
MA
B
LT
Revision: August 20072004 QX56
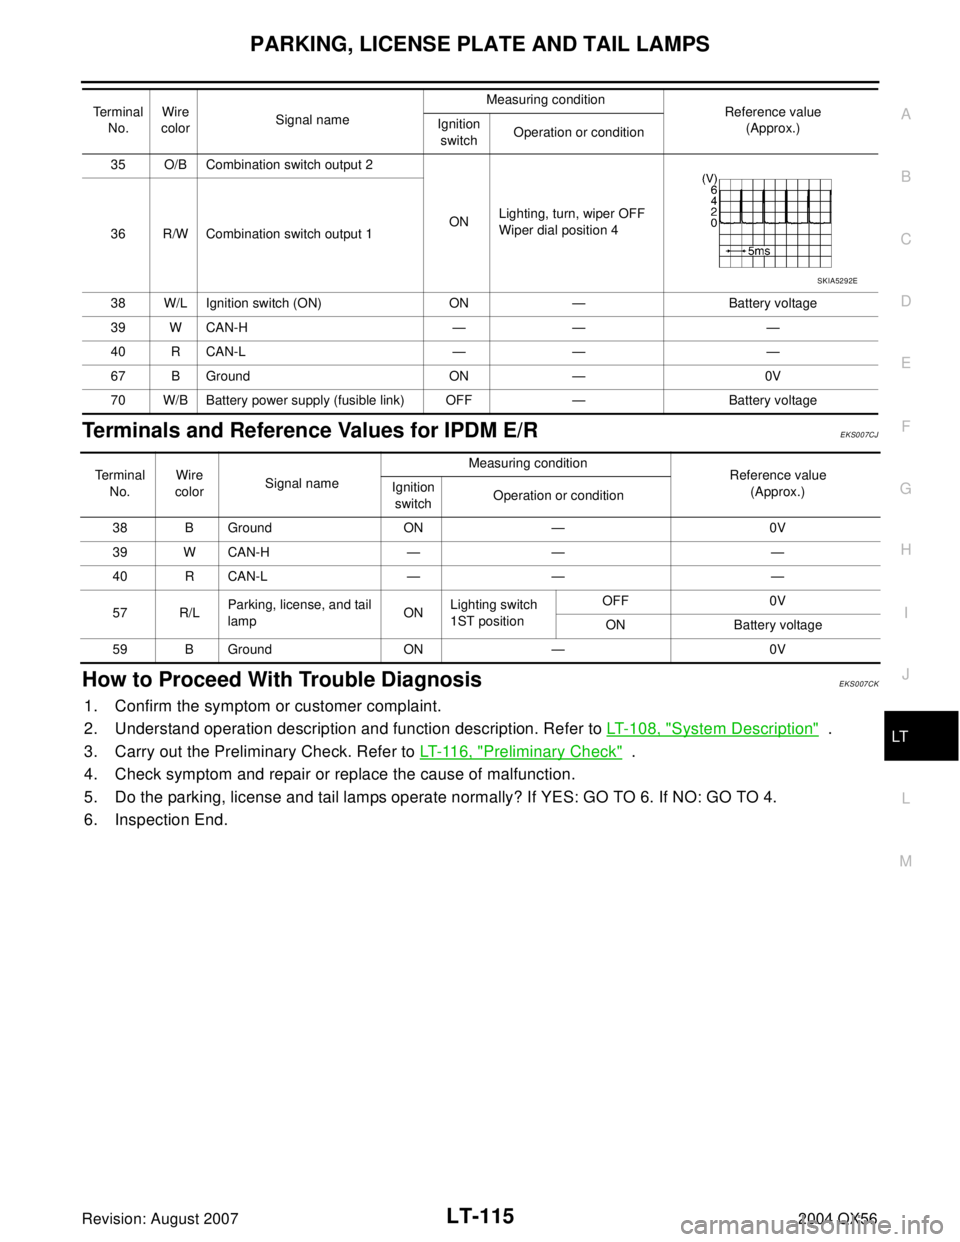
Terminals and Reference Values for IPDM E/REKS007CJ
How to Proceed With Trouble DiagnosisEKS007CK
1. Confirm the symptom or customer complaint.
2. Understand operation description and function description. Refer to LT- 1 0 8 , "
System Description" .
3. Carry out the Preliminary Check. Refer to LT- 11 6 , "
Preliminary Check" .
4. Check symptom and repair or replace the cause of malfunction.
5. Do the parking, license and tail lamps operate normally? If YES: GO TO 6. If NO: GO TO 4.
6. Inspection End.
35 O/B Combination switch output 2
ONLighting, turn, wiper OFF
Wiper dial position 4
36 R/W Combination switch output 1
38 W/L Ignition switch (ON) ON — Battery voltage
39 W CAN-H — — —
40 R CAN-L — — —
67 B Ground ON — 0V
70 W/B Battery power supply (fusible link) OFF — Battery voltage Terminal
No.Wire
colorSignal nameMeasuring condition
Reference value
(Approx.) Ignition
switchOperation or condition
SKIA5292E
Terminal
No.Wire
colorSignal nameMeasuring condition
Reference value
(Approx.) Ignition
switchOperation or condition
38 B Ground ON — 0V
39 W CAN-H — — —
40 R CAN-L — — —
57 R/LParking, license, and tail
lampONLighting switch
1ST positionOFF 0V
ON Battery voltage
59 B Ground ON — 0V
Page 2550 of 3371
PARKING, LICENSE PLATE AND TAIL LAMPS
LT-119
C
D
E
F
G
H
I
J
L
MA
B
LT
Revision: August 20072004 QX56
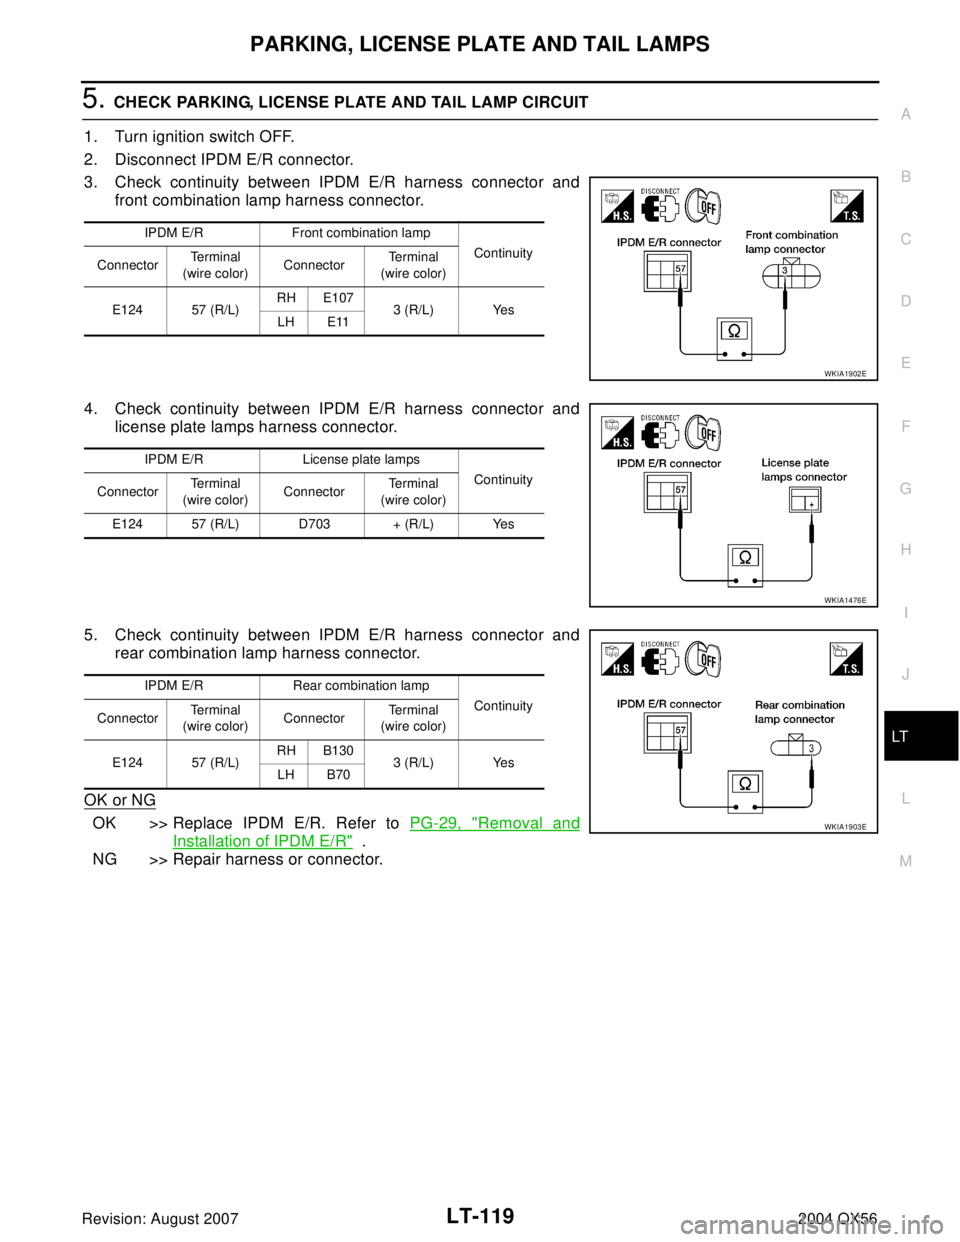
5. CHECK PARKING, LICENSE PLATE AND TAIL LAMP CIRCUIT
1. Turn ignition switch OFF.
2. Disconnect IPDM E/R connector.
3. Check continuity between IPDM E/R harness connector and
front combination lamp harness connector.
4. Check continuity between IPDM E/R harness connector and
license plate lamps harness connector.
5. Check continuity between IPDM E/R harness connector and
rear combination lamp harness connector.
OK or NG
OK >> Replace IPDM E/R. Refer to PG-29, "Removal and
Installation of IPDM E/R" .
NG >> Repair harness or connector.
IPDM E/R Front combination lamp
Continuity
ConnectorTe r m i n a l
(wire color)ConnectorTe r m i n a l
(wire color)
E124 57 (R/L)RH E107
3 (R/L) Yes
LH E11
WKIA1902E
IPDM E/R License plate lamps
Continuity
ConnectorTe r m i n a l
(wire color)ConnectorTe r m i n a l
(wire color)
E124 57 (R/L) D703 + (R/L) Yes
WKIA1476E
IPDM E/R Rear combination lamp
Continuity
ConnectorTe r m i n a l
(wire color)ConnectorTe r m i n a l
(wire color)
E124 57 (R/L)RH B130
3 (R/L) Yes
LH B70
WKIA1903E
Page 2551 of 3371
LT-120
PARKING, LICENSE PLATE AND TAIL LAMPS
Revision: August 20072004 QX56
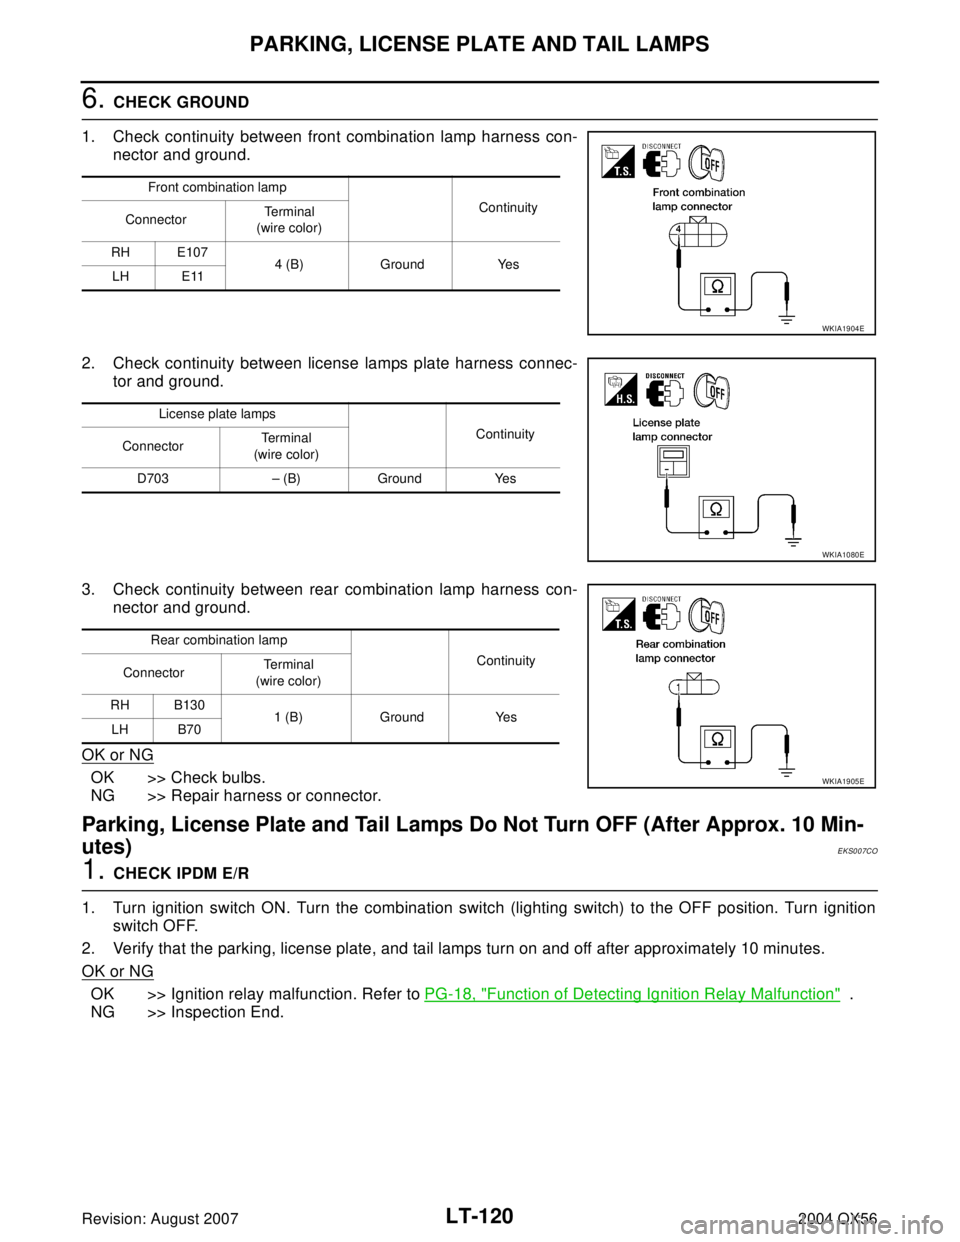
6. CHECK GROUND
1. Check continuity between front combination lamp harness con-
nector and ground.
2. Check continuity between license lamps plate harness connec-
tor and ground.
3. Check continuity between rear combination lamp harness con-
nector and ground.
OK or NG
OK >> Check bulbs.
NG >> Repair harness or connector.
Parking, License Plate and Tail Lamps Do Not Turn OFF (After Approx. 10 Min-
utes)
EKS007CO
1. CHECK IPDM E/R
1. Turn ignition switch ON. Turn the combination switch (lighting switch) to the OFF position. Turn ignition
switch OFF.
2. Verify that the parking, license plate, and tail lamps turn on and off after approximately 10 minutes.
OK or NG
OK >> Ignition relay malfunction. Refer to PG-18, "Function of Detecting Ignition Relay Malfunction" .
NG >> Inspection End.
Front combination lamp
Continuity
ConnectorTe r m i n a l
(wire color)
RH E107
4 (B) Ground Yes
LH E11
WKIA1904E
License plate lamps
Continuity
ConnectorTerminal
(wire color)
D703 – (B) Ground Yes
WKIA1080E
Rear combination lamp
Continuity
ConnectorTe r m i n a l
(wire color)
RH B130
1 (B) Ground Yes
LH B70
WKIA1905E
Page 2573 of 3371
LT-142
INTERIOR ROOM LAMP
Revision: August 20072004 QX56
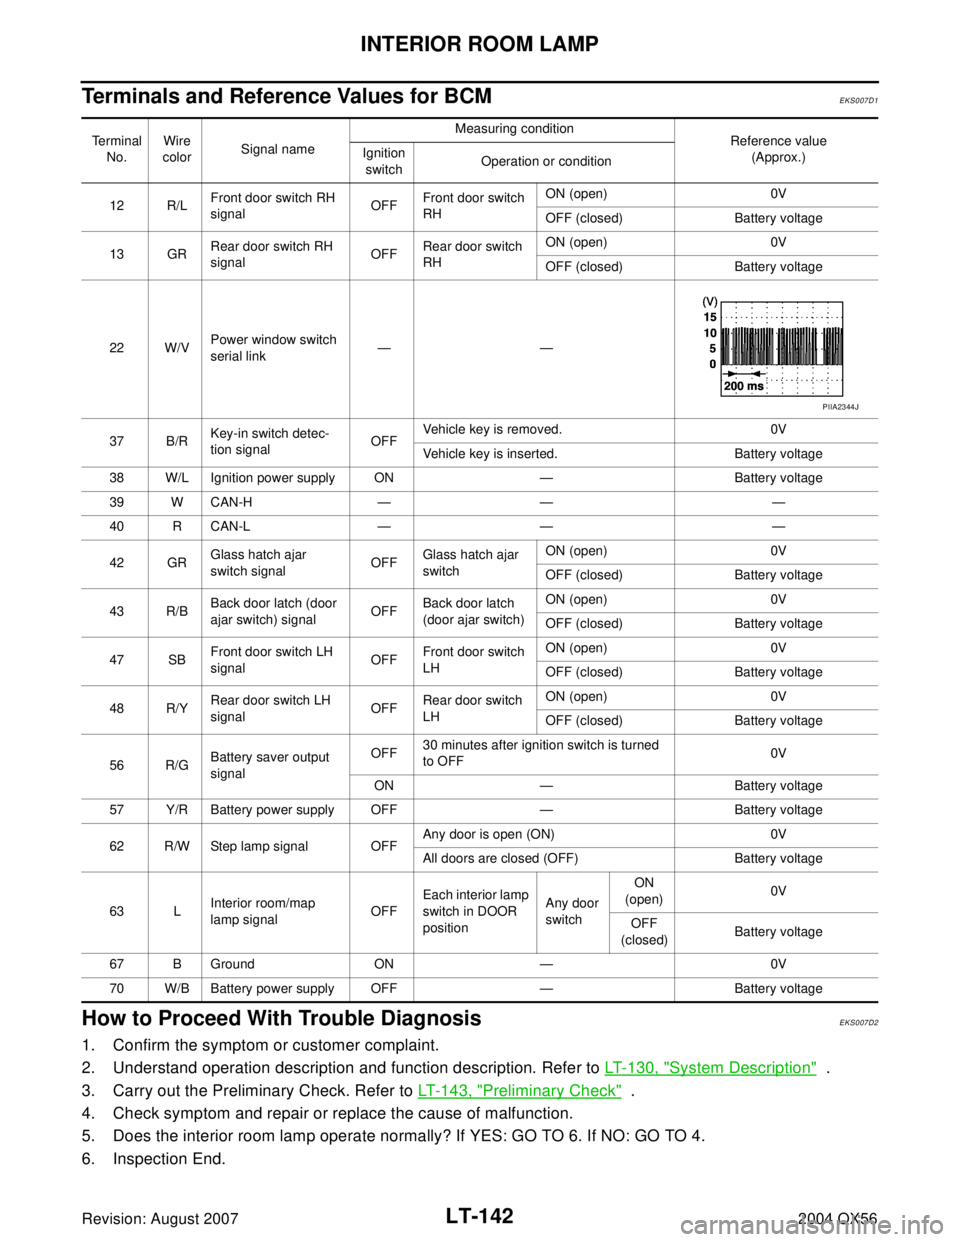
Terminals and Reference Values for BCMEKS007D1
How to Proceed With Trouble DiagnosisEKS007D2
1. Confirm the symptom or customer complaint.
2. Understand operation description and function description. Refer to LT-130, "
System Description" .
3. Carry out the Preliminary Check. Refer to LT- 1 4 3 , "
Preliminary Check" .
4. Check symptom and repair or replace the cause of malfunction.
5. Does the interior room lamp operate normally? If YES: GO TO 6. If NO: GO TO 4.
6. Inspection End.
Te r m i n a l
No.Wire
colorSignal nameMeasuring condition
Reference value
(Approx.) Ignition
switchOperation or condition
12 R/LFront door switch RH
signalOFFFront door switch
RHON (open) 0V
OFF (closed) Battery voltage
13 GRRear door switch RH
signalOFFRear door switch
RHON (open) 0V
OFF (closed) Battery voltage
22 W/VPower window switch
serial link——
37 B/RKey-in switch detec-
tion signalOFFVehicle key is removed. 0V
Vehicle key is inserted. Battery voltage
38 W/L Ignition power supply ON — Battery voltage
39 W CAN-H — — —
40 R CAN-L — — —
42 GRGlass hatch ajar
switch signalOFFGlass hatch ajar
switchON (open) 0V
OFF (closed) Battery voltage
43 R/BBack door latch (door
ajar switch) signalOFFBack door latch
(door ajar switch)ON (open) 0V
OFF (closed) Battery voltage
47 SBFront door switch LH
signalOFFFront door switch
LHON (open) 0V
OFF (closed) Battery voltage
48 R/YRear door switch LH
signalOFFRear door switch
LHON (open) 0V
OFF (closed) Battery voltage
56 R/GBattery saver output
signalOFF30 minutes after ignition switch is turned
to OFF0V
ON — Battery voltage
57 Y/R Battery power supply OFF — Battery voltage
62 R/W Step lamp signal OFFAny door is open (ON) 0V
All doors are closed (OFF) Battery voltage
63 LInterior room/map
lamp signalOFFEach interior lamp
switch in DOOR
positionAny door
switchON
(open)0V
OFF
(closed)Battery voltage
67 B Ground ON — 0V
70 W/B Battery power supply OFF — Battery voltage
PIIA2344J
Page 2578 of 3371
INTERIOR ROOM LAMP
LT-147
C
D
E
F
G
H
I
J
L
MA
B
LT
Revision: August 20072004 QX56
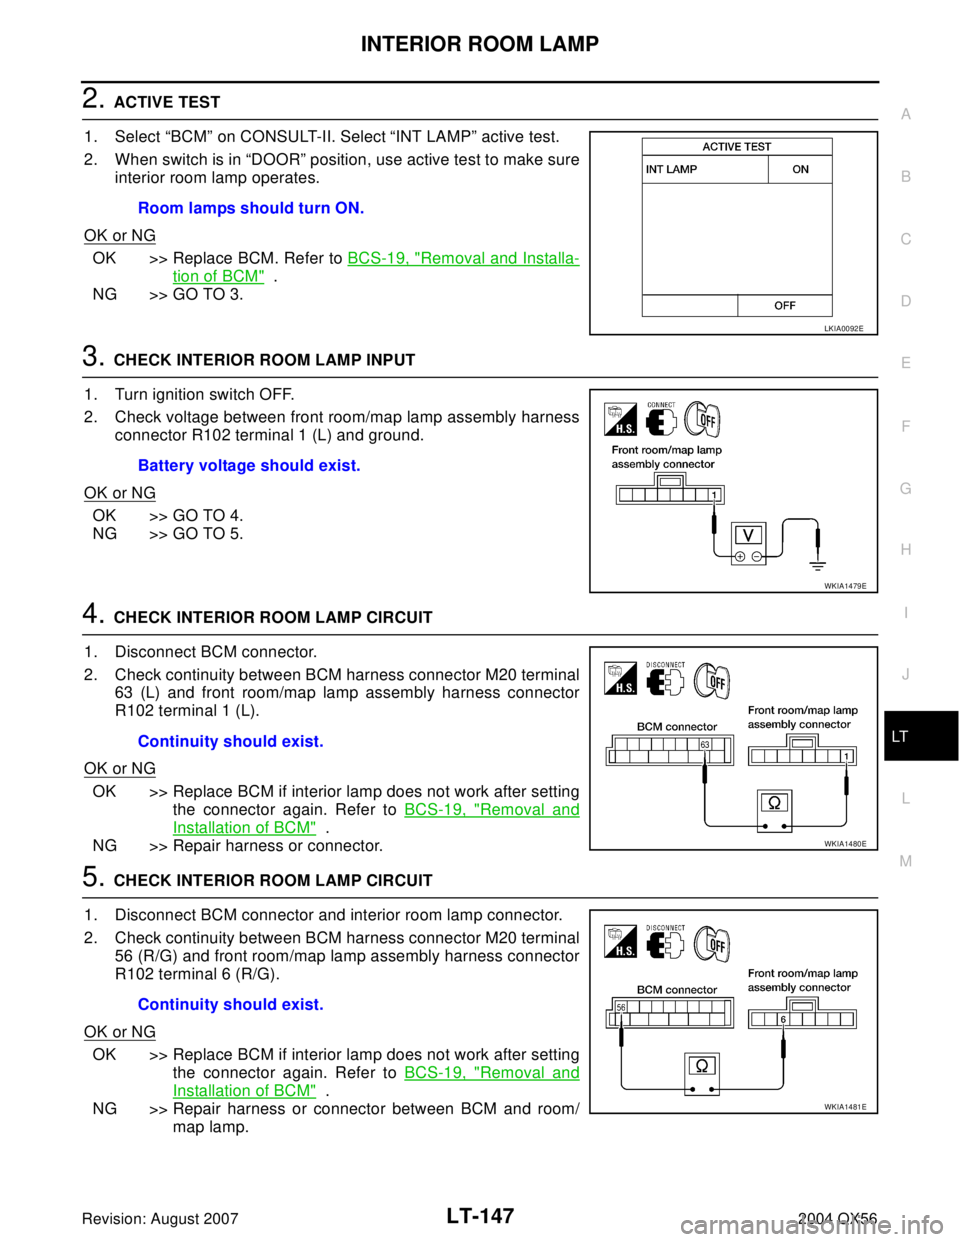
2. ACTIVE TEST
1. Select “BCM” on CONSULT-II. Select “INT LAMP” active test.
2. When switch is in “DOOR” position, use active test to make sure
interior room lamp operates.
OK or NG
OK >> Replace BCM. Refer to BCS-19, "Removal and Installa-
tion of BCM" .
NG >> GO TO 3.
3. CHECK INTERIOR ROOM LAMP INPUT
1. Turn ignition switch OFF.
2. Check voltage between front room/map lamp assembly harness
connector R102 terminal 1 (L) and ground.
OK or NG
OK >> GO TO 4.
NG >> GO TO 5.
4. CHECK INTERIOR ROOM LAMP CIRCUIT
1. Disconnect BCM connector.
2. Check continuity between BCM harness connector M20 terminal
63 (L) and front room/map lamp assembly harness connector
R102 terminal 1 (L).
OK or NG
OK >> Replace BCM if interior lamp does not work after setting
the connector again. Refer to BCS-19, "
Removal and
Installation of BCM" .
NG >> Repair harness or connector.
5. CHECK INTERIOR ROOM LAMP CIRCUIT
1. Disconnect BCM connector and interior room lamp connector.
2. Check continuity between BCM harness connector M20 terminal
56 (R/G) and front room/map lamp assembly harness connector
R102 terminal 6 (R/G).
OK or NG
OK >> Replace BCM if interior lamp does not work after setting
the connector again. Refer to BCS-19, "
Removal and
Installation of BCM" .
NG >> Repair harness or connector between BCM and room/
map lamp. Room lamps should turn ON.
LKIA0092E
Battery voltage should exist.
WKIA1479E
Continuity should exist.
WKIA1480E
Continuity should exist.
WKIA1481E