Page 3081 of 4449
FL-8
FUEL LEVEL SENSOR UNIT, FUEL FILTER AND FUEL PUMP ASSEMBLY
Revision: 2004 November 2004 FX35/FX45
1. Turn ignition switch “ON” (with engine stopped), then check connections for leaks by applying fuel pres-
sure to fuel piping.
2. Start engine and let it idle and make sure there are no fuel leaks at the fuel system connections.
Disassembly and AssemblyABS005Z0
CAUTION:
Sub fuel level sensor unit cannot be disassembled and should be replaced as a unit.
DISASSEMBLY
Remove fuel level sensor unit as follows.
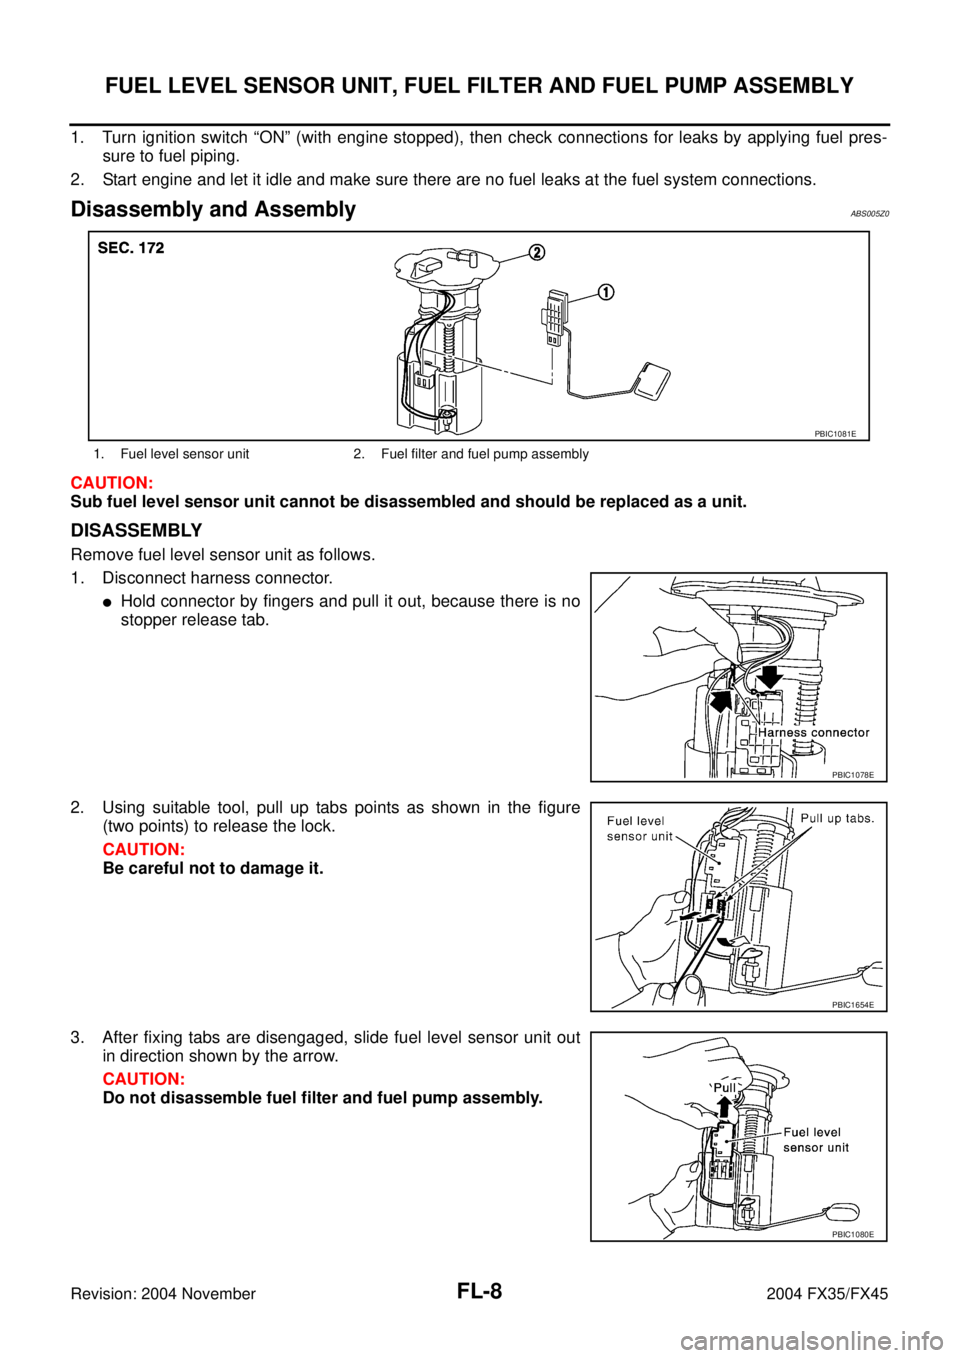
1. Disconnect harness connector.
�Hold connector by fingers and pull it out, because there is no
stopper release tab.
2. Using suitable tool, pull up tabs points as shown in the figure
(two points) to release the lock.
CAUTION:
Be careful not to damage it.
3. After fixing tabs are disengaged, slide fuel level sensor unit out
in direction shown by the arrow.
CAUTION:
Do not disassemble fuel filter and fuel pump assembly.
1. Fuel level sensor unit 2. Fuel filter and fuel pump assembly
PBIC1081E
PBIC1078E
PBIC1654E
PBIC1080E
Page 3082 of 4449
FUEL LEVEL SENSOR UNIT, FUEL FILTER AND FUEL PUMP ASSEMBLY
FL-9
C
D
E
F
G
H
I
J
K
L
MA
FL
Revision: 2004 November 2004 FX35/FX45
ASSEMBLY
1. Check for damage of fuel level sensor unit installation position on the side of fuel filter and fuel pump
assembly.
2. Slide fuel level sensor unit until it aligns to installation groove, then insert it until stop.
�After inserting, apply force in reverse direction (removal direction) to ensure it cannot be pulled out.
3. Connect harness connector.
�Securely insert harness connector until it stops.
Page 3083 of 4449
FL-10
FUEL TANK
Revision: 2004 November 2004 FX35/FX45
FUEL TANKPFP:17202
Removal and InstallationABS005Z1
REMOVAL
WARNING:
Be sure to read “General Precautions” when working on the fuel system. Refer to FL-3, "
General Pre-
cautions" .
�Drain fuel from fuel tank if necessary. Refer to FL-4, "REMOVAL" .
�Perform work on level place.
1. Perform steps 2 to 7 of “REMOVAL” in “ FUEL LEVEL SENSOR UNIT, FUEL FILTER AND FUEL PUMP
ASSEMBLY” on main and sub fuel level sensor units. Refer to FL-4, "
REMOVAL" .
2. Remove tunnel stay. Refer to RSU-5, "
REAR SUSPENSION ASSEMBLY" .
3. Remove exhaust front tube, center muffler and main muffler. Refer to EX-3, "
EXHAUST SYSTEM" .
4. Remove insulator.
5. Remove propeller shaft. Refer to PR-6, "
REAR PROPELLER SHAFT" .
6. Remove parking rear brake cables. Refer to PB-3, "
PARKING BRAKE CONTROL" .
7. Remove rear suspension assembly. Refer to RSU-5, "
REAR SUSPENSION ASSEMBLY" .
8. Remove fuel tank protector.
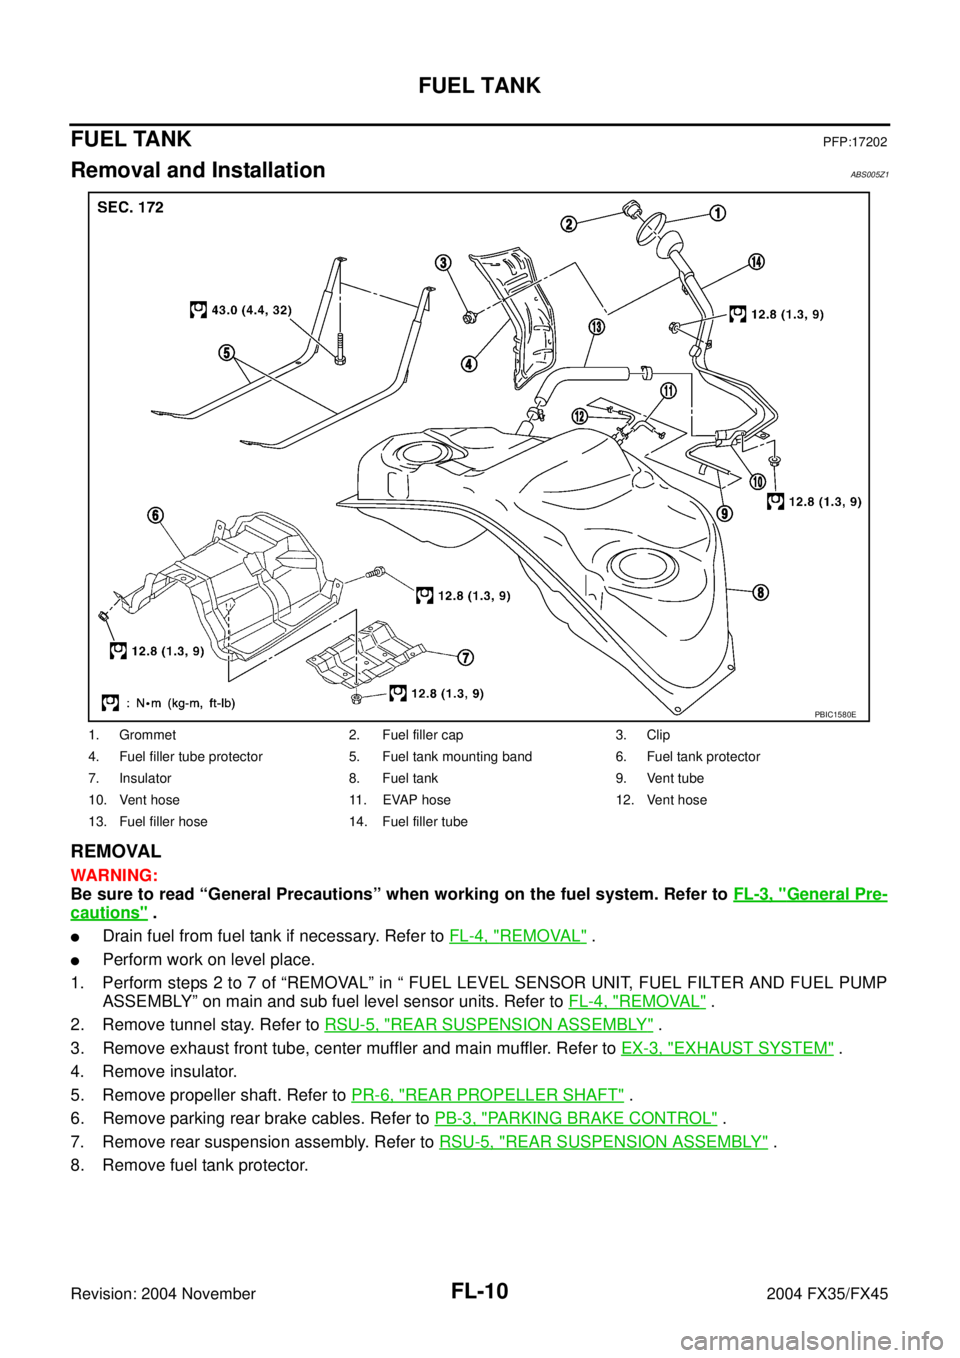
1. Grommet 2. Fuel filler cap 3. Clip
4. Fuel filler tube protector 5. Fuel tank mounting band 6. Fuel tank protector
7. Insulator 8. Fuel tank 9. Vent tube
10. Vent hose 11. EVAP hose 12. Vent hose
13. Fuel filler hose 14. Fuel filler tube
PBIC1580E
Page 3084 of 4449
FUEL TANK
FL-11
C
D
E
F
G
H
I
J
K
L
MA
FL
Revision: 2004 November 2004 FX35/FX45
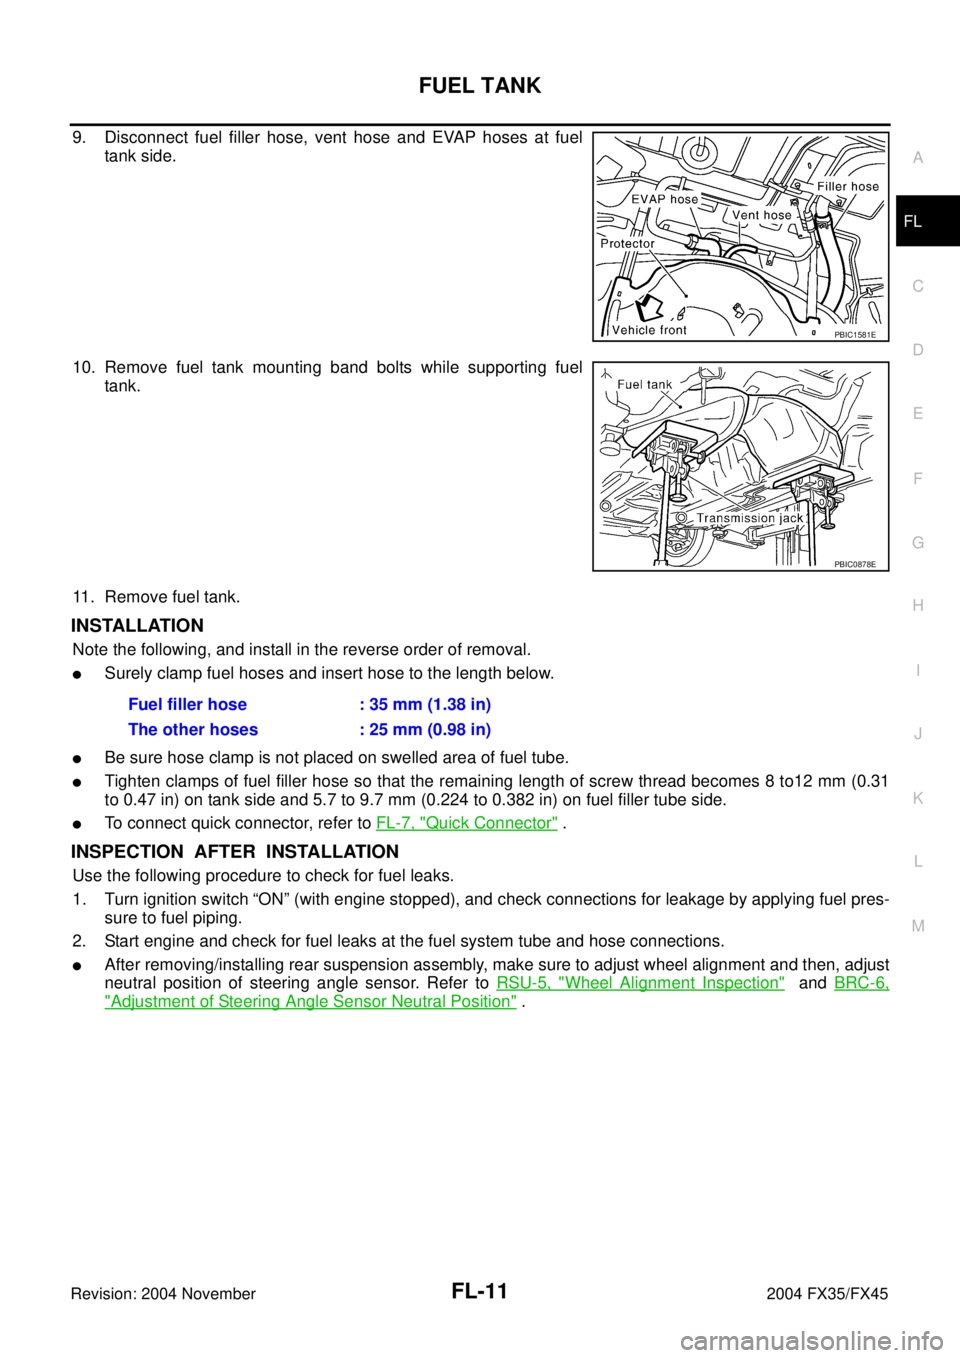
9. Disconnect fuel filler hose, vent hose and EVAP hoses at fuel
tank side.
10. Remove fuel tank mounting band bolts while supporting fuel
tank.
11. Remove fuel tank.
INSTALLATION
Note the following, and install in the reverse order of removal.
�Surely clamp fuel hoses and insert hose to the length below.
�Be sure hose clamp is not placed on swelled area of fuel tube.
�Tighten clamps of fuel filler hose so that the remaining length of screw thread becomes 8 to12 mm (0.31
to 0.47 in) on tank side and 5.7 to 9.7 mm (0.224 to 0.382 in) on fuel filler tube side.
�To connect quick connector, refer to FL-7, "Quick Connector" .
INSPECTION AFTER INSTALLATION
Use the following procedure to check for fuel leaks.
1. Turn ignition switch “ON” (with engine stopped), and check connections for leakage by applying fuel pres-
sure to fuel piping.
2. Start engine and check for fuel leaks at the fuel system tube and hose connections.
�After removing/installing rear suspension assembly, make sure to adjust wheel alignment and then, adjust
neutral position of steering angle sensor. Refer to RSU-5, "
Wheel Alignment Inspection" and BRC-6,
"Adjustment of Steering Angle Sensor Neutral Position" .
PBIC1581E
PBIC0878E
Fuel filler hose : 35 mm (1.38 in)
The other hoses : 25 mm (0.98 in)
Page 3085 of 4449
FL-12
SERVICE DATA AND SPECIFICATIONS (SDS)
Revision: 2004 November 2004 FX35/FX45
SERVICE DATA AND SPECIFICATIONS (SDS)PFP:00030
Standard and LimitABS005Z2
Fuel tank capacity
Approx. 90 (23-3/4 US gal, 19-3/4 Imp gal)
Page 3087 of 4449
FSU-2
PRECAUTIONS
Revision: 2004 November 2004 FX35/FX45
PRECAUTIONSPFP:00001
CautionAES000MZ
�When installing rubber bushings, final tightening must be carried out under unladen conditions with tires
on ground. Oil will shorten the life of rubber bushings. Be sure to wipe off any spilled oil.
�Unladen conditions mean that fuel, engine coolant and lubricant are full. Spare tire, jack, hand tools and
mats are in designated positions.
�After servicing suspension parts, be sure to check wheel alignment.
�Caulking nuts are not reusable. Always use new ones when installing. Since new caulking nuts are pre-
oiled, tighten as they are.
�Avoid burden to front cross bar.
Page 3091 of 4449
FSU-6
FRONT SUSPENSION ASSEMBLY
Revision: 2004 November 2004 FX35/FX45
FRONT SUSPENSION ASSEMBLYPFP:54010
On-Vehicle Inspection and ServiceAES000N3
Make sure the mounting conditions (looseness, back lash) of each component and component statues (wear,
damage) are normal.
INSPECTION OF TRANSVERSE LINK BALL JOINT END PLAY
1. Set front wheels in a straight-ahead position. Do not depress brake pedal.
2. Measure axial end play by installing and moving up/down between transverse link and steering knuckle
with an iron pry bar or something similar.
CAUTION:
Be careful not to damage ball joint boot.
STRUT INSPECTION
Check strut for oil leakage, damage and replace if necessary. Refer to FSU-11, "COIL SPRING AND STRUT" .
Wheel Alignment InspectionAES000N4
DESCRIPTION
Measure wheel alignment under unladen conditions.
NOTE:
Unladen conditions mean that fuel, engine coolant, and lubricant are full. Spare tire, jack, hand tools and mats
are designated positions.
PRELIMINARY CHECK
1. Check tires for improper air pressure and wear.
2. Check road wheels for runout.
3. Check wheel bearing axial end play.
4. Check transverse link ball joint axial end play.
5. Check strut operation.
6. Check each mounting part of axle and suspension for looseness and deformation.
7. Check each link, rod and member for cracks, deformation and other damage.
8. Check vehicle posture.
INSPECTION OF CAMBER, CASTER AND KINGPIN INCLINATION ANGLES
�Camber, caster, kingpin inclination angles cannot be adjusted.
�Before inspection, mount front wheels onto turning radius gauge. Mount rear wheels onto a stand that has
same height so vehicle will remain horizontal.
Using a CCK Gauge
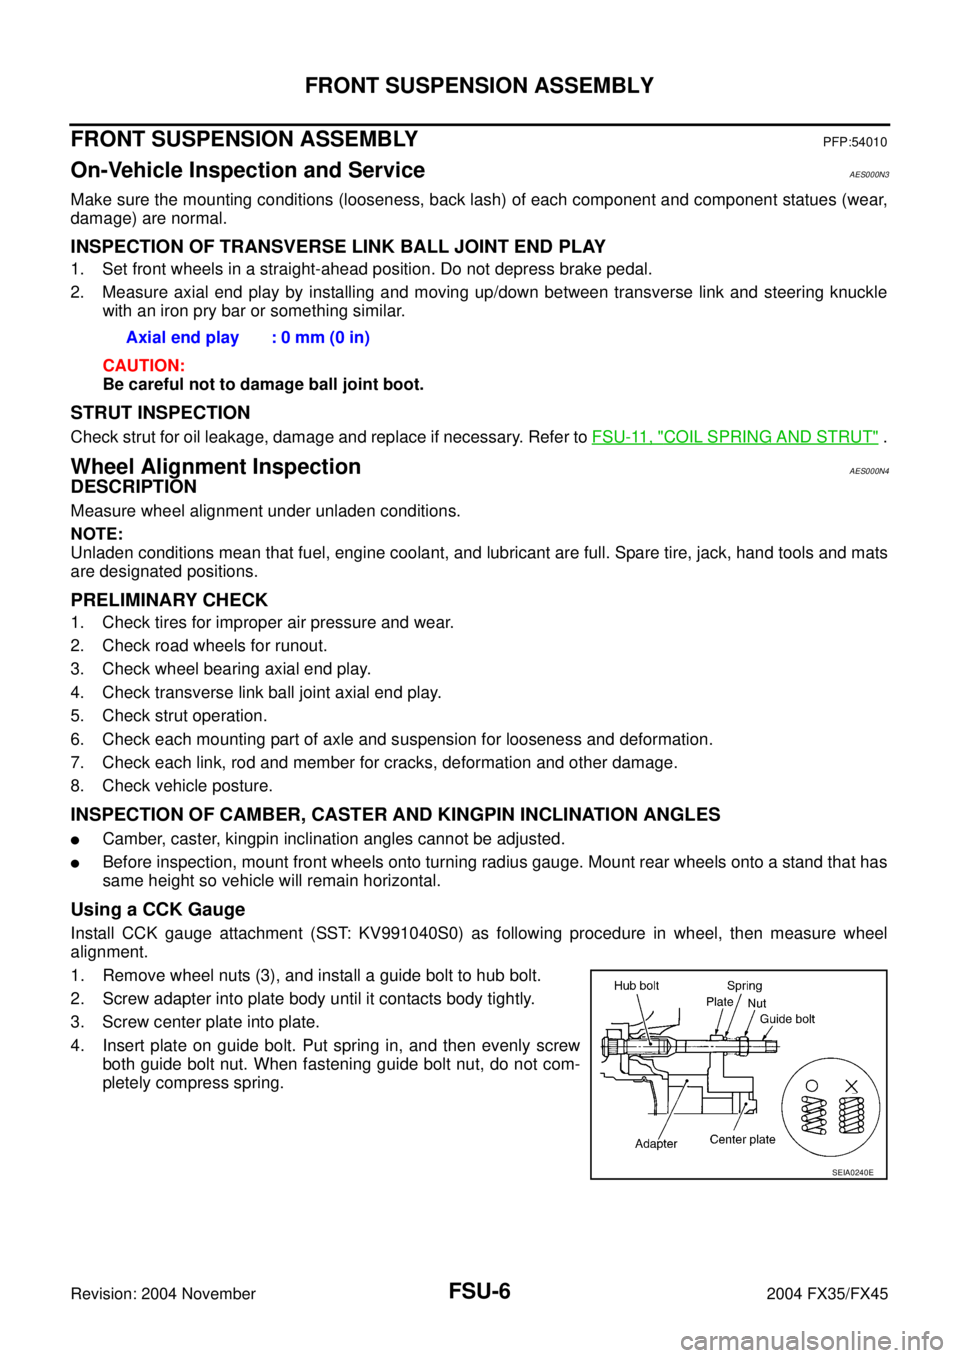
Install CCK gauge attachment (SST: KV991040S0) as following procedure in wheel, then measure wheel
alignment.
1. Remove wheel nuts (3), and install a guide bolt to hub bolt.
2. Screw adapter into plate body until it contacts body tightly.
3. Screw center plate into plate.
4. Insert plate on guide bolt. Put spring in, and then evenly screw
both guide bolt nut. When fastening guide bolt nut, do not com-
pletely compress spring.Axial end play : 0 mm (0 in)
SEIA0240E
Page 3103 of 4449
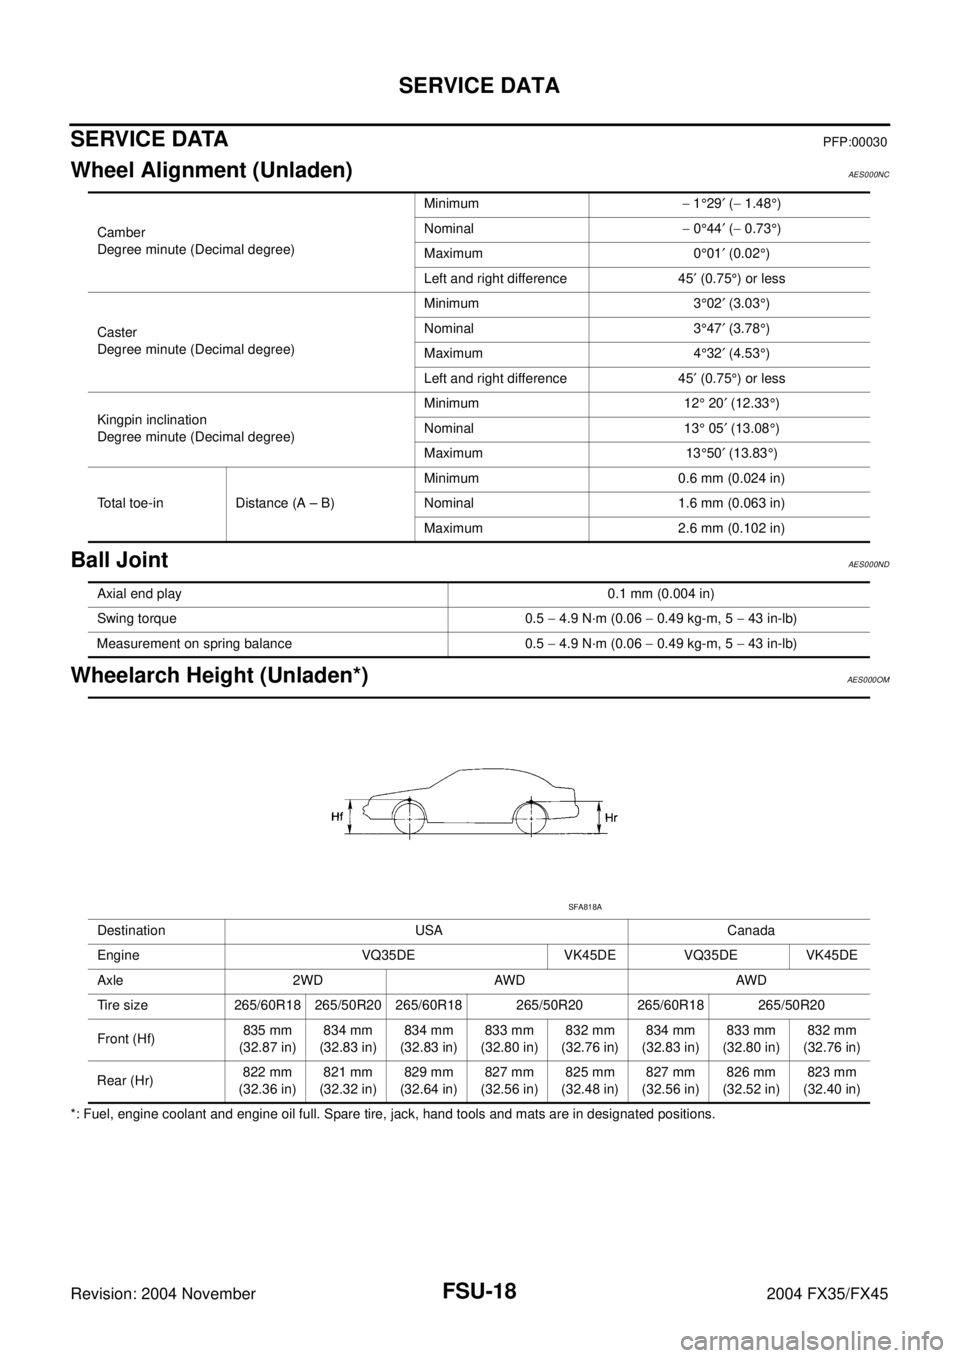
FSU-18
SERVICE DATA
Revision: 2004 November 2004 FX35/FX45
SERVICE DATAPFP:00030
Wheel Alignment (Unladen)AES000NC
Ball JointAES000ND
Wheelarch Height (Unladen*)AES000OM
*: Fuel, engine coolant and engine oil full. Spare tire, jack, hand tools and mats are in designated positions.Camber
Degree minute (Decimal degree)Minimum− 1°29′ (− 1.48°)
Nominal− 0°44′ (− 0.73°)
Maximum 0°01′ (0.02°)
Left and right difference 45′ (0.75°) or less
Caster
Degree minute (Decimal degree)Minimum 3°02′ (3.03°)
Nominal 3°47′ (3.78°)
Maximum 4°32′ (4.53°)
Left and right difference 45′ (0.75°) or less
Kingpin inclination
Degree minute (Decimal degree)Minimum 12° 20′ (12.33°)
Nominal 13° 05′ (13.08°)
Maximum 13°50′ (13.83°)
Total toe-in Distance (A – B)Minimum 0.6 mm (0.024 in)
Nominal 1.6 mm (0.063 in)
Maximum 2.6 mm (0.102 in)
Axial end play 0.1 mm (0.004 in)
Swing torque 0.5 − 4.9 N·m (0.06 − 0.49 kg-m, 5 − 43 in-lb)
Measurement on spring balance 0.5 − 4.9 N·m (0.06 − 0.49 kg-m, 5 − 43 in-lb)
Destination USA Canada
Engine VQ35DE VK45DE VQ35DE VK45DE
Axle 2WD AWD AWD
Tire size 265/60R18 265/50R20 265/60R18 265/50R20 265/60R18 265/50R20
Front (Hf)835 mm
(32.87 in)834 mm
(32.83 in)834 mm
(32.83 in)833 mm
(32.80 in)832 mm
(32.76 in)834 mm
(32.83 in)833 mm
(32.80 in)832 mm
(32.76 in)
Rear (Hr)822 mm
(32.36 in)821 mm
(32.32 in)829 mm
(32.64 in)827 mm
(32.56 in)825 mm
(32.48 in)827 mm
(32.56 in)826 mm
(32.52 in)823 mm
(32.40 in)
SFA818A