Page 2796 of 4449
TIMING CHAIN
EM-71
[VQ35DE]
C
D
E
F
G
H
I
J
K
L
MA
EM
Revision: 2004 November 2004 FX35/FX45
36. Use a scraper to remove all traces of liquid gasket from water
pump cover, chain tensioner cover and intake valve timing con-
trol covers.
INSPECTION AFTER REMOVAL
Timing Chain
Check for cracks and any excessive wear at link plates and roller
links of timing chain. Replace timing chain as necessary.
INSTALLATION
NOTE:
The below figure shows the relationship between the mating mark on each timing chain and that on the corre-
sponding sprocket, with the components installed.
SEM926E
PBIC0282E
KBIA1053E
Page 2797 of 4449
EM-72
[VQ35DE]
TIMING CHAIN
Revision: 2004 November 2004 FX35/FX45
1. Install timing chain tensioners (secondary) to cylinder head as the following if removed. Refer to EM-87,
"INSTALLATION" .
a. Install chain tensioners with stopper pin attached and new O-rings.
b. Install No. 1 camshaft brackets. Refer to EM-87, "
INSTALLATION" .
2. Install new O-rings onto cylinder block.
3. Install new O-rings to cylinder head.
4. Apply liquid gasket to rear timing chain case back side as shown with tube presser [SST: WS39930000 ( –
)].
Use Genuine RTV Silicone Sealant or equivalent. Refer to GI-48, "
RECOMMENDED CHEMICAL
PRODUCTS AND SEALANTS".
CAUTION:
�For “A” in the figure, completely wipe out liquid gasket extended on a portion touching at
engine coolant.
PBIC0788E
SBIA0496E
Page 2807 of 4449
EM-82
[VQ35DE]
CAMSHAFT
Revision: 2004 November 2004 FX35/FX45
CAMSHAFTPFP:13001
Removal and InstallationABS00FPH
1.Intake valve timing control solenoid
valve2. Gasket 3. Camshaft bracket (No. 2 to No. 4)
4. Camshaft (EXH) 5. Camshaft (INT) 6. Camshaft bracket (No. 1)
7. Dowel pin 8. Valve lifter 9. O-ring
10. Chain tensioner 11. Spring 12. Plunger
13. Cylinder head (right bank) 14. Cylinder head (left bank) 15.Camshaft position sensor (PHASE)
(right bank)
16.Camshaft position sensor (PHASE)
(left bank)
SBIA0576E
Page 2808 of 4449
![INFINITI FX35 2004 Service Manual CAMSHAFT
EM-83
[VQ35DE]
C
D
E
F
G
H
I
J
K
L
MA
EM
Revision: 2004 November 2004 FX35/FX45
REMOVAL
1. Remove front timing chain case, camshaft sprocket, timing chain and rear timing chain case. Refer to](/manual-img/42/57021/w960_57021-2807.png "INFINITI FX35 2004 Service Manual CAMSHAFT
EM-83
[VQ35DE]
C
D
E
F
G
H
I
J
K
L
MA
EM
Revision: 2004 November 2004 FX35/FX45
REMOVAL
1. Remove front timing chain case, camshaft sprocket, timing chain and rear timing chain case. Refer to")
CAMSHAFT
EM-83
[VQ35DE]
C
D
E
F
G
H
I
J
K
L
MA
EM
Revision: 2004 November 2004 FX35/FX45
REMOVAL
1. Remove front timing chain case, camshaft sprocket, timing chain and rear timing chain case. Refer to EM-
63, "TIMING CHAIN" .
2. If necessary, remove camshaft position sensor (PHASE) (right
and left banks) from cylinder head back side.
CAUTION:
�Handle carefully to avoid dropping and shocks.
�Do not disassemble.
�Do not allow metal powder to adhere to magnetic part at
sensor tip.
�Do not place sensors in a location where they are
exposed to magnetism.
3. Remove intake valve timing control solenoid valve from No.1
camshaft bracket.
4. Remove intake and exhaust camshaft brackets.
�Mark camshafts, camshaft brackets, and bolts so they are
placed in the same position and direction for installation.
�Equally loosen camshaft bracket bolts in several steps in the
reverse order as shown in the figure.
5. Remove camshaft.
6. Remove valve lifter.
�Identify installation positions, and store them without mixing them up.
KBIA1046E
SEM443GA
PBIC2050E
Page 2809 of 4449
![INFINITI FX35 2004 Service Manual EM-84
[VQ35DE]
CAMSHAFT
Revision: 2004 November 2004 FX35/FX45
7. Remove secondary timing chain tensioner from cylinder head.
�Remove chain tensioner with its stopper pin attached.
NOTE:
Stopper pin w](/manual-img/42/57021/w960_57021-2808.png "INFINITI FX35 2004 Service Manual EM-84
[VQ35DE]
CAMSHAFT
Revision: 2004 November 2004 FX35/FX45
7. Remove secondary timing chain tensioner from cylinder head.
�Remove chain tensioner with its stopper pin attached.
NOTE:
Stopper pin w")
EM-84
[VQ35DE]
CAMSHAFT
Revision: 2004 November 2004 FX35/FX45
7. Remove secondary timing chain tensioner from cylinder head.
�Remove chain tensioner with its stopper pin attached.
NOTE:
Stopper pin was attached when secondary timing chain was
removed.
INSPECTION AFTER REMOVAL
Camshaft Runout
1. Put V block on precise flat bed, and support No. 2 and No. 4
journal of camshaft.
CAUTION:
Do not support journal No. 1 (on the side of camshaft
sprocket) because it has a different diameter from the other
three locations.
2. Set dial gauge vertically to No. 3 journal.
3. Turn camshaft to one direction with hands, and measure cam-
shaft runout on dial gauge. (Total indicator reading)
4. If it exceeds the standard, replace camshaft.
Camshaft Cam Height
1. Measure camshaft cam height.
2. If wear is beyond the limit, replace camshaft.
Camshaft Journal Oil Clearance
Outer Diameter of Camshaft Journal
Measure outer diameter of camshaft journal.
Inner Diameter of Camshaft Bracket
�Tighten camshaft bracket bolt with specified torque. Refer to EM-87, "INSTALLATION" .
SBIA0499E
Standard : Less than 0.05 mm (0.0020 in)PBIC0929E
Standard cam height (intake and exhaust)
: 44.865 - 45.055 mm (1.7663 - 1.7738 in)
Cam wear limit
: 0.2 mm (0.008 in)
EMQ0072D
Standard outer diameter:
No. 1: 25.935 - 25.955 mm (1.0211 - 1.0218 in)
No. 2, 3, 4: 23.445 - 23.465 mm (0.9230 - 0.9238 in)
PBIC0040E
Page 2810 of 4449
![INFINITI FX35 2004 Service Manual CAMSHAFT
EM-85
[VQ35DE]
C
D
E
F
G
H
I
J
K
L
MA
EM
Revision: 2004 November 2004 FX35/FX45
�Using inside micrometer, measure inner diameter “A” of cam-
shaft bracket.
Calculation of Camshaft Journal](/manual-img/42/57021/w960_57021-2809.png "INFINITI FX35 2004 Service Manual CAMSHAFT
EM-85
[VQ35DE]
C
D
E
F
G
H
I
J
K
L
MA
EM
Revision: 2004 November 2004 FX35/FX45
�Using inside micrometer, measure inner diameter “A” of cam-
shaft bracket.
Calculation of Camshaft Journal")
CAMSHAFT
EM-85
[VQ35DE]
C
D
E
F
G
H
I
J
K
L
MA
EM
Revision: 2004 November 2004 FX35/FX45
�Using inside micrometer, measure inner diameter “A” of cam-
shaft bracket.
Calculation of Camshaft Journal Oil Clearance
(Journal oil clearance) = (inner diameter of camshaft bracket) – (outer diameter of camshaft journal).
If it exceeds the limit, replace either or both camshaft and cylinder head.
NOTE:
Camshaft brackets cannot be replaced as a single part, because it is machined together with cylinder head.
Replace whole cylinder head assembly.
Camshaft End Play
�Install dial indicator in thrust direction on front end of camshaft.
Measure end play of dial indicator when camshaft is moved for-
ward/backward (in direction to axis).
�Measure the following parts if out of the limit.
–Dimension “A” for camshaft No. 1 journal
–Dimension “B” for cylinder head No. 1 journal
�Refer to the standards above, and then replace camshaft and/or
cylinder head.
Camshaft Sprocket Runout
1. Put V-block on precise flat table, and support No. 2 and No. 4 journal of camshaft.
CAUTION:
Do not support journal No. 1 (on the side of camshaft sprocket) because it has a different diameter
from the other three locations.Standard inner diameter:
No. 1 : 26.000 - 26.021 mm (1.0236 - 1.0244 in)
No. 2, 3, 4 : 23.500 - 23.521 mm (0.9252 - 0.9260 in)
PBIC1645E
Standard:
No. 1 : 0.045 - 0.086 mm (0.0018 - 0.0034 in)
No. 2, 3, 4 : 0.035 - 0.076 mm (0.0014 - 0.0030 in)
Limit : 0.15 mm (0.0059 in)
Standard : 0.115 - 0.188 mm (0.0045 - 0.0074 in)
Limit : 0.24 mm (0.0094 in)
SEM864E
Standard : 27.500 - 27.548 mm (1.0827 - 1.0846 in)
Standard : 27.360 - 27.385 mm (1.0772 - 1.0781 in)
KBIA2404J
Page 2811 of 4449
![INFINITI FX35 2004 Service Manual EM-86
[VQ35DE]
CAMSHAFT
Revision: 2004 November 2004 FX35/FX45
2. Measure camshaft sprocket runout with dial indicator. (Total indi-
cator reading)
�If it exceeds the limit, replace camshaft sprocket.](/manual-img/42/57021/w960_57021-2810.png "INFINITI FX35 2004 Service Manual EM-86
[VQ35DE]
CAMSHAFT
Revision: 2004 November 2004 FX35/FX45
2. Measure camshaft sprocket runout with dial indicator. (Total indi-
cator reading)
�If it exceeds the limit, replace camshaft sprocket.")
EM-86
[VQ35DE]
CAMSHAFT
Revision: 2004 November 2004 FX35/FX45
2. Measure camshaft sprocket runout with dial indicator. (Total indi-
cator reading)
�If it exceeds the limit, replace camshaft sprocket.
Valve Lifter
Check if surface of valve lifter has any wear or cracks.
�If anything above is found, replace valve lifter.
Valve Lifter Clearance
Outer Diameter of Valve Lifter
Measure outer diameter at 1/2 height of valve lifter with micrometer
since valve lifter is in barrel shape.
Valve Lifter Hole Diameter
Using inside micrometer, measure diameter of valve lifter hole of cyl-
inder head.
Calculation of Valve Lifter Clearance
(Valve lifter clearance) = (hole diameter of valve lifter) – (outer diameter of valve lifter).
If it exceeds the standard, referring to each standard of valve lifter outer diameter and valve lifter hole diame-
ter, replace either or both valve lifter and cylinder head.Limit : 0.15 mm (0.0059 in)
PBIC0930E
KBIA0182E
Valve lifter outer diameter (Intake and exhaust)
: 33.977 - 33.987 mm (1.3377 - 1.3381 in)
JEM798G
Standard (Intake and exhaust)
: 34.000 - 34.016 mm (1.3386 - 1.3392 in)
SEM867E
Standard (Intake and exhaust)
: 0.013 - 0.039 mm (0.0005 - 0.0015 in)
Page 2813 of 4449
EM-88
[VQ35DE]
CAMSHAFT
Revision: 2004 November 2004 FX35/FX45
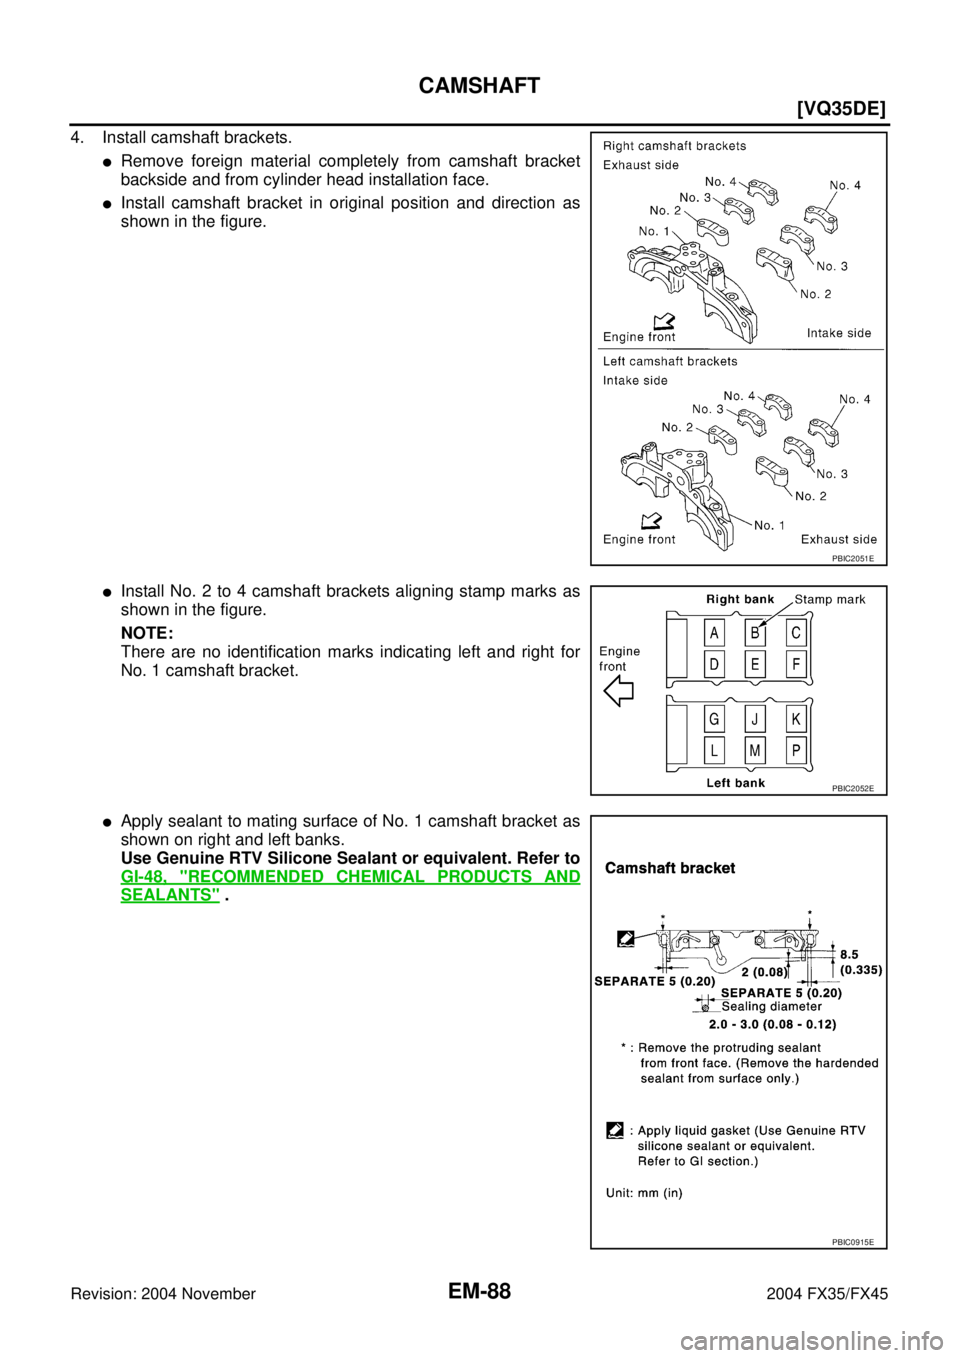
4. Install camshaft brackets.
�Remove foreign material completely from camshaft bracket
backside and from cylinder head installation face.
�Install camshaft bracket in original position and direction as
shown in the figure.
�Install No. 2 to 4 camshaft brackets aligning stamp marks as
shown in the figure.
NOTE:
There are no identification marks indicating left and right for
No. 1 camshaft bracket.
�Apply sealant to mating surface of No. 1 camshaft bracket as
shown on right and left banks.
Use Genuine RTV Silicone Sealant or equivalent. Refer to
GI-48, "
RECOMMENDED CHEMICAL PRODUCTS AND
SEALANTS" .
PBIC2051E
PBIC2052E
PBIC0915E
![INFINITI FX35 2004 Service Manual TIMING CHAIN
EM-71
[VQ35DE]
C
D
E
F
G
H
I
J
K
L
MA
EM
Revision: 2004 November 2004 FX35/FX45
36. Use a scraper to remove all traces of liquid gasket from water
pump cover, chain tensioner cover and in](/manual-img/42/57021/w960_57021-2795.png "INFINITI FX35 2004 Service Manual TIMING CHAIN
EM-71
[VQ35DE]
C
D
E
F
G
H
I
J
K
L
MA
EM
Revision: 2004 November 2004 FX35/FX45
36. Use a scraper to remove all traces of liquid gasket from water
pump cover, chain tensioner cover and in")
![INFINITI FX35 2004 Service Manual EM-72
[VQ35DE]
TIMING CHAIN
Revision: 2004 November 2004 FX35/FX45
1. Install timing chain tensioners (secondary) to cylinder head as the following if removed. Refer to EM-87,
"INSTALLATION" .
a. Inst](/manual-img/42/57021/w960_57021-2796.png "INFINITI FX35 2004 Service Manual EM-72
[VQ35DE]
TIMING CHAIN
Revision: 2004 November 2004 FX35/FX45
1. Install timing chain tensioners (secondary) to cylinder head as the following if removed. Refer to EM-87,
\"INSTALLATION\" .
a. Inst")
![INFINITI FX35 2004 Service Manual EM-82
[VQ35DE]
CAMSHAFT
Revision: 2004 November 2004 FX35/FX45
CAMSHAFTPFP:13001
Removal and InstallationABS00FPH
1.Intake valve timing control solenoid
valve2. Gasket 3. Camshaft bracket (No. 2 to N](/manual-img/42/57021/w960_57021-2806.png "INFINITI FX35 2004 Service Manual EM-82
[VQ35DE]
CAMSHAFT
Revision: 2004 November 2004 FX35/FX45
CAMSHAFTPFP:13001
Removal and InstallationABS00FPH
1.Intake valve timing control solenoid
valve2. Gasket 3. Camshaft bracket (No. 2 to N")