Page 4212 of 4449
AUTOMATIC DRIVE POSITIONER
SE-83
C
D
E
F
G
H
J
K
L
MA
B
SE
Revision: 2004 November 2004 FX35/FX45
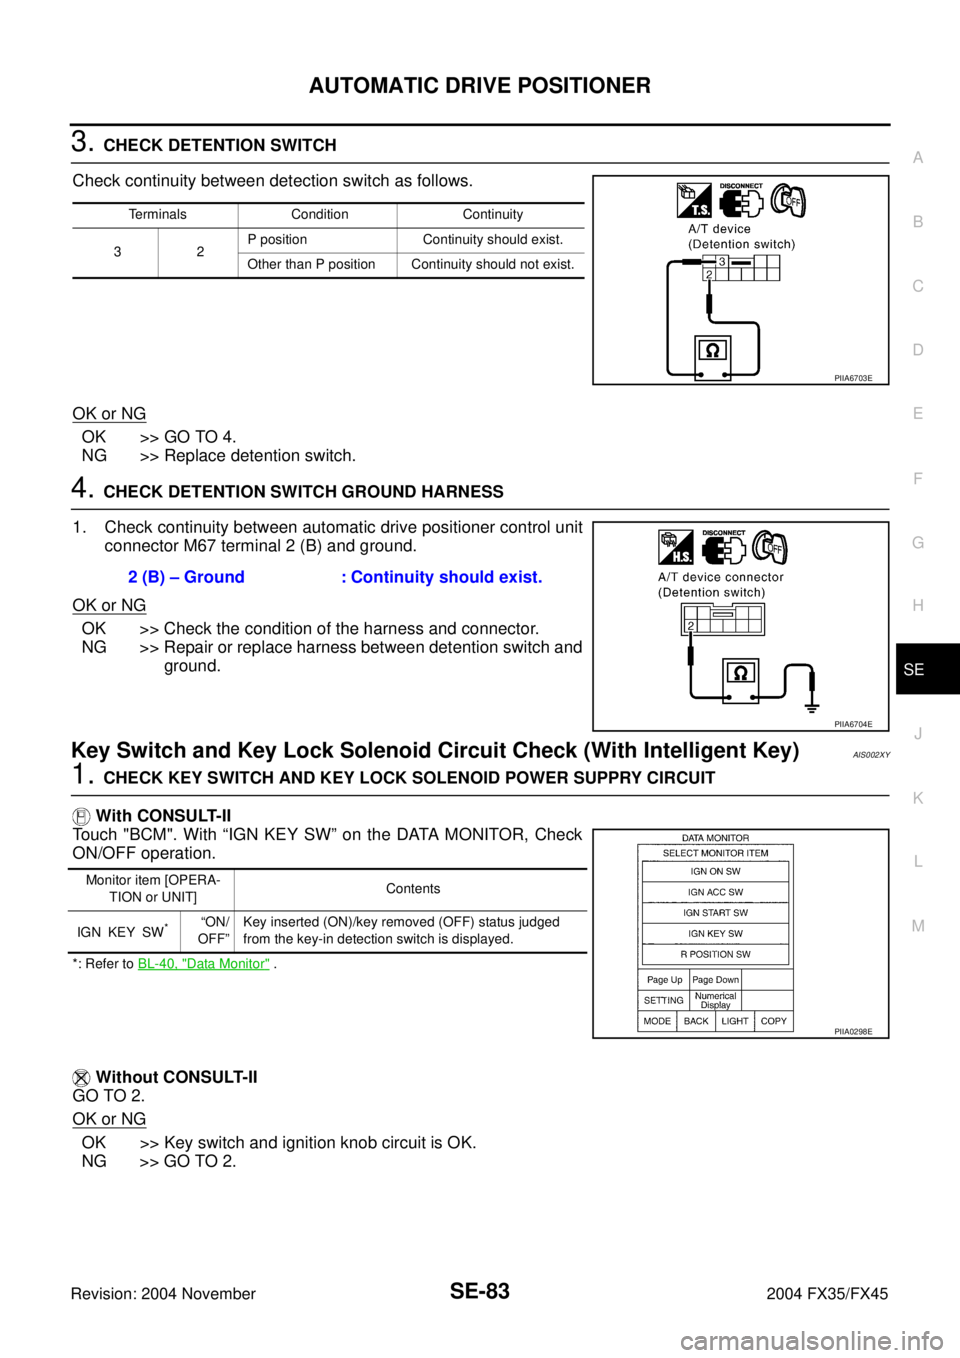
3. CHECK DETENTION SWITCH
Check continuity between detection switch as follows.
OK or NG
OK >> GO TO 4.
NG >> Replace detention switch.
4. CHECK DETENTION SWITCH GROUND HARNESS
1. Check continuity between automatic drive positioner control unit
connector M67 terminal 2 (B) and ground.
OK or NG
OK >> Check the condition of the harness and connector.
NG >> Repair or replace harness between detention switch and
ground.
Key Switch and Key Lock Solenoid Circuit Check (With Intelligent Key)AIS002XY
1. CHECK KEY SWITCH AND KEY LOCK SOLENOID POWER SUPPRY CIRCUIT
With CONSULT-II
Touch "BCM". With “IGN KEY SW” on the DATA MONITOR, Check
ON/OFF operation.
*: Refer to BL-40, "Data Monitor" .
Without CONSULT-II
GO TO 2.
OK or NG
OK >> Key switch and ignition knob circuit is OK.
NG >> GO TO 2.
Terminals Condition Continuity
32P position Continuity should exist.
Other than P position Continuity should not exist.
PIIA6703E
2 (B) – Ground : Continuity should exist.
PIIA6704E
Monitor item [OPERA-
TION or UNIT]Contents
IGN KEY SW
*“ON/
OFF”Key inserted (ON)/key removed (OFF) status judged
from the key-in detection switch is displayed.
PIIA0298E
Page 4216 of 4449
AUTOMATIC DRIVE POSITIONER
SE-87
C
D
E
F
G
H
J
K
L
MA
B
SE
Revision: 2004 November 2004 FX35/FX45
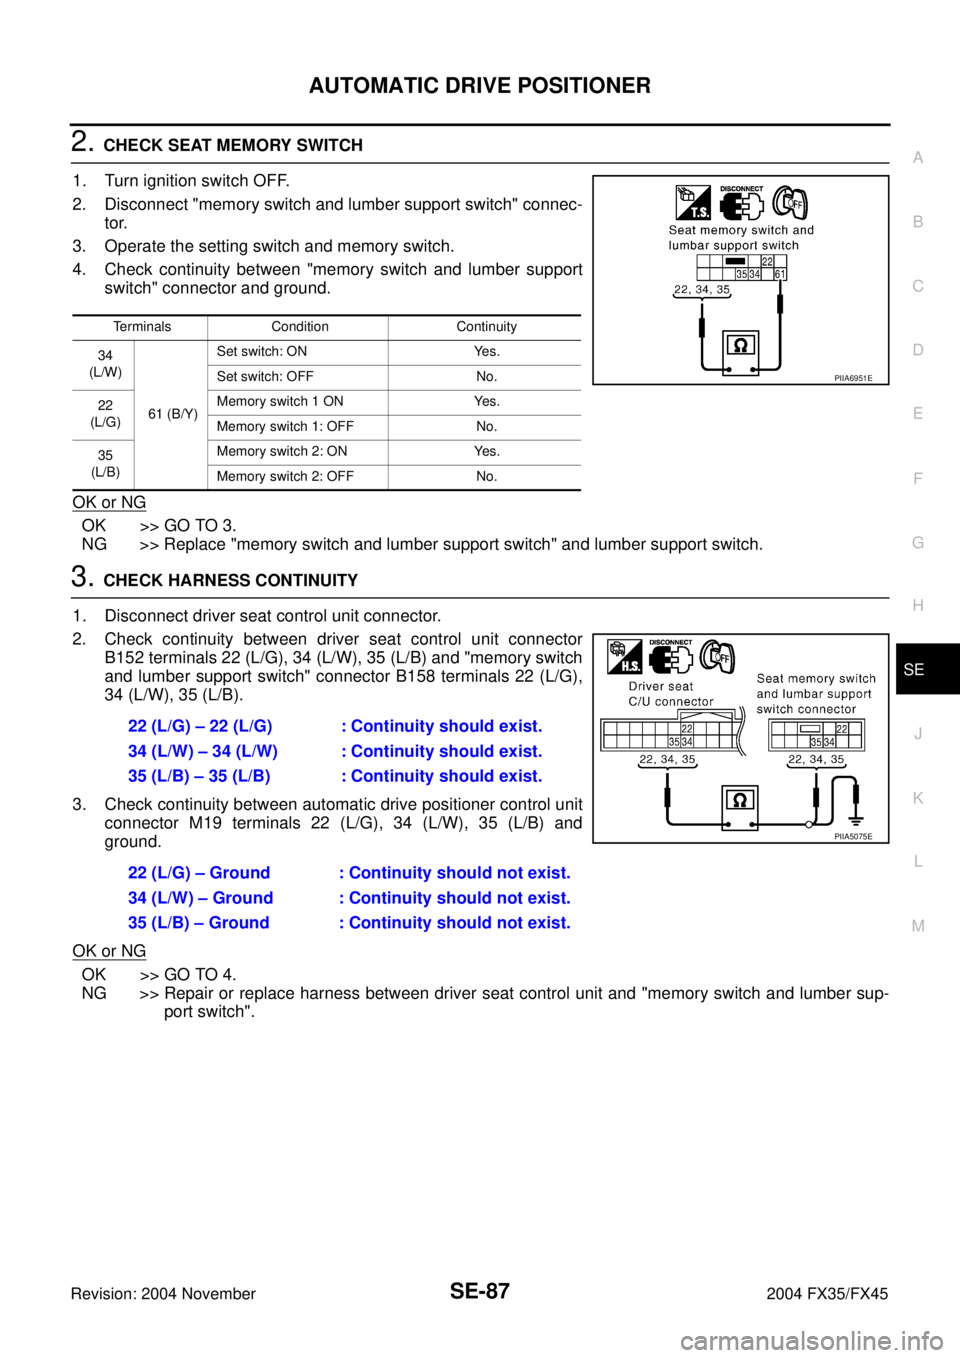
2. CHECK SEAT MEMORY SWITCH
1. Turn ignition switch OFF.
2. Disconnect "memory switch and lumber support switch" connec-
tor.
3. Operate the setting switch and memory switch.
4. Check continuity between "memory switch and lumber support
switch" connector and ground.
OK or NG
OK >> GO TO 3.
NG >> Replace "memory switch and lumber support switch" and lumber support switch.
3. CHECK HARNESS CONTINUITY
1. Disconnect driver seat control unit connector.
2. Check continuity between driver seat control unit connector
B152 terminals 22 (L/G), 34 (L/W), 35 (L/B) and "memory switch
and lumber support switch" connector B158 terminals 22 (L/G),
34 (L/W), 35 (L/B).
3. Check continuity between automatic drive positioner control unit
connector M19 terminals 22 (L/G), 34 (L/W), 35 (L/B) and
ground.
OK or NG
OK >> GO TO 4.
NG >> Repair or replace harness between driver seat control unit and "memory switch and lumber sup-
port switch".
Terminals Condition Continuity
34
(L/W)
61 (B/Y)Set switch: ON Yes.
Set switch: OFF No.
22
(L/G)Memory switch 1 ON Yes.
Memory switch 1: OFF No.
35
(L/B)Memory switch 2: ON Yes.
Memory switch 2: OFF No.
PIIA6951E
22 (L/G) – 22 (L/G) : Continuity should exist.
34 (L/W) – 34 (L/W) : Continuity should exist.
35 (L/B) – 35 (L/B) : Continuity should exist.
22 (L/G) – Ground : Continuity should not exist.
34 (L/W) – Ground : Continuity should not exist.
35 (L/B) – Ground : Continuity should not exist.
PIIA5075E
Page 4217 of 4449
SE-88
AUTOMATIC DRIVE POSITIONER
Revision: 2004 November 2004 FX35/FX45
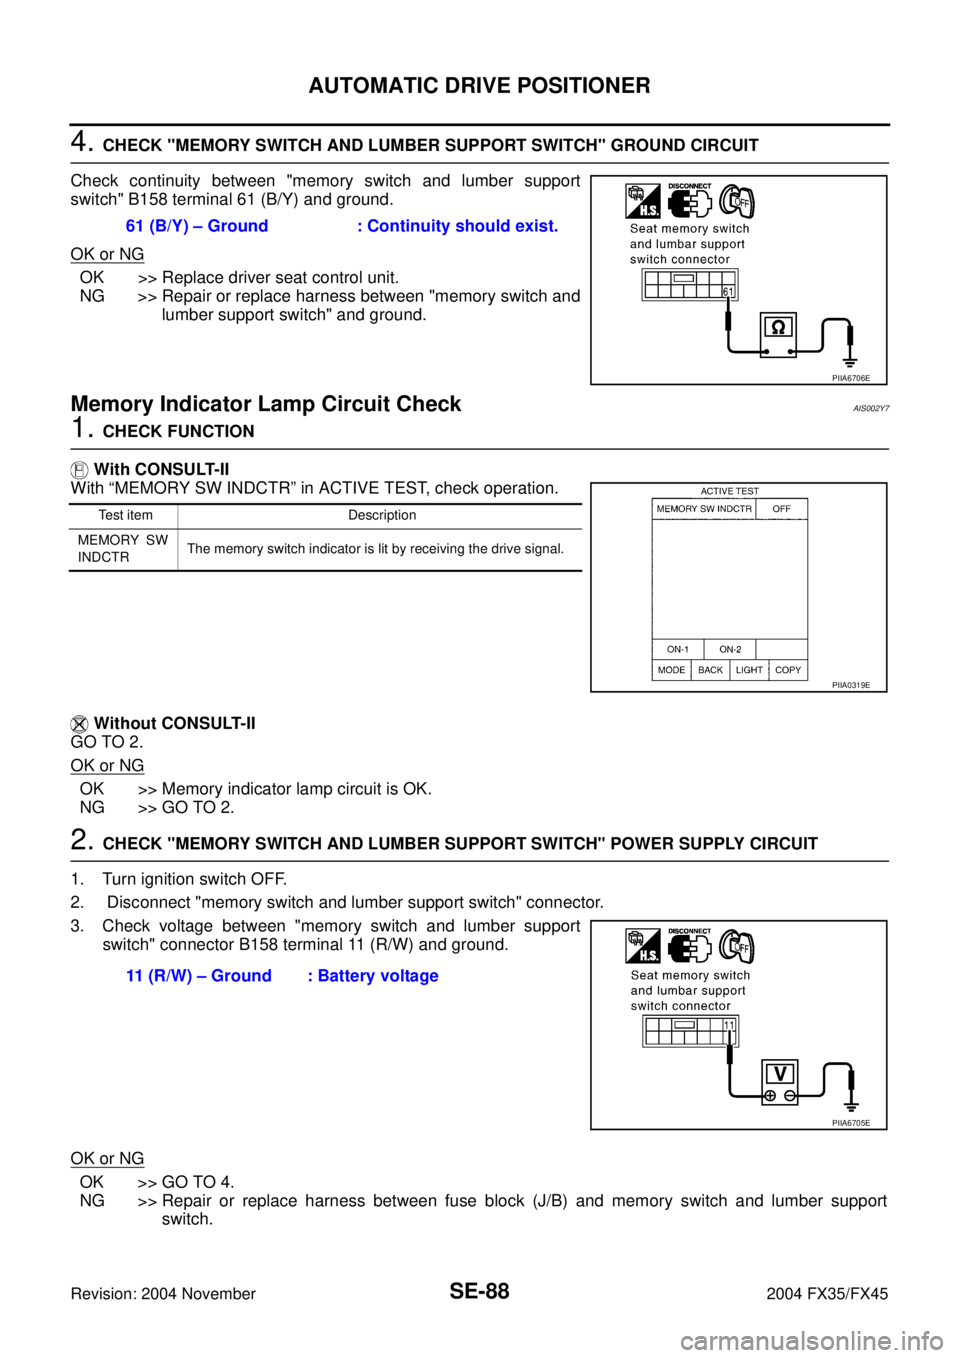
4. CHECK "MEMORY SWITCH AND LUMBER SUPPORT SWITCH" GROUND CIRCUIT
Check continuity between "memory switch and lumber support
switch" B158 terminal 61 (B/Y) and ground.
OK or NG
OK >> Replace driver seat control unit.
NG >> Repair or replace harness between "memory switch and
lumber support switch" and ground.
Memory Indicator Lamp Circuit CheckAIS002Y7
1. CHECK FUNCTION
With CONSULT-II
With “MEMORY SW INDCTR” in ACTIVE TEST, check operation.
Without CONSULT-II
GO TO 2.
OK or NG
OK >> Memory indicator lamp circuit is OK.
NG >> GO TO 2.
2. CHECK "MEMORY SWITCH AND LUMBER SUPPORT SWITCH" POWER SUPPLY CIRCUIT
1. Turn ignition switch OFF.
2. Disconnect "memory switch and lumber support switch" connector.
3. Check voltage between "memory switch and lumber support
switch" connector B158 terminal 11 (R/W) and ground.
OK or NG
OK >> GO TO 4.
NG >> Repair or replace harness between fuse block (J/B) and memory switch and lumber support
switch. 61 (B/Y) – Ground : Continuity should exist.
PIIA6706E
Test item Description
MEMORY SW
INDCTRThe memory switch indicator is lit by receiving the drive signal.
PIIA0319E
11 (R/W) – Ground : Battery voltage
PIIA6705E
Page 4218 of 4449
AUTOMATIC DRIVE POSITIONER
SE-89
C
D
E
F
G
H
J
K
L
MA
B
SE
Revision: 2004 November 2004 FX35/FX45
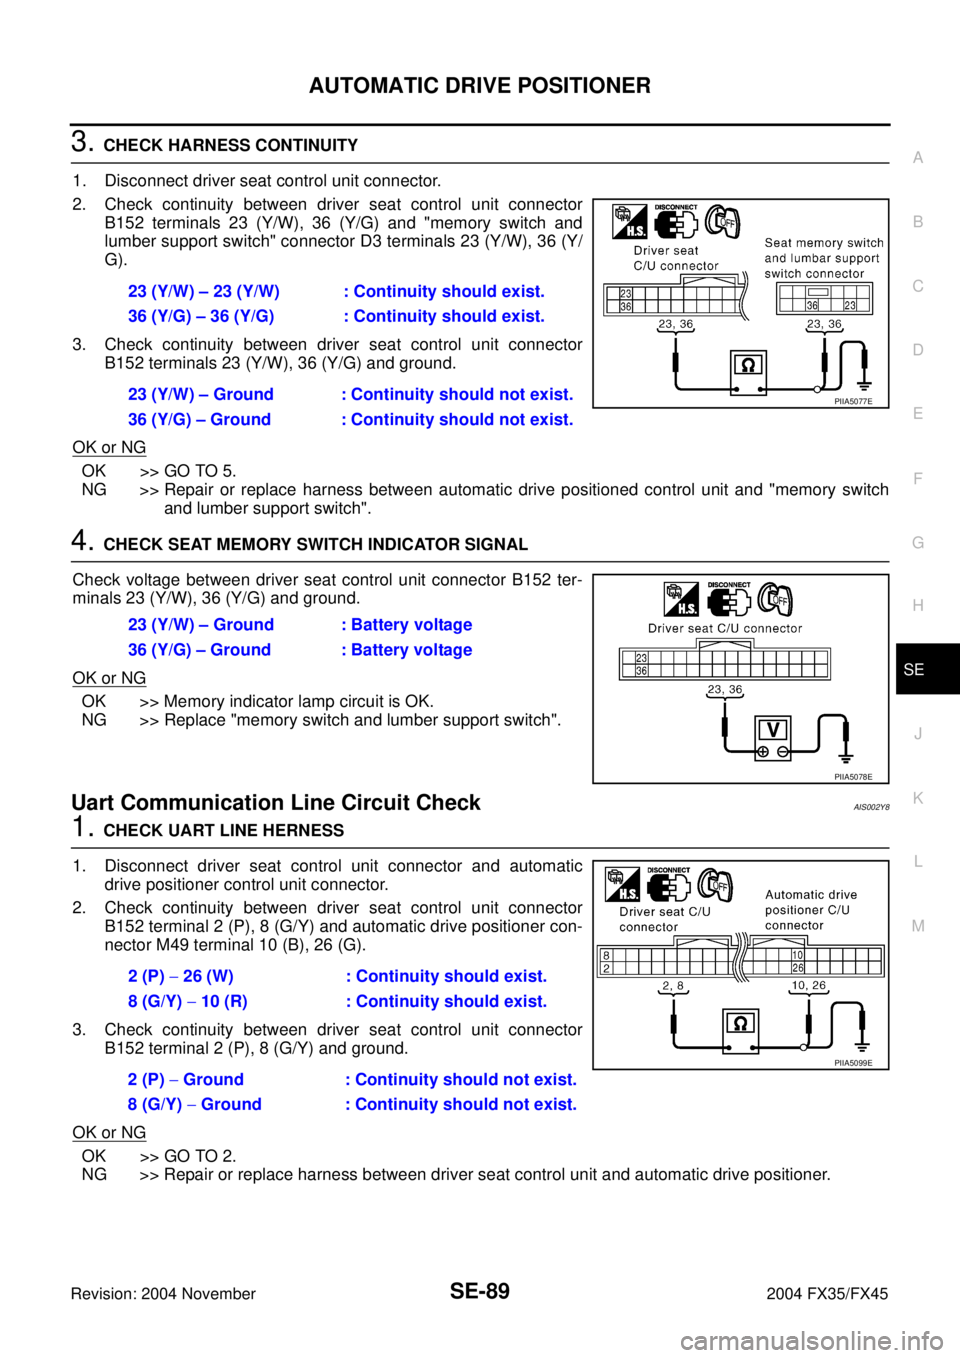
3. CHECK HARNESS CONTINUITY
1. Disconnect driver seat control unit connector.
2. Check continuity between driver seat control unit connector
B152 terminals 23 (Y/W), 36 (Y/G) and "memory switch and
lumber support switch" connector D3 terminals 23 (Y/W), 36 (Y/
G).
3. Check continuity between driver seat control unit connector
B152 terminals 23 (Y/W), 36 (Y/G) and ground.
OK or NG
OK >> GO TO 5.
NG >> Repair or replace harness between automatic drive positioned control unit and "memory switch
and lumber support switch".
4. CHECK SEAT MEMORY SWITCH INDICATOR SIGNAL
Check voltage between driver seat control unit connector B152 ter-
minals 23 (Y/W), 36 (Y/G) and ground.
OK or NG
OK >> Memory indicator lamp circuit is OK.
NG >> Replace "memory switch and lumber support switch".
Uart Communication Line Circuit CheckAIS002Y8
1. CHECK UART LINE HERNESS
1. Disconnect driver seat control unit connector and automatic
drive positioner control unit connector.
2. Check continuity between driver seat control unit connector
B152 terminal 2 (P), 8 (G/Y) and automatic drive positioner con-
nector M49 terminal 10 (B), 26 (G).
3. Check continuity between driver seat control unit connector
B152 terminal 2 (P), 8 (G/Y) and ground.
OK or NG
OK >> GO TO 2.
NG >> Repair or replace harness between driver seat control unit and automatic drive positioner.23 (Y/W) – 23 (Y/W) : Continuity should exist.
36 (Y/G) – 36 (Y/G) : Continuity should exist.
23 (Y/W) – Ground : Continuity should not exist.
36 (Y/G) – Ground : Continuity should not exist.
PIIA5077E
23 (Y/W) – Ground : Battery voltage
36 (Y/G) – Ground : Battery voltage
PIIA5078E
2 (P) − 26 (W) : Continuity should exist.
8 (G/Y) − 10 (R) : Continuity should exist.
2 (P) − Ground : Continuity should not exist.
8 (G/Y) − Ground : Continuity should not exist.
PIIA5099E
Page 4219 of 4449
SE-90
AUTOMATIC DRIVE POSITIONER
Revision: 2004 November 2004 FX35/FX45
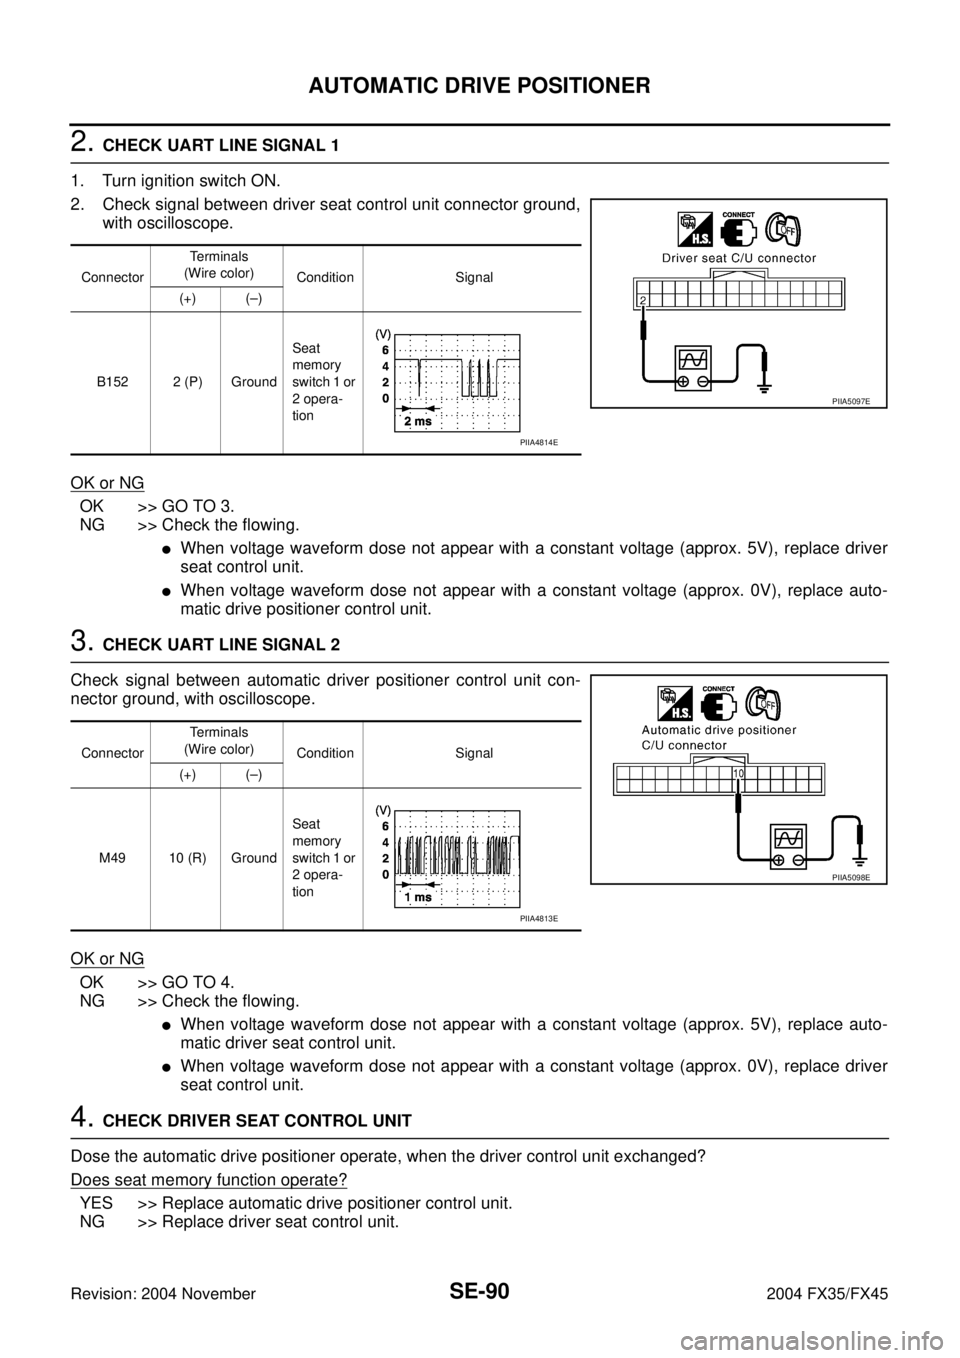
2. CHECK UART LINE SIGNAL 1
1. Turn ignition switch ON.
2. Check signal between driver seat control unit connector ground,
with oscilloscope.
OK or NG
OK >> GO TO 3.
NG >> Check the flowing.
�When voltage waveform dose not appear with a constant voltage (approx. 5V), replace driver
seat control unit.
�When voltage waveform dose not appear with a constant voltage (approx. 0V), replace auto-
matic drive positioner control unit.
3. CHECK UART LINE SIGNAL 2
Check signal between automatic driver positioner control unit con-
nector ground, with oscilloscope.
OK or NG
OK >> GO TO 4.
NG >> Check the flowing.
�When voltage waveform dose not appear with a constant voltage (approx. 5V), replace auto-
matic driver seat control unit.
�When voltage waveform dose not appear with a constant voltage (approx. 0V), replace driver
seat control unit.
4. CHECK DRIVER SEAT CONTROL UNIT
Dose the automatic drive positioner operate, when the driver control unit exchanged?
Does seat memory function operate?
YES >> Replace automatic drive positioner control unit.
NG >> Replace driver seat control unit.
ConnectorTe r m i n a l s
(Wire color)
Condition Signal
(+) (–)
B152 2 (P) GroundSeat
memory
switch 1 or
2 opera-
tion
PIIA5097E
PIIA4814E
ConnectorTe r m i n a l s
(Wire color)
Condition Signal
(+) (–)
M49 10 (R) GroundSeat
memory
switch 1 or
2 opera-
tion
PIIA5098E
PIIA4813E
Page 4238 of 4449
REAR SEAT
SE-109
C
D
E
F
G
H
J
K
L
MA
B
SE
Revision: 2004 November 2004 FX35/FX45
REMOVAL
1. Pull the lock at the front bottom of the seat cushion forward (1
for each side), and pull the seat cushion upward to release the
wire from the plastic hook, then pull the seat cushion forward to
remove.
2. Remove the seatback mounting nuts.
3. Remove the seatback mounting bolt and nut.
Remove the remote control wire.
INSTALLATION
Install in the reverse order of removal.
NOTE:
After rear wheel house finisher assembly is remove the seatback is installed. Refer to EI-44, "
Removal and
Installation" .
REMOVAL OF SEAT CUSHION TRIM AND PAD
1. Remove the cup holder in the back of the seat cushion.
2. Removal the hog rings to separate the trim and pad.
PIIA6034E
PIIA6035E
PIIA6036E
PIIA4985E
Page 4240 of 4449
REAR SEAT
SE-111
C
D
E
F
G
H
J
K
L
MA
B
SE
Revision: 2004 November 2004 FX35/FX45
REMOVAL OF REMOTE CONTROL LEVER
1. Remove the rear seat. Refer to SE-109, "REMOVAL" .
2. Remove the luggage side finisher assembly. Refer to EI-44, "
Removal and Installation" .
3. Remove the remote control lever cover.
4. Remove the remote control lever mounting bolt.
5. Remove the remote control lever assembly.
INSTALLATION OF REMOTE CONTROL LEVER
Install in the reverse order of removal.
PIIB1434E
1. Remote control wire 2. Bolt 3. Remote control lever
Page 4260 of 4449
TROUBLE DIAGNOSIS
SRS-19
C
D
E
F
G
I
J
K
L
MA
B
SRS
Revision: 2004 November 2004 FX35/FX45
Trouble Diagnosis with CONSULT-IIAHS000HS
DIAGNOSTIC PROCEDURE 2
CAUTION:
If CONSULT-II is used with no connection of CONSULT-II CONVERTER, malfunctions might be
detected in self-diagnosis depending on control unit which carry out CAN communication.
1. Turn ignition switch OFF.
2. Connect CONSULT-II and CONSULT-II CONVERTER to data
link connector.
3. Turn ignition switch ON.
4. Touch “START (NISSAN BASED VHCL)”.
5. Touch “AIR BAG”.
If “AIR BAG” is not indicated, refer to GI-40, "
CONSULT-II Data
Link Connector (DLC) Circuit" .
6. Touch “SELF-DIAG [CURRENT]”.
PBIB1503E
PHIA0157E
SRS771
SRS697