Page 79 of 256

�´
�Ü
�Õ
CONT INUED
If it takes several pushes on the
button to lock or unlock the doors
and the tailgate, replace the battery
as soon as possible.
Battery type: CR2025 To replace the battery, remove the
round cover on the back of the
transmitter by turning it
counterclockwise with a coin. Insert
a new battery with the side facing
up. Align the mark on the
cover with the mark on the
transmitter. Set the cover in place
andturnitclockwise.
Avoid dropping or throwing the
transmitter.
Protect the transmitter from
extreme temperatures.
Do not immerse the transmitter in
any liquid.
If you lose a transmitter, the
replacement needs to be
reprogrammed by a Honda dealer.
As required by the FCC:This device complies with Part 15 of theFCC rules. Operation is subject to thef ollowing two conditions: (1) This devicemay not cause harmf ul interf erence, and(2) this device must accept anyinterf erence received, includinginterf erence that may cause undesiredoperation.
Changes or modif ications not expresslyapproved by the party responsible f orcompliance could void the user’sauthority to operate the equipment.
This device complies with IndustryCanada Standard RSS-210.Operation is subject to the f ollowing twoconditions: (1) this device may not causeinterf erence, and (2) this device mustaccept any interf erence that may causeundesired operation of the device.
Inst rument s and Cont rols
Remote Transmitter
Replacing the Transmitter Battery
Remote Transmitter Care
75
BATTERYROUND
COVER
Page 81 of 256
�µ
See pages f or important saf ety
inf ormation and warnings about how toproperly position the seats and seat-backs. 12 14
Make all seat adjustments bef ore
you start driving.
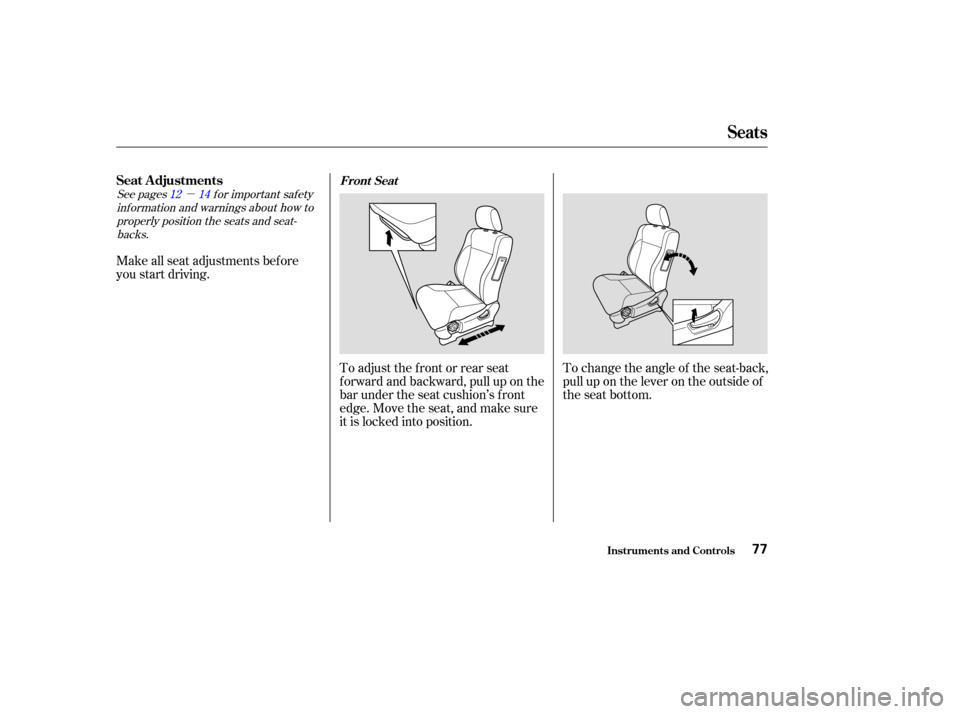
To adjust the front or rear seat
f orward and backward, pull up on the
bar under the seat cushion’s f ront
edge. Move the seat, and make sure
it is locked into position.To change the angle of the seat-back,
pull up on the lever on the outside of
the seat bottom.
Seats
Inst rument s and Cont rols
Seat A djustmentsFront Seat
77
Page 84 of 256
You can recline the seat-backs on the
f ront seats so they are level with the
rear seat cushions, making a large
cushioned area. To do this:Adjust the rear seats as f ar back
as they will go. Remove the head restraints f rom
the f ront seats (see page ), and
store them in the f ront seat-back
pockets.Adjust the front seats forward as
f ar as they will go. Pull up the seat-
back angle adjustment lever and
pivot the seat-back backward until
it is level with the rear seat
cushion.
Move the f ront seat backward
until it touches the rear seat.
Adjust the rear seat-back to the
desired position.
Reverse this procedure to return the
f ront and rear seats to the upright
position. Make sure you install the
head restraints and the seats are
locked securely bef ore driving.
When you return the seat-back to
the upright position, hold the seat-
back to keep it f rom going up too
quickly.
2.
1. 793.
4.
5.
Seats
Inst rument s and Cont rols
Reclining the Front Seats
80
Page 87 of 256
You cannot fold up the rear seat if
it is not latched securely in the
rearmost position. Unlock the seat f rom the f loor by
pulling the lock release strap
under the seat cushion’s back
edge, then lif t the rear of the seat.
Pivot the seat forward.Pull out the f astening strap f rom
the slit on the seat-back. Move the
f ront seat f orward slightly, then
attach the anchor on the fastening
strap to the hook on the bottom of
the f ront seat. Adjust the f ront
seat to the desired position.
Tightenthestraptoremoveany
slack and make sure the seat is
secure.
3.
4. 5.
6.
CONT INUED
Seats
Inst rument s and Cont rols83
LOCK RELEASE
STRAP
FASTENING
STRAP
Page 91 of 256

If your vehicle’s battery is
disconnected or goes dead, or the
driver’s window f use is removed, the
AUTO f unction will be disabled. The
power window system needs to be
reset af ter reconnecting the battery
or installing the f use.Start the engine. Push down and
hold the driver’s window switch
until the window is f ully open.
Pull and hold the driver’s window
switch to close the window
completely, then hold the switch
f or a second or two more.
If the power windows do not operate
properly af ter resetting, have your
vehicle checked by a Honda dealer. Open the glove box by pulling the
bottom of the handle. Close it with a
f irm push. Lock or unlock the glove
box with the master key.
The glove box light comes on only
when the instrument panel indicators
are on.
1.
2.
Glove Box
Inst rument s and Cont rols
Power Windows, Glove Box
87
Lock
An open glove box can cause
serious injury to your passenger
inacrash,evenifthe
passenger is wearing the seat
belt.
Always keep the glove box
closed while driving.
Page 97 of 256
Unf old the legs. Lock them in place
by pushing on the middle of the
locking arms. Make sure all f our are
locked.To f old the legs, pull on the middle
of each locking arm.
To put the table back in place, hold
on to the handle and put the
projection on the table into the hole
in the cargo area f loor. Be sure to lock the legs of the
table.
Do not stand on the table.
Do not put a weight of over 44 lbs
(20kg)onthetable.
Hot items such as pots, pans, or
kettles should not be placed
directly on the table top.
Built-in Table
Inst rument s and Cont rols
Using the Built-in T able
93
Page 98 of 256
To remove the box f or cleaning, pull
upward on the f ront center edge to
disengage the locking tabs under the
seat bottom, then pull the box out. A storage box is located under the
f ront passenger’s seat. To use it, pull
upward slightly on the f ront center
edge of the box and slide it out.Some larger styles of sunglasses
may not f it in the holder. To open the sunglasses holder, push
on the f ront edge. It will unlatch and
swing down. To close it, push it until
it latches. Make sure the holder is
closed while you are driving.To use the center table, pull up the
outside edge of the table until it
latches. To store it, pull the lever and
lower the table.
Storage Box
Sunglasses HolderCenter T able
St orage Box, Sunglasses Holder, Cent er T able
Inst rument s and Cont rols94
SUNGLASSES HOLDERPush
Page 101 of 256

The heating and air conditioning
systems in your Honda provide a
comf ortable driving environment in
all weather conditions.
The standard audio system has
many f eatures. This section de-
scribes those f eatures and how to
use them. (If you selected an
optional audio system, ref er to the
operating instructions that came
with it.)
Your Honda has an anti-thef t audio
system that requires a code number
to enable it................
Vents, Heating, and A/C . 98
.........................
Air Flow Buttons .99
..........................
Playing the Radio .102
............................
Radio Reception .106
..................................
Playing a CD .108
...................................
CD Changer .110
....................
Protecting Your CDs .111
.........
CD Player Error Messages . 112
.....
CD Changer Error Messages . 113
...............................
Playing a Tape .114
.................
Radio Thef t Protection . 117
..........................
Setting the Clock .118
...............................
Cruise Control .119
Comf ort and Convenience Features
Comf ort and Convenience Feat ures97