Page 39 of 256

�µ
Use childproof door locks to prevent
children f rom opening the doors.
This can prevent children f rom
accidentally f alling out.Lock all doors and the tailgate
when your vehicle is not in use.
Children who play in vehicles can
accidentally get trapped inside the
vehicle. Teach your children not to
play in or around vehicles.
Keep vehicle keys and remote
transmitters out of the reach of
children. Even very young
children learn how to unlock
vehicle doors, turn on the ignition,
and open the tailgate or hatch
glass, which can lead to accidental
injury or death.
Do not leave children alone in a
vehicle. Leaving children without
adult supervision is illegal in most
states and Canadian provinces,
and can be very hazardous. For
example, inf ants and small
childrenleftinavehicleonahot
day can die f rom heatstroke. And
children lef t alone with the key in
the ignition can accidentally set
the vehicle in motion, possibly
injuring themselves or others.
Driver and Passenger Saf ety
Protecting Children General Guidelines
35
Page 41 of 256
When properly installed, a rear-
f acing child seat may prevent the
driver or a f ront passenger f rom
moving the seat as far back as
recommended, or f rom locking the
seat-back in the desired position.
In either of these situations, we
strongly recommend that you install
the child seat directly behind the
f ront passenger seat, move the f ront
seat as far forward as needed, and
leave it unoccupied. Or you may wish
to get a smaller child seat that allows
you to saf ely carry a f ront passenger.
Never put a rear-f acing child seat in
the f ront seat. If the passenger’s
f ront airbag inf lates, it can hit the
back of the child seat with enough
forcetokillorseriouslyinjurean
inf ant. In this vehicle, a rear-f acing child
seatcanbeplacedinanyseating
position in the back seat, but not in
the front seat.Child Seat Placement
Protecting Inf ants
Driver and Passenger Saf ety37
Page 47 of 256
When not using the LATCH system,
all child seats must be secured to the
vehicle with the lap part of a lap/
shoulder belt.With the child seat in the desired
seating position, route the belt
through the child seat according
to the seat maker’s instructions,
then insert the latch plate into the
buckle.To activate the lockable retractor,
slowly pull the shoulder part of the
belt all the way out until it stops,
then let the belt f eed back into the
retractor.
Af ter the belt has retracted, tug on
it. If the belt is locked, you will not
be able to pull it out. If you can pull
the belt out, it is not locked and
you will need to repeat these steps.
In addition, the lap/shoulder belts in
the back seating positions, and in the
f ront passenger seat, have a locking
mechanism that must be activated to
secure a child seat.
2.
1.
3.
CONT INUED
Installing a Child Seat with a L ap/
Shoulder Belt
Installing a Child Seat
Driver and Passenger Saf ety43
Page 48 of 256
Af ter conf irming that the belt is
locked,thengrabtheshoulder
part of the belt near the buckle
andpulluptoremoveanyslack
f rom the lap part of the belt.
Remember, if the lap part of the
belt is not tight, the child seat will
not be secure.
To remove slack, it may help to
putweightonthechildseat,or
push on the back of the seat while
pulling up on the belt.Push and pull the child seat
f orward and f rom side to side to
verif y that it is f irmly secured. If
the child seat is not secure,
unlatch the belt, allow it to retract
f ully, then repeat these steps.
To deactivate the locking
mechanism and remove a child
seat, unlatch the buckle, unroute
the seat belt, and let the belt f ully
retract.
4.
5.
Driver and Passenger Saf ety
Installing a Child Seat
44
Page 57 of 256

This section gives inf ormation about
the controls and displays that
contribute to the daily operation of
your Honda. All the essential
controls are within easy reach............................
Control Locations .54
............................
Instrument Panel .55
.............................................
Gauges .61
...................................
Trip Meter .61
.....................................
Odometer .61
..................................
Fuel Gauge .61
...................
Temperature Gauge . 62
Outside Temperature ..................................
Indicator .62
Controls Near the Steering .......................................
Wheel .63
......................
Wipers and Washers .64
.........
Turn Signals and Headlights . 65
........
Instrument Panel Brightness . 66
.................
Hazard Warning Button . 66
.................
Rear Window Def ogger . 66
.................................
Parking Brake .67
..........
Steering Wheel Adjustment . 68
...............................
Keys and Locks .69
........................
Immobilizer System .70
................................
Ignition Switch .71
......................................
Door Locks .72
......................
Power Door Locks .72
..............
Childproof Door Locks . 72
...........
Tailgate and Hatch Glass . 73
.......................
Remote Transmitter .74 ....................................
Seat Heaters .76
.................................................
Seats .77
........................
Seat Adjustments .77
Driver’s Seat Height ..............................
Adjustment .78
......................................
Armrests .78
..........................
Head Restraints .79
..........
Reclining the Front Seats . 80
...
Folding the Rear Seats Down . 81
..........
Folding the Rear Seat Up . 82
.....................
Detachable Anchor .84
..............................
Power Windows .86
........................................
Grove Box .87
.........................................
Moonroof .88
.............................................
Mirrors .89
....
Adjusting the Power Mirrors . 89
................
Power Mirror Heaters . 90
...........
Interior Convenience Items . 91
.............................
Beverage Holder .92
...................................
Built-in Table .92
.....................................
Storage Box .94
..........................
Sunglasses Holder .94
....................................
Center Table .94
..............
Accessory Power Sockets . 95
Instruments and Controls
Inst rument s and Cont rols53
Page 58 of 256
Control L ocations
Inst rument s and Cont rols54
POWER DOOR LOCK SWITCH
POWER WINDOW
SWITCHES
HOOD RELEASE
HANDLE
HATCH GLASS
RELEASE BUTTON
A/T model is shown. FUEL FILL DOOR RELEASE HANDLE
HEATING/COOLING CONTROLSPARKING BRAKE
DIGITAL CLOCK AUDIO SYSTEM
MIRROR CONTROLS
(P.72)
(P.86)
(P.126)
(P.73)
(P.125) (P.98)(P.67)
(P.118)
(P.89)
(P.102)
Page 59 of 256
�Î
�Î
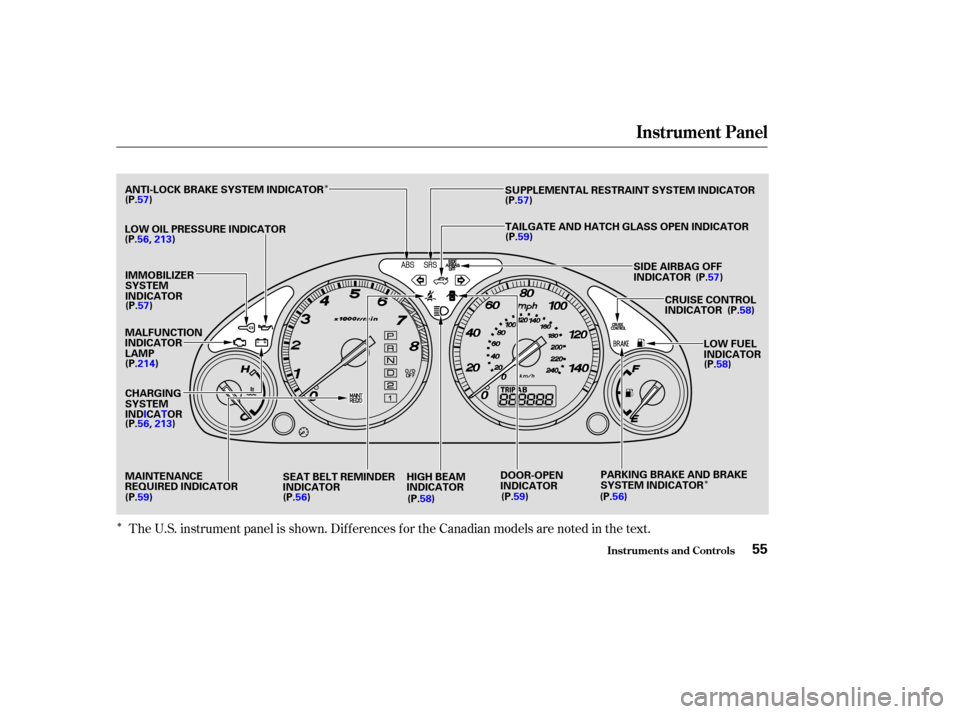
�ÎThe U.S. instrument panel is shown. Dif f erences f or the Canadian models are noted in the text.
Instrument Panel
Inst rument s and Cont rols55
LOW OIL PRESSURE INDICATOR
IMMOBILIZER
SYSTEM
INDICATOR
MALFUNCTION
INDICATOR
LAMP
CHARGING
SYSTEM
IND ICATOR
MAINTENANCE
REQUIRED INDICATOR HIGH BEAM
INDICATORDOOR-OPEN
INDICATOR
PARKING BRAKE AND BRAKE
SYSTEM INDICATOR LOW FUEL
INDICATOR
CRUISE CONTROL
INDICATOR
TAILGATE AND HATCH GLASS OPEN INDICATOR
SUPPLEMENTAL RESTRAINT SYSTEM INDICATOR
ANTI-LOCK BRAKE SYSTEM INDICATOR
(P.56, 213)
(P.57)
(P.214)
(P.56, 213)
(P.59) SEAT BELT REMINDER
INDICATOR
(P.58) (P.59)
(P.56) (P.58)
(P.
58)
(P.57)
SIDE AIRBAG OFF
INDICATOR
(P.59)
(P.57)
(P.57)
(P.56)
Page 61 of 256
. It will then go of f
if you have inserted a properly-coded
ignition key. If it is not a properly-
coded key, t")
This indicator comes on f or a f ew
seconds when you turn the ignition
switch to ON (II). It will then go of f
if you have inserted a properly-coded
ignition key. If it is not a properly-
coded key, the indicator will blink
and the engine will not start (see
page ).
This indicator also blinks several
times when you turn the ignition
switch f rom ON (II) to ACCESSORY
(I) or LOCK (0).
This indicator comes on when you
turn the ignition switch to ON (II). If
it comes on at any other time, it
indicates a potential problem with
your f ront airbags. This indicator will
also alert you to a potential problem
with your side airbags, passenger’s
side airbag automatic cutoff system
or automatic seat belt tensioners.
For complete inf ormation, see page
.
This indicator comes on when you
turn the ignition switch to ON (II). If
it comes on at any other time, it
indicates that the passenger’s side
airbag has automatically shut off.
For more inf ormation, see page . This indicator normally comes on f or
a f ew seconds when you turn the
ignition switch to ON (II), and when
the ignition switch is turned to
START (III). If it comes on at any
other time, there is a problem with
theABS.If thishappens,haveyour
vehicle checked at a dealer. With
this on, your vehicle still has normal
braking ability but no anti-lock
brakes. For complete inf ormation,
see page .
27
70
26 149
If equipped If equipped
Inst rument s and Cont rols
Supplemental Restraint
System Indicator
Anti-lock Brake System (ABS)
Indicator Immobilizer System
Indicator
Side Airbag Of f Indicator
Instrument Panel
57
U.S Canada