2004 GMC YUKON DENALI tow
[x] Cancel search: towPage 185 of 468

serious damage to your vehicle. This system is also
designed to assist your service technician in correctly
diagnosing any malfunction.
Notice:If you keep driving your vehicle with this
light on, after a while, your emission controls
may not work as well, your fuel economy may not
be as good and your engine may not run as
smoothly. This could lead to costly repairs that may
not be covered by your warranty.
Notice:Modi®cations made to the engine,
transmission, exhaust, intake or fuel system of your
vehicle or the replacement of the original tires
with other than those of the same Tire Performance
Criteria (TPC) can affect your vehicle's emission
controls and may cause this light to come on.
Modi®cations to these systems could lead to costly
repairs not covered by your warranty. This may
also result in a failure to pass a required Emission
Inspection/Maintenance test.
This light should come on, as a check to show you it is
working, when the ignition is on and the engine is
not running. If the light does not come on, have it
repaired. This light will also come on during a
malfunction in one of two ways:
·Light FlashingÐ A mis®re condition has been
detected. A mis®re increases vehicle emissions and
may damage the emission control system on your
vehicle. Diagnosis and service may be required.
·Light On SteadyÐ An emission control system
malfunction has been detected on your vehicle.
Diagnosis and service may be required.
If the Light is Flashing
The following may prevent more serious damage to
your vehicle:
·Reducing vehicle speed.
·Avoiding hard accelerations.
·Avoiding steep uphill grades.
·If you are towing a trailer, reduce the amount of
cargo being hauled as soon as it is possible.
If the light stops ¯ashing and remains on steady, see ªIf
the Light Is On Steadyº following.
If the light continues to ¯ash, when it is safe to do so,
stop the vehicle.Find a safe place to park your vehicle.
Turn the key off, wait at least 10 seconds and restart
the engine. If the light remains on steady, see ªIf
the Light Is On Steadyº following. If the light is still
¯ashing, follow the previous steps, and see your dealer
for service as soon as possible.
3-41
Page 188 of 468

Security Light
This light will come on
brie¯y when you turn the
key toward START.
The light will stay on until
the engine starts.
If the light ¯ashes, the Passlock
žsystem has entered a
tamper mode. If the vehicle fails to start, seePasslockž
on page 2-18.
If the light comes on continuously while driving and
stays on, there may be a problem with the Passlock
ž
system. Your vehicle will not be protected by Passlockž,
and you should see your dealer.
Also, see
Content Theft-Deterrent on page 2-16for
additional information regarding the security light.
Cruise Control Light
The cruise light comes on
whenever you set your
cruise control. See
Cruise
ControlunderTurn
Signal/Multifunction Lever
on page 3-7
.
Tow/Haul Mode Light
This light is displayed
when the Tow/Haul mode
has been activated.
For more information, see
Towing a Trailer on
page 4-51.
3-44
Page 207 of 468

TRACTION SYS LIMITED
If the brake traction±control system activates constantly,
or if the brakes have heated up due to high speed
braking, brake traction±control will be disabled and the
TRACTION SYS LIMITED message will be displayed.
The system will return to normal operation after the
brakes have cooled.
TRANS HOT IDLE ENGINE
If the transmission ¯uid in the vehicle gets hot, this
message will appear on the DIC along with a continuous
chime. Driving with the transmission ¯uid temperature
high can cause damage to the vehicle. Stop the vehicle
and let it idle to allow the transmission to cool. This
message will clear and the chime will stop when the ¯uid
temperature reaches a safe level.
TRANSMISSION HOT
If the transmission ¯uid temperature becomes high, the
message center will display this message.
When the transmission enters the protection mode, you
may notice a change in the transmission shifting
patterns. When the transmission ¯uid temperature
returns to normal, the display will turn off and the
transmission shifting patterns will return to normal.
Notice:If you drive your vehicle while the
transmission ¯uid is overheating and the
transmission temperature warning is displayed on
the instrument panel cluster and/or DIC, you
can damage the transmission. This could lead to
costly repairs that would not be covered by
your warranty. Do not drive your vehicle with
overheated transmission ¯uid or while transmission
temperature warning is displayed.
The following situations can cause the transmission to
operate at higher temperatures:
·Towing a trailer
·Hot outside air temperatures
·Hauling a large or heavy load
·Low transmission ¯uid level
·High transmission ¯uid level
·Restricted air ¯ow to the radiator.
A temporary solution to hotter transmission operating
temperatures may be to let the transmission cool down.
If the transmission is operated at higher temperatures
on a frequent basis, see
Scheduled Maintenance
on page 6-4for the proper transmission maintenance
intervals.
3-63
Page 213 of 468

AUTO EQ (Automatic Equalization):Press this button
to enhance the audio performance for different
passengers in the vehicle.
The setting last chosen will appear on the display when
you ®rst press AUTO EQ. Each time you press this
button, another setting will appear on the display and
AUTO EQ will switch to one of the preset settings listed.
Your audio system allows you to choose from four
different equalization settings: normal, driver, rear and
spacious. These settings can be used while listening to
the radio, cassette or the CD player.
NORMAL:This setting provides the best overall vehicle
sound quality for all seating locations.
DRIVER:This setting gives the driver the best sound
quality.
REAR:This setting gives the rear seat passengers the
best sound quality.
SPACIOUS:This setting makes the listening space
seem larger.
The radio can save separate AUTO EQ settings for
each preset and source.Adjusting the Speakers (Balance/Fade)
AUDIO:To adjust the balance between the right
and the left speakers, push and release the AUDIO
knob until BAL appears on the display. Turn the knob to
move the sound toward the right or the left speakers.
To adjust the fade between the front and the rear
speakers, push and release the AUDIO knob until FADE
appears on the display. Turn the knob to move the
sound toward the front or the rear speakers.
To adjust the balance and fade to the middle position,
push the AUDIO knob then push it again and hold it until
the radio produces one beep. The balance and fade
will be adjusted to the middle position and the display
will show the speaker balance.
To adjust all tone and speaker controls to the middle
position, push and hold the AUDIO knob when no tone
or speaker control is displayed. ALL will appear on
the display, you will hear a beep and the display level
will be adjusted to the middle position.
3-69
Page 234 of 468

Problem Recommended Action
After stopping the player, I
push Play but sometimes
the DVD starts where I
left off and sometimes at
the beginning.If the stop button was
pressed one time, the
DVD player will resume
playing where the DVD
was stopped. If the stop
button was pressed two
times the DVD player will
begin to play from the
beginning of the DVD.
The auxiliary source is
running but there is no
picture or sound.Check that the DVD
player is in the auxiliary
source mode.
Check the auxiliary input
connections at both
devices.
My disc is stuck in the
player. The Load/Eject
button does not work.Turn the DVD power off,
then on and press the
Load/Eject button on the
DVD player.
Do not attempt to forcibly
remove the disc from the
DVD player. This could
permanently damage the
disc and DVD player.Problem Recommended Action
Sometimes the wireless
headphone audio cuts out
or buzzes.Check for obstructions,
low batteries, reception
range, and interference
from cellular telephone
towers or by using your
cellular telephone in the
vehicle.
Check that the
headphones are facing
the front of the vehicle.
I lost the remote and/or
the headphones.See your dealer for
assistance.
The DVD is playing, but
there is no picture or
sound.Check that the DVD
player is in DVD mode.
The audio/video skips or
jumps.The DVD or CD could be
dirty, scratched, or
damaged.
What is the best way to
clean the video screen?Wipe the video screen
with a damp, soft cloth.
The audio from the radio
for the Radio with
Six-Disc CD and XMŸ
has taken over the audio
from the DVD or CD
when using the wired
headphones.The RSE is working
correctly.
Use the wireless
headphones or have the
front seat passengers
listen to another audio
source.
3-90
Page 245 of 468

Your Driving, the Road, and Your Vehicle..........4-2
Defensive Driving...........................................4-2
Drunken Driving.............................................4-2
Control of a Vehicle........................................4-5
Braking.........................................................4-6
Stabilitrak
žSystem.........................................4-9
Steering......................................................4-11
Off-Road Recovery.......................................4-13
Passing.......................................................4-13
Loss of Control.............................................4-15
Operating Your All-Wheel-Drive Vehicle
Off Paved Roads.......................................4-16
Driving at Night............................................4-28
Driving in Rain and on Wet Roads..................4-29
City Driving..................................................4-32Freeway Driving...........................................4-33
Before Leaving on a Long Trip.......................4-34
Highway Hypnosis........................................4-35
Hill and Mountain Roads................................4-35
Winter Driving..............................................4-37
If You Are Stuck: In Sand, Mud, Ice or Snow........4-41
Towing..........................................................4-44
Towing Your Vehicle.....................................4-44
Recreational Vehicle Towing...........................4-44
Loading Your Vehicle....................................4-44
AutorideŸ...................................................4-50
Trailer Recommendations...............................4-51
Towing a Trailer...........................................4-51
Section 4 Driving Your Vehicle
4-1
Page 286 of 468

Rocking Your Vehicle To Get It Out
First, turn your steering wheel left and right. That will
clear the area around your front wheels. If your vehicle
has the Stabilitrak
žSystem, turn the system off by
pressing the Stabilitrakžbutton so that the STABILITY
SYS DISABLED message and the traction off light
are illuminated on the instrument panel cluster. Then
shift back and forth between REVERSE (R) and a
forward gear, spinning the wheels as little as possible.
Release the accelerator pedal while you shift, and press
lightly on the accelerator pedal when the transmission
is in gear. By slowly spinning your wheels in the forward
and reverse directions, you will cause a rocking
motion that may free your vehicle. If that does not get
you out after a few tries, you may need to be towed out.
Or, you can use your recovery hooks if your vehicle
has them. If you do need to be towed out, see
Towing
Your Vehicle on page 4-44.
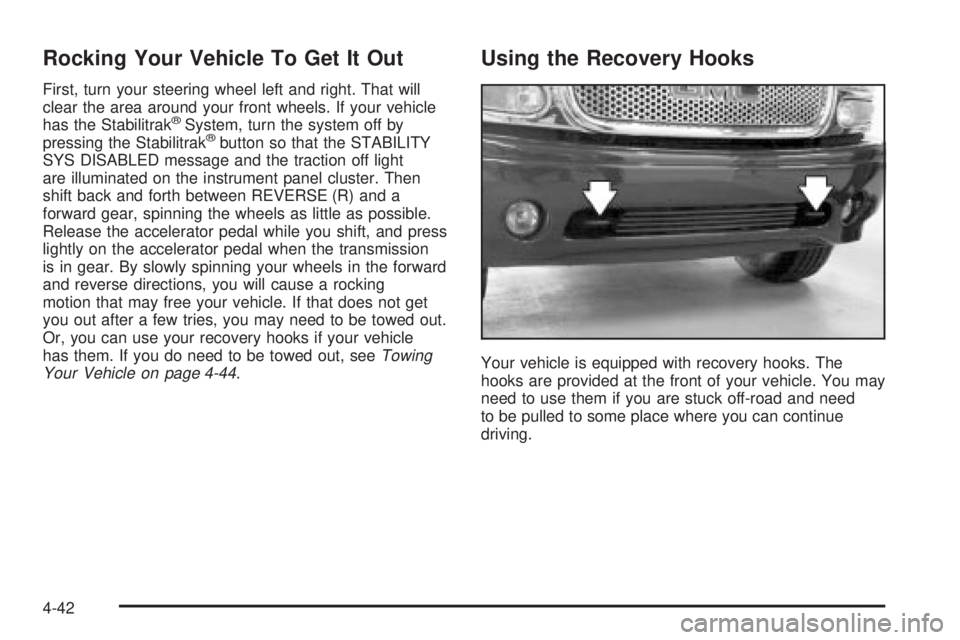
Using the Recovery Hooks
Your vehicle is equipped with recovery hooks. The
hooks are provided at the front of your vehicle. You may
need to use them if you are stuck off-road and need
to be pulled to some place where you can continue
driving.
4-42
Page 287 of 468

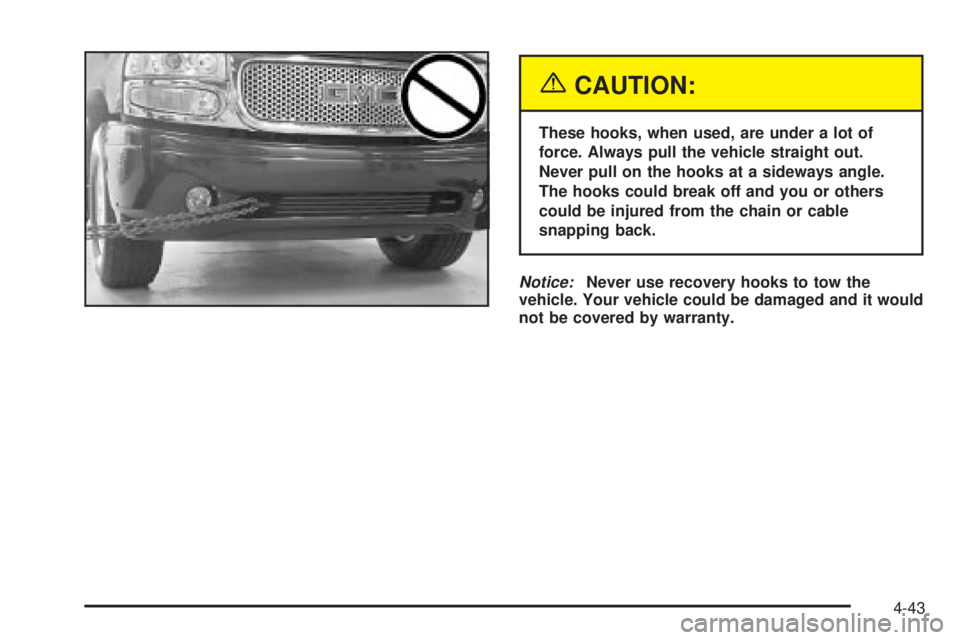
{CAUTION:
These hooks, when used, are under a lot of
force. Always pull the vehicle straight out.
Never pull on the hooks at a sideways angle.
The hooks could break off and you or others
could be injured from the chain or cable
snapping back.
Notice:Never use recovery hooks to tow the
vehicle. Your vehicle could be damaged and it would
not be covered by warranty.
4-43