Page 119 of 468
Tow/Haul Mode
Your vehicle is equipped with a Tow/Haul mode.
The button is located on the end of the column shift
lever. You can use this feature to assist when towing or
hauling a heavy load. See ªTow/Haul Modeº under
Towing a Trailer on page 4-51for more information.
The Tow/Haul mode also interacts with the AutorideŸ
feature to enhance the ride when trailering or with a
loaded vehicle. See
AutorideŸ on page 4-50.
All-Wheel Drive
With this feature, engine power is sent to all four wheels
all the time.
This is like four-wheel drive, but there is no separate
lever or switch to engage or disengage the front axle. It
is fully automatic, and adjusts itself as needed for
road conditions.
2-25
Page 120 of 468
Parking Brake
To set the parking brake, hold the regular brake pedal
down with your right foot. Push down the parking
brake pedal with your left foot.
A chime will activate and the warning light will ¯ash
when the parking brake is applied and the vehicle
is moving at least 3 mph (5 km/h) for at least three
seconds.To release the parking brake, hold the regular brake
pedal down. Pull the bottom edge of the lever, located
above the parking brake pedal, with the parking
brake symbol, to release the parking brake.
If the ignition is on when the parking brake is released,
the brake system warning light will go off.
Notice:Driving with the parking brake on can
overheat the brake system and cause premature
wear or damage to brake system parts. Verify that
the parking brake is fully released and the brake
warning light is off before driving.
If you are towing a trailer and are parking on any hill,
see
Towing a Trailer on page 4-51.
2-26
Page 121 of 468
Shifting Into Park (P)
{CAUTION:
It can be dangerous to get out of your vehicle
if the shift lever is not fully in PARK (P) with
the parking brake ®rmly set. Your vehicle can
roll. If you have left the engine running, the
vehicle can move suddenly. You or others
could be injured. To be sure your vehicle will
not move, even when you are on fairly level
ground, use the steps that follow. If you are
pulling a trailer, see
Towing a Trailer on
page 4-51
.
1. Hold the brake pedal down with your right foot and
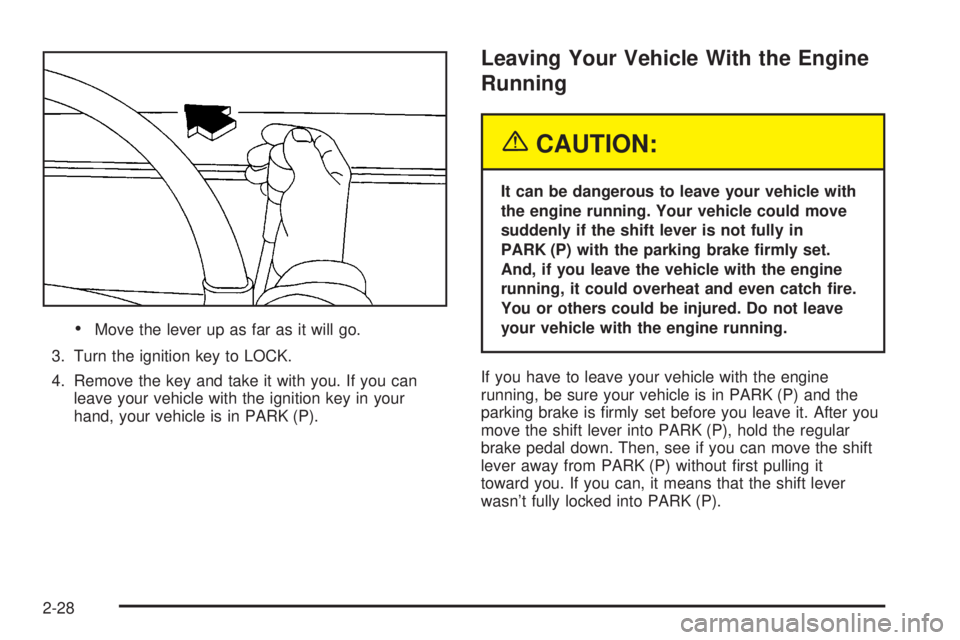
set the parking brake.2. Move the shift lever into PARK (P) like this:·Pull the shift lever toward you.
2-27
Page 122 of 468

·Move the lever up as far as it will go.
3. Turn the ignition key to LOCK.
4. Remove the key and take it with you. If you can
leave your vehicle with the ignition key in your
hand, your vehicle is in PARK (P).
Leaving Your Vehicle With the Engine
Running
{CAUTION:
It can be dangerous to leave your vehicle with
the engine running. Your vehicle could move
suddenly if the shift lever is not fully in
PARK (P) with the parking brake ®rmly set.
And, if you leave the vehicle with the engine
running, it could overheat and even catch ®re.
You or others could be injured. Do not leave
your vehicle with the engine running.
If you have to leave your vehicle with the engine
running, be sure your vehicle is in PARK (P) and the
parking brake is ®rmly set before you leave it. After you
move the shift lever into PARK (P), hold the regular
brake pedal down. Then, see if you can move the shift
lever away from PARK (P) without ®rst pulling it
toward you. If you can, it means that the shift lever
wasn't fully locked into PARK (P).
2-28
Page 125 of 468

Running Your Engine While You
Are Parked
It is better not to park with the engine running. But if
you ever have to, here are some things to know.
{CAUTION:
Idling the engine with the climate control
system off could allow dangerous exhaust into
your vehicle. See the earlier Caution under
Engine Exhaust on page 2-30.
Also, idling in a closed-in place can let deadly
carbon monoxide (CO) into your vehicle even if
the climate control fan is at the highest setting.
One place this can happen is a garage.
Exhaust Ð with CO Ð can come in easily.
NEVER park in a garage with the engine
running.
Another closed-in place can be a blizzard. See
Winter Driving on page 4-37.
{CAUTION:
It can be dangerous to get out of your vehicle
if the shift lever is not fully in PARK (P) with
the parking brake ®rmly set. Your vehicle can
roll. Do not leave your vehicle when the engine
is running unless you have to. If you have left
the engine running, the vehicle can move
suddenly. You or others could be injured.
To be sure your vehicle will not move, even
when you are on fairly level ground, always set
your parking brake and move the shift lever to
PARK (P).
Follow the proper steps to be sure your vehicle will not
move. See
Shifting Into Park (P) on page 2-27.
If you are pulling a trailer, see
Towing a Trailer on
page 4-51.
2-31
Page 128 of 468

3. Keep pressing the on/off button until the desired
zone number appears in the display. Release the
button. After approximately four seconds of
inactivity, the new zone number will be locked in
and the compass/temperature display will return.
4. Calibrate the compass as described below.
Compass Calibration
The compass may need calibration if one of the
following occurs:
·After approximately ®ve seconds, the display does
not show a compass heading (N for North, for
example), there may be a strong magnetic ®eld
interfering with the compass. Such interference may
be caused by a magnetic antenna mount, magnetic
note pad holder or a similar magnetic item.
·The compass does not display the correct heading
and the compass zone variance is set correctly.In order to calibrate, CAL must be displayed in the
mirror compass windows. If CAL is not displayed, push
the on/off button for approximately 12 seconds or
until CAL is displayed.
The compass can be calibrated by driving the vehicle in
circles at 5 mph (8 km/h) or less until the display
reads a direction.
Passenger Air Bag Indicator
Your vehicle may be equipped with a passenger air bag
indicator, on the mirror glass, just above the buttons.
If your vehicle has this feature, the mirror will display the
word ON, or an air bag symbol in Canada, when the
passenger air bag is enabled. For more information, see
Passenger Sensing System on page 1-81.
Cleaning the Mirror
When cleaning the mirror, use a paper towel or similar
material dampened with glass cleaner. Do not spray
glass cleaner directly on the mirror as that may cause
the liquid cleaner to enter the mirror housing.
2-34
Page 140 of 468

Cargo Cover
{CAUTION:
An improperly stored cargo cover could be
thrown about the vehicle during a collision or
sudden maneuver. You or others could be
injured. If you remove the cover, always store
it in the proper storage location. When you put
it back, always be sure that it is securely
reattached.
If you have a cargo cover, you can use it to cover items
in the cargo area of your vehicle.
To use the cover, do the following:
1. Pull the cover handle toward the rear of the vehicle.
2. Latch the cover posts into the retaining sockets
on the cargo area trim panels.
To return the cover to the retracted position, do the
following:
1. Pull up on the cover handle to release the cover
posts from the retaining sockets.
2. Let the cover move forward to the full retracted
position.To remove the cover from the vehicle, do the following:
1. Let the cover go all the way into the holder.
2. Then, grasping the passenger's side cover endcap,
push the cover endcap toward the driver's side of
the vehicle. The endcap should lock in the
compressed position.
3. Lift the cover up on the passenger's side, swing the
cover rearward and take it out of the vehicle.
To put the cover in the vehicle, do the following:
1. Make sure the cover slot in the holder faces
rearward with the round surface facing down.
2. Then, hold the cover at an angle and place the
cover holder tab into the slot in the driver's side
trim panel.
3. Move the other end of the cover forward and hold it
next to the passenger's side trim panel slot.
4. Push the button on top of the passenger's side
endcap. This will allow the cover to extend into
the trim slot.
5. Lightly pull on the cover holder to make sure it is
secure. On some models there are two slots. The
slots furthest forward allow the cover to be used
if the third seat is removed or folded down.
2-46
Page 145 of 468

Instrument Panel Overview...............................3-4
Hazard Warning Flashers................................3-6
Other Warning Devices...................................3-6
Horn.............................................................3-7
Tilt Wheel.....................................................3-7
Turn Signal/Multifunction Lever.........................3-7
Exterior Lamps.............................................3-14
Interior Lamps..............................................3-17
Accessory Power Outlets...............................3-18
Ashtrays and Cigarette Lighter........................3-19
Climate Controls............................................3-20
Dual Automatic Climate Control System...........3-20
Outlet Adjustment.........................................3-26
Rear Climate Control System.........................3-27
Climate Controls Personalization.....................3-29
Warning Lights, Gages and Indicators.............3-30
Warning Lights, Gages, and Indicators.............3-30
Instrument Panel Cluster................................3-31
Speedometer and Odometer...........................3-32
Tachometer.................................................3-32
Safety Belt Reminder Light.............................3-32Air Bag Readiness Light................................3-32
Passenger Air Bag Status Indicator.................3-34
Charging System Light..................................3-35
Voltmeter Gage............................................3-36
Brake System Warning Light..........................3-36
Anti-Lock Brake System Warning Light.............3-37
Traction Off Light..........................................3-38
Engine Coolant Temperature Gage..................3-38
Transmission Temperature Gage.....................3-39
Tire Pressure Light.......................................3-40
Malfunction Indicator Lamp.............................3-40
Oil Pressure Gage........................................3-43
Security Light...............................................3-44
Cruise Control Light......................................3-44
Tow/Haul Mode Light....................................3-44
Fuel Gage...................................................3-45
Low Fuel Warning Light.................................3-45
Driver Information Center (DIC).......................3-46
DIC Operation and Displays...........................3-46
DIC Warnings and Messages.........................3-57
Section 3 Instrument Panel
3-1