Page 474 of 588
Replacement Bulbs
Exterior Lamp Bulb Number
Low-Beam Headlamps 9006
High-Beam Headlamp 9005
Daytime Running Lamps (DRL) 4114K
Front Roof Marker Lamps 194
Front Parking and Turn Lamp 3457A
Rear Marker Lamp, Taillamp and
Stop Lamp**3157
Taillamp and Stop Lamp** 1157
Sidemarker Lamp (If Equipped) 194
Rear Turn Lamp 3157
Rear Turn Lamp ** 1156
Back-up Lamp 3157
Back-up Lamp** 1156
Center High-Mounted Stoplamp 912
Cargo Lamp 912
Fender Marker Lamps 194
* For any Bulb not listed here, contact your dealer.
** Chassis Cab Models
Windshield Wiper Blade
Replacement
Windshield wiper blades should be inspected at least
twice a year for wear and cracking. SeeScheduled
Maintenance on page 6-4for more information.
Replacement blades come in different types and are
removed in different ways. For proper type and length,
see
Normal Maintenance Replacement Parts on
page 6-17.
5-74
Page 482 of 588
Belt:A rubber coated layer of cords that is located
between the plies and the tread. Cords may be made
from steel or other reinforcing materials.
Bead:The tire bead contains steel wires wrapped by
steel cords that hold the tire onto the rim.
Bias Ply Tire:A pneumatic tire in which the plies are
laid at alternate angles less than 90 degrees to the
centerline of the tread.
Cold In¯ation Pressure:The amount of air pressure in
a tire, measured in pounds per square inch (psi) or
kilopascals (kPa) before a tire has built up heat
from driving. See
In¯ation - Tire Pressure on page 5-84.
Curb Weight:This means the weight of a motor
vehicle with standard and optional equipment including
the maximum capacity of fuel, oil and coolant, but
without passengers and cargo.
DOT Markings:A code molded into the sidewall of a
tire signifying that the tire is in compliance with the U.S.
Department of Transportation motor vehicle safety
standards. The DOT code includes the Tire Identi®cation
Number (TIN), an alphanumeric designator which can
also identify the tire manufacturer, production plant,
brand and date of production.
GVWR:Gross Vehicle Weight Rating, see
Loading
Your Vehicle on page 4-57.GAWR FRT:Gross Axle Weight Rating for the front
axle, see
Loading Your Vehicle on page 4-57.
GAWR RR:Gross Axle Weight Rating for the rear axle,
see
Loading Your Vehicle on page 4-57.
Intended Outboard Sidewall:The side of an
asymmetrical tire, that must always face outward when
mounted on a vehicle.
Kilopascal (kPa):The metric unit for air pressure.
There are 6.9 kPa's to one psi.
Light Truck (LT-Metric) Tire:A tire used on light duty
trucks and some multipurpose passenger vehicles.
Load Index:An assigned number ranging from 1 to 279
that corresponds to the load carrying capacity of a
tire.
Maximum In¯ation Pressure:The maximum air
pressure to which a cold tire may be in¯ated. The
maximum air pressure is molded onto the sidewall.
Maximum Load Rating:The load rating for a tire at the
maximum permissible in¯ation pressure for that tire.
Maximum Loaded Vehicle Weight:The sum of curb
weight; accessory weight; vehicle capacity weight;
and production options weight.
5-82
Page 486 of 588
Tire Inspection and Rotation
Tires should be rotated every 5,000 to 8,000 miles
(8 000 to 13 000 km).
Any time you notice unusual wear, rotate your tires as
soon as possible and check wheel alignment. Also
check for damaged tires or wheels. See
When It Is Time
for New Tires on page 5-88andWheel Replacement
on page 5-92for more information.
Make sure the spare tire is stored securely. Push, pull,
and then try to rotate or turn the tire. If it moves,
use the wheel wrench/hoist shaft to tighten the cable.
See
Changing a Flat Tire on page 5-96.
If your vehicle has dual rear wheels, also see
Dual Tire
Operation on page 5-85.
The purpose of regular rotation is to achieve more
uniform wear for all tires on the vehicle. The ®rst rotation
is the most important. See
Scheduled Maintenance
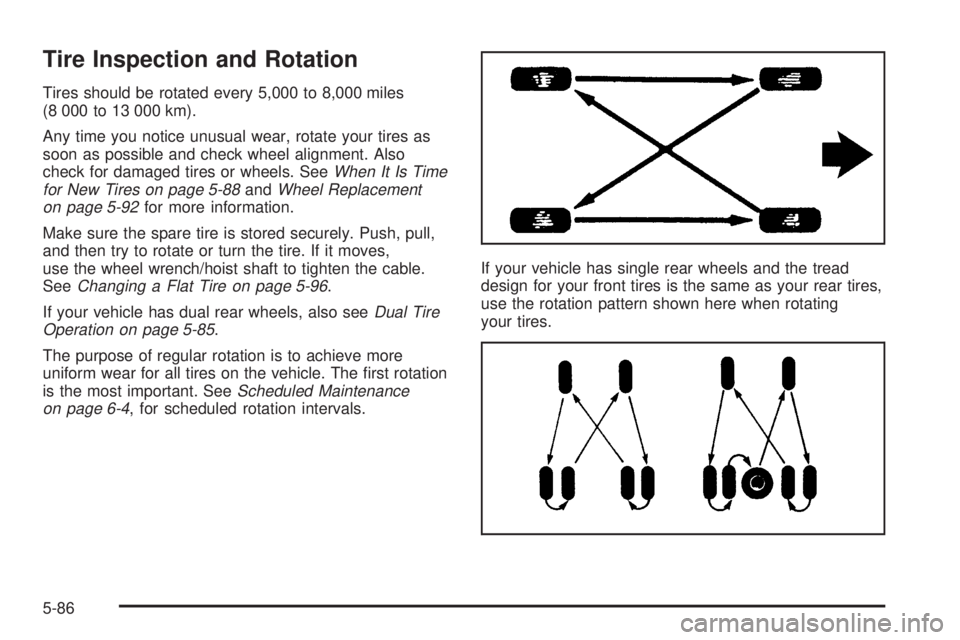
on page 6-4, for scheduled rotation intervals.If your vehicle has single rear wheels and the tread
design for your front tires is the same as your rear tires,
use the rotation pattern shown here when rotating
your tires.
5-86
Page 487 of 588
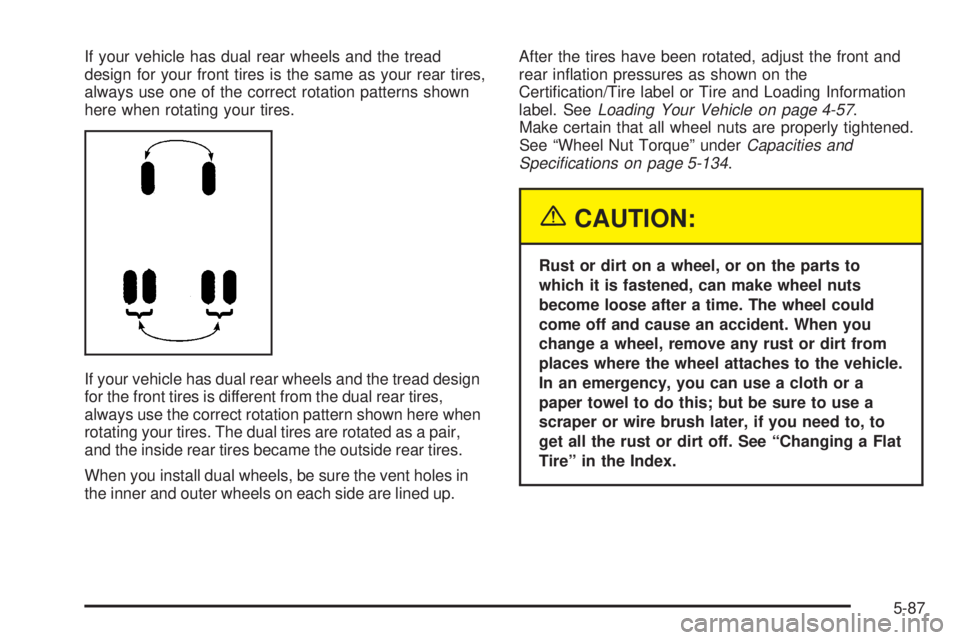
If your vehicle has dual rear wheels and the tread
design for your front tires is the same as your rear tires,
always use one of the correct rotation patterns shown
here when rotating your tires.
If your vehicle has dual rear wheels and the tread design
for the front tires is different from the dual rear tires,
always use the correct rotation pattern shown here when
rotating your tires. The dual tires are rotated as a pair,
and the inside rear tires became the outside rear tires.
When you install dual wheels, be sure the vent holes in
the inner and outer wheels on each side are lined up.After the tires have been rotated, adjust the front and
rear in¯ation pressures as shown on the
Certi®cation/Tire label or Tire and Loading Information
label. See
Loading Your Vehicle on page 4-57.
Make certain that all wheel nuts are properly tightened.
See ªWheel Nut Torqueº under
Capacities and
Speci®cations on page 5-134.
{CAUTION:
Rust or dirt on a wheel, or on the parts to
which it is fastened, can make wheel nuts
become loose after a time. The wheel could
come off and cause an accident. When you
change a wheel, remove any rust or dirt from
places where the wheel attaches to the vehicle.
In an emergency, you can use a cloth or a
paper towel to do this; but be sure to use a
scraper or wire brush later, if you need to, to
get all the rust or dirt off. See ªChanging a Flat
Tireº in the Index.
5-87
Page 494 of 588
Tire Chains
{CAUTION:
If your vehicle has dual wheels or P265/75R16,
LT265/75R16 or P265/70R17 size tires, don't
use tire chains. They can damage your vehicle
because there's not enough clearance. Tire
chains used on a vehicle without the
properamount of clearance can cause damage
to thebrakes, suspension or other vehicle
parts. Thearea damaged by the tire chains
could cause you to lose control of your vehicle
and you or others may be injured in a crash.
Use another type of traction device only if its
manufacturer recommends it for use on your
vehicle and tire size combination and road
CAUTION: (Continued)
CAUTION: (Continued)
conditions. Follow that manufacturer's
instructions. To help avoid damage to your
vehicle, drive slowly, readjust or remove the
device if it's contacting your vehicle, and don't
spin your wheels.
If you do ®nd traction devices that will ®t,
install them on the rear tires.²
Notice:If your vehicle does not have dual wheels
and is equipped with a tire size other than
P265/75R16, LT265/75R16 or P265/70R17, use tire
chains only where legal and only when you
must. Use chains that are the proper size for your
tires. Install them on the tires of the rear axle. Don't
use chains on the tires of the front axle. Tighten
them as tightly as possible with the ends securely
fastened. Drive slowly and follow the chain
manufacturer's instructions. If you can hear the
chains contacting your vehicle, stop and retighten
them. If the contact continues, slow down until
it stops. Driving too fast or spinning the wheels with
chains on will damage your vehicle.
5-94
Page 495 of 588
If a Tire Goes Flat
It's unusual for a tire to ªblowoutº while you're driving,
especially if you maintain your tires properly. If air goes
out of a tire, it's much more likely to leak out slowly.
But if you should ever have a ªblowout,º here are a few
tips about what to expect and what to do:
If a front tire fails, the ¯at tire will create a drag that
pulls the vehicle toward that side. Take your foot off the
accelerator pedal and grip the steering wheel ®rmly.
Steer to maintain lane position, and then gently brake to
a stop well out of the traffic lane.
A rear blowout, particularly on a curve, acts much like a
skid and may require the same correction you'd use
in a skid. In any rear blowout, remove your foot from the
accelerator pedal. Get the vehicle under control by
steering the way you want the vehicle to go. It may be
very bumpy and noisy, but you can still steer. Gently
brake to a stop, well off the road if possible.{CAUTION:
Lifting a vehicle and getting under it to do
maintenance or repairs is dangerous without
the appropriate safety equipment and training.
The jack provided with your vehicle is
designed only for changing a ¯at tire. If it is
used for anything else, you or others could be
badly injured or killed if the vehicle slips off
the jack. Use the jack provided with your
vehicle only for changing a ¯at tire.
If a tire goes ¯at, the next part shows how to use your
jacking equipment to change a ¯at tire safely.
5-95
Page 496 of 588
Changing a Flat Tire
If a tire goes ¯at, avoid further tire and wheel damage
by driving slowly to a level place. Turn on your
hazard warning ¯ashers.
{CAUTION:
Changing a tire can be dangerous. The vehicle
can slip off the jack and roll over or fall on you
or other people. You and they could be badly
injured or even killed. Find a level place to
change your tire. To help prevent the vehicle
from moving:
1. Set the parking brake ®rmly.
2. Put the shift lever in PARK (P).
3. Turn off the engine and do not restart
while the vehicle is raised.
CAUTION: (Continued)
CAUTION: (Continued)
4. Do not allow passengers to remain in the
vehicle.
5. Put the wheel blocks at the front and rear
of the tire farthest away from the one
being changed. That would be the tire on
the other side, at the opposite end of the
vehicle.
5-96
Page 500 of 588
3. Insert the hoist end
(open end) (F) of the
extension through
the hole (G) in the rear
bumper.
Be sure the hoist end of the extension connects to
the hoist shaft (E). The ribbed square end of the
extension is used to lower the spare tire.
4. Turn the wheel wrench (H) counterclockwise to
lower the spare tire to the ground. Continue to
turn the wheel wrench until the spare tire can be
pulled out from under the vehicle.
If the spare tire does not lower to the ground, the
secondary latch is engaged causing the tire
not to lower. See ªSecondary Latch Systemº later in
this section.5. The wheel wrench has
a hook that allows you
to pull the hoist
cable towards you to
assist in reaching
the spare tire.
6. When the tire has been
lowered, tilt the
retainer (D) at the end
of the cable so it
can be pulled up
through the wheel
opening.
7. Put the spare tire near the ¯at tire.
5-100