Page 502 of 588

2. Use the wheel wrench to loosen all the wheel nuts.
Turn the wheel wrench counterclockwise to loosen
the wheel nuts. Don't remove the wheel nuts yet.
Notice:If your vehicle has QUADRASTEERŸ and
you use a jack to raise the vehicle without
positioning it correctly, you could damage the
QUADRASTEERŸ system. When raising your
vehicle on a jack, avoid contact with tie rods and tie
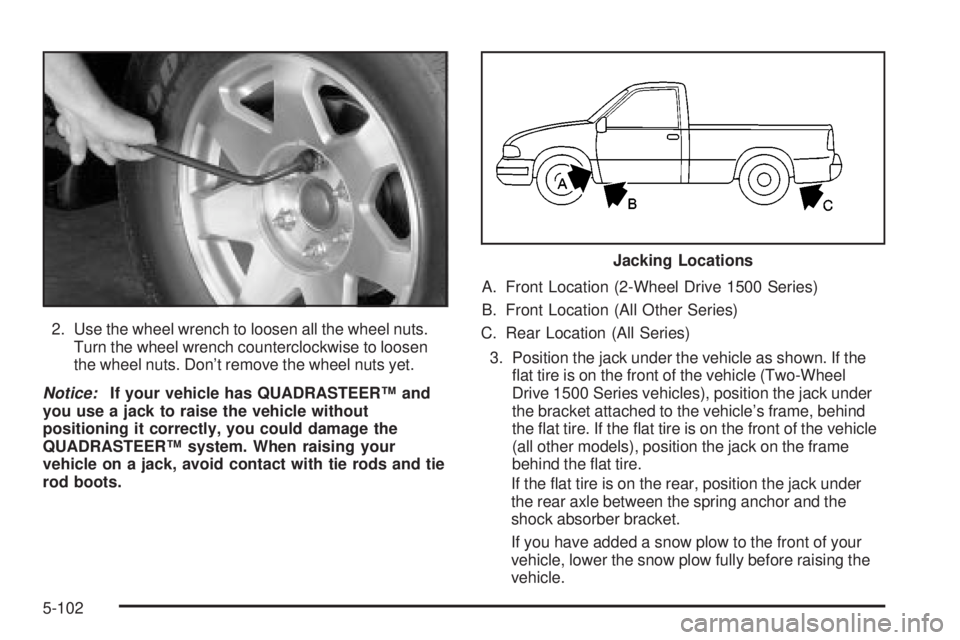
rod boots.A. Front Location (2-Wheel Drive 1500 Series)
B. Front Location (All Other Series)
C. Rear Location (All Series)
3. Position the jack under the vehicle as shown. If the
¯at tire is on the front of the vehicle (Two-Wheel
Drive 1500 Series vehicles), position the jack under
the bracket attached to the vehicle's frame, behind
the ¯at tire. If the ¯at tire is on the front of the vehicle
(all other models), position the jack on the frame
behind the ¯at tire.
If the ¯at tire is on the rear, position the jack under
the rear axle between the spring anchor and the
shock absorber bracket.
If you have added a snow plow to the front of your
vehicle, lower the snow plow fully before raising the
vehicle.
Jacking Locations
5-102
Page 504 of 588
4. Make sure the jack head is positioned so that the
rear axle is resting securely between the grooves
that are on the jack head. Turn the wheel
wrench clockwise to raise the vehicle. Raise the
vehicle far enough off the ground so there is enough
room for the spare tire to ®t under the wheel well. Front Position All Other Models
Rear Position
5-104
Page 507 of 588
Front Position 2WD 1500 SeriesRear Position
5-107
Page 510 of 588
To store the jack and jack tools do the following:
1. Put the jack tools and gloves in the tool bag and
place in the retaining bracket. Tighten down the
wing nut.
2. Assemble the wheel blocks and bottle jack together
with the wing nut and retaining hook.
3. Position the jack in the mounting bracket. Position
the holes in the base of the jack onto the pin in the
mounting bracket.Store the tire under the rear of the vehicle in the spare tire
carrier. Use the art and text following to help you:
A. Spare Tire (Valve
Stem Pointed
Down)
B. Hoist Assembly
C. Hoist Cable
D. Tire Retainer
E. Hoist Shaft
F. Hoist End of
Extension ToolG. Hoist Shaft Access
Hole
H. Wheel Wrench
I. Jack Handle
Extensions
J. Hoist Lock
(If Equipped)
5-110
Page 511 of 588
1. Put the tire on the ground at the rear of the vehicle
with the valve stem pointed down, and to the rear.
2. Tilt the retainer (D)
downward and through
the wheel opening.
Make sure the retainer
is fully seated across
the underside of
the wheel.
3. Attach the wheel wrench (H) and extensions (I)
together.4. Insert the hoist end (F)
through the hole (G) in
the rear bumper
and into the hoist
shaft.
5. Raise the tire part way upward. Make sure the
retainer is seated in the wheel opening.
6. Raise the tire fully against the underside of the
vehicle by turning the wheel wrench clockwise
until you hear two clicks or feel it skip twice. You
cannot overtighten the cable.
5-111
Page 514 of 588
8. Attach the jack handle, extension, and wheel
wrench to the jack and place it (with the wheel
blocks) under the vehicle towards the front of the
rear bumper. Position the center lift point of the jack
under the center of the spare tire.
9. Turn the wrench clockwise to raise the jack until it
lifts the end ®tting.
10. Continue raising the jack until the spare tire stops
moving upward and is held ®rmly in place. The
secondary latch has released and the spare tire is
balancing on the jack.
5-114
Page 519 of 588

Cleaning the Top of the Instrument
Panel
Use only mild soap and water to clean the top surfaces
of the instrument panel. Sprays containing silicones
or waxes may cause annoying re¯ections in the
windshield and even make it difficult to see through the
windshield under certain conditions.
Cleaning Interior Plastic Components
Use only a mild soap and water solution on a soft cloth
or sponge. Commercial cleaners may affect the
surface ®nish.
Cleaning Glass Surfaces
Glass should be cleaned often. GM Glass Cleaner or a
liquid household glass cleaner will remove normal
tobacco smoke and dust ®lms on interior glass. See
Vehicle Care/Appearance Materials on page 5-123.
Notice:If you use abrasive cleaners when cleaning
glass surfaces on your vehicle, you could scratch
the glass and/or cause damage to the rear window
defogger and the integrated radio antenna. When
cleaning the glass on your vehicle, use only a soft
cloth and glass cleaner.
Care of Safety Belts
Keep belts clean and dry.
{CAUTION:
Do not bleach or dye safety belts. If you do, it
may severely weaken them. In a crash, they
might not be able to provide adequate
protection. Clean safety belts only with mild
soap and lukewarm water.
Weatherstrips
Silicone grease on weatherstrips will make them last
longer, seal better, and not stick or squeak. Apply
silicone grease with a clean cloth at least every six
months. During very cold, damp weather more frequent
application may be required. See
Recommended
Fluids and Lubricants on page 6-14.
5-119
Page 529 of 588
Device Usage
SEO Special Equipment Option
TRAILER Trailer Brake Wiring
UPFIT Up®tter (Not Used)
SL RIDERide Control Harness
Connection
HDLR 2 Headliner Wiring Connector
BODY Body Wiring Connector
DEFOG Rear Defogger Relay
HDLNR 1 Headliner Wiring Connector 1
SPARE RELAY Not Used
CB SEATDriver and Passenger Seat
Module Circuit Breaker
CB RT DOORRight Power Windows Circuit
Breaker
SPARE Not Used
INFOInfotainment Harness
ConnectionUnderhood Fuse Block
The underhood fuse block in the engine compartment
on the driver's side of the vehicle near the battery.
Lift the cover for access to the fuse/relay block.
To remove fuses hold the end of the fuse between your
thumb and index ®nger and pull straight out.
See
Engine Compartment Overview on page 5-12for
more information on its location.
5-129