2004 DAEWOO NUBIRA battery
[x] Cancel search: batteryPage 2338 of 2643
AUDIO SYSTEMS 9F – 9
DAEWOO V–121 BL4
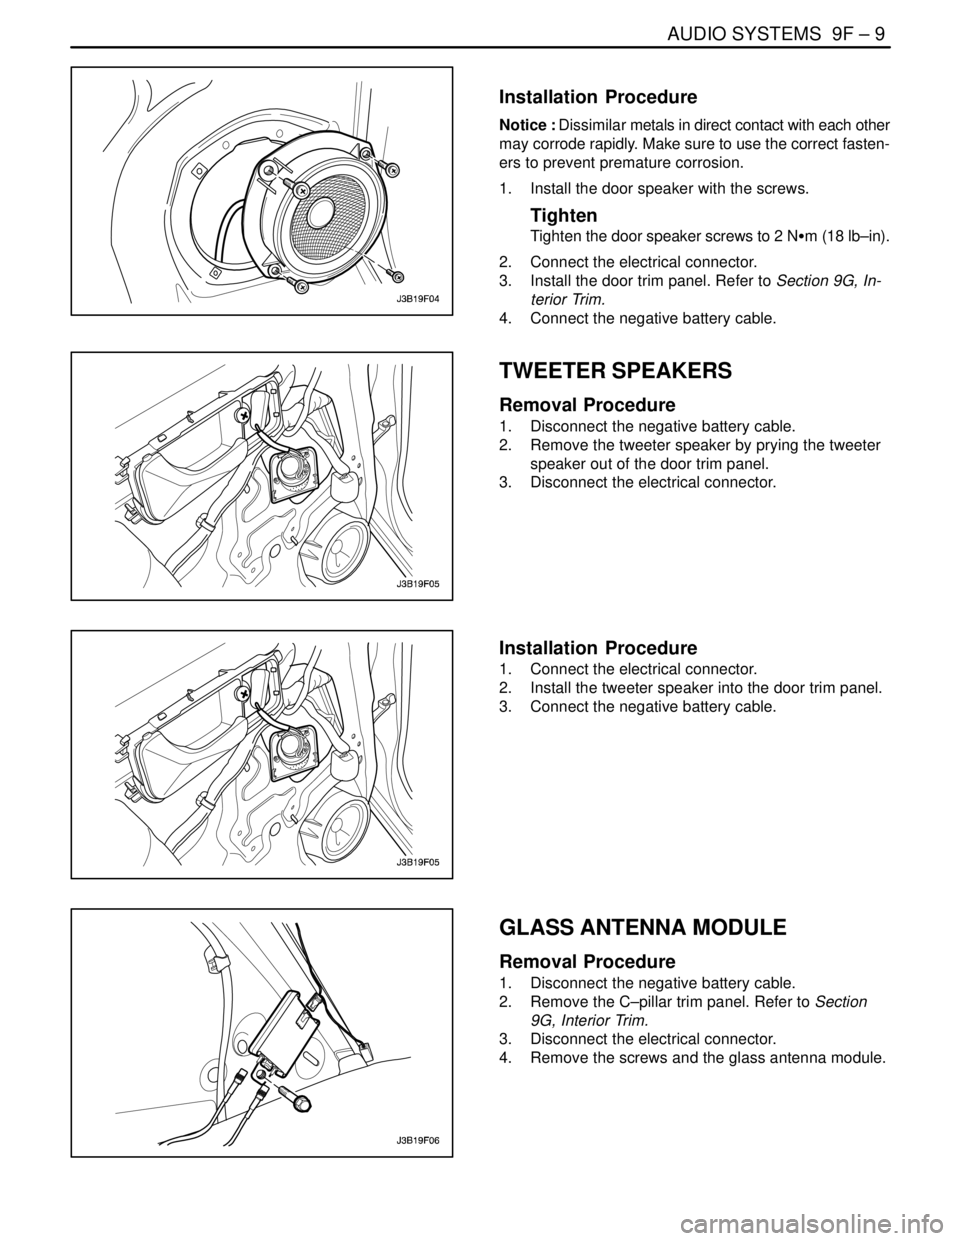
Installation Procedure
Notice : Dissimilar metals in direct contact with each other
may corrode rapidly. Make sure to use the correct fasten-
ers to prevent premature corrosion.
1. Install the door speaker with the screws.
Tighten
Tighten the door speaker screws to 2 NSm (18 lb–in).
2. Connect the electrical connector.
3. Install the door trim panel. Refer to Section 9G, In-
terior Trim.
4. Connect the negative battery cable.
TWEETER SPEAKERS
Removal Procedure
1. Disconnect the negative battery cable.
2. Remove the tweeter speaker by prying the tweeter
speaker out of the door trim panel.
3. Disconnect the electrical connector.
Installation Procedure
1. Connect the electrical connector.
2. Install the tweeter speaker into the door trim panel.
3. Connect the negative battery cable.
GLASS ANTENNA MODULE
Removal Procedure
1. Disconnect the negative battery cable.
2. Remove the C–pillar trim panel. Refer to Section
9G, Interior Trim.
3. Disconnect the electrical connector.
4. Remove the screws and the glass antenna module.
Page 2339 of 2643
9F – 10IAUDIO SYSTEMS
DAEWOO V–121 BL4
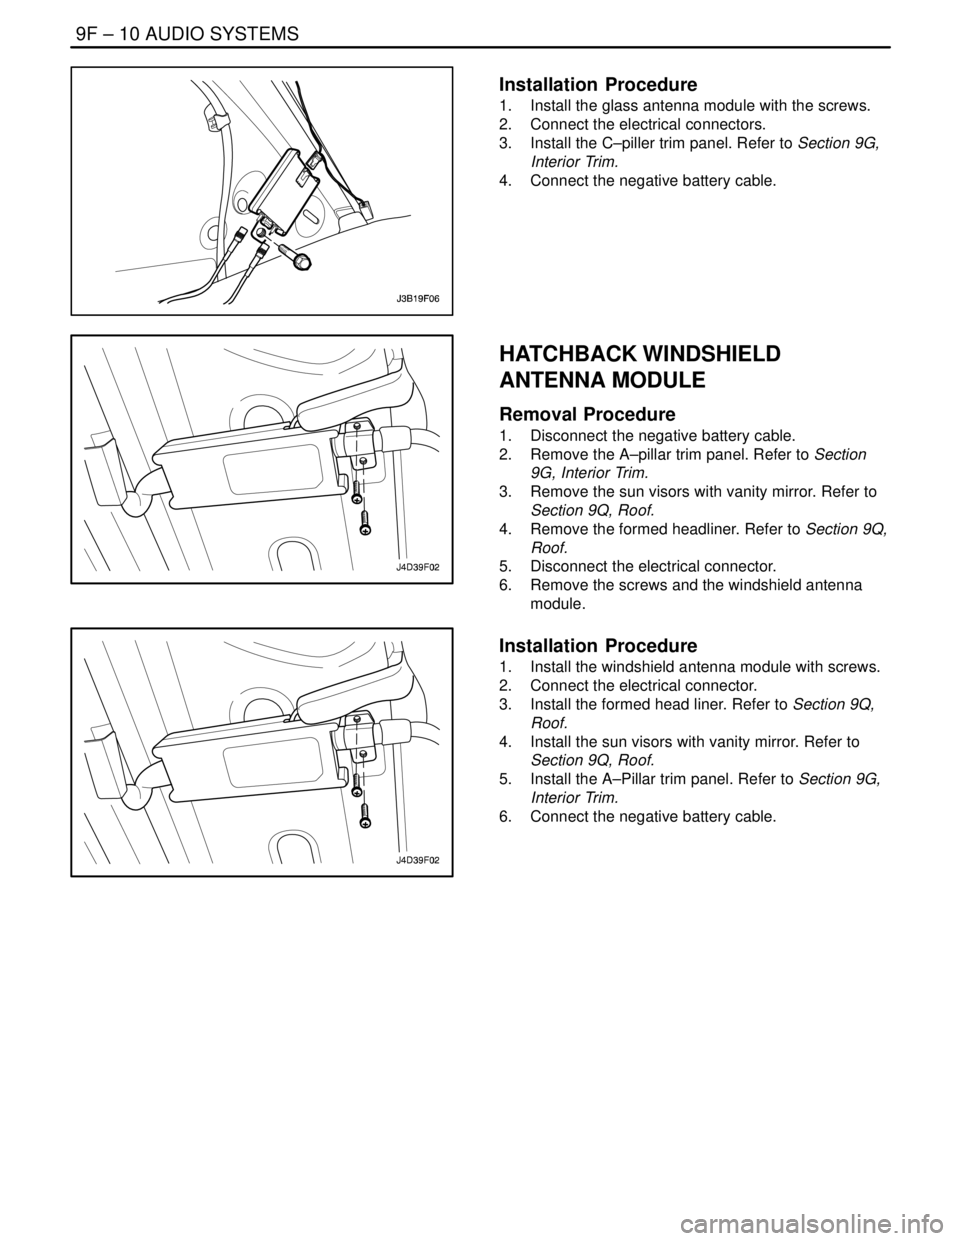
Installation Procedure
1. Install the glass antenna module with the screws.
2. Connect the electrical connectors.
3. Install the C–piller trim panel. Refer to Section 9G,
Interior Trim.
4. Connect the negative battery cable.
HATCHBACK WINDSHIELD
ANTENNA MODULE
Removal Procedure
1. Disconnect the negative battery cable.
2. Remove the A–pillar trim panel. Refer to Section
9G, Interior Trim.
3. Remove the sun visors with vanity mirror. Refer to
Section 9Q, Roof.
4. Remove the formed headliner. Refer to Section 9Q,
Roof.
5. Disconnect the electrical connector.
6. Remove the screws and the windshield antenna
module.
Installation Procedure
1. Install the windshield antenna module with screws.
2. Connect the electrical connector.
3. Install the formed head liner. Refer to Section 9Q,
Roof.
4. Install the sun visors with vanity mirror. Refer to
Section 9Q, Roof.
5. Install the A–Pillar trim panel. Refer to Section 9G,
Interior Trim.
6. Connect the negative battery cable.
Page 2340 of 2643

AUDIO SYSTEMS 9F – 11
DAEWOO V–121 BL4
GENERAL DESCRIPTION
AND SYSTEM OPERATION
STEREO CASSETTE AM/FM RADIO
There are three audio systems offered. The stereo digital
logic cassette AM/FM radio with electronic tape ejection
is offered in standard and deluxe models. Both models
feature RDS (radio data system) which automatically se-
lects the best station within the chain of RDS stations cur-
rently being listened to. A trunk mounted CD changer is
also available.
AUDIO SCURITY SYSTEM
The audio security system is activated whenever the audio
system circuit is disconnected from the battery. A four–
digit security code must be entered in order for the audio
system to resume functioning. The security code is
stamped on a card located in the vehicle (usually in the
glove box). The following security code entering proce-
dure must be used to deactivate the audio security sys-
tem:
1. After connecting the audio security system to the
battery, ”CODE” will flash on the display.
2. Enter the proper security number into the unit, us-
ing the preset buttons No. 1 through 8.
3. For example, if the security number is ”1234”:
a. Press the preset button No. 1. ”CODE” will
disappear and ”1 – – – ” will appear on the dis-
play.
b. Press the preset button No. 2, and ”12 – – ”
will appear.
c. Press the preset button No. 3, and ”123– ” will
appear.
d. Press the preset button No. 4, and ”1234” will
appear and flash three times.4. The audio system will function and will transfer to
the radio.
If the incorrect security number is entered into the unit,
”Err” will appear followed by ”CODE” and there will be sev-
eral audible beeps. If this happens, repeat the security en-
tering procedure beginning with Step 2.
SPEAKERS
All audio systems use eight speakers, four speakers and
four tweeters mounted in each door.
TAPE PLAYER AND CASSETTE
CARE
The head and the capstan are the two parts of the tape
player that should be cleaned. This service should be per-
formed every 100 hours of cassette operation.
To clean the head and the capstan, use a cotton swab
dipped in rubbing alcohol.
A cassette cleaning kit may also be used to clean the head
and the capstan. Follow the cleaning kit instructions to
clean the tape player.
Do not touch the tape head with magnetized tools. If the
head becomes magnetized, it will degrade cassettes
played in the player. No service is performed on the cas-
settes. The cassette manufacturer handles warranties of
the cassettes. Store cassettes away from extreme heat
and direct sunlight.
COMPACT DISC CARE
Handle discs carefully. Store the discs in protective cases
away from the sun, heat, and dust. If the surface is soiled,
dampen a clean, soft cloth in a solution of mild neutral de-
tergent and wipe the disc clean.
Page 2341 of 2643

SECTION : 9G
INTERIOR TRIM
CAUTION : Disconnect the negative battery cable before removing or installing any electrical unit or when a tool
or equipment could easily come in contact with exposed electrical terminals. Disconnecting this cable will help
prevent personal injury and damage to the vehicle. The ignition must also be in LOCK unless otherwise noted.
TABLE OF CONTENTS
SPECIFICATIONS9G–1 . . . . . . . . . . . . . . . . . . . . . . . . . .
Fastener Tightening Specifications 9G–1. . . . . . . . . . .
SPECIAL TOOLS9G–2 . . . . . . . . . . . . . . . . . . . . . . . . . . .
Special Tools Table 9G–2. . . . . . . . . . . . . . . . . . . . . . . .
MAINTENANCE AND REPAIR9G–3 . . . . . . . . . . . . . . .
ON–VEHICLE SERVICE 9G–3. . . . . . . . . . . . . . . . . . . . .
Front Door Trim Panel 9G–3. . . . . . . . . . . . . . . . . . . . . .
Rear Door Trim Panel 9G–4. . . . . . . . . . . . . . . . . . . . . .
A–pillar Trim Panel 9G–4. . . . . . . . . . . . . . . . . . . . . . . . .
Upper B–pillar Trim Panel 9G–5. . . . . . . . . . . . . . . . . . .
Lower B–pillar Trim Panel 9G–5. . . . . . . . . . . . . . . . . . .
C–pillar Trim Panel 9G–6. . . . . . . . . . . . . . . . . . . . . . . . .
Deck Lid Sill Plate Cover 9G–6. . . . . . . . . . . . . . . . . . .
Front Rocker Trim Panel 9G–7. . . . . . . . . . . . . . . . . . . .
Rear Rocker Trim Panel 9G–7. . . . . . . . . . . . . . . . . . . .
Front Wheelhouse Trim 9G–8. . . . . . . . . . . . . . . . . . . . .
Rear Wheelhouse Trim 9G–8. . . . . . . . . . . . . . . . . . . . .
Floor Console 9G–9. . . . . . . . . . . . . . . . . . . . . . . . . . . . . Floor Carpet 9G–10. . . . . . . . . . . . . . . . . . . . . . . . . . . . .
Luggage Compartment Rear Low Cover 9G–11. . . . .
Luggage Compartment Wheelhouse Trim
Panel 9G–12. . . . . . . . . . . . . . . . . . . . . . . . . . . . . . . . . .
Driver’s Side Knee Bolster 9G–12. . . . . . . . . . . . . . . . .
Hatchback Door Lower Garnish Molding 9G–13. . . . .
Hatchback Door Upper Garnish Molding 9G–14. . . . .
Luggage Compartment Wheelhouse Trim Panel
(HATCHBACK) 9G–14. . . . . . . . . . . . . . . . . . . . . . . . .
Luggage Compartment Rear Trim Panel 9G–14. . . . .
GENERAL DESCRIPTION AND SYSTEM
OPERATION9G–16 . . . . . . . . . . . . . . . . . . . . . . . . . . . . .
Interior Trim Panels 9G–16. . . . . . . . . . . . . . . . . . . . . . .
Pressure Relief Vent 9G–16. . . . . . . . . . . . . . . . . . . . . .
Floor Console 9G–16. . . . . . . . . . . . . . . . . . . . . . . . . . . .
Floor Carpet 9G–16. . . . . . . . . . . . . . . . . . . . . . . . . . . . .
Rear Compartment Security Cover
(HATCHBACK) 9G–16. . . . . . . . . . . . . . . . . . . . . . . . .
SPECIFICATIONS
FASTENER TIGHTENING SPECIFICATIONS
ApplicationNSmLb–FtLb–In
Door Trim Panel Screws2.5–22
Driver’s Side Knee Bolster Mounting Bolts10–89
Floor Console Screws2.5–22
Gearshift Housing Bolts8–70
Hood Latch Release Handle Mounting Screw3–27
Seat Belt Anchor Bolt3828–
Page 2349 of 2643
INTERIOR TRIM 9G – 9
DAEWOO V–121 BL4
Installation Procedure
1. Install the rear wheelhouse trim with the screws.
2. Install the seat belt bolt.
3. Install the rear seat. Refer to Section 9H, Seats.
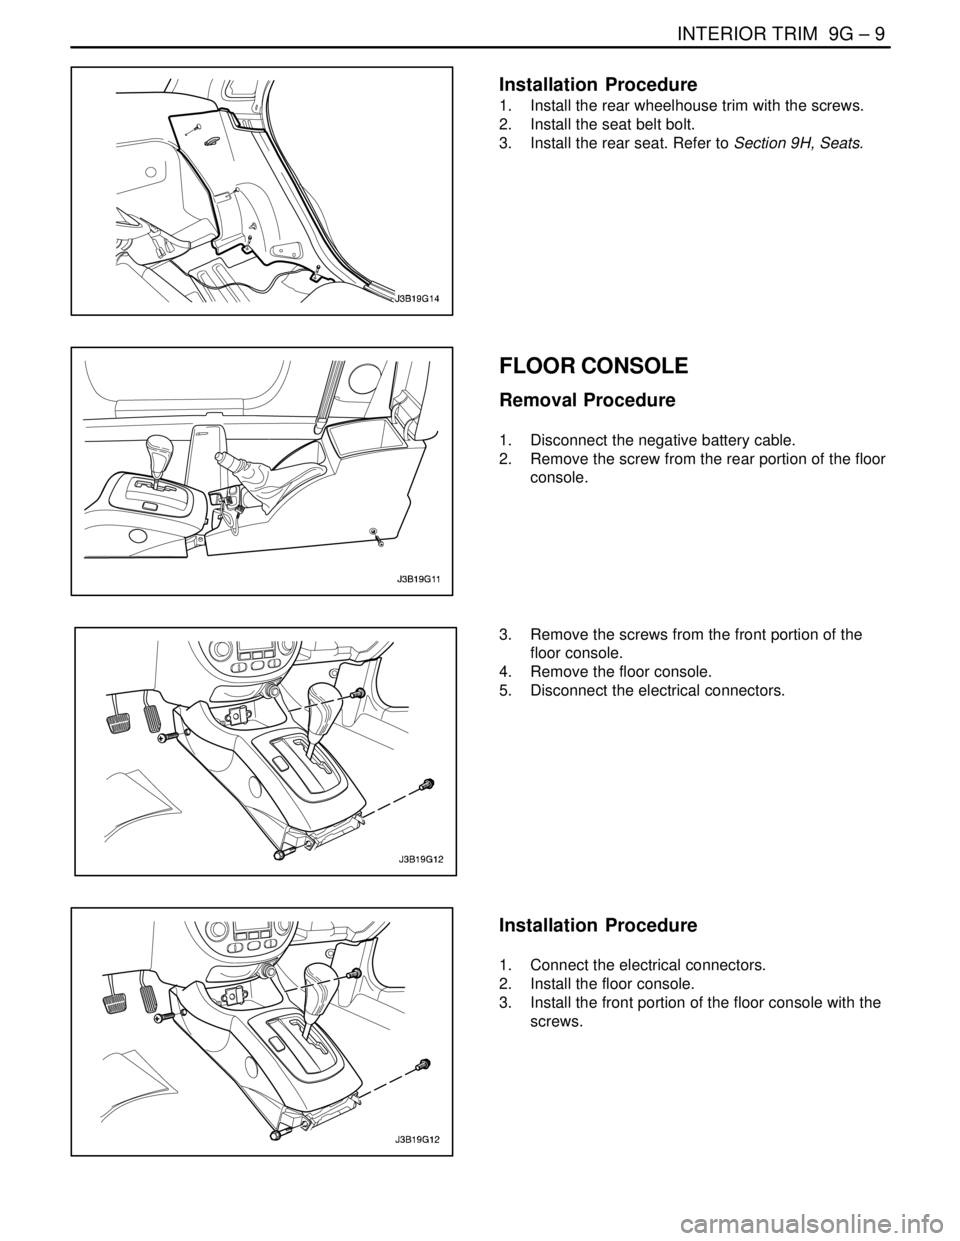
FLOOR CONSOLE
Removal Procedure
1. Disconnect the negative battery cable.
2. Remove the screw from the rear portion of the floor
console.
3. Remove the screws from the front portion of the
floor console.
4. Remove the floor console.
5. Disconnect the electrical connectors.
Installation Procedure
1. Connect the electrical connectors.
2. Install the floor console.
3. Install the front portion of the floor console with the
screws.
Page 2350 of 2643
9G – 10IINTERIOR TRIM
DAEWOO V–121 BL4
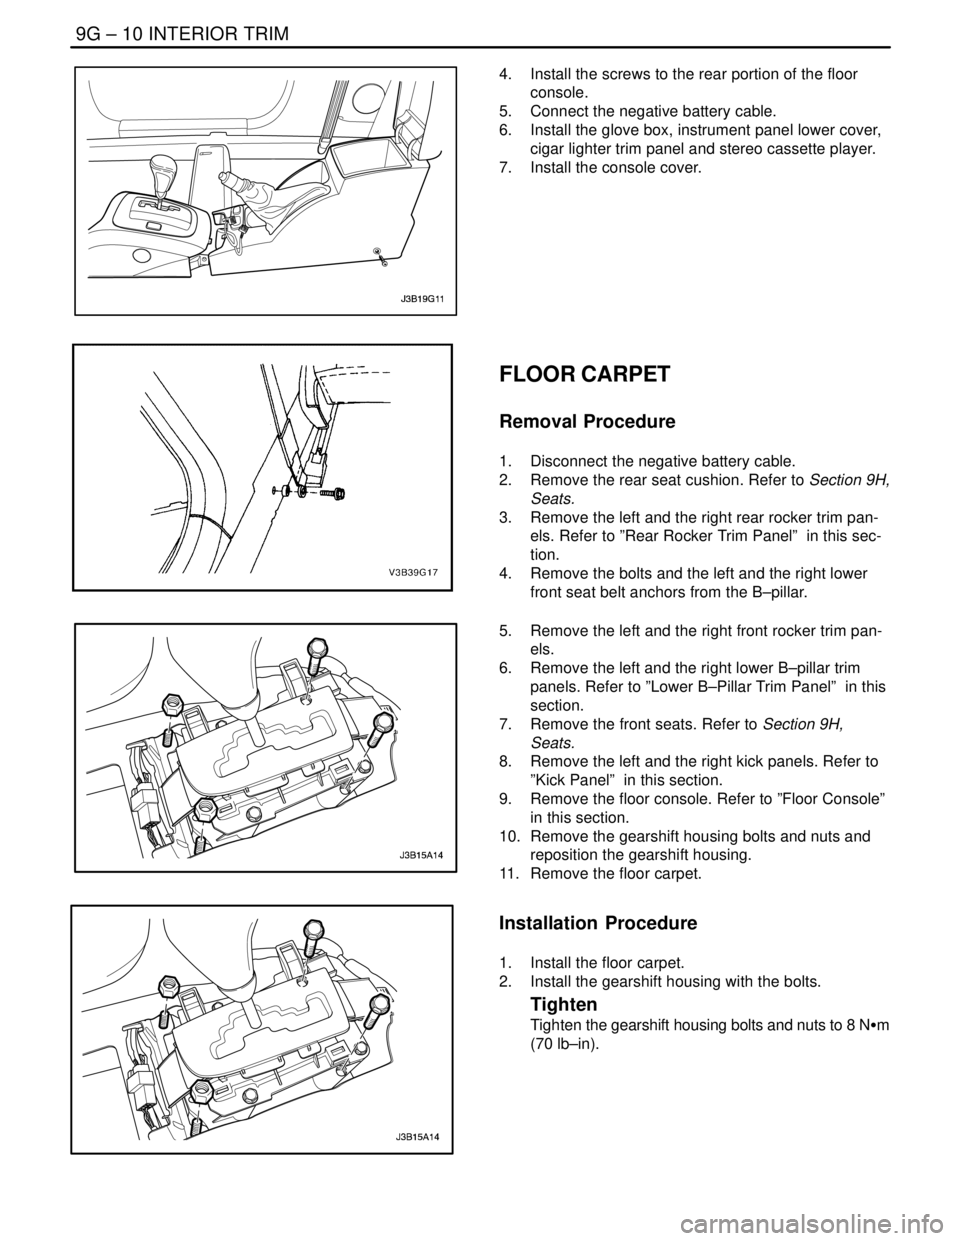
4. Install the screws to the rear portion of the floor
console.
5. Connect the negative battery cable.
6. Install the glove box, instrument panel lower cover,
cigar lighter trim panel and stereo cassette player.
7. Install the console cover.
FLOOR CARPET
Removal Procedure
1. Disconnect the negative battery cable.
2. Remove the rear seat cushion. Refer to Section 9H,
Seats.
3. Remove the left and the right rear rocker trim pan-
els. Refer to ”Rear Rocker Trim Panel” in this sec-
tion.
4. Remove the bolts and the left and the right lower
front seat belt anchors from the B–pillar.
5. Remove the left and the right front rocker trim pan-
els.
6. Remove the left and the right lower B–pillar trim
panels. Refer to ”Lower B–Pillar Trim Panel” in this
section.
7. Remove the front seats. Refer to Section 9H,
Seats.
8. Remove the left and the right kick panels. Refer to
”Kick Panel” in this section.
9. Remove the floor console. Refer to ”Floor Console”
in this section.
10. Remove the gearshift housing bolts and nuts and
reposition the gearshift housing.
11. Remove the floor carpet.
Installation Procedure
1. Install the floor carpet.
2. Install the gearshift housing with the bolts.
Tighten
Tighten the gearshift housing bolts and nuts to 8 NSm
(70 lb–in).
Page 2351 of 2643
INTERIOR TRIM 9G – 11
DAEWOO V–121 BL4
3. Install the floor console. Refer to ”Floor Console” in
this section.
4. Install the left and the right kick panels. Refer to
”Kick Panel” in this section.
5. Install the front seats. Refer to Section 9H, Seats.
6. Install the left and the right lower B–pillar trim pan-
els. Refer to ”Lower B–Pillar Trim Panel” in this
section.
7. Install the left and the right front rocker trim panels.
8. Install the left and the right lower front seat belt an-
chors to the B–pillar with the bolts.
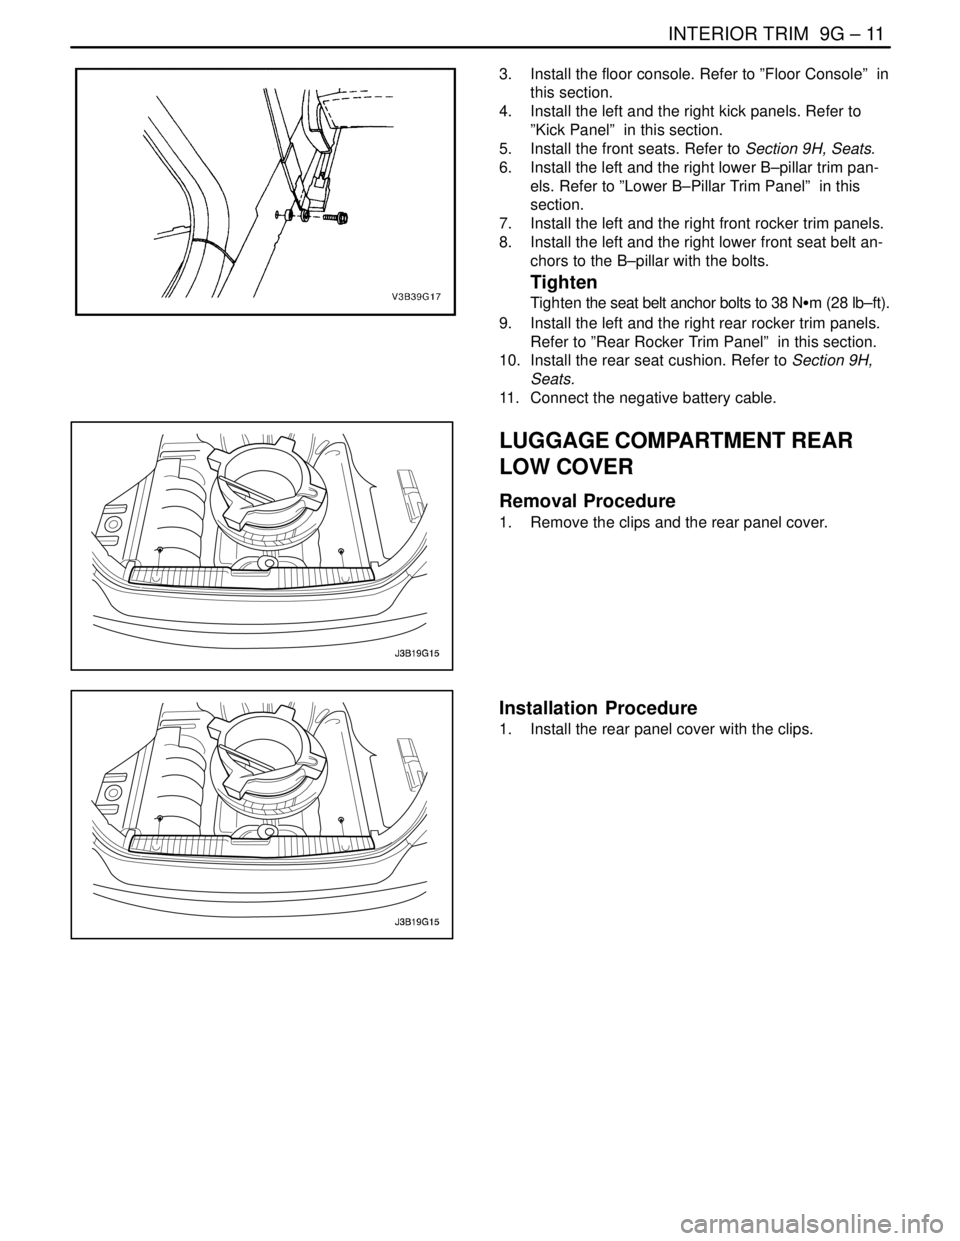
Tighten
Tighten the seat belt anchor bolts to 38 NSm (28 lb–ft).
9. Install the left and the right rear rocker trim panels.
Refer to ”Rear Rocker Trim Panel” in this section.
10. Install the rear seat cushion. Refer to Section 9H,
Seats.
11. Connect the negative battery cable.
LUGGAGE COMPARTMENT REAR
LOW COVER
Removal Procedure
1. Remove the clips and the rear panel cover.
Installation Procedure
1. Install the rear panel cover with the clips.
Page 2357 of 2643

SECTION : 9H
SEATS
CAUTION : Disconnect the negative battery cable before removing or installing any electrical unit or when a tool
or equipment could easily come in contact with exposed electrical terminals. Disconnecting this cable will help
prevent personal injury and damage to the vehicle. The ignition must also be in LOCK unless otherwise noted.
TABLE OF CONTENTS
SPECIFICATIONS9H–2 . . . . . . . . . . . . . . . . . . . . . . . . . .
Fastener Tightening Specifications 9H–2. . . . . . . . . . .
MAINTENANCE AND REPAIR9H–3 . . . . . . . . . . . . . . .
ON–VEHICLE SERVICE 9H–3. . . . . . . . . . . . . . . . . . . . .
Front Bucket Seat 9H–3. . . . . . . . . . . . . . . . . . . . . . . . .
Front Seatback 9H–4. . . . . . . . . . . . . . . . . . . . . . . . . . . .
Front Seat Cushion 9H–5. . . . . . . . . . . . . . . . . . . . . . . .
Lumbar Support Lever 9H–5. . . . . . . . . . . . . . . . . . . . . .
Height Adjustment Knobs 9H–6. . . . . . . . . . . . . . . . . . .
Front Seat Trim 9H–6. . . . . . . . . . . . . . . . . . . . . . . . . . . . Head Restraint 9H–7. . . . . . . . . . . . . . . . . . . . . . . . . . . .
Rear Seat Cushion 9H–8. . . . . . . . . . . . . . . . . . . . . . . . .
Split Rear Seatback 9H–8. . . . . . . . . . . . . . . . . . . . . . . .
Split Rear Seatback Hinge 9H–9. . . . . . . . . . . . . . . . . .
Rear Seat Center Armrest 9H–9. . . . . . . . . . . . . . . . . .
Seat Covers 9H–10. . . . . . . . . . . . . . . . . . . . . . . . . . . . .
Child Seat Anchorage 9H–10. . . . . . . . . . . . . . . . . . . . .
Hatchback Child Seat Anchorage 9H–11. . . . . . . . . . .
GENERAL DESCRIPTION AND SYSTEM
OPERATION9H–12 . . . . . . . . . . . . . . . . . . . . . . . . . . . . .
Seats 9H–12. . . . . . . . . . . . . . . . . . . . . . . . . . . . . . . . . . .