2004 DAEWOO LACETTI height
[x] Cancel search: heightPage 181 of 2643

1.8L DOHC ENGINE MECHANICAL 1C2 – 61
DAEWOO V–121 BL4
4. Inspect the dimension for the valve seat width.
S Intake: 1.2 to 1.4 mm (0.047 to 0.055 inch).
S Exhaust: 1.4 to 1.8 mm (0.055 to 0.070 inch).
5. Inspect the assembly height of the intake valves
and the exhaust valves. If the dimension is exceed-
ed, install new valves. Inspect the assembly height
of the intake valves and the exhaust valves again. If
the valve assembly height is still too large despite
replacing the valves, replace the cylinder head.
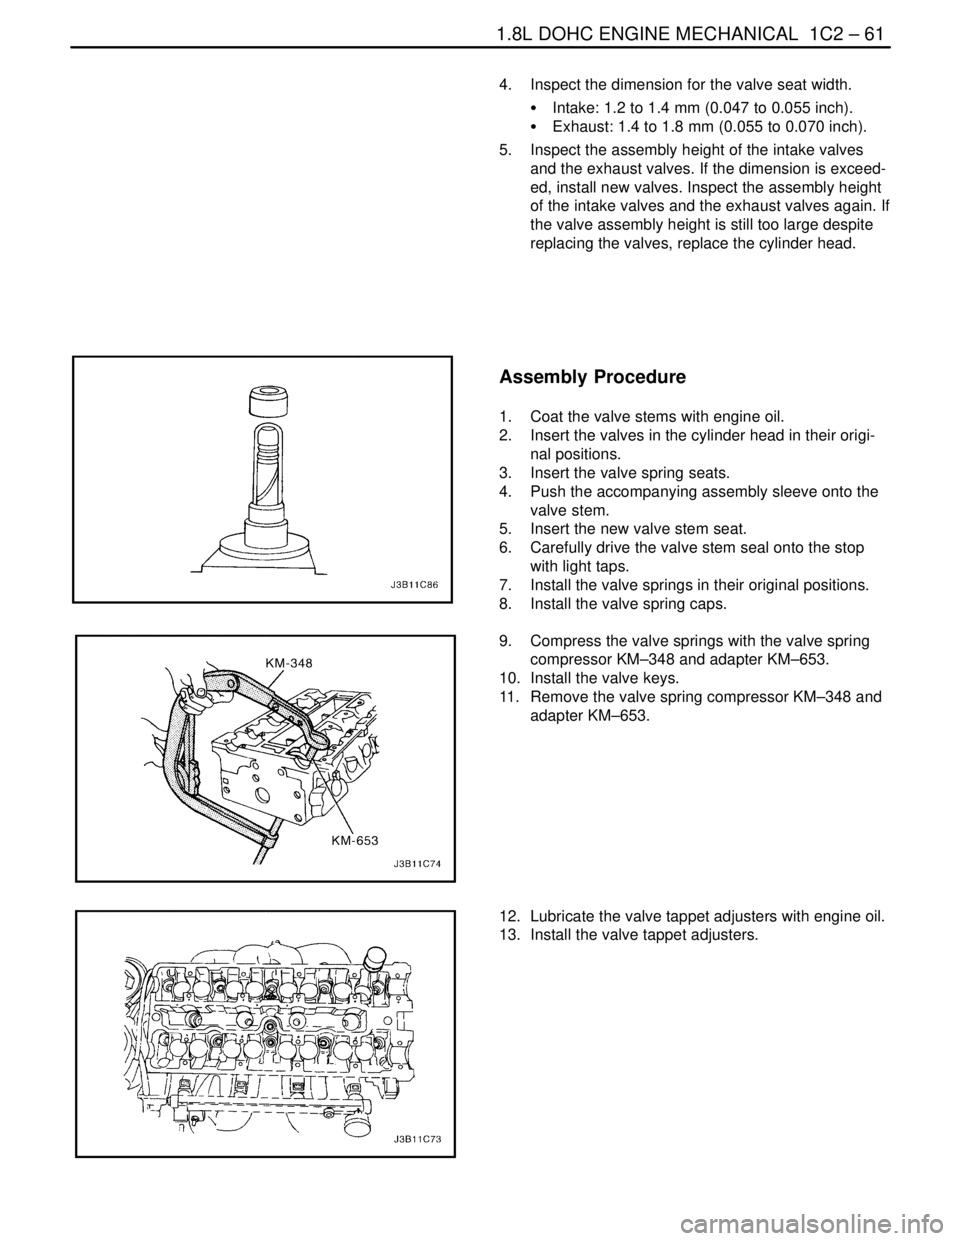
Assembly Procedure
1. Coat the valve stems with engine oil.
2. Insert the valves in the cylinder head in their origi-
nal positions.
3. Insert the valve spring seats.
4. Push the accompanying assembly sleeve onto the
valve stem.
5. Insert the new valve stem seat.
6. Carefully drive the valve stem seal onto the stop
with light taps.
7. Install the valve springs in their original positions.
8. Install the valve spring caps.
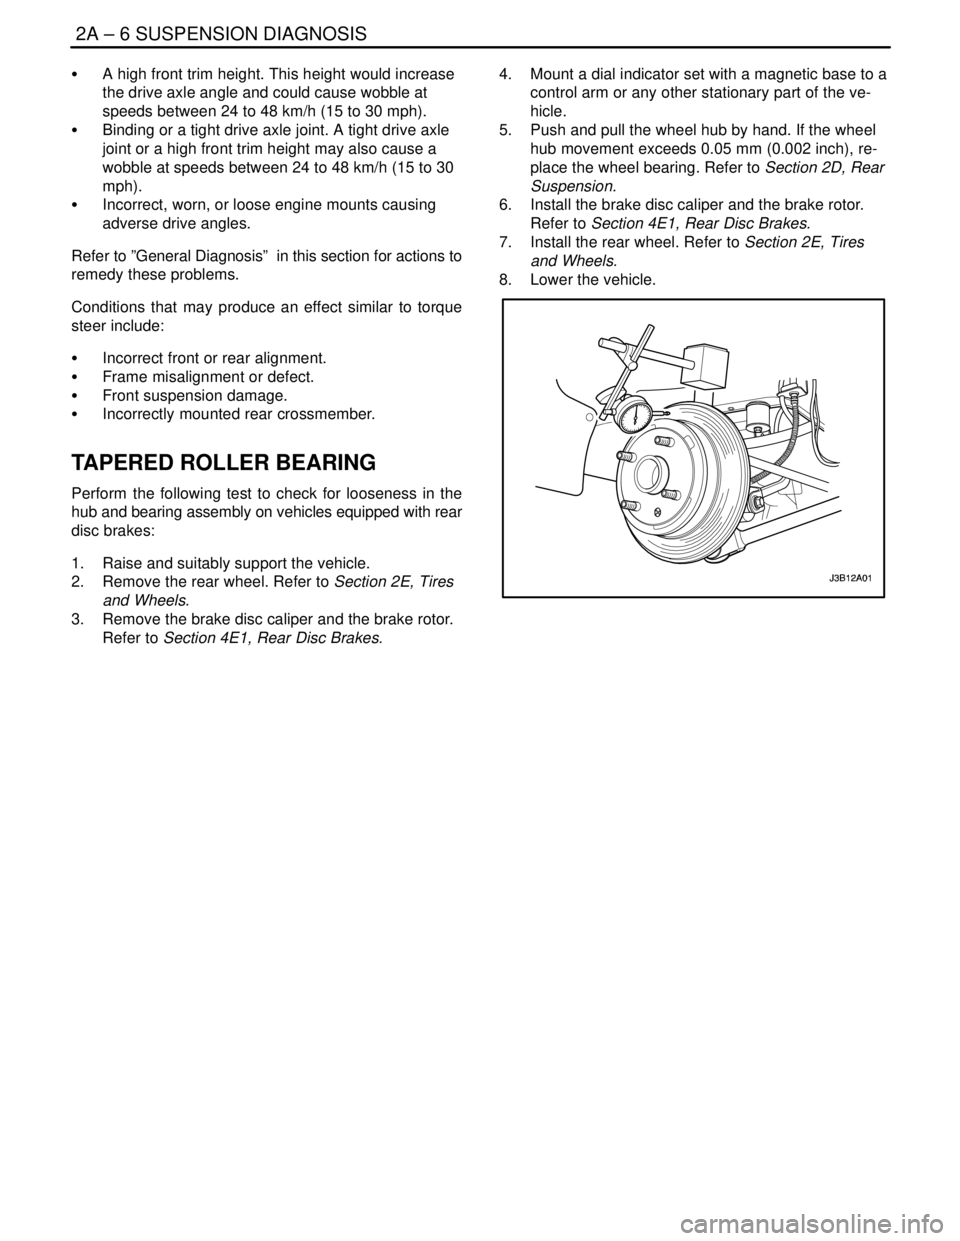
9. Compress the valve springs with the valve spring
compressor KM–348 and adapter KM–653.
10. Install the valve keys.
11. Remove the valve spring compressor KM–348 and
adapter KM–653.
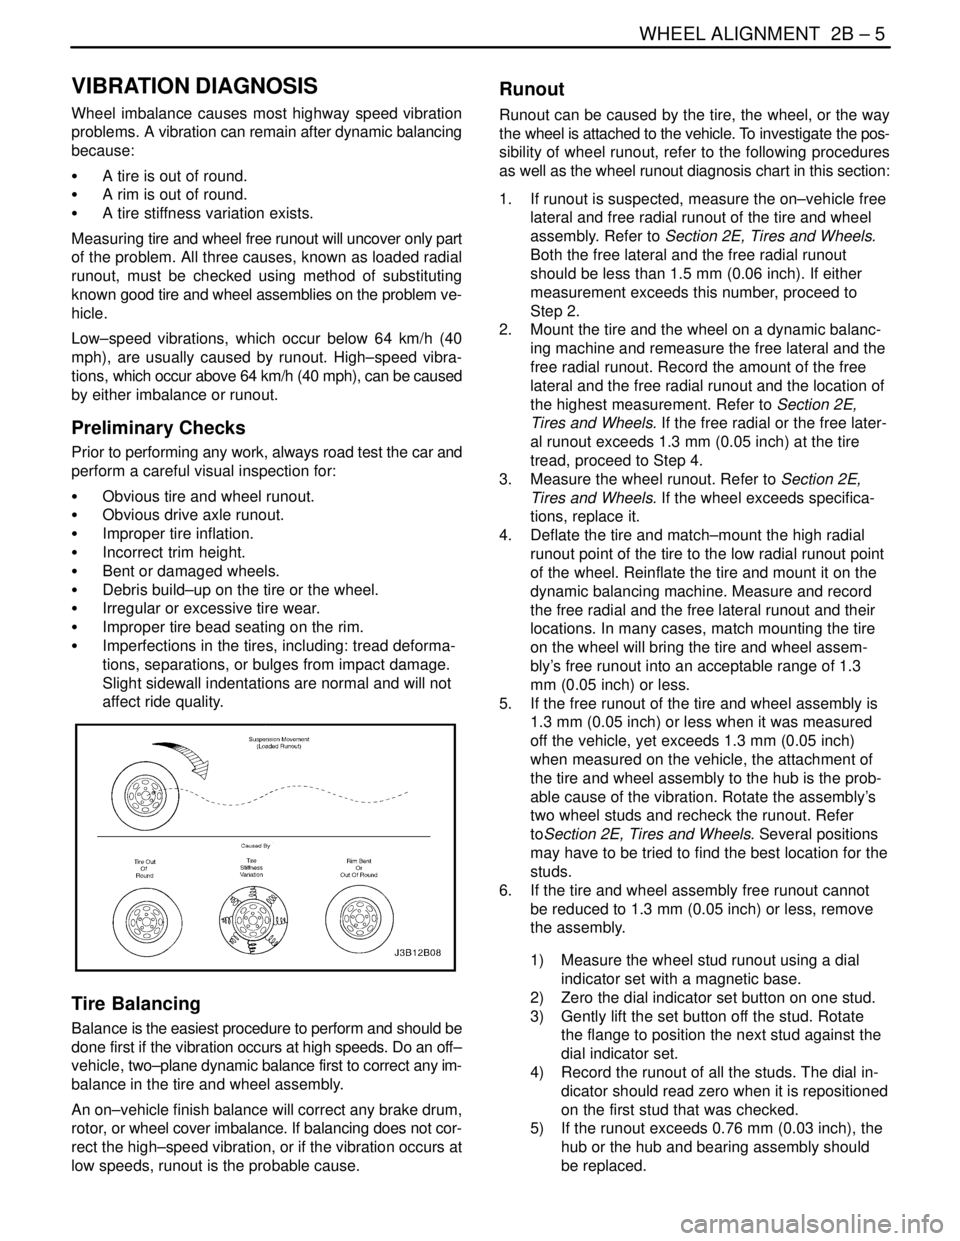
12. Lubricate the valve tappet adjusters with engine oil.
13. Install the valve tappet adjusters.
Page 905 of 2643

2A – 4ISUSPENSION DIAGNOSIS
DAEWOO V–121 BL4
Checks Action
Check the steering gear preload adjustment.Perform a rack bearing preload adjustment.
Check the front–wheel and the rear–wheel alignment.Align the front and the rear wheels.
Erratic Steering when Braking
ChecksAction
Inspect for worn or loose wheel bearings.Replace the wheel bearings.
Inspect for a broken or a sagging spring.Replace the spring.
Inspect for a leaking wheel cylinder or caliper.Replace the wheel cylinder or the caliper.
Inspect for warped rotors.Replace the rotors.
Inspect for an incorrect or an uneven caster.If the caster is beyond specifications, check the frame and
repair it as needed.
Low or Uneven Trim Height
ChecksAction
Inspect for a broken or a sagging spring.Replace the spring.
Check for an overloaded vehicle.Maintain the proper load weight.
Inspect for an incorrect or weak spring.Replace the spring.
Ride Too Soft
ChecksAction
Inspect for worn strut dampeners.Replace the strut dampeners.
Inspect for a broken or a sagging spring.Replace the spring.
Ride Too Harsh
ChecksAction
Inspect for incorrect strut dampeners.Replace the strut dampeners.
Inspect for an incorrect spring.Replace the spring.
Body Leans or Sways in Corners
ChecksAction
Inspect for a loose stabilizer shaft link.Tighten the stabilizer shaft link.
Inspect for worn strut dampeners or strut mountings.Replace the strut dampeners. Tighten the strut assembly
mounting bolts.
Check for an overloaded vehicle.Maintain the proper load weight.
Inspect for a broken or a sagging spring.Replace the spring.
Suspension Bottoms
ChecksAction
Inspect for worn strut dampeners.Replace the strut dampeners.
Check for an overloaded vehicle.Maintain the proper load weight.
Inspect for a broken or a sagging spring.Replace the spring.
Page 907 of 2643

2A – 6ISUSPENSION DIAGNOSIS
DAEWOO V–121 BL4
S A high front trim height. This height would increase
the drive axle angle and could cause wobble at
speeds between 24 to 48 km/h (15 to 30 mph).
S Binding or a tight drive axle joint. A tight drive axle
joint or a high front trim height may also cause a
wobble at speeds between 24 to 48 km/h (15 to 30
mph).
S Incorrect, worn, or loose engine mounts causing
adverse drive angles.
Refer to ”General Diagnosis” in this section for actions to
remedy these problems.
Conditions that may produce an effect similar to torque
steer include:
S Incorrect front or rear alignment.
S Frame misalignment or defect.
S Front suspension damage.
S Incorrectly mounted rear crossmember.
TAPERED ROLLER BEARING
Perform the following test to check for looseness in the
hub and bearing assembly on vehicles equipped with rear
disc brakes:
1. Raise and suitably support the vehicle.
2. Remove the rear wheel. Refer to Section 2E, Tires
and Wheels.
3. Remove the brake disc caliper and the brake rotor.
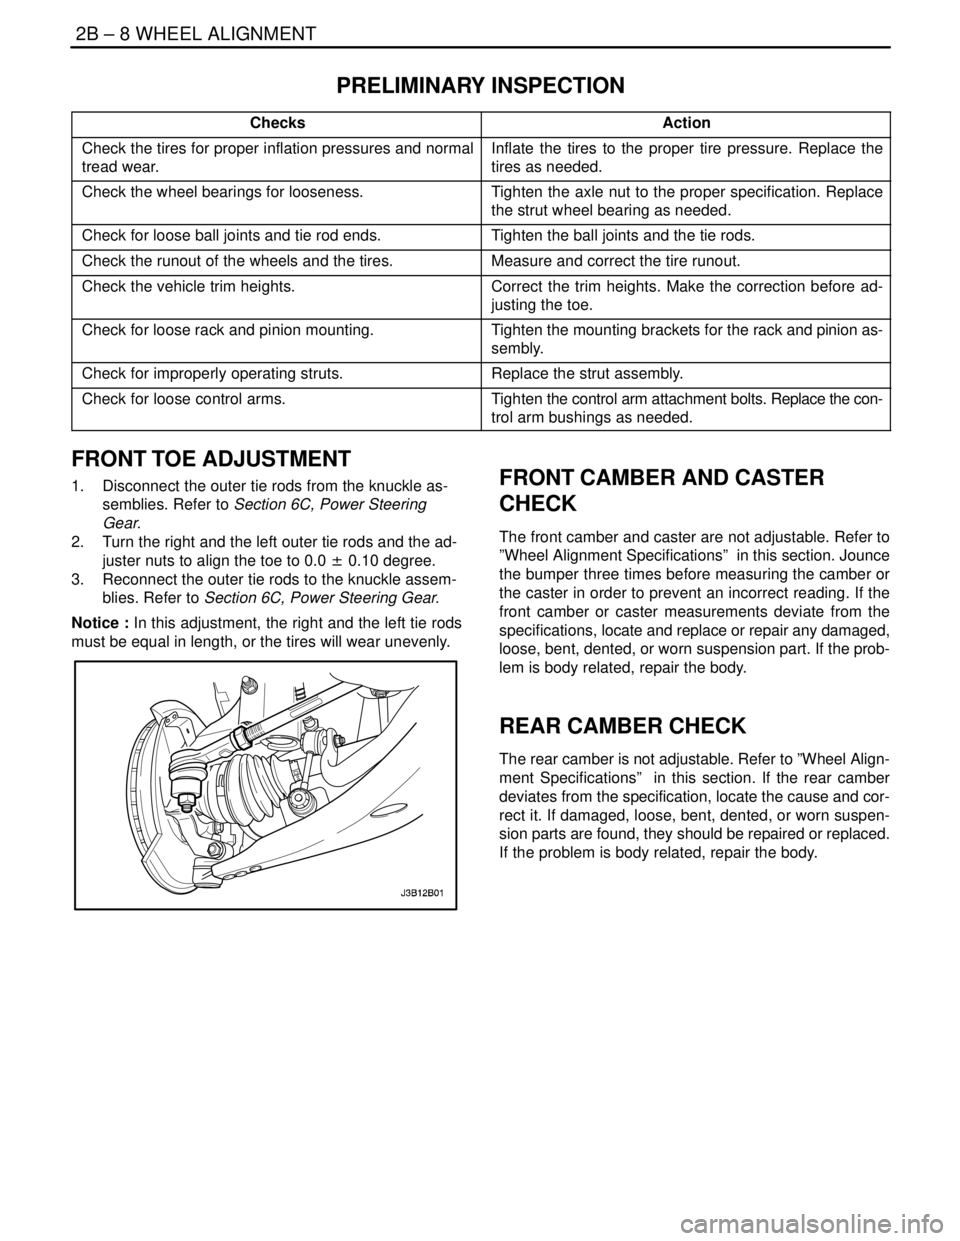
Refer to Section 4E1, Rear Disc Brakes.4. Mount a dial indicator set with a magnetic base to a
control arm or any other stationary part of the ve-
hicle.
5. Push and pull the wheel hub by hand. If the wheel
hub movement exceeds 0.05 mm (0.002 inch), re-
place the wheel bearing. Refer to Section 2D, Rear
Suspension.
6. Install the brake disc caliper and the brake rotor.
Refer to Section 4E1, Rear Disc Brakes.
7. Install the rear wheel. Refer to Section 2E, Tires
and Wheels.
8. Lower the vehicle.
Page 912 of 2643

WHEEL ALIGNMENT 2B – 5
DAEWOO V–121 BL4
VIBRATION DIAGNOSIS
Wheel imbalance causes most highway speed vibration
problems. A vibration can remain after dynamic balancing
because:
S A tire is out of round.
S A rim is out of round.
S A tire stiffness variation exists.
Measuring tire and wheel free runout will uncover only part
of the problem. All three causes, known as loaded radial
runout, must be checked using method of substituting
known good tire and wheel assemblies on the problem ve-
hicle.
Low–speed vibrations, which occur below 64 km/h (40
mph), are usually caused by runout. High–speed vibra-
tions, which occur above 64 km/h (40 mph), can be caused
by either imbalance or runout.
Preliminary Checks
Prior to performing any work, always road test the car and
perform a careful visual inspection for:
S Obvious tire and wheel runout.
S Obvious drive axle runout.
S Improper tire inflation.
S Incorrect trim height.
S Bent or damaged wheels.
S Debris build–up on the tire or the wheel.
S Irregular or excessive tire wear.
S Improper tire bead seating on the rim.
S Imperfections in the tires, including: tread deforma-
tions, separations, or bulges from impact damage.
Slight sidewall indentations are normal and will not
affect ride quality.
Tire Balancing
Balance is the easiest procedure to perform and should be
done first if the vibration occurs at high speeds. Do an off–
vehicle, two–plane dynamic balance first to correct any im-
balance in the tire and wheel assembly.
An on–vehicle finish balance will correct any brake drum,
rotor, or wheel cover imbalance. If balancing does not cor-
rect the high–speed vibration, or if the vibration occurs at
low speeds, runout is the probable cause.
Runout
Runout can be caused by the tire, the wheel, or the way
the wheel is attached to the vehicle. To investigate the pos-
sibility of wheel runout, refer to the following procedures
as well as the wheel runout diagnosis chart in this section:
1. If runout is suspected, measure the on–vehicle free
lateral and free radial runout of the tire and wheel
assembly. Refer to Section 2E, Tires and Wheels.
Both the free lateral and the free radial runout
should be less than 1.5 mm (0.06 inch). If either
measurement exceeds this number, proceed to
Step 2.
2. Mount the tire and the wheel on a dynamic balanc-
ing machine and remeasure the free lateral and the
free radial runout. Record the amount of the free
lateral and the free radial runout and the location of
the highest measurement. Refer to Section 2E,
Tires and Wheels. If the free radial or the free later-
al runout exceeds 1.3 mm (0.05 inch) at the tire
tread, proceed to Step 4.
3. Measure the wheel runout. Refer to Section 2E,
Tires and Wheels. If the wheel exceeds specifica-
tions, replace it.
4. Deflate the tire and match–mount the high radial
runout point of the tire to the low radial runout point
of the wheel. Reinflate the tire and mount it on the
dynamic balancing machine. Measure and record
the free radial and the free lateral runout and their
locations. In many cases, match mounting the tire
on the wheel will bring the tire and wheel assem-
bly’s free runout into an acceptable range of 1.3
mm (0.05 inch) or less.
5. If the free runout of the tire and wheel assembly is
1.3 mm (0.05 inch) or less when it was measured
off the vehicle, yet exceeds 1.3 mm (0.05 inch)
when measured on the vehicle, the attachment of
the tire and wheel assembly to the hub is the prob-
able cause of the vibration. Rotate the assembly’s
two wheel studs and recheck the runout. Refer
toSection 2E, Tires and Wheels. Several positions
may have to be tried to find the best location for the
studs.
6. If the tire and wheel assembly free runout cannot
be reduced to 1.3 mm (0.05 inch) or less, remove
the assembly.
1) Measure the wheel stud runout using a dial
indicator set with a magnetic base.
2) Zero the dial indicator set button on one stud.
3) Gently lift the set button off the stud. Rotate
the flange to position the next stud against the
dial indicator set.
4) Record the runout of all the studs. The dial in-
dicator should read zero when it is repositioned
on the first stud that was checked.
5) If the runout exceeds 0.76 mm (0.03 inch), the
hub or the hub and bearing assembly should
be replaced.
Page 915 of 2643

2B – 8IWHEEL ALIGNMENT
DAEWOO V–121 BL4
PRELIMINARY INSPECTION
ChecksAction
Check the tires for proper inflation pressures and normal
tread wear.Inflate the tires to the proper tire pressure. Replace the
tires as needed.
Check the wheel bearings for looseness.Tighten the axle nut to the proper specification. Replace
the strut wheel bearing as needed.
Check for loose ball joints and tie rod ends.Tighten the ball joints and the tie rods.
Check the runout of the wheels and the tires.Measure and correct the tire runout.
Check the vehicle trim heights.Correct the trim heights. Make the correction before ad-
justing the toe.
Check for loose rack and pinion mounting.Tighten the mounting brackets for the rack and pinion as-
sembly.
Check for improperly operating struts.Replace the strut assembly.
Check for loose control arms.Tighten the control arm attachment bolts. Replace the con-
trol arm bushings as needed.
FRONT TOE ADJUSTMENT
1. Disconnect the outer tie rods from the knuckle as-
semblies. Refer to Section 6C, Power Steering
Gear.
2. Turn the right and the left outer tie rods and the ad-
juster nuts to align the toe to 0.0 ± 0.10 degree.
3. Reconnect the outer tie rods to the knuckle assem-
blies. Refer to Section 6C, Power Steering Gear.
Notice : In this adjustment, the right and the left tie rods
must be equal in length, or the tires will wear unevenly.FRONT CAMBER AND CASTER
CHECK
The front camber and caster are not adjustable. Refer to
”Wheel Alignment Specifications” in this section. Jounce
the bumper three times before measuring the camber or
the caster in order to prevent an incorrect reading. If the
front camber or caster measurements deviate from the
specifications, locate and replace or repair any damaged,
loose, bent, dented, or worn suspension part. If the prob-
lem is body related, repair the body.
REAR CAMBER CHECK
The rear camber is not adjustable. Refer to ”Wheel Align-
ment Specifications” in this section. If the rear camber
deviates from the specification, locate the cause and cor-
rect it. If damaged, loose, bent, dented, or worn suspen-
sion parts are found, they should be repaired or replaced.
If the problem is body related, repair the body.
Page 919 of 2643

2C – 2IFRONT SUSPENSION
DAEWOO V–121 BL4
SPECIFICATIONS
GENERAL SPECIFICATIONS
ApplicationTrim Height
Center of Front Wheel to Bottom of Front Wheel Well368 mm (14.4 in.)
Center of Rear Wheel to Bottom of Rear Wheel Well367 mm (14.4 in.)
* CONDITION : Full Fuel in the Tank
FASTENER TIGHTENING SPECIFICATIONS
ApplicationNSmLb–FtLb–In
Ball Joint Pinch Bolt Nut6044–
Ball Joint–to–Control Arm Nuts10074–
Front Control Arm–to–Crossmember Bolt12592–
Rear Contral Arm–to–Crossmember Bolt11 081–
Crossmember Link–to–Crossmember Bolt11 484–
Crossmember Link–to–Transaxle Bracket Nut169125–
Drive Axle–to–Hub Caulking Nut300221–
Front Crossmember–to–Body Bolts13096–
Piston Rod Nut7555–
Rear Crossmember–to–Body Bolts196145–
Stabilizer Link–to–Strut Assembly Nut4735–
Stabilizer Shaft–to–Crossmember Clamp Bolts2518–
Stabilizer Shaft–to–Stabilizer Link Nut4735–
Steering Knuckle–to–Strut Assembly Nuts/Bolts12089–
Strut Assembly–to–Body Nut6548–
Page 923 of 2643

2C – 6IFRONT SUSPENSION
DAEWOO V–121 BL4
BALL JOINT AND KNUCKLE
Ball Joint Inspection
1. Raise the front of the vehicle to allow the front sus-
pension to hang free.
2. Grasp the tire at the top and the bottom.
3. Move the top of the tire in an in–and–out motion.
4. Look for any horizontal movement of the knuckle
relative to the control arm.
5. Ball joints must be replaced under the following
conditions:
S The joint is loose.
S The ball seal is cut.
S The ball stud is disconnected from the knuckle.
S The ball stud is loose at the knuckle.
S The ball stud can be twisted in its socket with
finger pressure.
Ball Stud Inspection
Make sure to check the tightness of the ball stud in the
knuckle boss during each inspection of the ball joint. One
way to inspect the ball stud for wear is to shake the wheel
and feel for movement of the stud end at the knuckle boss.Another way to inspect the ball stud for wear is to check
the fastener torque at the pinch nut. A loose nut can indi-
cate a stressed stud or a hole in the knuckle boss.
Worn or damaged ball joints and knuckles must be re-
placed.
EXCESSIVE FRICTION CHECK
Use the following procedure to check for excessive friction
in the front suspension:
1. Enlist the help of another technician to lift up on the
front bumper, raising the vehicle as high as pos-
sible.
2. Slowly release the bumper, allowing the vehicle to
assume its normal trim height. See ”General Speci-
fications” in this section.
3. Measure the distance from the street level to the
center of the bumper.
4. Push down on the bumper, release slowly, and al-
low the vehicle to assume its normal trim height.
5. Measure the distance from the street level to the
center of the bumper.
6. The difference between the two measurements
should be less than 12.7 mm (0.5 inch). If the differ-
ence exceeds this limit, inspect the control arms,
the struts, and the ball joints for damage or wear.
Page 942 of 2643

FRONT SUSPENSION 2C – 25
DAEWOO V–121 BL4
GENERAL DESCRIPTION
AND SYSTEM OPERATION
FRONT SUSPENSION
The front suspension for this vehicle is a combination of
a strut assembly and a knuckle assembly. The strut as-
sembly combines a strut dampener and spring mounted
to the body of the vehicle. The upper end of the strut is iso-
lated by a rubber mount and contains a bearing to allow the
strut to turn. The knuckle is attached to the strut assembly
and pivots on a ball joint bolted to the control arm. The con-
trol arms pivot from the body using rubber bushings.
The ball joint is fastened to the steering knuckle with a
pinch bolt and nut, and to the lower control arm with rivets.
The stabilizer bar interconnects both strut assemblies ofthe vehicle through the stabilizer link and is attached to the
front suspension crossmember. Jounce and rebound
movements affecting one wheel are partially transmitted
to the opposite wheel of the vehicle to stabilize body roll.
When servicing the control arm–to–body attachment and
the stabilizer shaft–to–body insulators, make sure the at-
taching bolts are loose until the control arms are moved to
the trim height, which is curb height. Trim height is the nor-
mal position to which the control arms move when the ve-
hicle is sitting on the ground. Refer to ”General Specifica-
tions” in this section.
The springs in the front suspension of engine family II are
stronger and the strut dampeners heavier than are the
springs and strut dampeners found in the front suspension
of engine family I.