2004 CADILLAC SEVILLE warning
[x] Cancel search: warningPage 329 of 410
How to Check
Use a good quality pocket-type gage to check tire
pressure. You can’t tell if your tires are properly inflated
simply by looking at them. Radial tires may look
properly inflated even when they’re underinflated. Check
tire inflation pressure when the tire is cold. Cold
means your vehicle has been sitting for at least three
hours or driven no more than 1 mile (1.6 km).
Remove the valve cap from the tire valve stem. Press
the tire gage firmly onto the valve to get a pressure
measurement. If the cold tire inflation pressure matches
the recommended pressure on the Tire and Loading
Information label, no further adjustment is necessary. If
the inflation pressure is low, add air until you reach
the recommended amount.
If you overfill the tire, release air by pushing on the
metal stem in the center of the tire valve. Recheck the
tire pressure with the tire gage.
Be sure to put the valve caps back on the valve stems.
They help prevent leaks by keeping out dirt and
moisture.Your vehicle has a Tire Pressure Monitor (TPM) that
sends tire pressure information to the Driver Information
Center (DIC). Using the DIC control buttons, the
driver is able to check tire pressure levels in all four
road tires. SeeTire Pressure Monitor Operation
on page 5-69andDIC Controls and Displays on
page 3-52for additional information.
Tire Pressure Monitor Operation
Your vehicle may have a Tire Pressure Monitor
System (TPM). The TPM system uses radio and sensor
technology to check tire pressure levels. Sensors,
mounted on each road wheel, transmit tire pressure
readings to a receiver located in the trunk. Tire pressure
status and tire pressure warnings are shown on the
Driver Information Center (DIC) display. SeeDriver
Information Center (DIC) on page 3-52, for details
regarding DIC controls and displays.
The system operates on a radio frequency subject to
Federal Communications Commission (FCC) Rules and
with Industry and Science Canada.
5-69
Page 334 of 410
Uniform Tire Quality Grading
Quality grades can be found where applicable on the
tire sidewall between tread shoulder and maximum
section width. For example:
Treadwear 200 Traction AA Temperature A
The following information relates to the system
developed by the United States National Highway
Traffic Safety Administration, which grades tires by
treadwear, traction and temperature performance. (This
applies only to vehicles sold in the United States.)
The grades are molded on the sidewalls of most
passenger car tires. The Uniform Tire Quality Grading
system does not apply to deep tread, winter-type
snow tires, space-saver or temporary use spare tires,
tires with nominal rim diameters of 10 to 12 inches
(25 to 30 cm), or to some limited-production tires.
While the tires available on General Motors passenger
cars and light trucks may vary with respect to these
grades, they must also conform to federal safety
requirements and additional General Motors Tire
Performance Criteria (TPC) standards.
Treadwear
The treadwear grade is a comparative rating based on
the wear rate of the tire when tested under controlled
conditions on a specified government test course.
For example, a tire graded 150 would wear one and
a half (1.5) times as well on the government course as
a tire graded 100. The relative performance of tires
depends upon the actual conditions of their use,
however, and may depart significantly from the norm
due to variations in driving habits, service practices and
differences in road characteristics and climate.
Traction – AA, A, B, C
The traction grades, from highest to lowest, are AA, A,
B, and C. Those grades represent the tire’s ability
to stop on wet pavement as measured under controlled
conditions on specified government test surfaces of
asphalt and concrete. A tire marked C may have poor
traction performance. Warning: The traction grade
assigned to this tire is based on straight-ahead braking
traction tests, and does not include acceleration,
cornering, hydroplaning, or peak traction characteristics.
5-74
Page 335 of 410
Temperature – A, B, C
The temperature grades are A (the highest), B, and C,
representing the tire’s resistance to the generation
of heat and its ability to dissipate heat when tested
under controlled conditions on a specified indoor
laboratory test wheel. Sustained high temperature can
cause the material of the tire to degenerate and
reduce tire life, and excessive temperature can lead to
sudden tire failure. The grade C corresponds to a
level of performance which all passenger car tires must
meet under the Federal Motor Vehicle Safety Standard
No. 109. Grades B and A represent higher levels of
performance on the laboratory test wheel than the
minimum required by law.
Warning: The temperature grade for this tire is
established for a tire that is properly inflated and not
overloaded. Excessive speed, underinflation, or
excessive loading, either separately or in combination,
can cause heat buildup and possible tire failure.
Wheel Alignment and Tire Balance
The wheels on your vehicle were aligned and balanced
carefully at the factory to give you the longest tire life
and best overall performance.
Scheduled wheel alignment and wheel balancing are
not needed. However, if you notice unusual tire wear or
your vehicle pulling one way or the other, the alignment
may need to be reset. If you notice your vehicle
vibrating when driving on a smooth road, your wheels
may need to be rebalanced.
Wheel Replacement
Replace any wheel that is bent, cracked or badly rusted
or corroded. If wheel nuts keep coming loose, the
wheel, wheel bolts and wheel nuts should be replaced.
If the wheel leaks air, replace it (except some
aluminum wheels, which can sometimes be repaired).
See your dealer if any of these conditions exist.
Your dealer will know the kind of wheel you need.
Each new wheel should have the same load-carrying
capacity, diameter, width, offset and be mounted
the same way as the one it replaces.
5-75
Page 338 of 410
A rear blowout, particularly on a curve, acts much like a
skid and may require the same correction you’d use
in a skid. In any rear blowout, remove your foot from the
accelerator pedal. Get the vehicle under control by
steering the way you want the vehicle to go. It may be
very bumpy and noisy, but you can still steer. Gently
brake to a stop, well off the road if possible.
{CAUTION:
Lifting a vehicle and getting under it to do
maintenance or repairs is dangerous without
the appropriate safety equipment and training.
The jack provided with your vehicle is
designed only for changing a flat tire. If it is
used for anything else, you or others could be
badly injured or killed if the vehicle slips off
the jack. Use the jack provided with your
vehicle only for changing a flat tire.
If a tire goes flat, the next part shows how to use your
jacking equipment to change a flat tire safely.
Changing a Flat Tire
If a tire goes flat, avoid further tire and wheel damage
by driving slowly to a level place. Turn on your
hazard warning flashers.
{CAUTION:
Changing a tire can cause an injury. The
vehicle can slip off the jack and roll over you
or other people. You and they could be badly
injured. Find a level place to change your tire.
To help prevent the vehicle from moving:
1. Put the shift lever in PARK (P).
2. Set the parking brake firmly.
3. Turn off the engine and do not restart
while the vehicle is raised.
4. Do not allow passengers to remain in the
vehicle.
To be even more certain the vehicle won’t
move, you can put blocks at the front and rear
of the tire farthest away from the one being
changed. That would be the tire on the other
side, at the opposite end of the vehicle.
5-78
Page 347 of 410
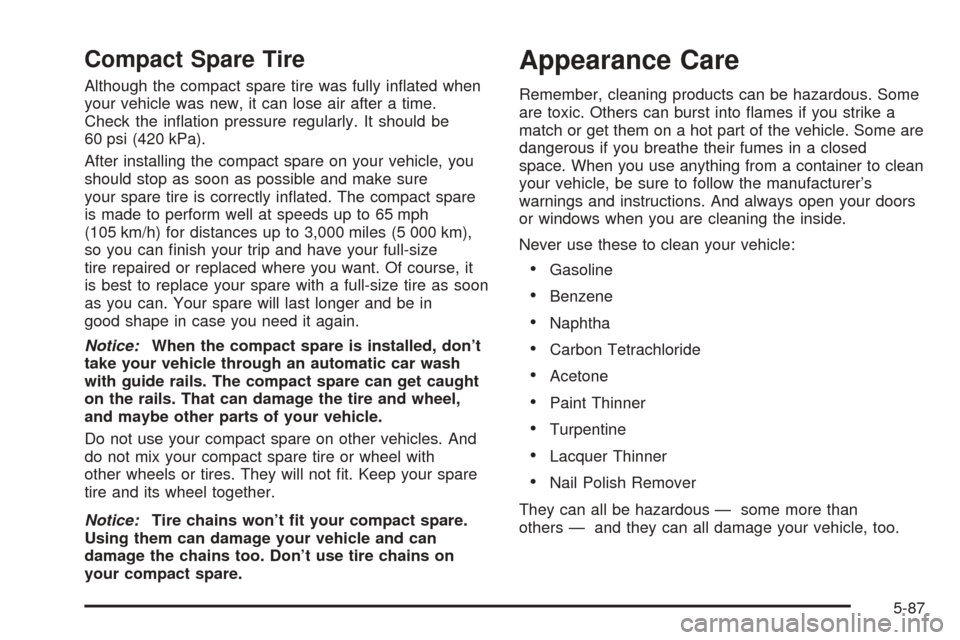
Compact Spare Tire
Although the compact spare tire was fully inflated when
your vehicle was new, it can lose air after a time.
Check the inflation pressure regularly. It should be
60 psi (420 kPa).
After installing the compact spare on your vehicle, you
should stop as soon as possible and make sure
your spare tire is correctly inflated. The compact spare
is made to perform well at speeds up to 65 mph
(105 km/h) for distances up to 3,000 miles (5 000 km),
so you can finish your trip and have your full-size
tire repaired or replaced where you want. Of course, it
is best to replace your spare with a full-size tire as soon
as you can. Your spare will last longer and be in
good shape in case you need it again.
Notice:When the compact spare is installed, don’t
take your vehicle through an automatic car wash
with guide rails. The compact spare can get caught
on the rails. That can damage the tire and wheel,
and maybe other parts of your vehicle.
Do not use your compact spare on other vehicles. And
do not mix your compact spare tire or wheel with
other wheels or tires. They will not fit. Keep your spare
tire and its wheel together.
Notice:Tire chains won’t fit your compact spare.
Using them can damage your vehicle and can
damage the chains too. Don’t use tire chains on
your compact spare.
Appearance Care
Remember, cleaning products can be hazardous. Some
are toxic. Others can burst into flames if you strike a
match or get them on a hot part of the vehicle. Some are
dangerous if you breathe their fumes in a closed
space. When you use anything from a container to clean
your vehicle, be sure to follow the manufacturer’s
warnings and instructions. And always open your doors
or windows when you are cleaning the inside.
Never use these to clean your vehicle:
•Gasoline
•Benzene
•Naphtha
•Carbon Tetrachloride
•Acetone
•Paint Thinner
•Turpentine
•Lacquer Thinner
•Nail Polish Remover
They can all be hazardous — some more than
others — and they can all damage your vehicle, too.
5-87
Page 395 of 410
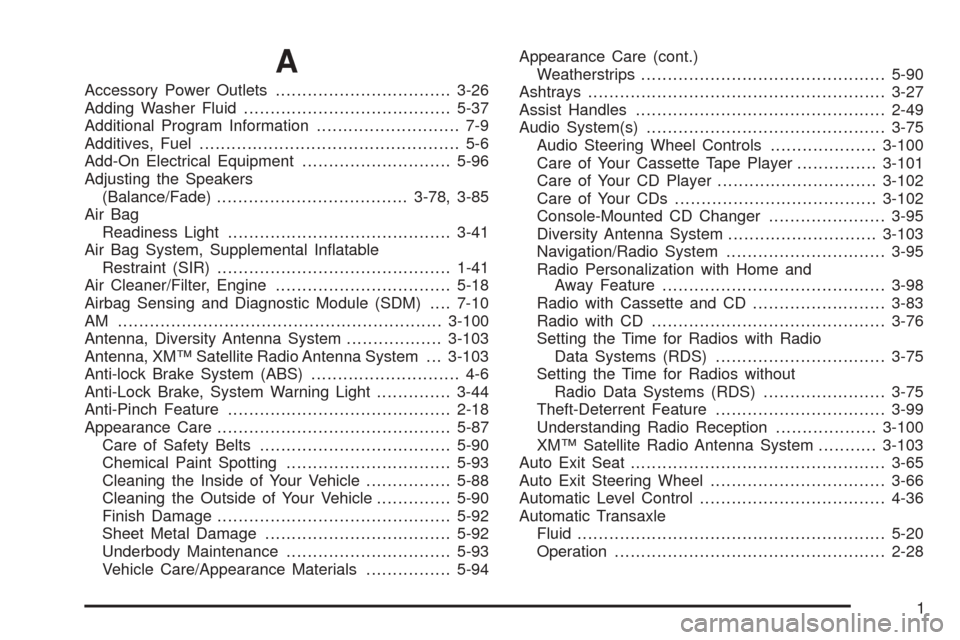
A
Accessory Power Outlets.................................3-26
Adding Washer Fluid.......................................5-37
Additional Program Information........................... 7-9
Additives, Fuel................................................. 5-6
Add-On Electrical Equipment............................5-96
Adjusting the Speakers
(Balance/Fade)....................................3-78, 3-85
Air Bag
Readiness Light..........................................3-41
Air Bag System, Supplemental Inflatable
Restraint (SIR)............................................1-41
Air Cleaner/Filter, Engine.................................5-18
Airbag Sensing and Diagnostic Module (SDM)....7-10
AM .............................................................3-100
Antenna, Diversity Antenna System..................3-103
Antenna, XM™ Satellite Radio Antenna System . . . 3-103
Anti-lock Brake System (ABS)............................ 4-6
Anti-Lock Brake, System Warning Light..............3-44
Anti-Pinch Feature..........................................2-18
Appearance Care............................................5-87
Care of Safety Belts....................................5-90
Chemical Paint Spotting...............................5-93
Cleaning the Inside of Your Vehicle................5-88
Cleaning the Outside of Your Vehicle..............5-90
Finish Damage............................................5-92
Sheet Metal Damage...................................5-92
Underbody Maintenance...............................5-93
Vehicle Care/Appearance Materials................5-94Appearance Care (cont.)
Weatherstrips..............................................5-90
Ashtrays........................................................3-27
Assist Handles...............................................2-49
Audio System(s).............................................3-75
Audio Steering Wheel Controls....................3-100
Care of Your Cassette Tape Player...............3-101
Care of Your CD Player..............................3-102
Care of Your CDs......................................3-102
Console-Mounted CD Changer......................3-95
Diversity Antenna System............................3-103
Navigation/Radio System..............................3-95
Radio Personalization with Home and
Away Feature..........................................3-98
Radio with Cassette and CD.........................3-83
Radio with CD............................................3-76
Setting the Time for Radios with Radio
Data Systems (RDS)................................3-75
Setting the Time for Radios without
Radio Data Systems (RDS).......................3-75
Theft-Deterrent Feature................................3-99
Understanding Radio Reception...................3-100
XM™ Satellite Radio Antenna System...........3-103
Auto Exit Seat................................................3-65
Auto Exit Steering Wheel.................................3-66
Automatic Level Control...................................4-36
Automatic Transaxle
Fluid..........................................................5-20
Operation...................................................2-28
1
Page 396 of 410
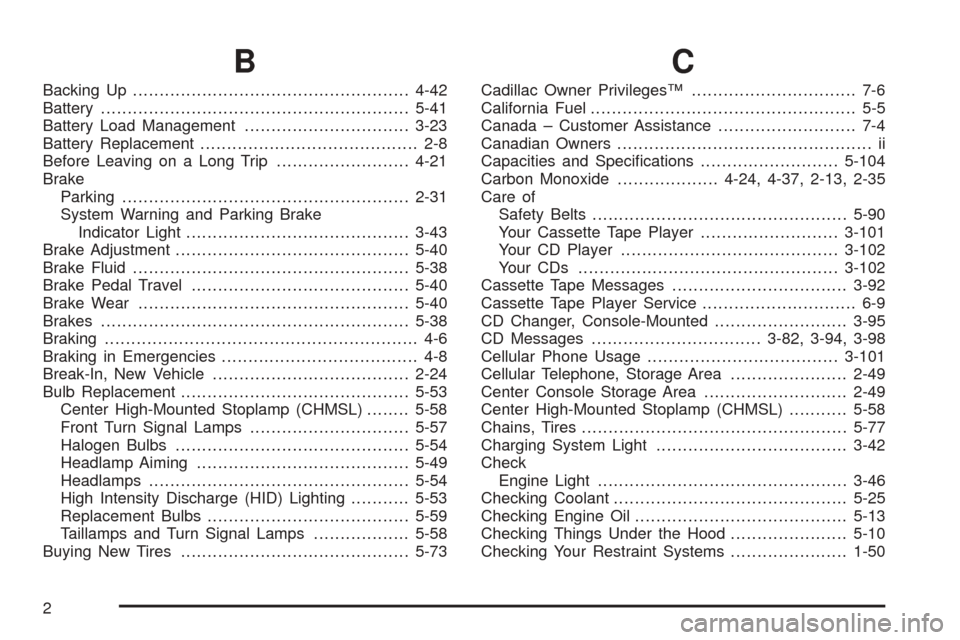
B
Backing Up....................................................4-42
Battery..........................................................5-41
Battery Load Management...............................3-23
Battery Replacement......................................... 2-8
Before Leaving on a Long Trip.........................4-21
Brake
Parking......................................................2-31
System Warning and Parking Brake
Indicator Light..........................................3-43
Brake Adjustment............................................5-40
Brake Fluid....................................................5-38
Brake Pedal Travel.........................................5-40
Brake Wear...................................................5-40
Brakes..........................................................5-38
Braking........................................................... 4-6
Braking in Emergencies..................................... 4-8
Break-In, New Vehicle.....................................2-24
Bulb Replacement...........................................5-53
Center High-Mounted Stoplamp (CHMSL)........5-58
Front Turn Signal Lamps..............................5-57
Halogen Bulbs............................................5-54
Headlamp Aiming........................................5-49
Headlamps.................................................5-54
High Intensity Discharge (HID) Lighting...........5-53
Replacement Bulbs......................................5-59
Taillamps and Turn Signal Lamps..................5-58
Buying New Tires...........................................5-73
C
Cadillac Owner Privileges™............................... 7-6
California Fuel.................................................. 5-5
Canada – Customer Assistance.......................... 7-4
Canadian Owners................................................ ii
Capacities and Specifications..........................5-104
Carbon Monoxide...................4-24, 4-37, 2-13, 2-35
Care of
Safety Belts................................................5-90
Your Cassette Tape Player..........................3-101
Your CD Player.........................................3-102
Your CDs .................................................3-102
Cassette Tape Messages.................................3-92
Cassette Tape Player Service............................. 6-9
CD Changer, Console-Mounted.........................3-95
CD Messages................................3-82, 3-94, 3-98
Cellular Phone Usage....................................3-101
Cellular Telephone, Storage Area......................2-49
Center Console Storage Area...........................2-49
Center High-Mounted Stoplamp (CHMSL)...........5-58
Chains, Tires..................................................5-77
Charging System Light....................................3-42
Check
Engine Light...............................................3-46
Checking Coolant............................................5-25
Checking Engine Oil........................................5-13
Checking Things Under the Hood......................5-10
Checking Your Restraint Systems......................1-50
2
Page 397 of 410
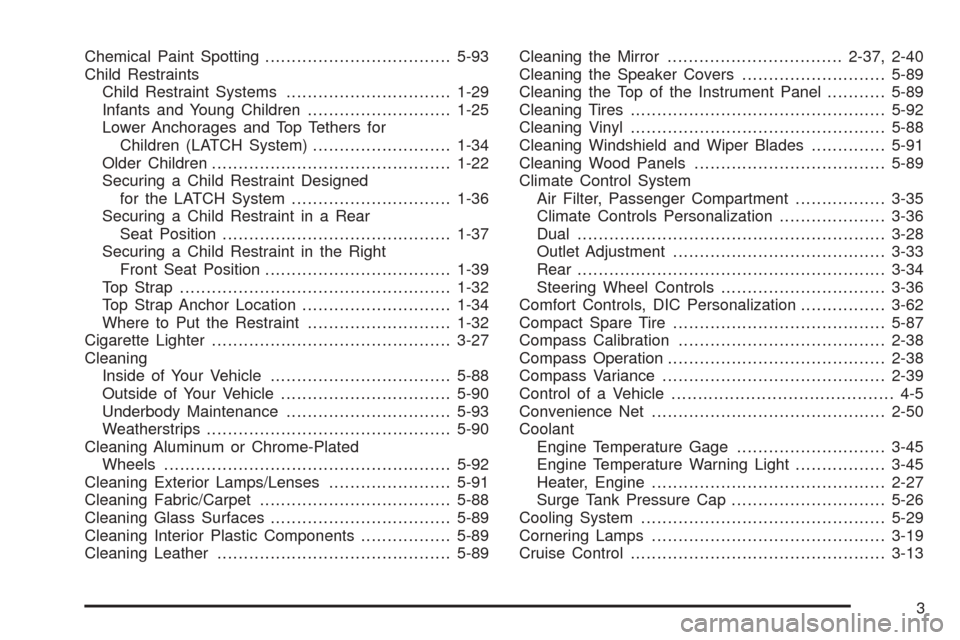
Chemical Paint Spotting...................................5-93
Child Restraints
Child Restraint Systems...............................1-29
Infants and Young Children...........................1-25
Lower Anchorages and Top Tethers for
Children (LATCH System)..........................1-34
Older Children.............................................1-22
Securing a Child Restraint Designed
for the LATCH System..............................1-36
Securing a Child Restraint in a Rear
Seat Position...........................................1-37
Securing a Child Restraint in the Right
Front Seat Position...................................1-39
Top Strap...................................................1-32
Top Strap Anchor Location............................1-34
Where to Put the Restraint...........................1-32
Cigarette Lighter.............................................3-27
Cleaning
Inside of Your Vehicle..................................5-88
Outside of Your Vehicle................................5-90
Underbody Maintenance...............................5-93
Weatherstrips..............................................5-90
Cleaning Aluminum or Chrome-Plated
Wheels......................................................5-92
Cleaning Exterior Lamps/Lenses.......................5-91
Cleaning Fabric/Carpet....................................5-88
Cleaning Glass Surfaces..................................5-89
Cleaning Interior Plastic Components.................5-89
Cleaning Leather............................................5-89Cleaning the Mirror.................................2-37, 2-40
Cleaning the Speaker Covers...........................5-89
Cleaning the Top of the Instrument Panel...........5-89
Cleaning Tires................................................5-92
Cleaning Vinyl................................................5-88
Cleaning Windshield and Wiper Blades..............5-91
Cleaning Wood Panels....................................5-89
Climate Control System
Air Filter, Passenger Compartment.................3-35
Climate Controls Personalization....................3-36
Dual..........................................................3-28
Outlet Adjustment........................................3-33
Rear..........................................................3-34
Steering Wheel Controls...............................3-36
Comfort Controls, DIC Personalization................3-62
Compact Spare Tire........................................5-87
Compass Calibration.......................................2-38
Compass Operation.........................................2-38
Compass Variance..........................................2-39
Control of a Vehicle.......................................... 4-5
Convenience Net............................................2-50
Coolant
Engine Temperature Gage............................3-45
Engine Temperature Warning Light.................3-45
Heater, Engine............................................2-27
Surge Tank Pressure Cap.............................5-26
Cooling System..............................................5-29
Cornering Lamps............................................3-19
Cruise Control................................................3-13
3