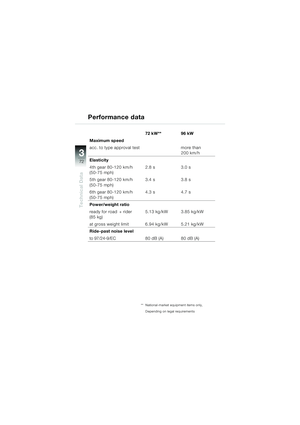
Page 41 of 80
39
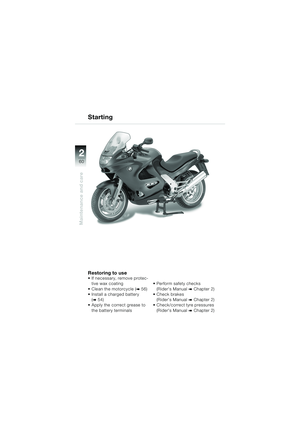
Maintenance and care
2
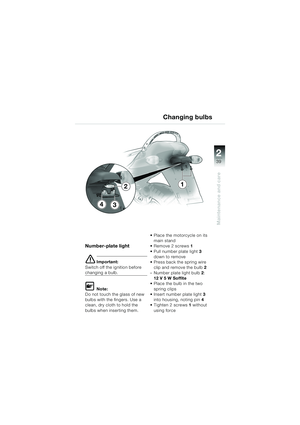
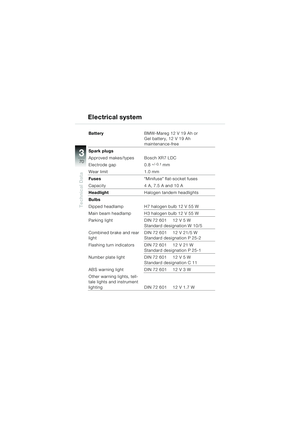
Number-plate light
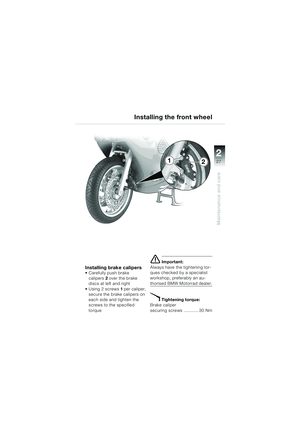
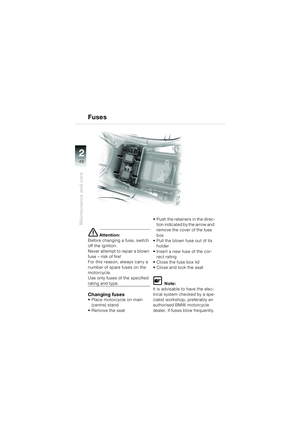
e Important:
Switch off the ignition before
changing a bulb.
L Note:
Do not touch the glass of new
bulbs with the fingers. Use a
clean, dry cloth to hold the
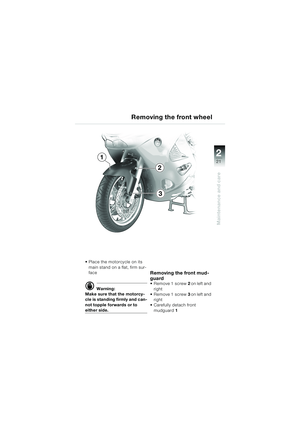
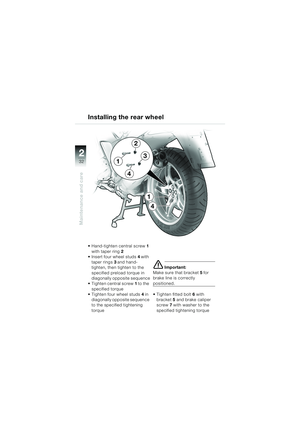
bulbs when inserting them. Place the motorcycle on its
main stand
Remove 2 screws 1
Pull number plate light 3
down to remove
Press back the spring wire clip and remove the bulb 2
– Number plate light bulb 2:
12 V 5 W Soffite
Place the bulb in the two
spring clips
Insert number plate light 3
into housing, noting pin 4
Tighten 2 screws 1 without
using force
Changing bulbs
3
1
4
2
20k41bkg3.book Seite 39 Mittwoch, 26. Mai 2004 3:33 15
Page 42 of 80
40
Maintenance and care
2
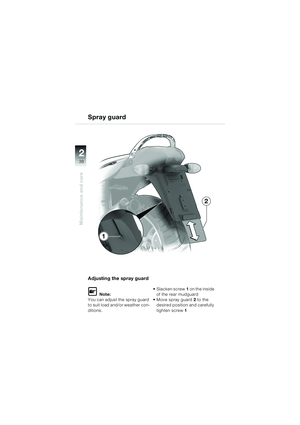
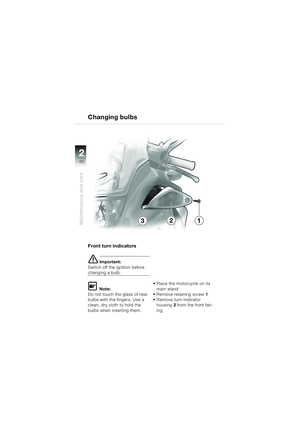
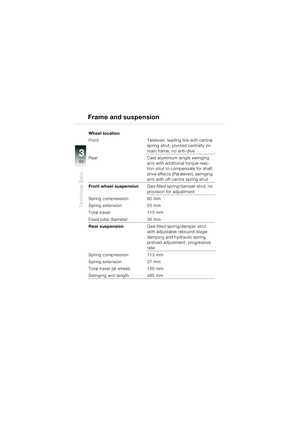
Front turn indicators
e Important:
Switch off the ignition before
changing a bulb.
L Note:
Do not touch the glass of new
bulbs with the fingers. Use a
clean, dry cloth to hold the
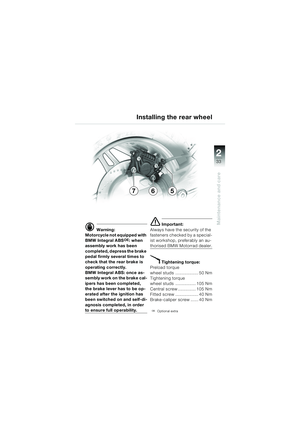
bulbs when inserting them. Place the motorcycle on its
main stand
Remove retaining screw 1
Remove turn-indicator housing 2 from the front fair-
ing
Changing bulbs
123
20k41bkg3.book Seite 40 Mittwoch, 26. Mai 2004 3:33 15
Page 43 of 80
41
Maintenance and care
2
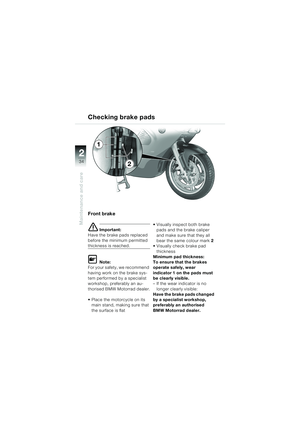
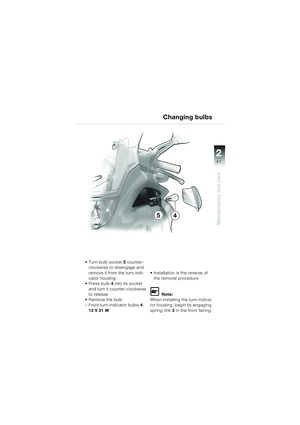
Turn bulb socket5 counter-
clockwise to disengage and
remove it from the turn-indi-
cator housing
Press bulb 4 into its socket
and turn it counter-clockwise
to release
Remove the bulb
– Front turn-indicator bulbs 4:
12 V 21 W Installation is the reverse of
the removal procedure
L Note:
When installing the turn-indica-
tor housing, begin by engaging
spring link 3 in the front fairing.
Changing bulbs
54
20k41bkg3.book Seite 41 Mittwoch, 26. Mai 2004 3:33 15
Page 44 of 80
42
Maintenance and care
2
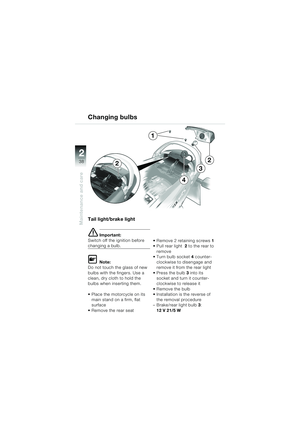
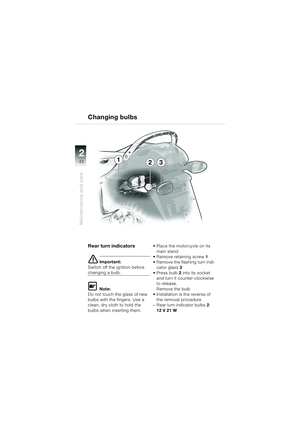
Rear turn indicators
e Important:
Switch off the ignition before
changing a bulb.
L Note:
Do not touch the glass of new
bulbs with the fingers. Use a
clean, dry cloth to hold the
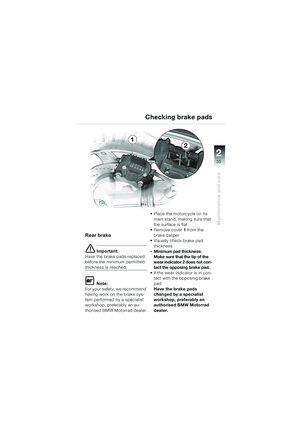
bulbs when inserting them. Place the motorcycle on its
main stand
Remove retaining screw 1
Remove the flashing turn indi- cator glass 3
Press bulb 2 into its socket
and turn it counter-clockwise
to release.
Remove the bulb
Installation is the reverse of
the removal procedure
– Rear turn indicator bulbs 2:
12 V 21 W
Changing bulbs
231
20k41bkg3.book Seite 42 Mittwoch, 26. Mai 2004 3:33 15
Page 45 of 80
43
Maintenance and care
2
Parking light
e Important:
Switch off the ignition before
changing a bulb.
L Note:
Do not touch the glass of new
bulbs with the fingers. Use a
clean, dry cloth to hold the
bulbs when inserting them.
Place the motorcycle on its main stand Working from in front, pull the
bulb holder 1 down and out of
the headlamp housing
Pull bulb 2 upwards out of the
holder
Insert the new bulb into the
holder
– Parking light bulb 2:
12 V 4 W
L Note:
Press the bulb holder fully into
its mounting.
Changing bulbs
2
1
20k41bkg3.book Seite 43 Mittwoch, 26. Mai 2004 3:33 15
Page 46 of 80
44
Maintenance and care
2
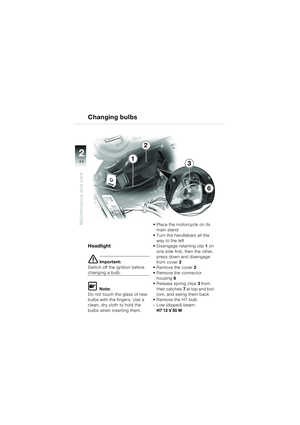
Headlight
e Important:
Switch off the ignition before
changing a bulb.
L Note:
Do not touch the glass of new
bulbs with the fingers. Use a
clean, dry cloth to hold the
bulbs when inserting them. Place the motorcycle on its
main stand
Turn the handlebars all the way to the left
Disengage retaining clip 1 on
one side first, then the other,
press down and disengage
from cover 2
Remove the cover 2
Remove the connector housing 6
Release spring clips 3 from
their catches 7 at top and bot-
tom, and swing them back
Remove the H7 bulb
– Low (dipped) beam: H7 12 V 55 W
1
2
3
6
Changing bulbs
20k41bkg3.book Seite 44 Mittwoch, 26. Mai 2004 3:33 15
Page 47 of 80
45
Maintenance and care
2
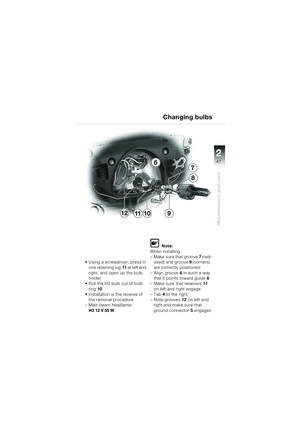
L Note:
Tab 5 must point vertically up,
so that it can be inserted into
recess 4.
Insert a new H7 bulb
Engage spring clips 3 at top
and bottom in catches 7 Attach plug housing
6 to bulb
connections
Insert cover 2
Engage retaining clip 1 on
one side first, then the other,
pull the clips up and engage
them
Changing bulbs
4
6
7
5
3
20k41bkg3.book Seite 45 Mittwoch, 26. Mai 2004 3:33 15
Page 48 of 80
46
Maintenance and care
21
2
5
43
High-beam headlight
e Important:
Switch off the ignition before
changing a bulb.
L Note:
Do not touch the glass of new
bulbs with the fingers. Use a
clean, dry cloth to hold the
bulbs when inserting them. Place the motorcycle on its
main stand
Turn the handlebars all the way to the left
Disengage retaining clip 1 on
one side first, then the other,
press down and disengage
from cover 2
Remove the cover 2
Disengage connector 3
Press earth (ground) clip 5
down and disengage it
Pull the bulb socket out of the
headlight housing using tab 4
Changing bulbs
20k41bkg3.book Seite 46 Mittwoch, 26. Mai 2004 3:33 15


 39
Maintenance and care
2
Number-plate light
e Important:
Switch off the ignition before
changing a bulb.
L Note:
Do not touch the glass of new
bulbs with the fingers. Use a
clean, dry cloth to hol")
 40
Maintenance and care
2
Front turn indicators
e Important:
Switch off the ignition before
changing a bulb.
L Note:
Do not touch the glass of new
bulbs with the fingers. Use a
clean, dry cloth to")
 41
Maintenance and care
2
Turn bulb socket5 counter-
clockwise to disengage and
remove it from the turn-indi-
cator housing
Press bulb 4 into its socket
and turn it counter-clockwise
to releas")
 42
Maintenance and care
2
Rear turn indicators
e Important:
Switch off the ignition before
changing a bulb.
L Note:
Do not touch the glass of new
bulbs with the fingers. Use a
clean, dry cloth to h")
 43
Maintenance and care
2
Parking light
e Important:
Switch off the ignition before
changing a bulb.
L Note:
Do not touch the glass of new
bulbs with the fingers. Use a
clean, dry cloth to hold the")
 44
Maintenance and care
2
Headlight
e Important:
Switch off the ignition before
changing a bulb.
L Note:
Do not touch the glass of new
bulbs with the fingers. Use a
clean, dry cloth to hold the
bu")
 45
Maintenance and care
2
L Note:
Tab 5 must point vertically up,
so that it can be inserted into
recess 4.
Insert a new H7 bulb
Engage spring clips 3 at top
and bottom in catches 7 Attach plu")
 46
Maintenance and care
21
2
5
43
High-beam headlight
e Important:
Switch off the ignition before
changing a bulb.
L Note:
Do not touch the glass of new
bulbs with the fingers. Use a
clean, dry clo")