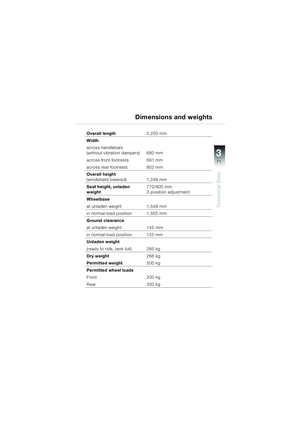
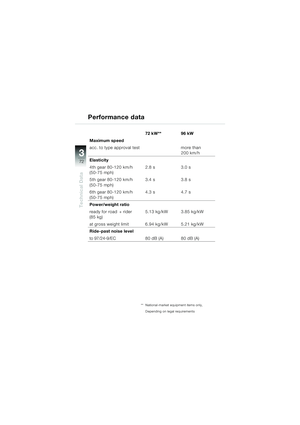
Page 25 of 80
23
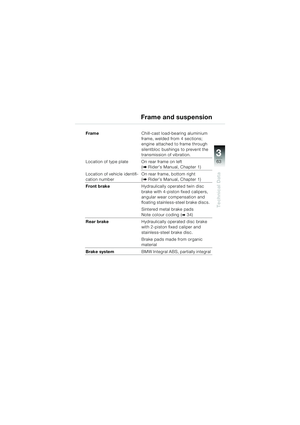
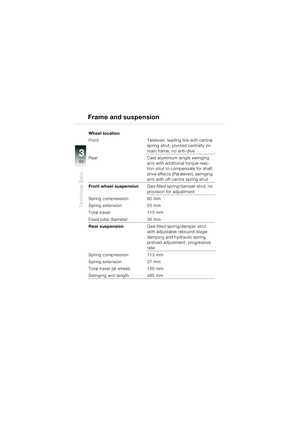
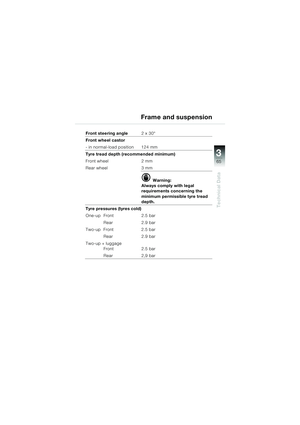
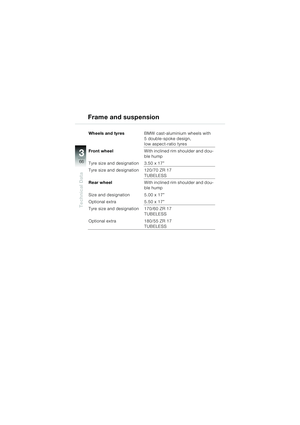
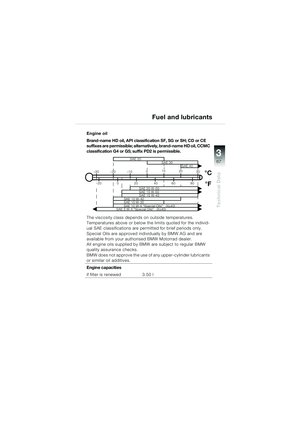
Maintenance and care
2
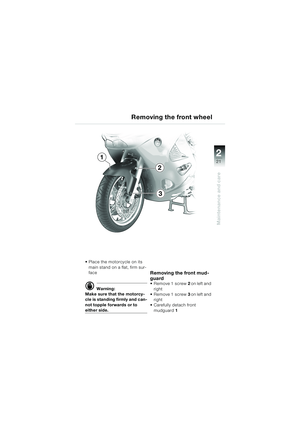
Removing the front wheel
d Warning:
Make sure that the motorcy-
cle is standing firmly and can-
not tip forward or to either
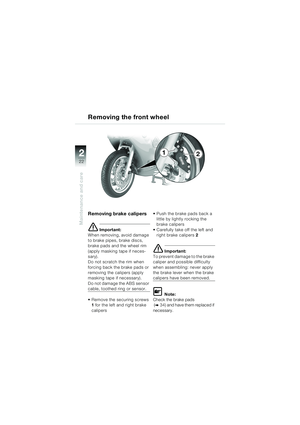
side Remove axle bolt
1
Slacken off axle clamp bolts 2
on the left and right
Raise the front wheel with front wheel stand,
BMW special tool
No. 36 3 970, or a suitable
auxiliary stand, and support if
necessary
L Note:
Make sure that the auxiliary
stand is set to the correct width
and height.
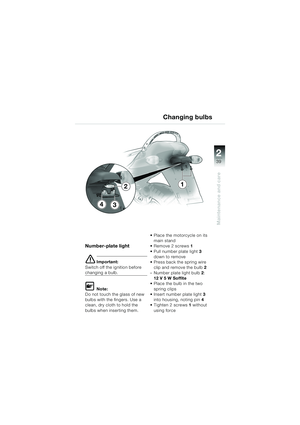
Removing the front wheel
1
2
20k41bkg3.book Seite 23 Mittwoch, 26. Mai 2004 3:33 15
Page 26 of 80
24
Maintenance and care
2
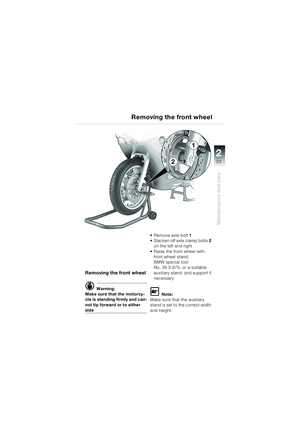
L Note:
Mark the installed position on
the tyre and ABS toothed ring;
note also the direction of rota-
tion arrow if it is marked on the
tyre.
Insert a suitable screwdriver through hole 1 in quick-
release axle 2 Remove quick-release axle
2
to the right, turning it slightly
at the same time
Remove spacers 3 and bear-
ing cap 4
Roll the front wheel forwards and out
e Important:
When setting down the front
wheel, avoid damage to the
brake discs and ABS toothed
ring.
Keep dirt and moisture away
from the wheel bearings.
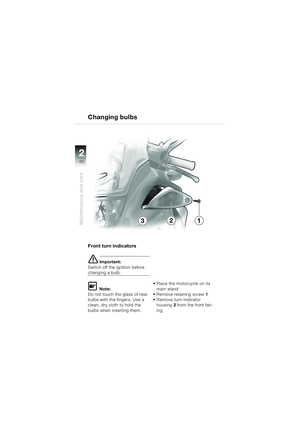
Removing the front wheel
3
1
4
2
20k41bkg3.book Seite 24 Mittwoch, 26. Mai 2004 3:33 15
Page 27 of 80
25
Maintenance and care
2
Installing the front wheel
Installing the front wheel
e Important:
Avoid damage to brake lines,
discs and pads when installing.
Keep dirt and moisture away
from the wheel bearings.
Do not damage the ABS sensor
cable, toothed ring or sensor.
L Note:
Note the position mark on the
tyre or the ABS toothed ring, or
the direction-of-rotation arrow
on the tyre.
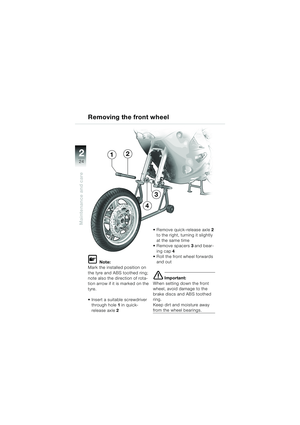
Roll the front wheel in
between the fork legs
Clean and insert spacing bushing 2 and bearing cap 3
As viewed in direction of
travel
– left: spacer bushing 2
– right: bearing cap 3
(collar toward the outside)
– Clean quick-release axle 1,
grease it and insert it from
the right, turning it slightly at
the same time (lift the wheel
while inserting the axle)
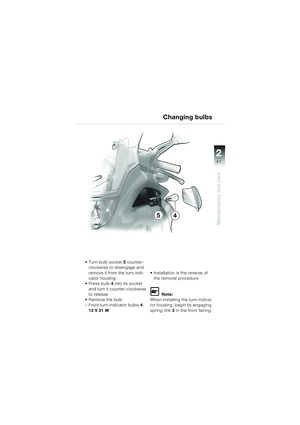
2
3
1
20k41bkg3.book Seite 25 Mittwoch, 26. Mai 2004 3:33 15
Page 28 of 80
26
Maintenance and care
2
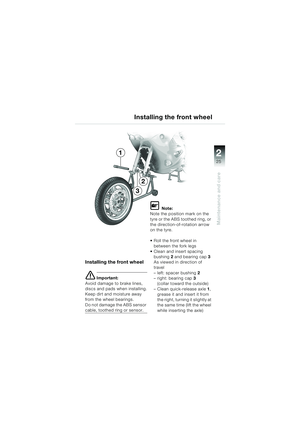
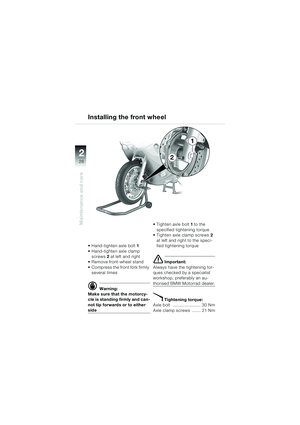
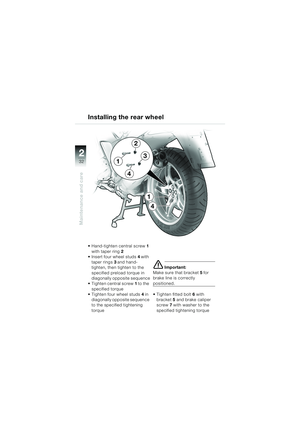
Hand-tighten axle bolt1
Hand-tighten axle clamp screws 2 at left and right
Remove front-wheel stand
Compress the front fork firmly several times
d Warning:
Make sure that the motorcy-
cle is standing firmly and can-
not tip forwards or to either
side Tighten axle bolt
1 to the
specified tightening torque
Tighten axle clamp screws 2
at left and right to the speci-
fied tightening torque
e Important:
Always have the tightening tor-
ques checked by a specialist
workshop, preferably an au-
thorised BMW Motorrad dealer.
X Tightening torque:
Axle bolt ...................... 30 Nm
Axle clamp screws ....... 21 Nm
Installing the front wheel
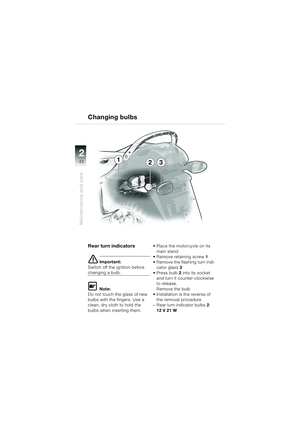
1
2
20k41bkg3.book Seite 26 Mittwoch, 26. Mai 2004 3:33 15
Page 29 of 80
27
Maintenance and care
2
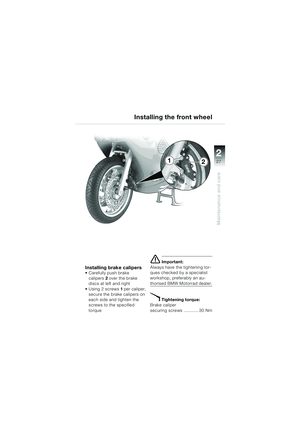
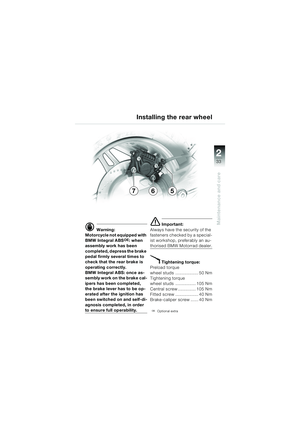
Installing brake calipers Carefully push brake calipers 2 over the brake
discs at left and right
Using 2screws 1 per caliper,
secure the brake calipers on
each side and tighten the
screws to the specified
torque
e Important:
Always have the tightening tor-
ques checked by a specialist
workshop, preferably an au-
thorised BMW Motorrad dealer.
X Tightening torque:
Brake caliper
securing screws ........... 30 Nm
Installing the front wheel
21
20k41bkg3.book Seite 27 Mittwoch, 26. Mai 2004 3:33 15
Page 30 of 80
28
Maintenance and care
2
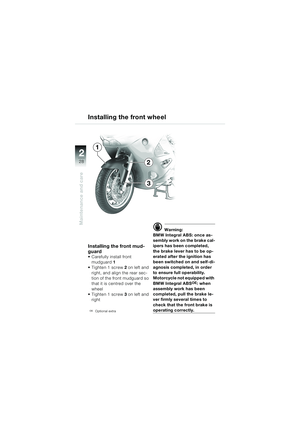
Installing the front wheel
Installing the front mud-
guard
Carefully install front mudguard 1
Tighten 1 screw 2 on left and
right, and align the rear sec-
tion of the front mudguard so
that it is centred over the
wheel
Tighten 1 screw 3 on left and
right
OEOptional extra
d Warning:
BMW Integral ABS: once as-
sembly work on the brake cal-
ipers has been completed,
the brake lever has to be op-
erated after the ignition has
been switched on and self-di-
agnosis completed, in order
to ensure full operability.
Motorcycle not equipped with
BMW Integral ABS
OE: when
assembly work has been
completed, pull the brake le-
ver firmly several times to
check that the front brake is
operating correctly.
1
2
3
20k41bkg3.book Seite 28 Mittwoch, 26. Mai 2004 3:33 15
Page 31 of 80
29
Maintenance and care
2
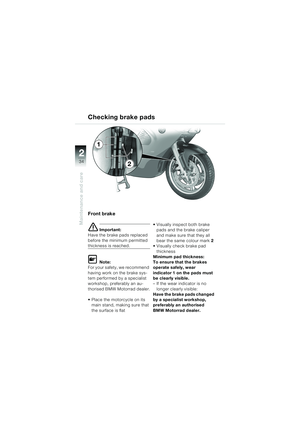
e Important:
Avoid damage to brake lines,
brake disc, brake pads and
wheel when removing.
Do not damage the ABS sensor
cable, toothed ring or sensor.
Do not scratch the wheel when
forcing back the brake pads or
removing the caliper (apply
masking tape if necessary).
To prevent damage to the brake
caliper and possible difficulty
when assembling: never oper-
ate the brake lever when the
brake calipers have been re-
moved. Place the motorcycle on its
main stand on a flat, firm
surface
(Rider's Manual
b chapter 3).
Apply a load at the front wheel so that the motorcycle cannot
tip toward the rear
Select first gear
Push the splash guard up (
b 36)
Remove fitted bolt 2 and
screw 3 for brake caliper 1
Removing the rear wheel
1
32
20k41bkg3.book Seite 29 Mittwoch, 26. Mai 2004 3:33 15
Page 32 of 80
30
Maintenance and care
2
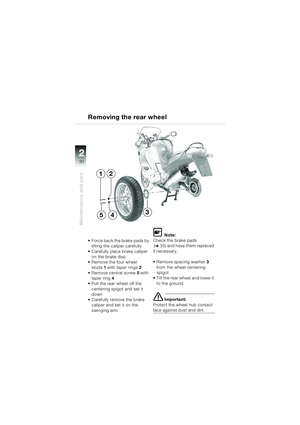
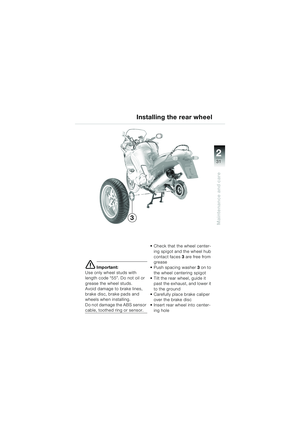
Removing the rear wheel
Force back the brake pads by tilting the caliper carefully
Carefully place brake caliper on the brake disc
Remove the four wheel studs 1 with taper rings 2
Remove central screw 5 with
taper ring 4
Pull the rear wheel off the
centering spigot and set it
down
Carefully remove the brake caliper and set it on the
swinging arm
L Note:
Check the brake pads
(
b 3 5 ) a n d h a v e t h e m r e p l a c e d
if necessary.
Remove spacing washer 3
from the wheel centering
spigot
Tilt the rear wheel and lower it to the ground
e Important:
Protect the wheel hub contact
face against dust and dirt.
1
5
2
43
20k41bkg3.book Seite 30 Mittwoch, 26. Mai 2004 3:33 15


 23
Maintenance and care
2
Removing the front wheel
d Warning:
Make sure that the motorcy-
cle is standing firmly and can-
not tip forward or to either
side Remove axle bolt
1
Slacken off axle c")
 24
Maintenance and care
2
L Note:
Mark the installed position on
the tyre and ABS toothed ring;
note also the direction of rota-
tion arrow if it is marked on the
tyre.
Insert a suitable screwdri")
 25
Maintenance and care
2
Installing the front wheel
Installing the front wheel
e Important:
Avoid damage to brake lines,
discs and pads when installing.
Keep dirt and moisture away
from the wheel b")
 26
Maintenance and care
2
Hand-tighten axle bolt1
Hand-tighten axle clamp screws 2 at left and right
Remove front-wheel stand
Compress the front fork firmly several times
d Warning:
Make s")
 27
Maintenance and care
2
Installing brake calipers Carefully push brake calipers 2 over the brake
discs at left and right
Using 2screws 1 per caliper,
secure the brake calipers on
each side and")
 28
Maintenance and care
2
Installing the front wheel
Installing the front mud-
guard
Carefully install front mudguard 1
Tighten 1 screw 2 on left and
right, and align the rear sec-
tion of the fr")
 29
Maintenance and care
2
e Important:
Avoid damage to brake lines,
brake disc, brake pads and
wheel when removing.
Do not damage the ABS sensor
cable, toothed ring or sensor.
Do not scratch the wh")
 30
Maintenance and care
2
Removing the rear wheel
Force back the brake pads by tilting the caliper carefully
Carefully place brake caliper on the brake disc
Remove the four wheel studs 1 with")