2004 BMW 645CI COUPE navigation
[x] Cancel search: navigationPage 95 of 216

Controls
93Reference
At a glance
Driving tips
Communications
Navigation
Entertainment
Mobility
Preselecting activation times
Control Center, for principle details, refer to
page 16:
1.Open "Climate"
2.Select "Ventilation" and press the con-
troller
3.Select "Activation time" and press the
controller
The two preselected activation times
should differ by at least 31 minutes.<
4.Move the controller to the left or right to
select "Time 1" or "Time 2"
5.Select the time and press the controller.
The first time setting is highlighted
6.Turn the controller to make the adjust-
ment
7.Press the controller to apply the setting.
The next adjustment is highlighted
8.Make the remaining adjustments. After
the last adjustment, the time is stored.
Activating activation timer
Move the controller to the left or right to
select "Time 1" or "Time 2" and press the
controller.
The activation time is activated.The independent ventilation is only
available for activation within the sub-
sequent 24 hours. After that, the time must
be reactivated.<
Page 97 of 216

Controls
95Reference
At a glance
Driving tips
Communications
Navigation
Entertainment
Mobility
The corresponding memory button 1 is
now programmed with the signal of the
original hand-held transmitter.
The equipment can be used in ignition key
position 2.
If the device cannot be operated after
repeated programming, check
whether the original hand-held transmitter
uses an alternating-code system. Here,
either read the instructions for the original
hand-held transmitter or hold down the
programmed memory button 1 of the inte-
grated universal remote control. If the indi-
cator lamp 2 on the integrated universal
remote control flashes rapidly for a short
time then lights up for approx. 2 seconds,
this indicates that the original hand-held
transmitter uses an alternating-code sys-
tem. In the case of an alternating-code sys-
tem, program the memory buttons 1 as
described at Alternating-code hand-held
transmitters.<
Alternating-code hand-held
transmitters
To program the integrated universal remote
control, consult the Operating Instructions
for the equipment to be set. You will find
information there on the possibilities for
synchronization.
When programming hand-held transmitters
that employ an alternating code, please
observe the following supplementary
instructions:
Programming will be easier with the
aid of a second person.<
1.Park your vehicle within the range of the
remote-controlled equipment
2.Program the integrated universal
remote control as described above at
Fixed-code hand-held transmitters
3.Locate the button at the receiver of the
equipment to be set, e.g. on the drive
4.Press the button on the receiver of the
equipment to be set. After step 4, you
have approx. 30 seconds for step 55.Press the programmed memory
button 1 of the integrated universal
remote control three times.
The corresponding memory button 1 is
now programmed with the signal of the
original hand-held transmitter.
If you have any additional questions,
please contact your BMW center.<
Clearing memory buttons
Press both outer buttons 1 of the inte-
grated universal remote control for approx.
20 seconds, maintaining pressure until the
indicator lamp 2 starts to flash. All three
memory buttons are cleared.
The memory of individual memory but-
tons 1 cannot be cleared.
Glove compartment
Opening
Press button. The glove compartment
opens automatically and the lamps come
on.
Closing
Fold the cover up.
To prevent injury in the event of an
accident while the vehicle is being
driven, close the glove compartment
immediately after use.<
Rechargeable flashlight*
The flashlight is located on the left side of
the glove compartment.
The flashlight can remain there continu-
ously.
Page 99 of 216

Controls
97Reference
At a glance
Driving tips
Communications
Navigation
Entertainment
Mobility
could cause personal injury to occupants
during braking or evasive maneuvers.<
Cup holders
The compartment of the rear center con-
sole contains a built-in and removable cup
holder.
The removable cup holder can be inserted
in the side of the center console.
Do not place glass containers in the
cup holders. This would lead to an
increased risk of injury in the event of an
accident.<
Ashtray
Opening
Press the trim strip of the cover.
Emptying
Press the opened cover beyond the resis-
tance point, refer to arrow:
The ashtray rises for removal.
Cigarette lighter
In ignition key position 2, press in the ciga-
rette lighter.
Remove as soon as the lighter jumps back
out.
Hold or touch the hot cigarette lighter
by the knob only. Holding or touching
it in other areas could result in burns.
Always remove the ignition key when you
leave the vehicle so that, for example, chil-
dren are unable to use the cigarette lighter
and burn themselves.<
Socket
In ignition key position 2, the lighter socket
can be used to plug in hand flashlights, car
vacuum cleaners, etc., with power ratings
of up to approx. 200 W at 12 V. Avoid dam-
aging the socket due to inserting plugs of
different shapes or sizes.
Page 101 of 216

Controls
99Reference
At a glance
Driving tips
Communications
Navigation
Entertainment
Mobility
Page 105 of 216

Driving tips
103Reference
At a glance
Controls
Communications
Navigation
Entertainment
Mobility
road surface. This phenomenon is referred
to as hydroplaning, and is characterized
by a partial or complete loss of contact
between the tires and the road surface, ulti-
mately undermining your ability to steer
and brake the vehicle.<
The risk of hydroplaning increases as the
tread depth of the tires decreases, also
refer to Tire tread on page 167.
Driving through water
Do not drive through water on the
road if it is deeper than 1 ft/30 cm,
and then only at walking speed at the most.
Otherwise, the vehicle's engine, the electri-
cal systems and the transmission may be
damaged.<
Braking safely
Your BMW is equipped with ABS as stan-
dard. The best way to achieve optimized
braking response from the ABS is to apply
maximum pressure to the brake pedal in
situations where this is required: panic
stops. Since the vehicle maintains steering
responsiveness, you can nevertheless
avoid possible obstacles with a minimum
of steering effort.
Pulsation at the brake pedal combines with
sounds from the hydraulic circuits to indi-
cate to the driver that ABS is in its active
mode.
Do not drive with your foot resting on
the brake pedal. Even light but con-
sistent pedal pressure can lead to high
temperatures, brake wear and possibly
even brake failure.<
Driving in wet conditions
While driving in wet conditions and in
heavy rain, it is a good idea to apply light
pressure to the brake pedal every few
miles. Monitor traffic conditions to ensure
that this maneuver does not endanger
other road users. The heat generated in this
process helps dry the pads and rotors to
ensure that full braking efficiency will then
be available when you need it.
Hills
To prevent overheating and thus
reduced efficiency of the brake sys-
tem, downshift to a gear in which only min-
imal brake applications are needed when
descending long or steep downhill
stretches. Even light but consistent pedal
pressure can lead to high temperatures,
brake wear and possibly even brake fail-
ure.<
You can further enhance the engine's brak-
ing effect by selecting a lower gear in the
automatic transmission's manual mode,
downshifting as far as first gear on
extremely steep stretches, refer to
page 59. This strategy helps you avoid
placing excessive loads on the brake sys-
tem.
Never drive with the clutch pressed
or allow the vehicle to coast with the
transmission in Neutral – or with the engine
switched off – there is no engine braking
when the transmission is in Neutral, and no
power assist for brakes and steering when
the engine is not running.
Never allow floor mats, carpets or any other
objects to protrude into the area around the
accelerator and brake pedals and obstruct
their movement.<
Corrosion on brake rotors
When the vehicle is driven only occasion-
ally, during extended periods when the
vehicle is not used at all, and in operating
conditions where brake applications are
less frequent, there is an increased ten-
dency for corrosion to form on rotors, while
contaminants accumulate on the brake
pads. This occurs because the minimum
pressure which must be exerted by the
pads during brake applications to clean the
rotors is not reached.
Should corrosion form on the brake rotors,
the brakes will tend to respond with a pul-
sating effect that even extended applica-
tion will fail to cure.
Page 107 of 216

Driving tips
105Reference
At a glance
Controls
Communications
Navigation
Entertainment
Mobility
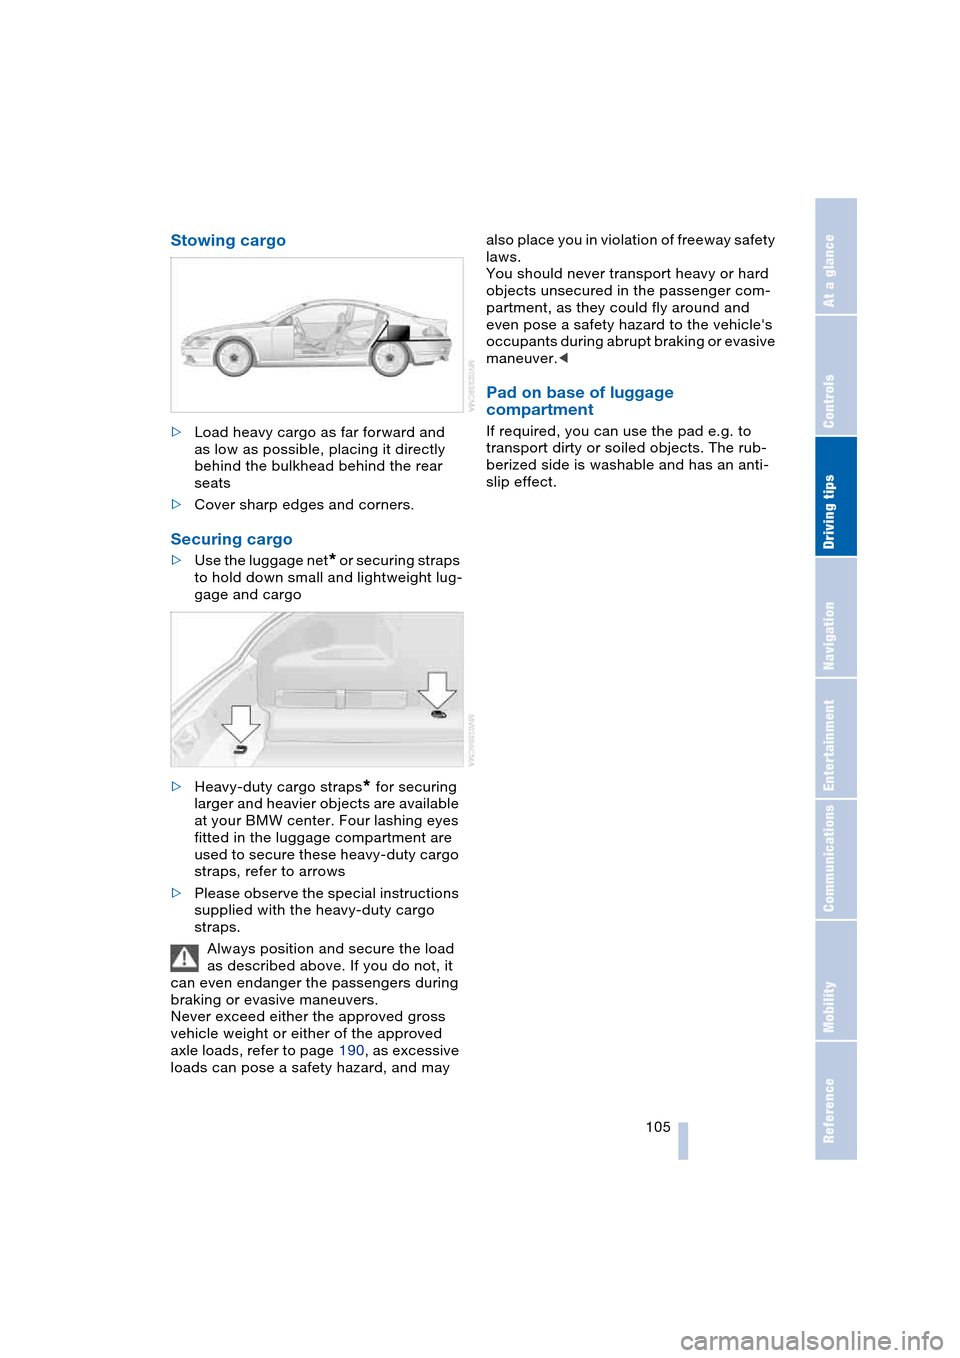
Stowing cargo
>Load heavy cargo as far forward and
as low as possible, placing it directly
behind the bulkhead behind the rear
seats
>Cover sharp edges and corners.
Securing cargo
>Use the luggage net* or securing straps
to hold down small and lightweight lug-
gage and cargo
>Heavy-duty cargo straps
* for securing
larger and heavier objects are available
at your BMW center. Four lashing eyes
fitted in the luggage compartment are
used to secure these heavy-duty cargo
straps, refer to arrows
>Please observe the special instructions
supplied with the heavy-duty cargo
straps.
Always position and secure the load
as described above. If you do not, it
can even endanger the passengers during
braking or evasive maneuvers.
Never exceed either the approved gross
vehicle weight or either of the approved
axle loads, refer to page 190, as excessive
loads can pose a safety hazard, and may also place you in violation of freeway safety
laws.
You should never transport heavy or hard
objects unsecured in the passenger com-
partment, as they could fly around and
even pose a safety hazard to the vehicle's
occupants during abrupt braking or evasive
maneuver.<
Pad on base of luggage
compartment
If required, you can use the pad e.g. to
transport dirty or soiled objects. The rub-
berized side is washable and has an anti-
slip effect.
Page 109 of 216

Navigation
This chapter describes how you can
enter destinations and specify your route
so that your navigation system guides you
reliably to your destination.
Page 110 of 216

Starting navigation system
108
Starting navigation system
Your navigation system can use satellites
to ascertain the precise position of your
vehicle and guide you reliably to any desti-
nation you enter.
Navigation DVD
Special navigation DVDs are required;
these are available from your BMW center.
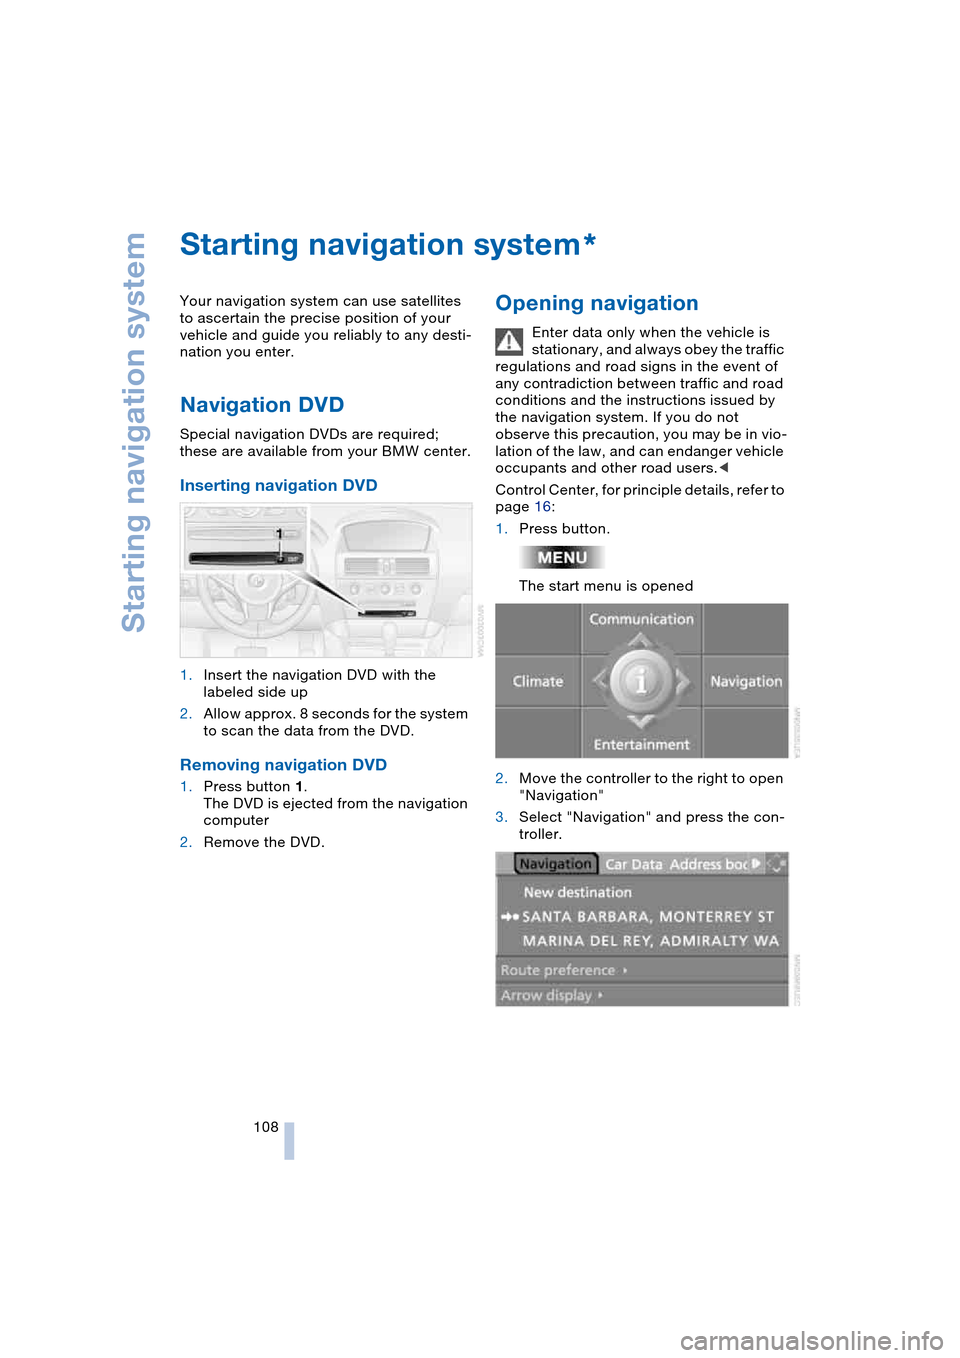
Inserting navigation DVD
1.Insert the navigation DVD with the
labeled side up
2.Allow approx. 8 seconds for the system
to scan the data from the DVD.
Removing navigation DVD
1.Press button 1.
The DVD is ejected from the navigation
computer
2.Remove the DVD.
Opening navigation
Enter data only when the vehicle is
stationary, and always obey the traffic
regulations and road signs in the event of
any contradiction between traffic and road
conditions and the instructions issued by
the navigation system. If you do not
observe this precaution, you may be in vio-
lation of the law, and can endanger vehicle
occupants and other road users.<
Control Center, for principle details, refer to
page 16:
1.Press button.
The start menu is opened
2.Move the controller to the right to open
"Navigation"
3.Select "Navigation" and press the con-
troller.
*