2004 BMW 645CI COUPE navigation
[x] Cancel search: navigationPage 53 of 216

Controls
51Reference
At a glance
Driving tips
Communications
Navigation
Entertainment
Mobility
Transporting children safely
The right place for children
Children always in the rear
Accident research shows that the safest
place for children in a vehicle is in the rear
seat.
Older children should be tightly secured
with a safety belt, after they have outgrown
a booster seat that is appropriate for their
age, height and weight.
Child-restraint system in the rear
Children under 13 years of age and
children less than 5 ft/150 cm tall
should always ride in the rear and the
restraint systems should be secured with
the vehicle's safety belts.<
Younger children should be secured in an
appropriate forward-facing child-restraint
system that has first been properly
secured. We strongly urge you to carefully
read and comply with the instructions for
installation and use provided by the child-
restraint's manufacturer whenever you use
such a device.
All rear sitting positions in your vehicle
meet the recommendations of SAE J1819,
an industry-recommended practice for
securing child-restraint systems in motor
vehicles.
Exception for front passenger seat
Should it become necessary to use
a child-restraint system on the front
passenger seat, the airbags on the passen-
ger's side must be deactivated. Deactivat-
ing the passenger airbags is only possible
on the Coupe. Your BMW center will be
glad to advise you.
ger seat of this vehicle if the passenger air-
bag is not deactivated. If you do so, the
child could be severely injured when the
airbag is triggered.
Your vehicle is equipped with an airbag
supplemental restraint system for the front
passenger. Because the backrest on any
rearward-facing child-restraint system – of
the kind designed for infants under 1 year
and 20 Ibs./9 kg – would be within the air-
bag's deployment range, you should never
mount such a system in the front passenger
seat, since the impact of the airbag against
the child restraint's backrest could lead to
serious or fatal injuries.<
Installing child-restraint
systems
Before installing any child-restraint system
or child seat, read the following:
Observe the child-restraint system
manufacturer's instructions for instal-
lation and use. Otherwise the degree of
protection can be reduced.
After an accident, have all parts of the
child-restraint system and of the relevant
vehicle safety belt system checked by a
BMW center and replaced if necessary.<
Commercially-available child-restraint sys-
tems are designed to be secured with a lap
belt or with the lap belt portion of a combi-
nation lap/shoulder belt. Improperly or
inadequately installed restraint systems
can increase the risk of injury to children.
Always read and follow the instructions that
come with the system.
Page 55 of 216

Controls
53Reference
At a glance
Driving tips
Communications
Navigation
Entertainment
Mobility
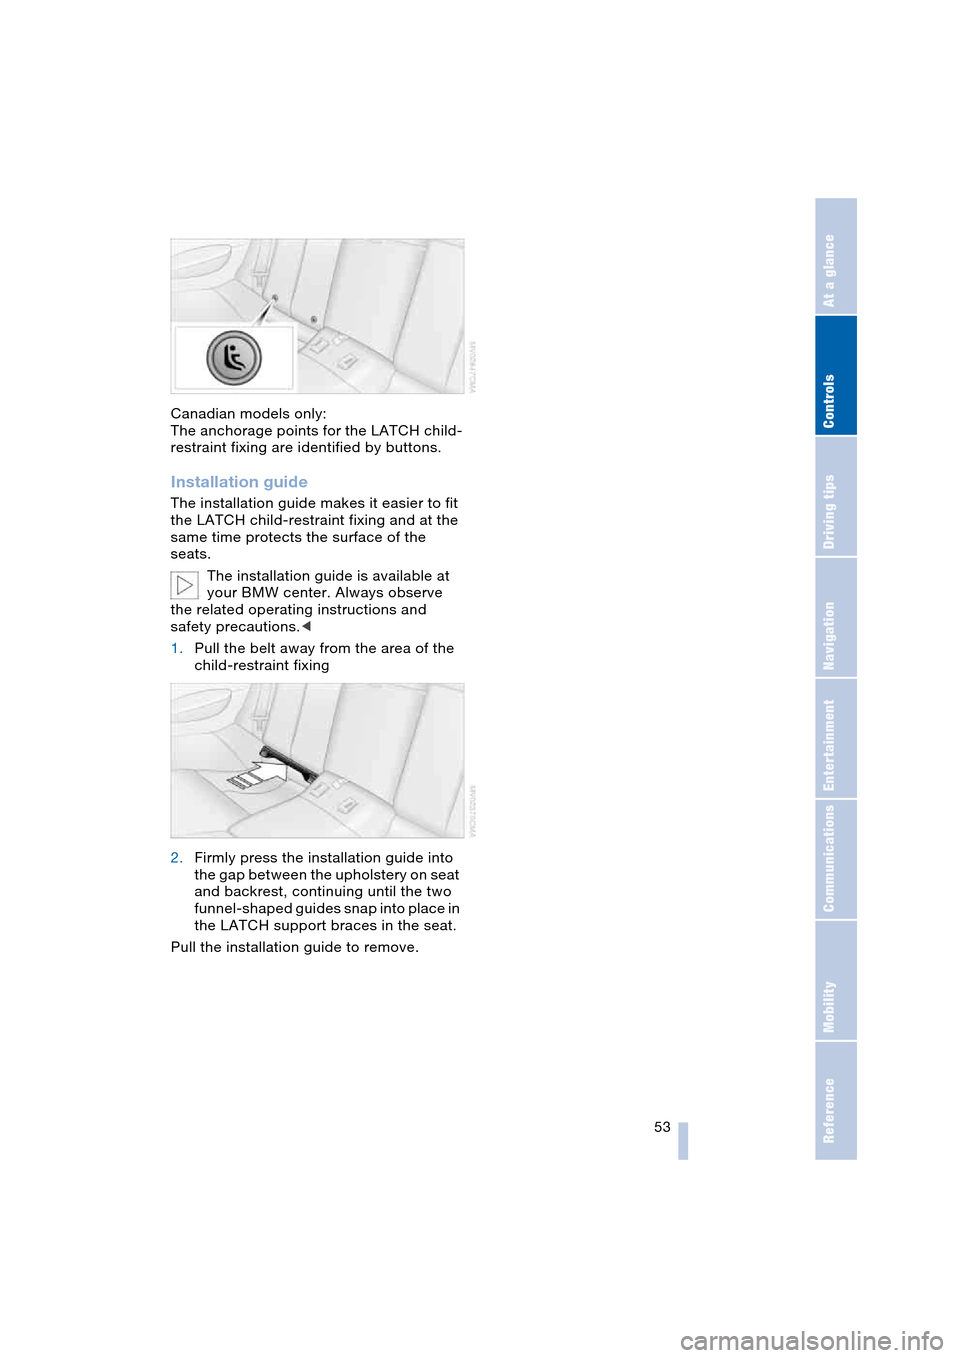
Canadian models only:
The anchorage points for the LATCH child-
restraint fixing are identified by buttons.
Installation guide
The installation guide makes it easier to fit
the LATCH child-restraint fixing and at the
same time protects the surface of the
seats.
The installation guide is available at
your BMW center. Always observe
the related operating instructions and
safety precautions.<
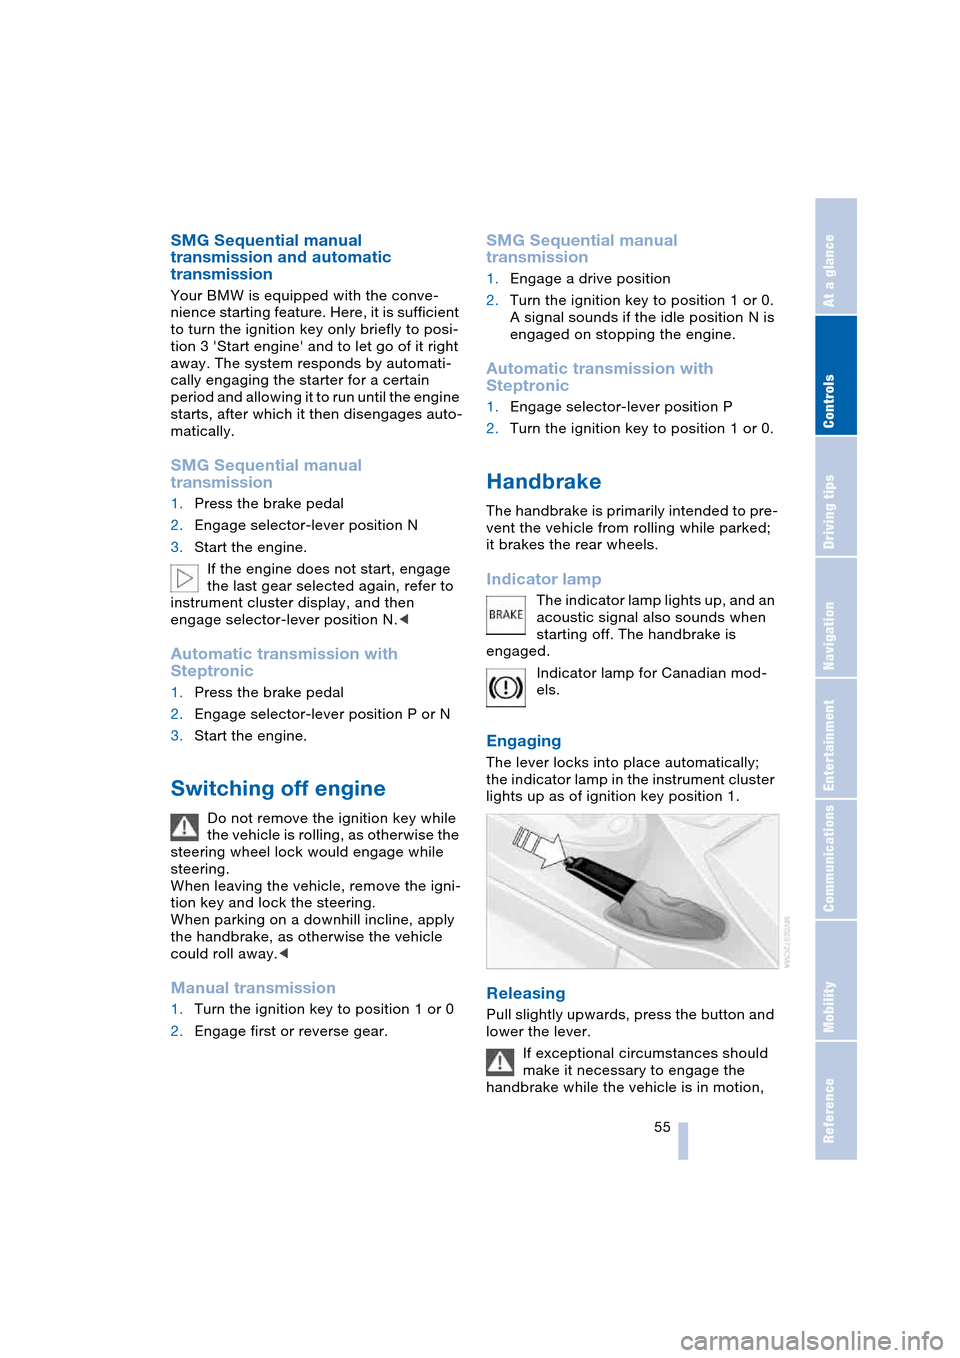
1.Pull the belt away from the area of the
child-restraint fixing
2.Firmly press the installation guide into
the gap between the upholstery on seat
and backrest, continuing until the two
funnel-shaped guides snap into place in
the LATCH support braces in the seat.
Pull the installation guide to remove.
Page 57 of 216

Controls
55Reference
At a glance
Driving tips
Communications
Navigation
Entertainment
Mobility
SMG Sequential manual
transmission and automatic
transmission
Your BMW is equipped with the conve-
nience starting feature. Here, it is sufficient
to turn the ignition key only briefly to posi-
tion 3 'Start engine' and to let go of it right
away. The system responds by automati-
cally engaging the starter for a certain
period and allowing it to run until the engine
starts, after which it then disengages auto-
matically.
SMG Sequential manual
transmission
1.Press the brake pedal
2.Engage selector-lever position N
3.Start the engine.
If the engine does not start, engage
the last gear selected again, refer to
instrument cluster display, and then
engage selector-lever position N.<
Automatic transmission with
Steptronic
1.Press the brake pedal
2.Engage selector-lever position P or N
3.Start the engine.
Switching off engine
Do not remove the ignition key while
the vehicle is rolling, as otherwise the
steering wheel lock would engage while
steering.
When leaving the vehicle, remove the igni-
tion key and lock the steering.
When parking on a downhill incline, apply
the handbrake, as otherwise the vehicle
could roll away.<
Manual transmission
1.Turn the ignition key to position 1 or 0
2.Engage first or reverse gear.
SMG Sequential manual
transmission
1.Engage a drive position
2.Turn the ignition key to position 1 or 0.
A signal sounds if the idle position N is
engaged on stopping the engine.
Automatic transmission with
Steptronic
1.Engage selector-lever position P
2.Turn the ignition key to position 1 or 0.
Handbrake
The handbrake is primarily intended to pre-
vent the vehicle from rolling while parked;
it brakes the rear wheels.
Indicator lamp
The indicator lamp lights up, and an
acoustic signal also sounds when
starting off. The handbrake is
engaged.
Indicator lamp for Canadian mod-
els.
Engaging
The lever locks into place automatically;
the indicator lamp in the instrument cluster
lights up as of ignition key position 1.
Releasing
Pull slightly upwards, press the button and
lower the lever.
If exceptional circumstances should
make it necessary to engage the
handbrake while the vehicle is in motion,
Page 59 of 216

Controls
57Reference
At a glance
Driving tips
Communications
Navigation
Entertainment
Mobility
>One-touch function for Sequential
mode
+: manual upshifts
—: manual downshifts
>D: Drive mode.
N is automatically engaged if the
driver's door is opened with the
engine running and neither pedals, shift
paddles nor the selector lever are oper-
ated.
This is indicated by an acoustic signal and
the flashing display N in the instrument
cluster.<
Gear display
R N 1 to 6
The currently engaged gear is displayed, in
the Drive mode preceded by a D.
Shiftlock
Press the brake pedal before shifting out
of N; the shift command will not be exe-
cuted unless the brake is applied.
R Reverse
Select only when the vehicle is completely
stationary.
Sequential mode
After every engine start, as soon as the
selector lever is pushed to the right and the
brake pedal is pressed, the Sequential
mode is activated.
The gear is changed using the shift paddles
or selector lever.
Driving off is also possible in second gear,
e.g. when the roadway is icy.
D Drive mode
In the Drive mode, all forward gears are
shifted automatically.
To switch from Sequential to Drive mode:
Briefly press the selector lever to the right
towards D.
Kickdown:
For rapid acceleration, e.g. overtaking,
press the accelerator pedal as far down as
it will go: you achieve maximum accelera-
tion.
To switch back to the Sequential mode:
briefly press the selector lever back to the
right towards D or change the current gear
using the shift paddles or selector lever.
Start off quickly on slopes. Do not
hold the vehicle on a hill by applying
the throttle, but engage the handbrake
instead. Otherwise overheating can occur
in the area of the transmission.<
Gear changes
Using selector lever
>To shift up, briefly press the selector
lever towards +
>To shift down, briefly press towards —.
Using shift paddles on steering
wheel
>To shift up, pull one of the shift paddles
>To shift down, press.
In the following situations, the SMG in the
Sequential mode assists you:
>Upshifts and downshifts are executed
only when they will result in a plausible
combination of engine and vehicle
Page 61 of 216

Controls
59Reference
At a glance
Driving tips
Communications
Navigation
Entertainment
Mobility
P Parking
Select only when the vehicle is completely
stationary. The rear wheels are blocked.
R Reverse
Select only when the vehicle is completely
stationary.
N Neutral
E.g. engage in car washes. The vehicle can
roll.
D Drive, automatic position
Position for normal vehicle operation.
All forward gears are available.
Under normal operating conditions, fuel
consumption is lowest when driving in
position D.
Kickdown
The kickdown mode provides maximum
acceleration:
Press the accelerator pedal beyond the
full-throttle resistance point.
M/S manual operation and
Sport program
Move the selector lever from position D to
the left into gearshift gate M/S:
The sport program is activated and DS
appears in the instrument cluster.
This position is recommended for a perfor-
mance-oriented driving style. It is engaged
automatically when the Dynamic Driving
Control is activated, see below.
When the selector lever is moved slightly
towards + or –, the Steptronic shifts gear
and manual operation is activated. The
instrument cluster shows M1 through M6.Upshifts and downshifts are executed only
when they will result in a plausible combi-
nation of engine and vehicle speed; thus,
for example, a downshift that would cause
the engine to overrev will not be executed
by the system. The selected gear appears
briefly in the instrument cluster, followed by
the current gear.
To use the automatic function again, move
the selector lever to the right into posi-
tion D.
Malfunction
The warning lamp lights up and a
message appears on the Control
Display. There is a malfunction in
the transmission system. Avoid heavy
loads.
While it will remain still possible to move
the selector lever to any desired position,
the transmission will revert to operation in
its default mode with only a limited number
of forward gears.
Have the system checked as soon as pos-
sible.
Towing, refer to page, 185, jump-starting,
refer to page 185.
Dynamic Driving Control
The Dynamic Driving Control makes it pos-
sible for your BMW to react in an even more
sports-oriented manner at the push of a
button:
>The engine responds more spontane-
ously to accelerator pedal movements
>The steering conveys a feeling of even
better contact with the road surface
>Cruise control:
The stored speed you call up is reached
more quickly.
Additionally with SMG:
>Gearshifts are faster
>The engine speed range is used opti-
mally in the Drive mode.
With automatic transmission:
>The Sport program is activated.
Page 63 of 216

Controls
61Reference
At a glance
Driving tips
Communications
Navigation
Entertainment
Mobility
Triple turn signal activation is acti-
vated.
Wiper system
1Standard wiper speed: briefly press
once.
The system automatically reverts to
operation in the intermittent mode
whenever the vehicle is stationary.
Fast wipe: briefly press twice or press
beyond the resistance point.
The system automatically reverts to
operation in the standard wipe mode
whenever the vehicle is stationary
2Switching off wipers or for brief wipe
3Activating/deactivating rain sensor
4Cleaning windshield and headlamps
5Adjusting rain sensor sensitivity level
The lever automatically returns to its initial
position when released.
Cleaning windshield and headlamps
The system sprays washer fluid against the
windshield and activates the wipers for a
brief period.
When the vehicle lighting system is
switched on, the headlamps are also cleaned at regular and appropriate inter-
vals.
Do not use the washers if there is any
danger that the fluid will freeze on the
windshield. If you do so, your vision could
be obscured. To avoid freezing, use a
washer fluid antifreeze, refer to Washer
fluid.
Avoid activating the washer when the res-
ervoir is empty, as damage to the pump
could result.<
Windshield washer nozzles
The windshield washer nozzles are auto-
matically heated in ignition key position 2.
Rain sensor
The rain sensor controls windshield wipe
operation depending on the amount of rain.
The rain sensor is located on the wind-
shield, directly in front of the interior rear-
view mirror.
Activating rain sensor
As of ignition key position 1, briefly press
the button. The indicator lamp in the button
lights up. The wipers will always respond
by completing at least one sweep of the
windshield.
Adjusting rain sensor sensitivity level
Turn the serrated dial 5.
Deactivating rain sensor
Press the button again. The indicator lamp
goes out.
The rain sensor is automatically deacti-
vated when you switch off the ignition.
Page 65 of 216

Controls
63Reference
At a glance
Driving tips
Communications
Navigation
Entertainment
Mobility
In addition, cruise control is interrupted
automatically
>when you apply pressure to the brake
pedal
>when you press down the clutch pedal
or engage position N of the automatic
transmission/SMG
>when DSC comes on.
4Recalling stored speed
Briefly press button 4: the vehicle acceler-
ates to and maintains the stored speed.
Deactivating system
When the ignition is switched off, the sys-
tem is deactivated and the stored speed is
deleted.
Displays in instrument cluster
1Display for stored speed with cruise
control activated
2Digital speedometer.
Briefly displays the selected speed
Page 67 of 216

Controls
65Reference
At a glance
Driving tips
Communications
Navigation
Entertainment
Mobility
Engine oil thermometer
The engine oil temperature is between
approx. 1607/706 and approx. 3407/
1706 during normal operation.
If the engine oil temperature is too high, a
message appears on the Control Display.
Fuel gauge
Fuel tank capacity: approx. 18.5 US gal-
lons/70 liters, including the reserve capac-
ity of approx. 2.1 gallons/8 liters. You can
find information on refueling on page 162.
If the tilt of the vehicle varies for a longer
period, when you are driving in mountain-
ous areas, for example, the indicator may
fluctuate slightly.
After the reserve quantity has been
reached, a message appears for a short
time on the Control Display; the remaining
range is shown in the computer. Below a
range of approx. 30 miles/50 km, the mes-
sage remains on the Control Display.
Refuel as soon as possible once your
cruising range falls below 30 miles/
50 km, as otherwise engine functions are
not ensured and damage can occur.<
Service requirement display
In instrument cluster
The remaining distance to be driven, the
date for the next maintenance as well as
the date entered for the state emission or
vehicle inspection are displayed briefly as
of ignition key position 2, if the date is
imminent.
Your BMW Service Advisor will deter-
mine your vehicle's current service
requirements by reading out the data
stored in the vehicle key.<
On Control Display
You can view additional information on ser-
vice and maintenance procedures on the
Control Display.
Control Center, for principle details, refer to
page 16:
1.Open the menu
2.Select "Service" and press the control-
ler
3.Select "Service requirements" and
press the controller
4.Select "Status" and press the control-
ler.
The display shows a list of selected service
and maintenance procedures, as well as
legally mandated official inspections.