Page 97 of 216

Controls
95Reference
At a glance
Driving tips
Communications
Navigation
Entertainment
Mobility
The corresponding memory button 1 is
now programmed with the signal of the
original hand-held transmitter.
The equipment can be used in ignition key
position 2.
If the device cannot be operated after
repeated programming, check
whether the original hand-held transmitter
uses an alternating-code system. Here,
either read the instructions for the original
hand-held transmitter or hold down the
programmed memory button 1 of the inte-
grated universal remote control. If the indi-
cator lamp 2 on the integrated universal
remote control flashes rapidly for a short
time then lights up for approx. 2 seconds,
this indicates that the original hand-held
transmitter uses an alternating-code sys-
tem. In the case of an alternating-code sys-
tem, program the memory buttons 1 as
described at Alternating-code hand-held
transmitters.<
Alternating-code hand-held
transmitters
To program the integrated universal remote
control, consult the Operating Instructions
for the equipment to be set. You will find
information there on the possibilities for
synchronization.
When programming hand-held transmitters
that employ an alternating code, please
observe the following supplementary
instructions:
Programming will be easier with the
aid of a second person.<
1.Park your vehicle within the range of the
remote-controlled equipment
2.Program the integrated universal
remote control as described above at
Fixed-code hand-held transmitters
3.Locate the button at the receiver of the
equipment to be set, e.g. on the drive
4.Press the button on the receiver of the
equipment to be set. After step 4, you
have approx. 30 seconds for step 55.Press the programmed memory
button 1 of the integrated universal
remote control three times.
The corresponding memory button 1 is
now programmed with the signal of the
original hand-held transmitter.
If you have any additional questions,
please contact your BMW center.<
Clearing memory buttons
Press both outer buttons 1 of the inte-
grated universal remote control for approx.
20 seconds, maintaining pressure until the
indicator lamp 2 starts to flash. All three
memory buttons are cleared.
The memory of individual memory but-
tons 1 cannot be cleared.
Glove compartment
Opening
Press button. The glove compartment
opens automatically and the lamps come
on.
Closing
Fold the cover up.
To prevent injury in the event of an
accident while the vehicle is being
driven, close the glove compartment
immediately after use.<
Rechargeable flashlight*
The flashlight is located on the left side of
the glove compartment.
The flashlight can remain there continu-
ously.
Page 98 of 216

Practical interior accessories
96 Be sure that the flashlight is switched
off when it is inserted into its holder.
Failure to comply with this precaution
could lead to overcharging and damage.<
Center armrest
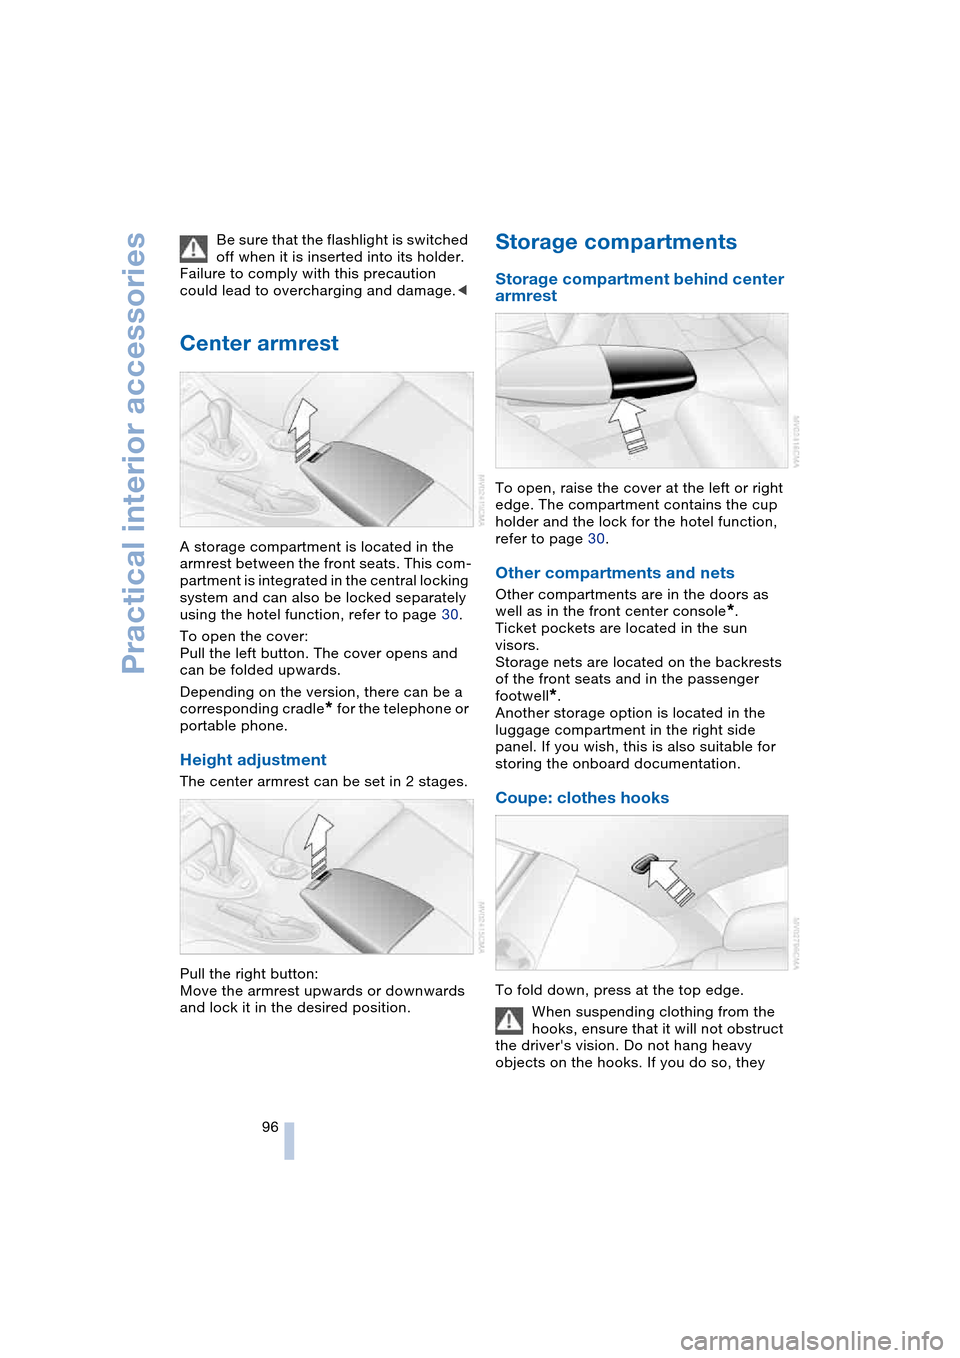
A storage compartment is located in the
armrest between the front seats. This com-
partment is integrated in the central locking
system and can also be locked separately
using the hotel function, refer to page 30.
To open the cover:
Pull the left button. The cover opens and
can be folded upwards.
Depending on the version, there can be a
corresponding cradle
* for the telephone or
portable phone.
Height adjustment
The center armrest can be set in 2 stages.
Pull the right button:
Move the armrest upwards or downwards
and lock it in the desired position.
Storage compartments
Storage compartment behind center
armrest
To open, raise the cover at the left or right
edge. The compartment contains the cup
holder and the lock for the hotel function,
refer to page 30.
Other compartments and nets
Other compartments are in the doors as
well as in the front center console
*.
Ticket pockets are located in the sun
visors.
Storage nets are located on the backrests
of the front seats and in the passenger
footwell
*.
Another storage option is located in the
luggage compartment in the right side
panel. If you wish, this is also suitable for
storing the onboard documentation.
Coupe: clothes hooks
To fold down, press at the top edge.
When suspending clothing from the
hooks, ensure that it will not obstruct
the driver's vision. Do not hang heavy
objects on the hooks. If you do so, they
Page 99 of 216

Controls
97Reference
At a glance
Driving tips
Communications
Navigation
Entertainment
Mobility
could cause personal injury to occupants
during braking or evasive maneuvers.<
Cup holders
The compartment of the rear center con-
sole contains a built-in and removable cup
holder.
The removable cup holder can be inserted
in the side of the center console.
Do not place glass containers in the
cup holders. This would lead to an
increased risk of injury in the event of an
accident.<
Ashtray
Opening
Press the trim strip of the cover.
Emptying
Press the opened cover beyond the resis-
tance point, refer to arrow:
The ashtray rises for removal.
Cigarette lighter
In ignition key position 2, press in the ciga-
rette lighter.
Remove as soon as the lighter jumps back
out.
Hold or touch the hot cigarette lighter
by the knob only. Holding or touching
it in other areas could result in burns.
Always remove the ignition key when you
leave the vehicle so that, for example, chil-
dren are unable to use the cigarette lighter
and burn themselves.<
Socket
In ignition key position 2, the lighter socket
can be used to plug in hand flashlights, car
vacuum cleaners, etc., with power ratings
of up to approx. 200 W at 12 V. Avoid dam-
aging the socket due to inserting plugs of
different shapes or sizes.
Page 100 of 216

Practical interior accessories
98
Socket
In front passenger footwell
Access to the socket:
Fold the cover upwards.
Ski bag*
Designed for safe, convenient transport of
up to 2 pairs of standard skis or one snow-
board.
The ski bag itself plus the additional capac-
ity provided by the luggage compartment
make it possible to transport skis with a
length of up to 6.9 ft/2.10 m.
Loading
1.Press the button downwards and pull
the filler element forwards
2.Extend the ski bag between the front
seats. The zipper allows more conve-
nient access to stored objects and can
also be left open to allow the ski bag to
dry
3.Press the button in the luggage com-
partment4.Open the loading flap and use the mag-
netic holder to secure it to the rear
panel.
To store the ski bag, perform the above
steps in reverse order.
Ensure that the skis are clean before
loading them into the bag. Take care
to avoid damage from sharp edges.<
Securing load
After loading, secure the ski bag and its
contents. To do so, tighten the retaining
belt at the buckle.
Secure the ski bag in this way. If you
fail to do so, it could move around and
endanger occupants during braking or eva-
sive maneuvers.<
To refit the filler element, insert the
two steps in the strip and press back
the filler element. Make sure that you do
not damage the rear seat upholstery.<
Page 101 of 216
Controls
99Reference
At a glance
Driving tips
Communications
Navigation
Entertainment
Mobility
Page 102 of 216
Page 103 of 216
Driving tips
This section is designed to provide you
with extra support by supplying information
useful in dealing with specific driving and
operating conditions.
Page 104 of 216

Things to remember when driving
102
Things to remember when driving
Break-in procedures
To ensure that your vehicle continues to
provide optimized economy of operation
throughout an extended service life, we
request that you devote careful attention to
the following section.
Engine and differential
Up to 1,200 miles/2,000 km:
You should attempt to vary both vehicle
and engine speeds. Until the break-in
period has been completed, you should
also refrain from exceeding an engine
speed of 4500 rpm or a driving speed of
100 mph/160 km/h.
Always obey all official speed limits.
Avoid full-throttle operation and use of the
transmission's kickdown mode during
these initial miles.
Once you have driven 1,200 miles/
2,000 km, the engine and vehicle speeds
can be gradually increased.
SMG Sequential manual
transmission
Do not use the acceleration assistant dur-
ing the break-in period, refer to page 60.
Tires
Due to technical factors associated with
their manufacture, tires do not achieve their
full traction potential until after an initial
break-in period. Therefore, drive reservedly
during the first 200 miles/300 km.
Brake system
Brakes require an initial break-in period of
approx. 300 miles/500 km to achieve opti-
mized contact and wear patterns between
brake pads and rotors.
Clutch
The function of the clutch is only at its opti-
mized level after a distance driven of
approx. 300 miles/500 km. During this
break-in period, engage the clutch gently.
After component replacement
You should also comply with these break-in
procedures should the components men-
tioned above need to be replaced at a later
point.
General driving notes
Hot exhaust system
Extreme temperatures occur at the
catalytic converter on this and every
catalyst-equipped vehicle. Do not remove
the heat shields installed adjacent to vari-
ous sections of the exhaust system, and
never apply undercoating to them. When
driving, standing at idle and while parking,
take care to avoid possible contact
between the hot exhaust system and any
highly flammable materials such as hay,
leaves, grass, etc. Such contact could lead
to a fire, and with it the risk of serious prop-
erty damage as well as personal injury.<
Parking vehicle
Condensation forms in the air conditioner
system during operation, and then exits
under the vehicle. Traces of condensed
water under the vehicle are thus normal.
Before driving into a car wash
Fold in the exterior mirrors manually, as
otherwise they could be damaged due to
the width of the vehicle.
Hydroplaning
When driving on wet or slushy roads,
reduce road speed. If you do not, a
wedge of water can form between tires and