2004 BMW 645CI COUPE&CONVERTIBLE cooling
[x] Cancel search: coolingPage 17 of 216
At a glance
15Reference
Controls
Driving tips
Communications
Navigation
Entertainment
Mobility
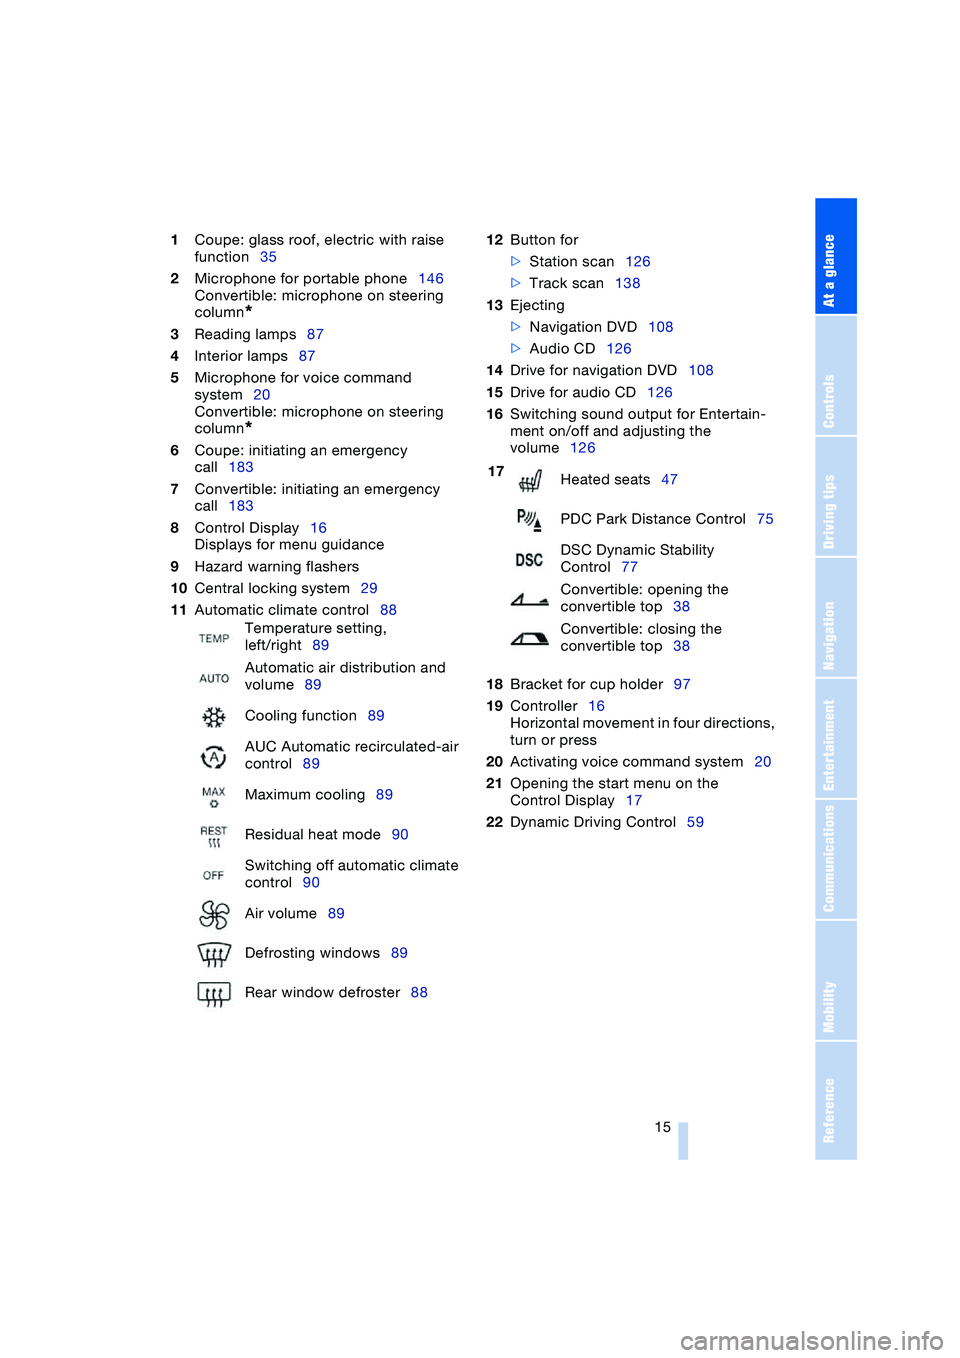
1Coupe: glass roof, electric with raise
function35
2Microphone for portable phone146
Convertible: microphone on steering
column
*
3Reading lamps87
4Interior lamps87
5Microphone for voice command
system20
Convertible: microphone on steering
column
*
6Coupe: initiating an emergency
call183
7Convertible: initiating an emergency
call183
8Control Display16
Displays for menu guidance
9Hazard warning flashers
10Central locking system29
11Automatic climate control8812Button for
>Station scan126
>Track scan138
13Ejecting
>Navigation DVD108
>Audio CD126
14Drive for navigation DVD108
15Drive for audio CD126
16Switching sound output for Entertain-
ment on/off and adjusting the
volume126
18Bracket for cup holder97
19Controller16
Horizontal movement in four directions,
turn or press
20Activating voice command system20
21Opening the start menu on the
Control Display17
22Dynamic Driving Control59 Temperature setting,
left/right89
Automatic air distribution and
volume89
Cooling function89
AUC Automatic recirculated-air
control89
Maximum cooling89
Residual heat mode90
Switching off automatic climate
control90
Air volume89
Defrosting windows89
Rear window defroster88
17
Heated seats47
PDC Park Distance Control75
DSC Dynamic Stability
Control77
Convertible: opening the
convertible top38
Convertible: closing the
convertible top38
Page 90 of 216
A congenial climate
88
A congenial climate
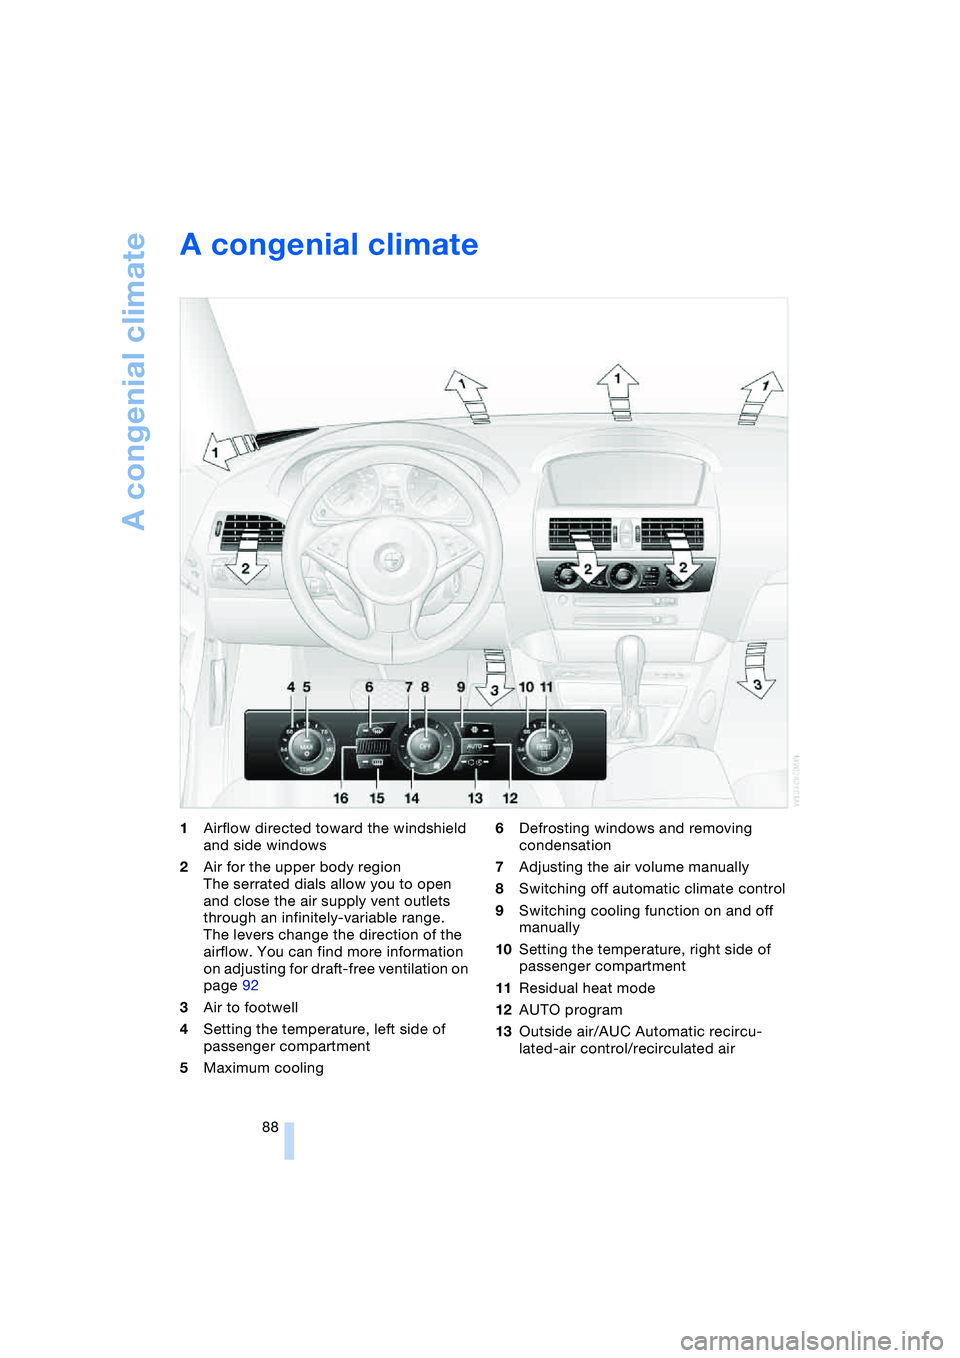
1Airflow directed toward the windshield
and side windows
2Air for the upper body region
The serrated dials allow you to open
and close the air supply vent outlets
through an infinitely-variable range.
The levers change the direction of the
airflow. You can find more information
on adjusting for draft-free ventilation on
page 92
3Air to footwell
4Setting the temperature, left side of
passenger compartment
5Maximum cooling6Defrosting windows and removing
condensation
7Adjusting the air volume manually
8Switching off automatic climate control
9Switching cooling function on and off
manually
10Setting the temperature, right side of
passenger compartment
11Residual heat mode
12AUTO program
13Outside air/AUC Automatic recircu-
lated-air control/recirculated air
Page 91 of 216
Controls
89Reference
At a glance
Driving tips
Communications
Navigation
Entertainment
Mobility
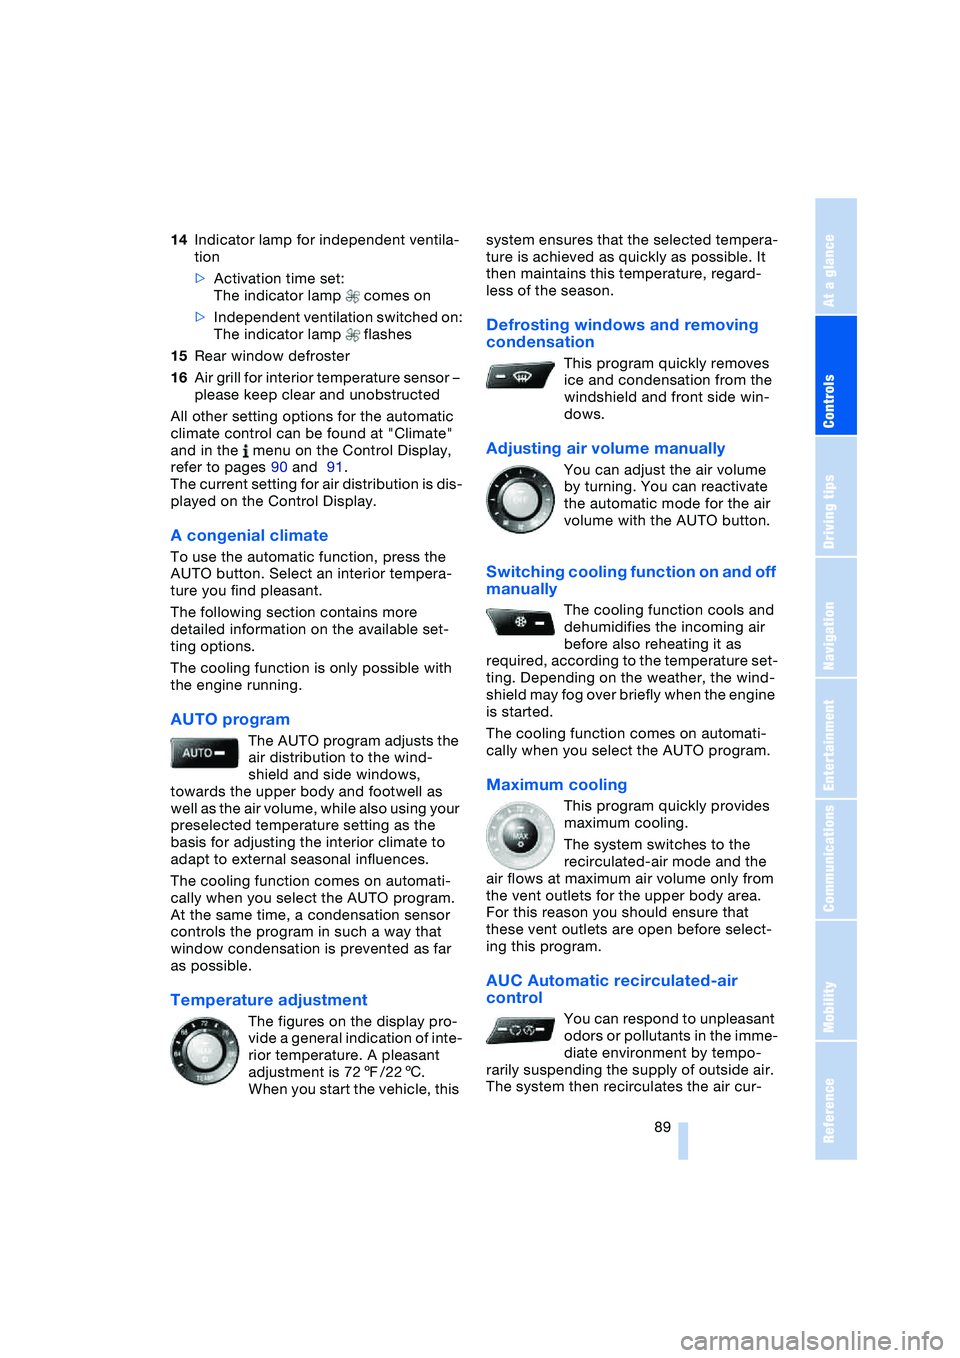
14Indicator lamp for independent ventila-
tion
>Activation time set:
The indicator lamp comes on
>Independent ventilation switched on:
The indicator lamp flashes
15Rear window defroster
16Air grill for interior temperature sensor –
please keep clear and unobstructed
All other setting options for the automatic
climate control can be found at "Climate"
and in the menu on the Control Display,
refer to pages 90 and 91.
The current setting for air distribution is dis-
played on the Control Display.
A congenial climate
To use the automatic function, press the
AUTO button. Select an interior tempera-
ture you find pleasant.
The following section contains more
detailed information on the available set-
ting options.
The cooling function is only possible with
the engine running.
AUTO program
The AUTO program adjusts the
air distribution to the wind-
shield and side windows,
towards the upper body and footwell as
well as the air volume, while also using your
preselected temperature setting as the
basis for adjusting the interior climate to
adapt to external seasonal influences.
The cooling function comes on automati-
cally when you select the AUTO program.
At the same time, a condensation sensor
controls the program in such a way that
window condensation is prevented as far
as possible.
Temperature adjustment
The figures on the display pro-
vide a general indication of inte-
rior temperature. A pleasant
adjustment is 727/226.
When you start the vehicle, this system ensures that the selected tempera-
ture is achieved as quickly as possible. It
then maintains this temperature, regard-
less of the season.
Defrosting windows and removing
condensation
This program quickly removes
ice and condensation from the
windshield and front side win-
dows.
Adjusting air volume manually
You can adjust the air volume
by turning. You can reactivate
the automatic mode for the air
volume with the AUTO button.
Switching cooling function on and off
manually
The cooling function cools and
dehumidifies the incoming air
before also reheating it as
required, according to the temperature set-
ting. Depending on the weather, the wind-
shield may fog over briefly when the engine
is started.
The cooling function comes on automati-
cally when you select the AUTO program.
Maximum cooling
This program quickly provides
maximum cooling.
The system switches to the
recirculated-air mode and the
air flows at maximum air volume only from
the vent outlets for the upper body area.
For this reason you should ensure that
these vent outlets are open before select-
ing this program.
AUC Automatic recirculated-air
control
You can respond to unpleasant
odors or pollutants in the imme-
diate environment by tempo-
rarily suspending the supply of outside air.
The system then recirculates the air cur-
Page 92 of 216
A congenial climate
90 rently within the vehicle. AUC executes this
function automatically.
Press the button repeatedly to run through
the following control sequence:
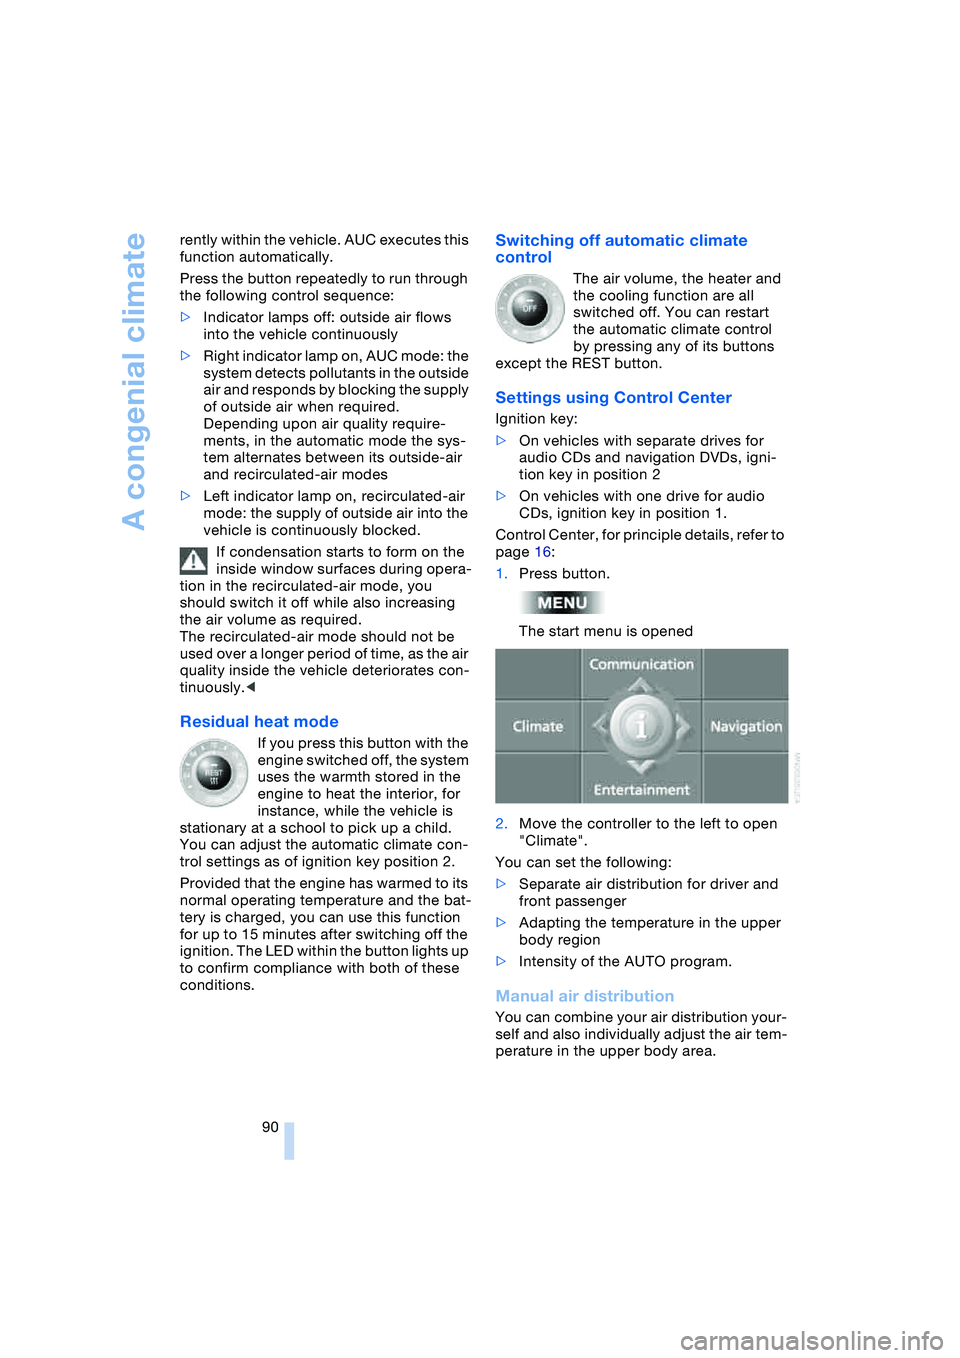
>Indicator lamps off: outside air flows
into the vehicle continuously
>Right indicator lamp on, AUC mode: the
system detects pollutants in the outside
air and responds by blocking the supply
of outside air when required.
Depending upon air quality require-
ments, in the automatic mode the sys-
tem alternates between its outside-air
and recirculated-air modes
>Left indicator lamp on, recirculated-air
mode: the supply of outside air into the
vehicle is continuously blocked.
If condensation starts to form on the
inside window surfaces during opera-
tion in the recirculated-air mode, you
should switch it off while also increasing
the air volume as required.
The recirculated-air mode should not be
used over a longer period of time, as the air
quality inside the vehicle deteriorates con-
tinuously.<
Residual heat mode
If you press this button with the
engine switched off, the system
uses the warmth stored in the
engine to heat the interior, for
instance, while the vehicle is
stationary at a school to pick up a child.
You can adjust the automatic climate con-
trol settings as of ignition key position 2.
Provided that the engine has warmed to its
normal operating temperature and the bat-
tery is charged, you can use this function
for up to 15 minutes after switching off the
ignition. The LED within the button lights up
to confirm compliance with both of these
conditions.
Switching off automatic climate
control
The air volume, the heater and
the cooling function are all
switched off. You can restart
the automatic climate control
by pressing any of its buttons
except the REST button.
Settings using Control Center
Ignition key:
>On vehicles with separate drives for
audio CDs and navigation DVDs, igni-
tion key in position 2
>On vehicles with one drive for audio
CDs, ignition key in position 1.
Control Center, for principle details, refer to
page 16:
1.Press button.
The start menu is opened
2.Move the controller to the left to open
"Climate".
You can set the following:
>Separate air distribution for driver and
front passenger
>Adapting the temperature in the upper
body region
>Intensity of the AUTO program.
Manual air distribution
You can combine your air distribution your-
self and also individually adjust the air tem-
perature in the upper body area.
Page 94 of 216
A congenial climate
92 climate control is optimized for driving with
the convertible top open. In addition, the air
supply is increased as the speed increases.
If the convertible program has been
selected, it is automatically active every
time the top is opened.
The effect of the convertible program
can be greatly enhanced if the wind
deflector is fitted.<
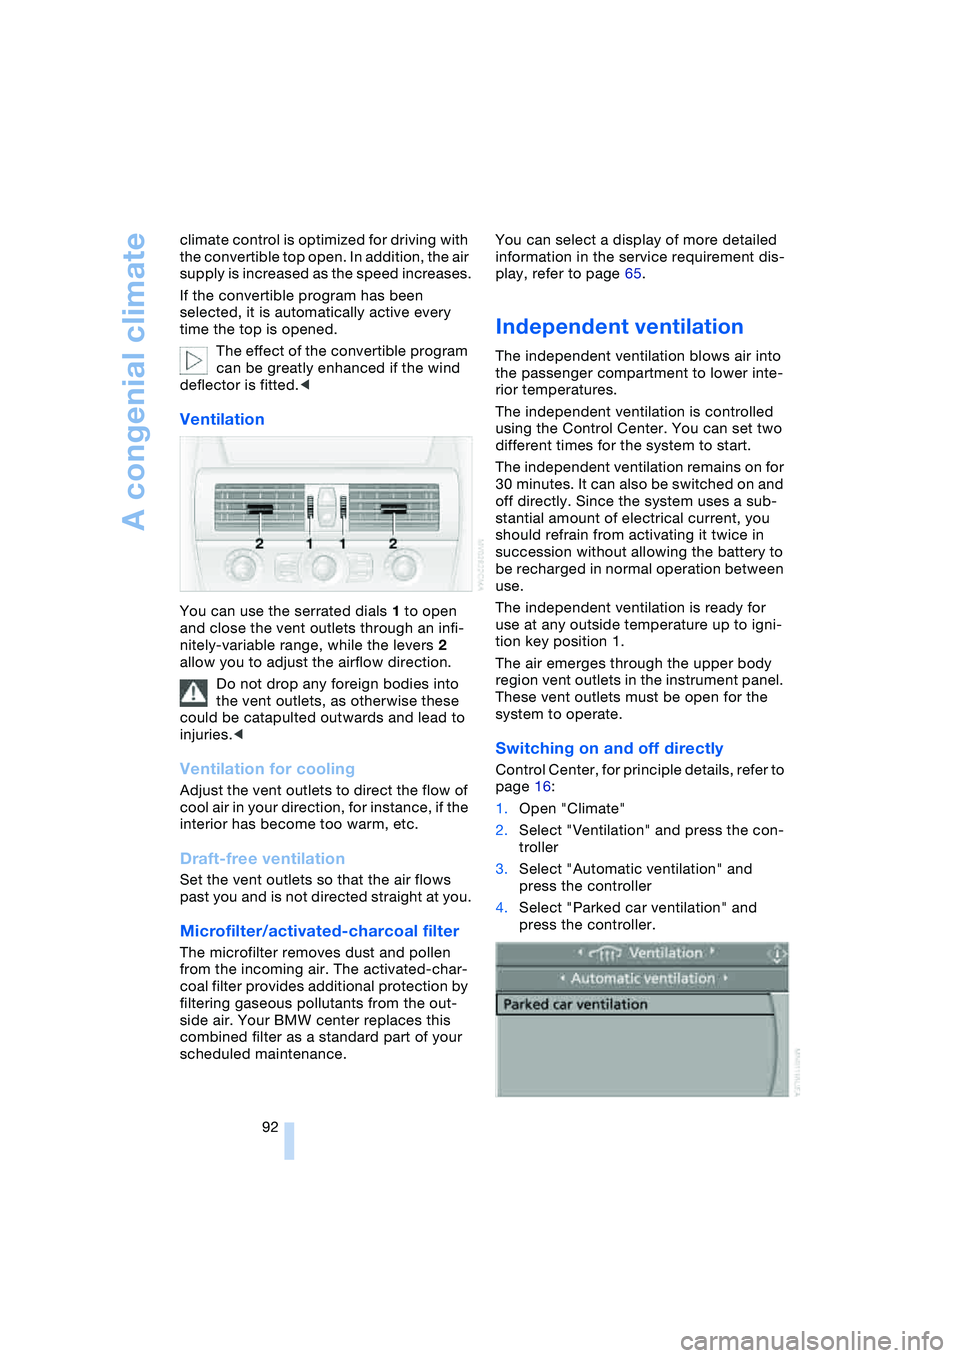
Ventilation
You can use the serrated dials 1 to open
and close the vent outlets through an infi-
nitely-variable range, while the levers 2
allow you to adjust the airflow direction.
Do not drop any foreign bodies into
the vent outlets, as otherwise these
could be catapulted outwards and lead to
injuries.<
Ventilation for cooling
Adjust the vent outlets to direct the flow of
cool air in your direction, for instance, if the
interior has become too warm, etc.
Draft-free ventilation
Set the vent outlets so that the air flows
past you and is not directed straight at you.
Microfilter/activated-charcoal filter
The microfilter removes dust and pollen
from the incoming air. The activated-char-
coal filter provides additional protection by
filtering gaseous pollutants from the out-
side air. Your BMW center replaces this
combined filter as a standard part of your
scheduled maintenance.You can select a display of more detailed
information in the service requirement dis-
play, refer to page 65.
Independent ventilation
The independent ventilation blows air into
the passenger compartment to lower inte-
rior temperatures.
The independent ventilation is controlled
using the Control Center. You can set two
different times for the system to start.
The independent ventilation remains on for
30 minutes. It can also be switched on and
off directly. Since the system uses a sub-
stantial amount of electrical current, you
should refrain from activating it twice in
succession without allowing the battery to
be recharged in normal operation between
use.
The independent ventilation is ready for
use at any outside temperature up to igni-
tion key position 1.
The air emerges through the upper body
region vent outlets in the instrument panel.
These vent outlets must be open for the
system to operate.
Switching on and off directly
Control Center, for principle details, refer to
page 16:
1.Open "Climate"
2.Select "Ventilation" and press the con-
troller
3.Select "Automatic ventilation" and
press the controller
4.Select "Parked car ventilation" and
press the controller.
Page 174 of 216
Under the hood
172
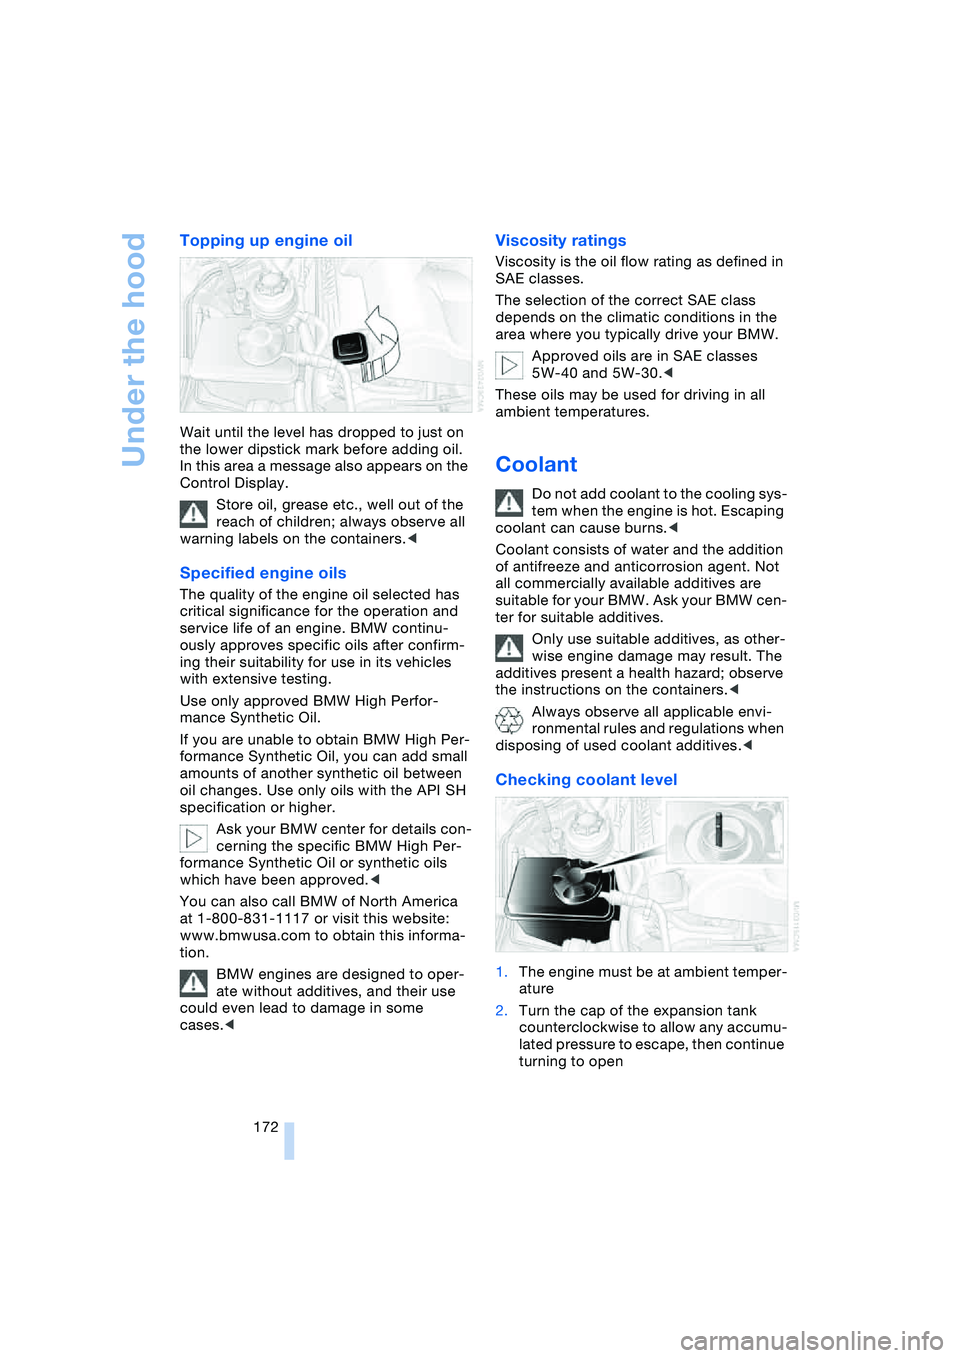
Topping up engine oil
Wait until the level has dropped to just on
the lower dipstick mark before adding oil.
In this area a message also appears on the
Control Display.
Store oil, grease etc., well out of the
reach of children; always observe all
warning labels on the containers.<
Specified engine oils
The quality of the engine oil selected has
critical significance for the operation and
service life of an engine. BMW continu-
ously approves specific oils after confirm-
ing their suitability for use in its vehicles
with extensive testing.
Use only approved BMW High Perfor-
mance Synthetic Oil.
If you are unable to obtain BMW High Per-
formance Synthetic Oil, you can add small
amounts of another synthetic oil between
oil changes. Use only oils with the API SH
specification or higher.
Ask your BMW center for details con-
cerning the specific BMW High Per-
formance Synthetic Oil or synthetic oils
which have been approved.<
You can also call BMW of North America
at 1-800-831-1117 or visit this website:
www.bmwusa.com to obtain this informa-
tion.
BMW engines are designed to oper-
ate without additives, and their use
could even lead to damage in some
cases.<
Viscosity ratings
Viscosity is the oil flow rating as defined in
SAE classes.
The selection of the correct SAE class
depends on the climatic conditions in the
area where you typically drive your BMW.
Approved oils are in SAE classes
5W-40 and 5W-30.<
These oils may be used for driving in all
ambient temperatures.
Coolant
Do not add coolant to the cooling sys-
tem when the engine is hot. Escaping
coolant can cause burns.<
Coolant consists of water and the addition
of antifreeze and anticorrosion agent. Not
all commercially available additives are
suitable for your BMW. Ask your BMW cen-
ter for suitable additives.
Only use suitable additives, as other-
wise engine damage may result. The
additives present a health hazard; observe
the instructions on the containers.<
Always observe all applicable envi-
ronmental rules and regulations when
disposing of used coolant additives.<
Checking coolant level
1.The engine must be at ambient temper-
ature
2.Turn the cap of the expansion tank
counterclockwise to allow any accumu-
lated pressure to escape, then continue
turning to open
Page 202 of 216
Everything from A to Z
200 "Communication
interface" 155
Compact disc
– refer to CD changer 137
– refer to CD player 137
Computer 69
– clock, 12/24 hour
mode 73
– displays on Control
Display 69
– hour signal 73
"Concert hall" 128
Condition Based Service,
CBS 174
"Confirmation" 28
Confirmation signals for
locking and unlocking 28
"Confirm unlock code" 147
Connecting a vacuum
cleaner
– refer to Lighter socket 97
– refer to Power socket 97
Consumption display, refer
to Average fuel
consumption 69
"Continue guidance to
dest.?" 119
Control Center 16
– adjusting the
brightness 72
– assistance window 19
– automatic climate
control 90
– changing settings 18, 72
– changing the menu
page 18
– confirming selection or
entry 18
– controller 16
– display, menus 16
– language selection 73
– menu guidance 17
– menu item selection 18
– operating elements 16
– selecting units of
measurement and display
format 72
– setting time and date 73
– start menu 17
– status information 19
– symbols 17Control Display 16
Controller, refer to
Control Center 16
Controls, refer to
Cockpit 10
Convenience operation
– convertible top 27, 29
– glass roof 27, 29
– windows 27, 29
Convenience start, refer to
Starting engine 54, 55
Convertible program for
automatic climate
control 91
Convertible top 37
– care, refer to the Caring
for your vehicle brochure
– convenience operation 29
– emergency closing 39
– manual closing in the
event of an electrical
malfunction 39
– opening and closing 38
Coolant 172
– level 172
Cooling, maximum 89
Cornering Brake Control,
CBC 76
Country of destination for
navigation 110
Courtesy lamps 87
Cruise control 62
Cruising range 69
Cup holders 97
Curb weight, refer to
Weights 190
"Current position" 109
Current position
– displaying 109
– entering 114
– storing 114
"Customer Relations" 157
Cylinders, refer to
Engine data 190
D
Dashboard, refer to
Cockpit 10
Data 190
– capacities 193
– dimensions 191
– engine 190
– weights 190
"Date" 74
Date 64
– setting 74
"Date format" 74
Daytime driving lamps 85
DBC Dynamic Brake
Control 78
Deactivating front
passenger airbag,
Coupe 51
Decommissioning the
vehicle, refer to the
Caring for your vehicle
brochure
Defect
– convertible top 39
– door lock 29
– fuel filler door 162
– glass roof 36
– luggage compartment
lid 30, 31
– SMG Sequential manual
transmission 58
Defrosting windows 89
Defrosting windows and
removing
condensation 89
Defrosting windshield, refer
to Defrosting windows 89
Defrost position, refer to
Defrosting windows 89
"Delete address book" for
navigation 116
"Delete address" for
navigation 115
"Delete all numbers" for
portable phone 150
"Delete data" for
navigation 116
"Delete" for portable
phone 149
Page 203 of 216
Reference 201
At a glance
Controls
Driving tips
Communications
Navigation
Entertainment
Mobility
Destination address
– deleting 115
– entering 110
Destination for navigation
– destination list 113
– entry 110
– selecting from address
book 115
– selecting using
information 113
– storing 114
Destination guidance 118
– bypassing route
sections 120
– canceling voice
instructions 50
– changing specified
route 116
– displaying route 119
– distance and arrival 118
– interrupting 118
– starting 118
– terminating/
continuing 118
– voice instructions 119
– volume of voice
instructions 119
Destination list 113
Destinations recently
driven to 113
"Dial" for portable
phone 147
"Dial number" 147
Digital clock 64
Dimensions
– Convertible 192
– Coupe 191
Dipstick for engine oil 171
Directional indicators, refer
to Turn signals 60
Direction announcements,
refer to Voice
instructions 119
Direction instructions, refer
to Voice instructions 119
Directory, refer to
Phone book 148
Directory for navigation,
refer to Address
book 114
Disc brakes 103Displacement, refer to
Engine data 190
Display, refer to
Control Center 16
"Display off" 19
Displays, refer to
Instrument cluster 12
"Display settings" 72
Displays on the windshield,
refer to Head-Up
Display 83
Disposal, vehicle
battery 181
Distance, refer to
Computer 70
Distance to destination,
refer to Computer 70
Distance warning, refer to
PDC Park Distance
Control 75
"Dist. to destination" 70
Door entry lighting 87
Door keys 26
Door lock 29
"Door locks" 27
Doors
– manual operation 29
– remote control 27
DOT Quality Grades 166
Draft-free ventilation 92
"Driver's door only" 27
Driving lamps, refer to
Parking lamps/
low beams 85
Driving notes 102
Driving route, refer to
Displaying the route 119
Driving stability control
systems 77
Driving through water 103
Driving tips, refer to
Driving notes 102
Drying the air, refer to
Cooling function 89
DSC Dynamic Stability
Control 77
– indicator lamp 13, 77
DTC Dynamic Traction
Control 77
– activating 77
– indicator lamp 13, 77DVD for navigation 108
Dynamic Brake Control,
DBC 78
Dynamic Driving Control 59
"Dynamic route" for
navigation 116
Dynamic Stability Control,
DSC 77
Dynamic Traction Control,
DTC 77
E
Easy Entry, refer to
Entry to the rear 46, 52
EBV Electronic brake-force
distribution 76
"Edit address" for
navigation 115
Eject button, refer to
Buttons on CD player 126
Electrical malfunction
– automatic transmission
with Steptronic 59
– convertible top 39
– door lock 29
– driver's door 29
– fuel filler door 162
– glass roof 36
– luggage compartment
lid 31
– SMG Sequential manual
transmission 58
Electric steering wheel
adjustment 48
Electronic brake-force
distribution, EBV 76
Emergency assistance,
refer to Roadside
Assistance 184
Emergency call 183
Emergency operation, refer
to Manual operation
– convertible top 39
– door lock 29
– driver's door 29
– fuel filler door 162
– glass roof 36
– luggage compartment
lid 30, 31