2004 BMW 645CI COUPE&CONVERTIBLE alarm
[x] Cancel search: alarmPage 8 of 216
Notes
6
For your own safety
Fuels
Use unleaded gasoline only.
Fuels containing up to and including
10 % ethanol or other oxygenates with
up to 2.8 % oxygen by weight – that is,
15 % MTBE or 3 % methanol plus an equiv-
alent amount of co-solvent – will not void
the applicable warranties with respect to
defects in materials or workmanship. Field
experience has indicated significant differ-
ences in fuel quality – volatility, composi-
tion, additives, etc. – among gasolines
offered for sale in the United States and
Canada. The use of poor-quality fuels may
result in drivability, starting and stalling
problems, especially under certain environ-
mental conditions such as high ambient
temperature and high altitude.
Should you encounter drivability problems
which you suspect could be related to the
fuel you are using, we recommend that you
respond by switching to a recognized high-
quality brand.
Failure to comply with these recommenda-
tions may result in unscheduled mainte-
nance.
Follow the relevant safety rules when you
are handling gasoline.<
Maintenance and repair
Advanced technology, e. g. the use of
modern materials and high-perfor-
mance electronics, requires specially
adapted maintenance and repair methods.
Therefore, only have corresponding work
on your BMW carried out by a BMW center
or a workshop that works according to
BMW repair procedures with correspond-
ingly trained personnel. If work is carried
out improperly there is a danger of conse-
quential damage and the related safety
risks.<
Parts and accessories
For your own safety, use genuine
parts and accessories approved by
BMW.
When you purchase accessories tested
and approved by BMW and Genuine BMW
Parts, you simultaneously acquire the
assurance that they have been thoroughly
tested by BMW to ensure optimum perfor-
mance when installed on your vehicle.
BMW warrants these parts to be free from
defects in material and workmanship.
BMW will not accept any liability for dam-
age resulting from installation of parts and
accessories not approved by BMW.
BMW cannot test every product made by
other manufacturers to verify if it can be
used on a BMW safely and without risk to
either the vehicle, its operation, or its occu-
pants.
Genuine BMW Parts, BMW Accessories
and other products approved by BMW,
together with professional advice on using
these items, are available from all BMW
centers.
Installation and operation of non-BMW
approved accessories such as alarms,
radios, amplifiers, radar detectors, wheels,
suspension components, brake dust
shields, telephones – including operation of
any portable phone from within the vehicle
without using an externally mounted
antenna – or transceiver equipment, for
instance, CBs, walkie-talkie, ham radio or
similar accessories, may cause extensive
damage to the vehicle, compromise its
safety, interfere with the vehicle's electrical
system or affect the validity of the BMW
Limited Warranty. Refer to your BMW cen-
ter for additional information.<
Maintenance, replacement, or repair
of the emission control devices and
systems may be performed by any automo-
tive repair establishment or individual using
any certified automotive part.<
Page 29 of 216
Controls
27Reference
At a glance
Driving tips
Communications
Navigation
Entertainment
Mobility
>Luggage compartment lid
>Fuel filler door.
The central locking system can be oper-
ated from the outside
>via the remote control
>via the door lock
and from inside via the button for the cen-
tral locking system.
If operated from the inside, the fuel filler
door and the compartment in the front
center console are not locked, refer to
page 29.
The anti-theft system is automatically acti-
vated whenever you activate the central
locking system from outside the vehicle.
It prevents the doors from being unlocked
using the safety lock buttons or door han-
dles. The alarm system is armed/disarmed
at the same time.
In the event of an accident, the central
locking system unlocks automatically. The
hazard warning flashers and interior lamps
also switch on.
Opening and closing: from
outside
Using the remote control
When you lock/unlock the vehicle, you
simultaneously activate/deactivate the
anti-theft system, arm/disarm the alarm
system, and switch the interior lamps on/
off.
Protect the remote control against
unauthorized use by handing over
only the spare key, for example when using
hotel valet parking.<
You can find more detailed information on
the alarm system on page 32.
Because any persons or animals left
unattended in a parked vehicle could
lock the doors from the inside, you should
always keep the remote control with you;
this precaution ensures that you will remain
able to unlock the vehicle from the outside
at all times.<
Unlocking
Use the button to unlock the vehicle
depending on the setting:
Control Center, for principle details, refer to
page 16:
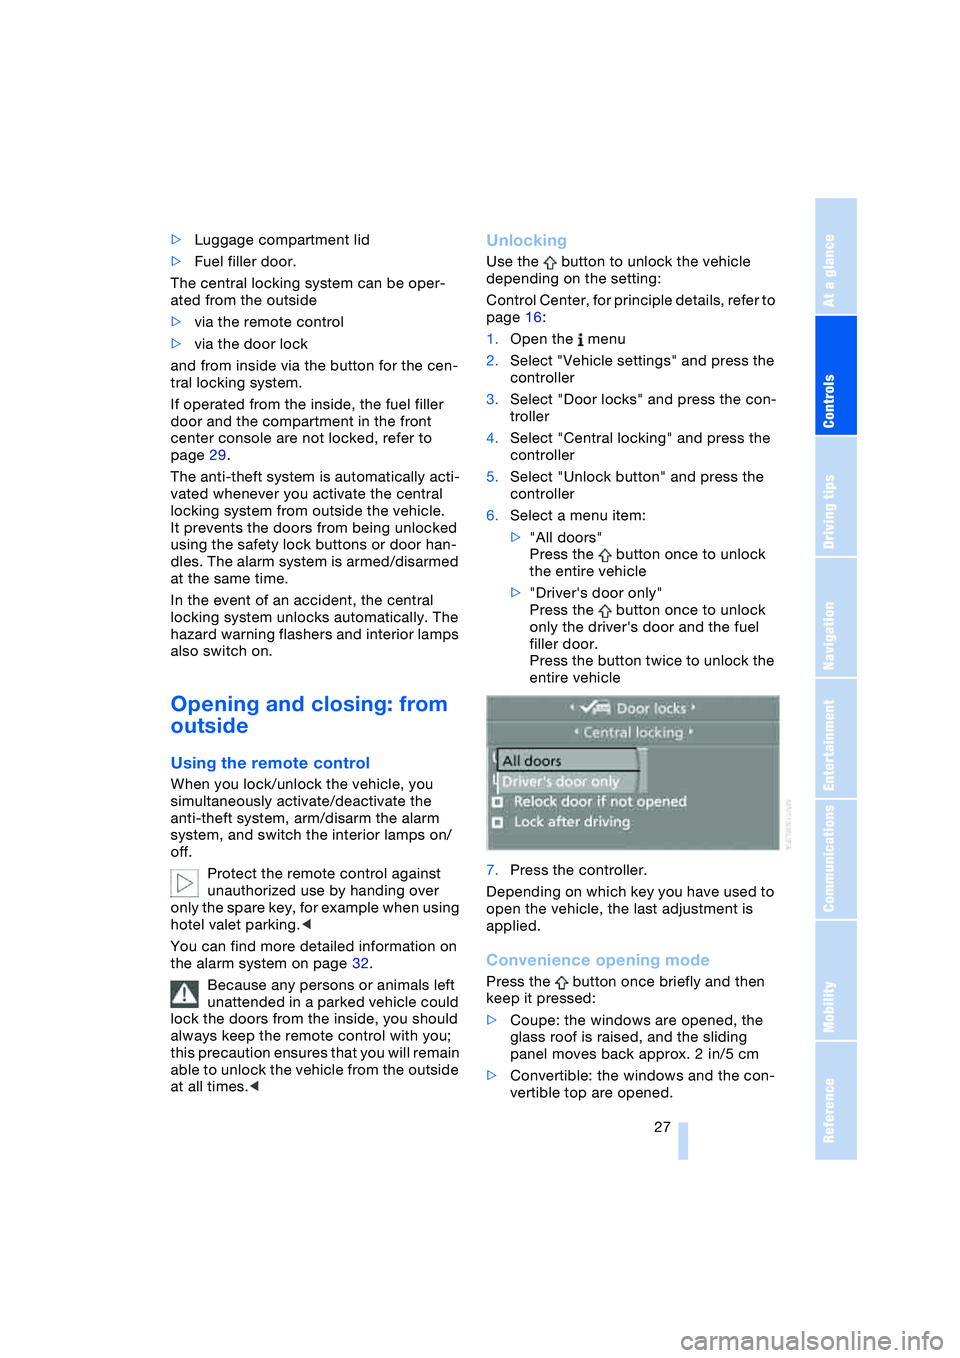
1.Open the menu
2.Select "Vehicle settings" and press the
controller
3.Select "Door locks" and press the con-
troller
4.Select "Central locking" and press the
controller
5.Select "Unlock button" and press the
controller
6.Select a menu item:
>"All doors"
Press the button once to unlock
the entire vehicle
>"Driver's door only"
Press the button once to unlock
only the driver's door and the fuel
filler door.
Press the button twice to unlock the
entire vehicle
7.Press the controller.
Depending on which key you have used to
open the vehicle, the last adjustment is
applied.
Convenience opening mode
Press the button once briefly and then
keep it pressed:
>Coupe: the windows are opened, the
glass roof is raised, and the sliding
panel moves back approx. 2 in/5 cm
>Convertible: the windows and the con-
vertible top are opened.
Page 30 of 216
Opening and closing
28
Locking and securing
Press the button.
Switching on interior lamps
Press the button if the vehicle is
locked.
You can also use this function to locate
your vehicle in parking garages etc.
Panic mode*
By pressing and holding the button for
more than approx. two seconds, you can
trigger the alarm system in response to any
impending danger.
To switch off the alarm: press any of the
buttons.
Opening luggage compartment lid
Press the button:
The luggage compartment lid opens,
regardless of whether it was previously
locked or unlocked.
A previously locked luggage com-
partment lid is also locked after clos-
ing.
Coupe: the luggage compartment lid
swings to the rear and upwards when
opened. Make sure there is sufficient free
space.<
Setting confirmation signals
You can have unlocking or locking the vehi-
cle confirmed.
Control Center, for principle details, refer to
page 16:
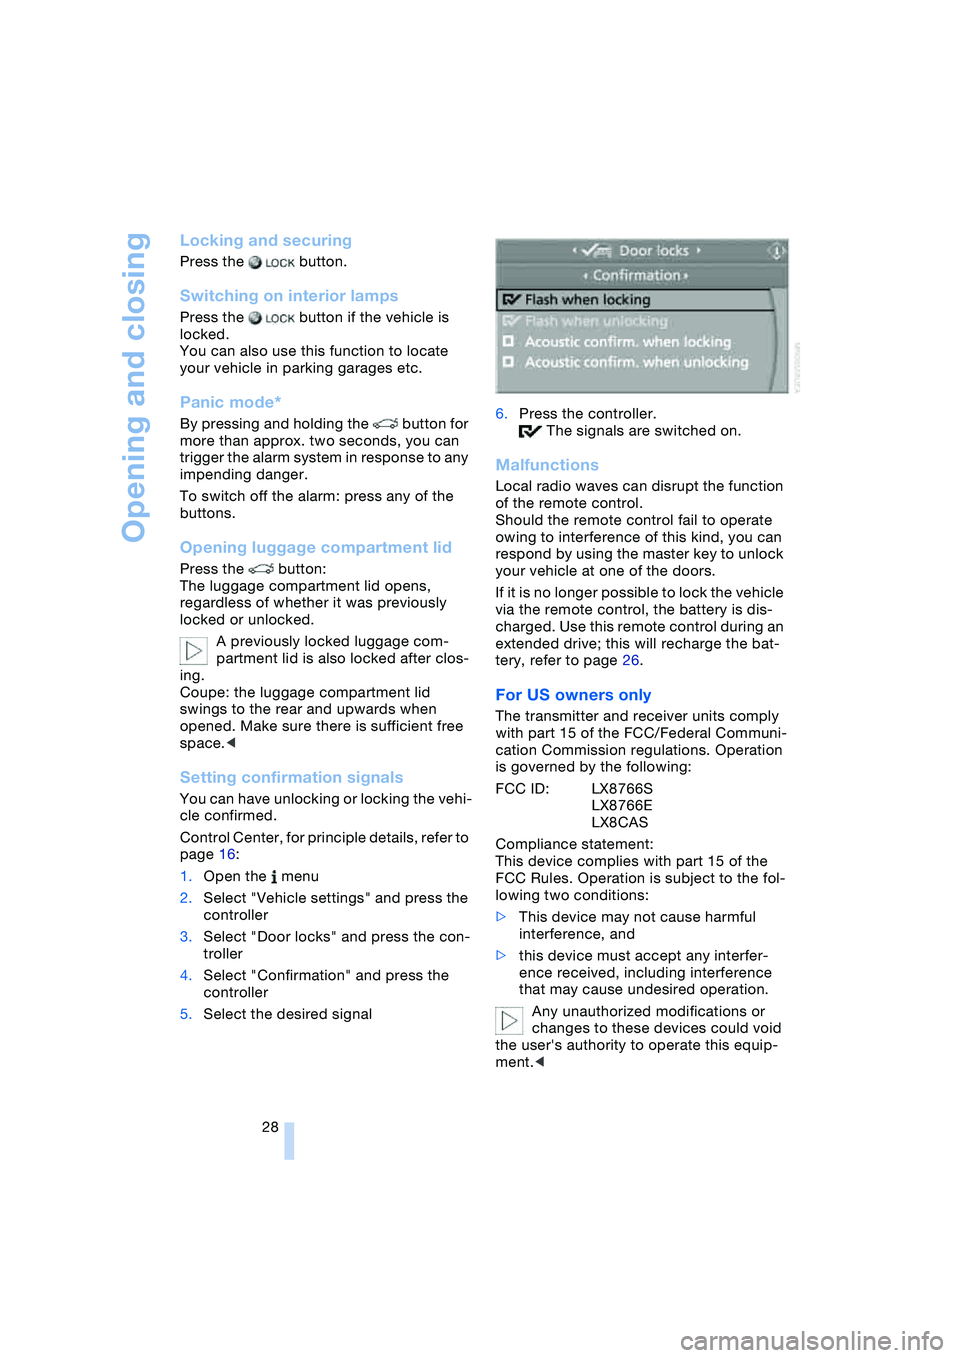
1.Open the menu
2.Select "Vehicle settings" and press the
controller
3.Select "Door locks" and press the con-
troller
4.Select "Confirmation" and press the
controller
5.Select the desired signal6.Press the controller.
The signals are switched on.
Malfunctions
Local radio waves can disrupt the function
of the remote control.
Should the remote control fail to operate
owing to interference of this kind, you can
respond by using the master key to unlock
your vehicle at one of the doors.
If it is no longer possible to lock the vehicle
via the remote control, the battery is dis-
charged. Use this remote control during an
extended drive; this will recharge the bat-
tery, refer to page 26.
For US owners only
The transmitter and receiver units comply
with part 15 of the FCC/Federal Communi-
cation Commission regulations. Operation
is governed by the following:
FCC ID: LX8766S
LX8766E
LX8CAS
Compliance statement:
This device complies with part 15 of the
FCC Rules. Operation is subject to the fol-
lowing two conditions:
>This device may not cause harmful
interference, and
>this device must accept any interfer-
ence received, including interference
that may cause undesired operation.
Any unauthorized modifications or
changes to these devices could void
the user's authority to operate this equip-
ment.<
Page 33 of 216
Controls
31Reference
At a glance
Driving tips
Communications
Navigation
Entertainment
Mobility
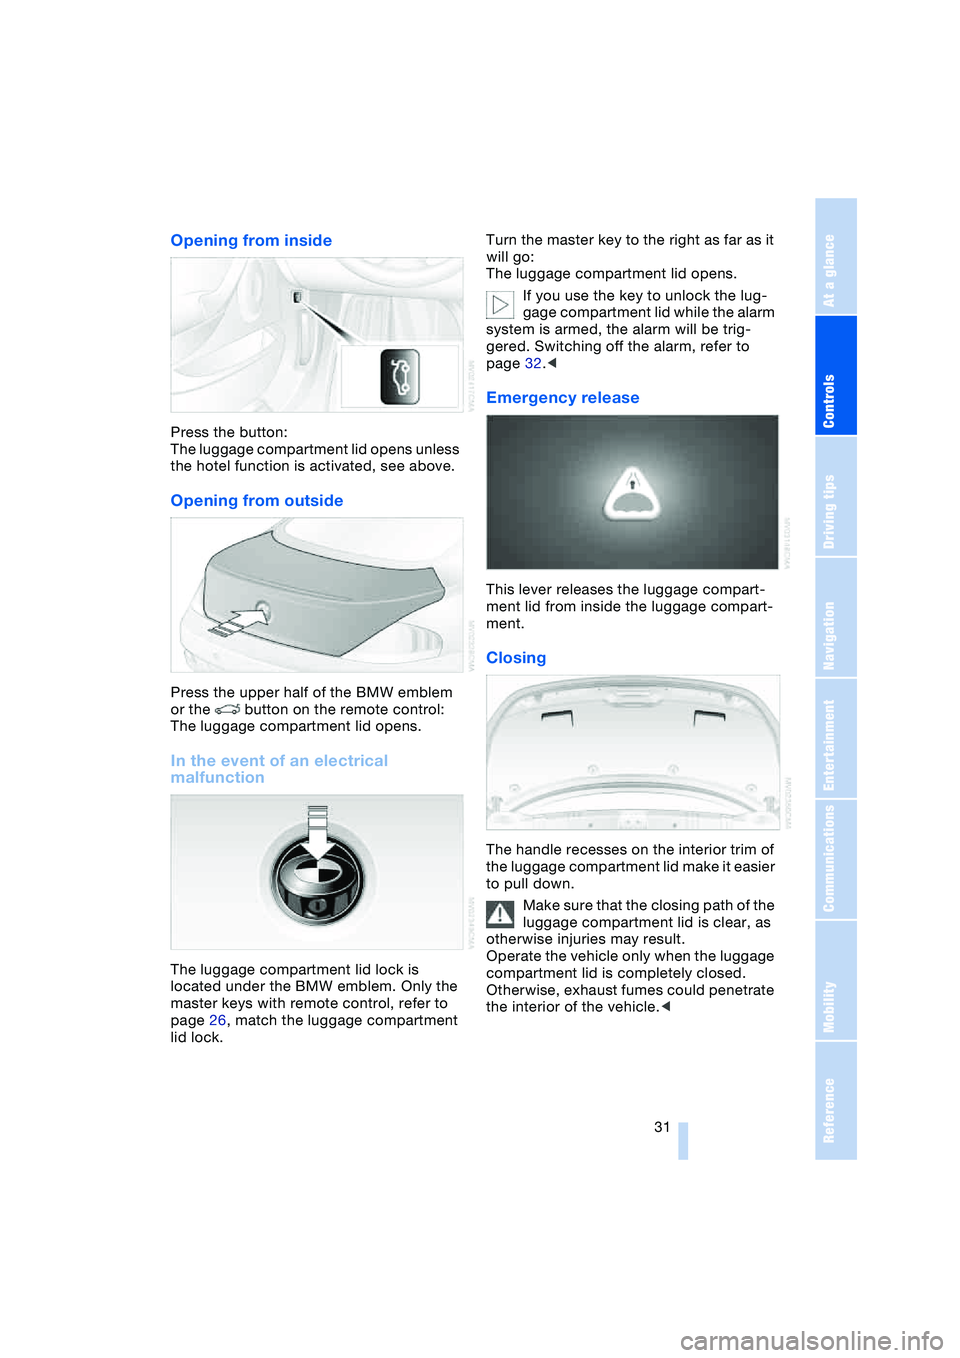
Opening from inside
Press the button:
The luggage compartment lid opens unless
the hotel function is activated, see above.
Opening from outside
Press the upper half of the BMW emblem
or the button on the remote control:
The luggage compartment lid opens.
In the event of an electrical
malfunction
The luggage compartment lid lock is
located under the BMW emblem. Only the
master keys with remote control, refer to
page 26, match the luggage compartment
lid lock.Turn the master key to the right as far as it
will go:
The luggage compartment lid opens.
If you use the key to unlock the lug-
gage compartment lid while the alarm
system is armed, the alarm will be trig-
gered. Switching off the alarm, refer to
page 32.<
Emergency release
This lever releases the luggage compart-
ment lid from inside the luggage compart-
ment.
Closing
The handle recesses on the interior trim of
the luggage compartment lid make it easier
to pull down.
Make sure that the closing path of the
luggage compartment lid is clear, as
otherwise injuries may result.
Operate the vehicle only when the luggage
compartment lid is completely closed.
Otherwise, exhaust fumes could penetrate
the interior of the vehicle.<
Page 34 of 216
Opening and closing
32 If special circumstances should make it
absolutely necessary to operate the vehicle
with the lid open:
1.Coupe: close both windows as well as
the glass roof
Convertible: with closed top, close all
windows
2.Adjust the automatic climate control to
supply a high air volume, refer to
page 89.
Luggage compartment
There are four lashing eyes on the inner
corners of the luggage compartment for
securing luggage nets or securing straps to
fix luggage in position.
Also refer to Cargo loading, page 104.
Convertible: increasing luggage
compartment capacity
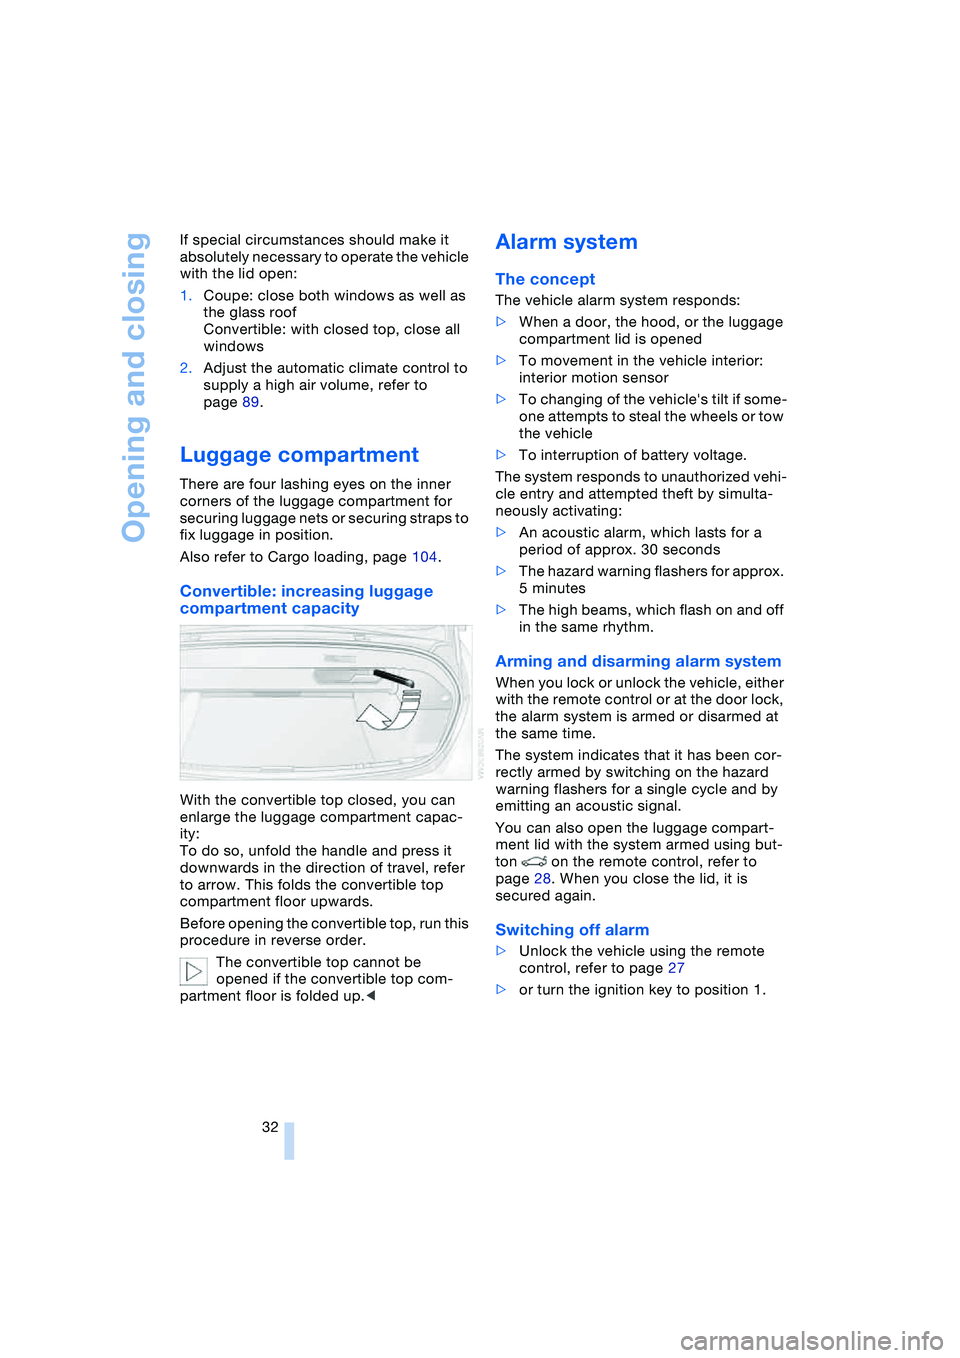
With the convertible top closed, you can
enlarge the luggage compartment capac-
ity:
To do so, unfold the handle and press it
downwards in the direction of travel, refer
to arrow. This folds the convertible top
compartment floor upwards.
Before opening the convertible top, run this
procedure in reverse order.
The convertible top cannot be
opened if the convertible top com-
partment floor is folded up.<
Alarm system
The concept
The vehicle alarm system responds:
>When a door, the hood, or the luggage
compartment lid is opened
>To movement in the vehicle interior:
interior motion sensor
>To changing of the vehicle's tilt if some-
one attempts to steal the wheels or tow
the vehicle
>To interruption of battery voltage.
The system responds to unauthorized vehi-
cle entry and attempted theft by simulta-
neously activating:
>An acoustic alarm, which lasts for a
period of approx. 30 seconds
>The hazard warning flashers for approx.
5 minutes
>The high beams, which flash on and off
in the same rhythm.
Arming and disarming alarm system
When you lock or unlock the vehicle, either
with the remote control or at the door lock,
the alarm system is armed or disarmed at
the same time.
The system indicates that it has been cor-
rectly armed by switching on the hazard
warning flashers for a single cycle and by
emitting an acoustic signal.
You can also open the luggage compart-
ment lid with the system armed using but-
ton on the remote control, refer to
page 28. When you close the lid, it is
secured again.
Switching off alarm
>Unlock the vehicle using the remote
control, refer to page 27
>or turn the ignition key to position 1.
Page 35 of 216
Controls
33Reference
At a glance
Driving tips
Communications
Navigation
Entertainment
Mobility
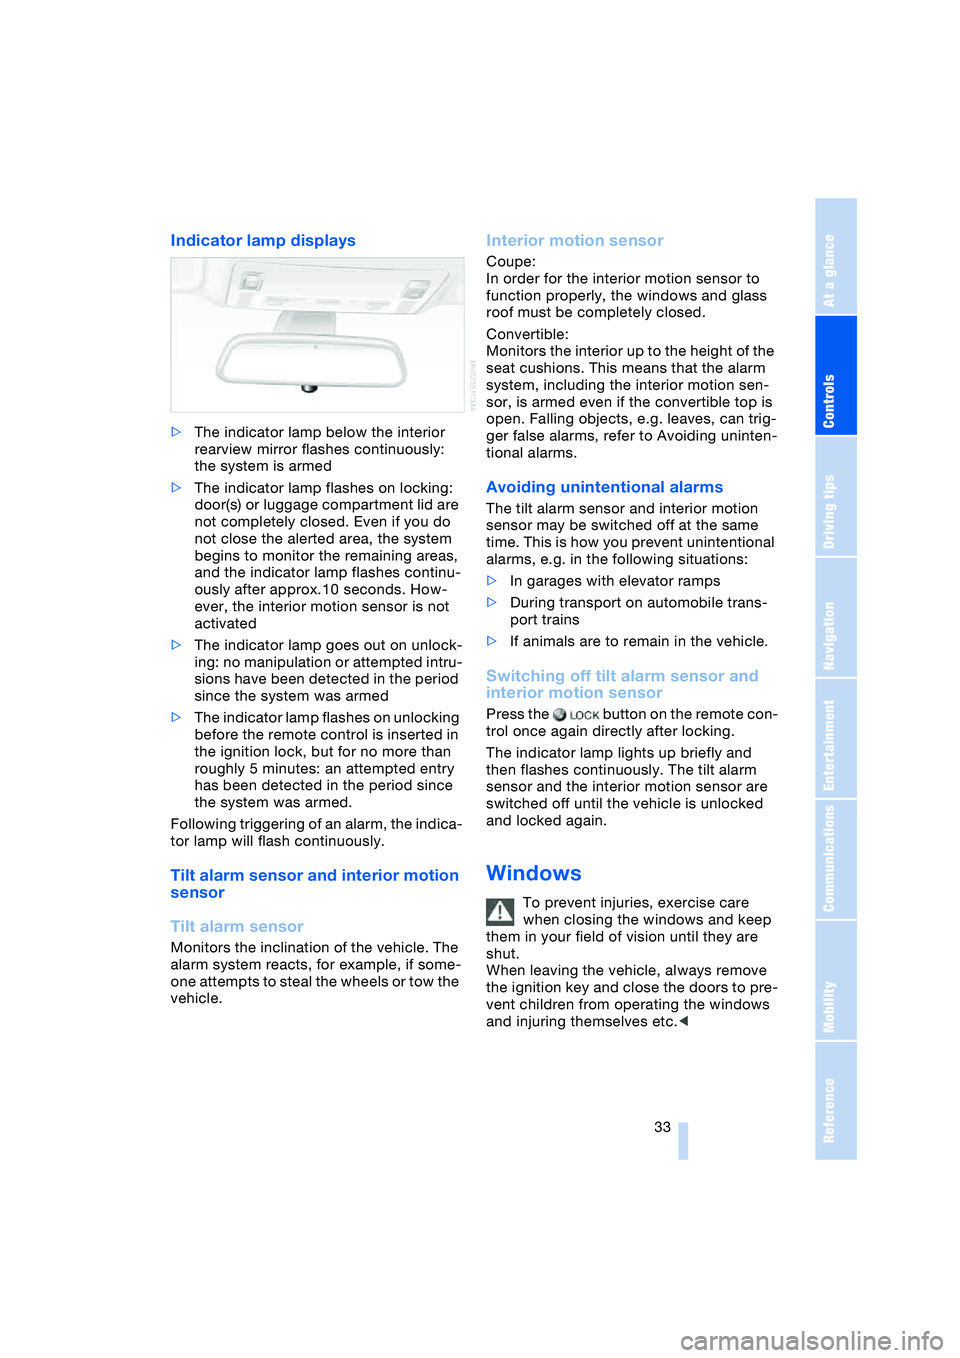
Indicator lamp displays
>The indicator lamp below the interior
rearview mirror flashes continuously:
the system is armed
>The indicator lamp flashes on locking:
door(s) or luggage compartment lid are
not completely closed. Even if you do
not close the alerted area, the system
begins to monitor the remaining areas,
and the indicator lamp flashes continu-
ously after approx.10 seconds. How-
ever, the interior motion sensor is not
activated
>The indicator lamp goes out on unlock-
ing: no manipulation or attempted intru-
sions have been detected in the period
since the system was armed
>The indicator lamp flashes on unlocking
before the remote control is inserted in
the ignition lock, but for no more than
roughly 5 minutes: an attempted entry
has been detected in the period since
the system was armed.
Following triggering of an alarm, the indica-
tor lamp will flash continuously.
Tilt alarm sensor and interior motion
sensor
Tilt alarm sensor
Monitors the inclination of the vehicle. The
alarm system reacts, for example, if some-
one attempts to steal the wheels or tow the
vehicle.
Interior motion sensor
Coupe:
In order for the interior motion sensor to
function properly, the windows and glass
roof must be completely closed.
Convertible:
Monitors the interior up to the height of the
seat cushions. This means that the alarm
system, including the interior motion sen-
sor, is armed even if the convertible top is
open. Falling objects, e.g. leaves, can trig-
ger false alarms, refer to Avoiding uninten-
tional alarms.
Avoiding unintentional alarms
The tilt alarm sensor and interior motion
sensor may be switched off at the same
time. This is how you prevent unintentional
alarms, e.g. in the following situations:
>In garages with elevator ramps
>During transport on automobile trans-
port trains
>If animals are to remain in the vehicle.
Switching off tilt alarm sensor and
interior motion sensor
Press the button on the remote con-
trol once again directly after locking.
The indicator lamp lights up briefly and
then flashes continuously. The tilt alarm
sensor and the interior motion sensor are
switched off until the vehicle is unlocked
and locked again.
Windows
To prevent injuries, exercise care
when closing the windows and keep
them in your field of vision until they are
shut.
When leaving the vehicle, always remove
the ignition key and close the doors to pre-
vent children from operating the windows
and injuring themselves etc.<
Page 81 of 216
Controls
79Reference
At a glance
Driving tips
Communications
Navigation
Entertainment
Mobility
have dropped below the minimum, possi-
bly owing to a leak in the hydraulic system.
Do not continue driving. Contact your BMW
center.<
Flat Tire Monitor
The concept
The Flat Tire Monitor keeps track of the
inflation pressures in the four tires as you
drive. The system provides an alert when-
ever the inflation pressure drops signifi-
cantly in relation to the pressure in another
tire.
The check of the tire inflation pressure is
based on monitoring the relative speeds
of the wheels. A flat tire is detected and
reported on the basis of a deviation in cer-
tain speed ratios.
Functional requirement
To ensure reliable operation, the system
should have been initialized with the cor-
rect tire inflation pressure.
System limits
The Flat Tire Monitor cannot indicate
sudden severe tire damage caused
by outside factors and does not detect a
natural, even pressure drop in all four
tires.<
In the following situations, the system
could be delayed or malfunction:
>When you are driving on snow-covered
or slippery road surfaces
>In the case of performance-oriented
driving: slip on the drive wheels, high
lateral acceleration
>False alarms and undetected loss of
pressure may occur when you are driv-
ing with snow chains fitted
>If the Flat Tire Monitor was not initial-
ized after the last inflation pressure cor-
rection, false alarms indicating a flat tire
that is not present are possible or pres-
sure loss might not be detected.
Initializing system
Perform the initialization immediately
after correcting the inflation pressure,
after changing a tire or changing a wheel or
all wheels. A drive is necessary for this pur-
pose.<
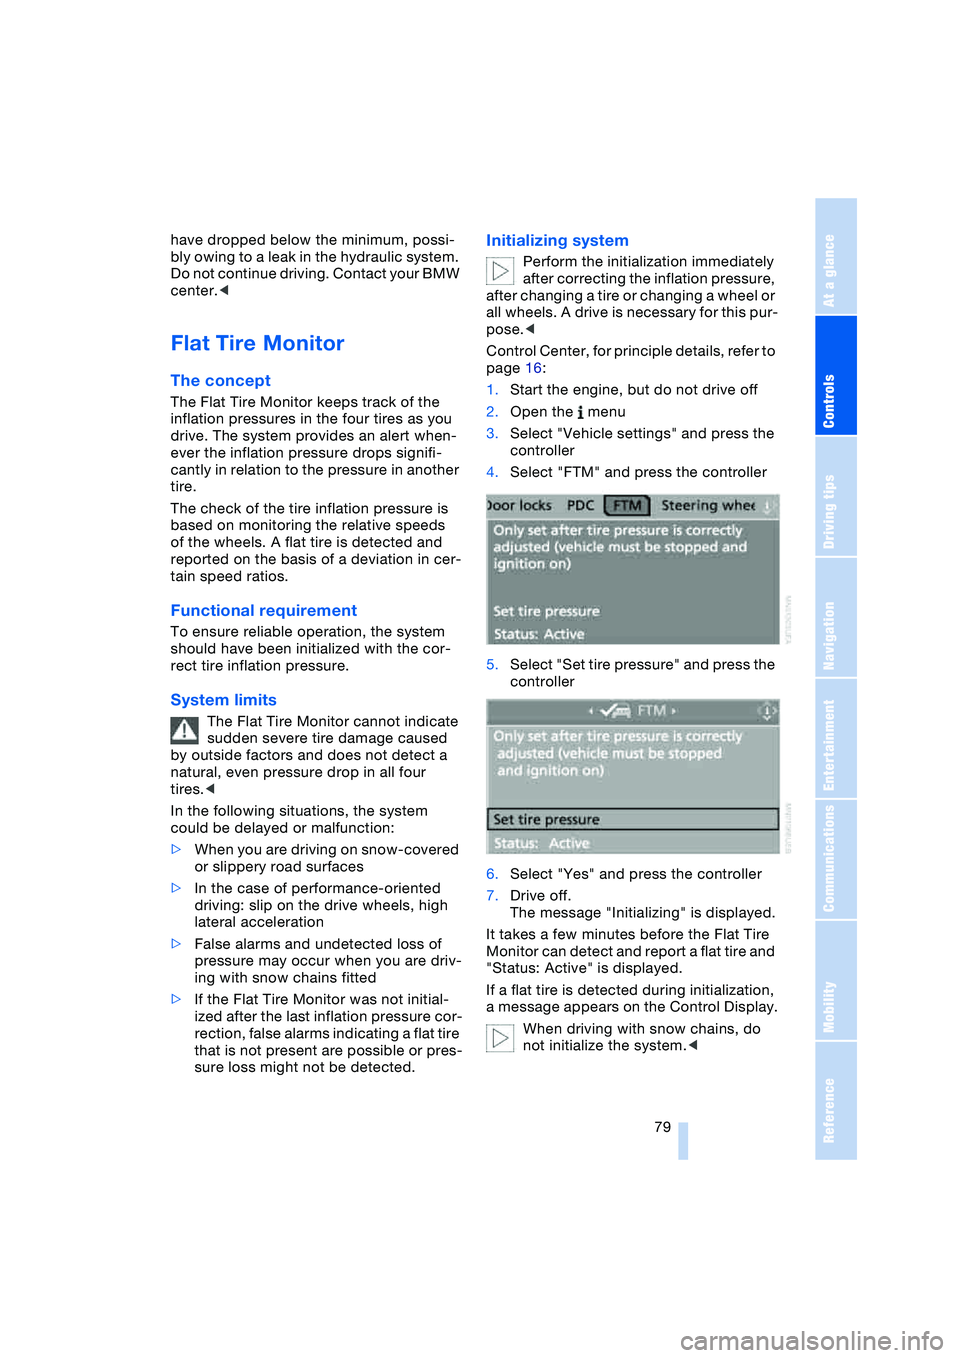
Control Center, for principle details, refer to
page 16:
1.Start the engine, but do not drive off
2.Open the menu
3.Select "Vehicle settings" and press the
controller
4.Select "FTM" and press the controller
5.Select "Set tire pressure" and press the
controller
6.Select "Yes" and press the controller
7.Drive off.
The message "Initializing" is displayed.
It takes a few minutes before the Flat Tire
Monitor can detect and report a flat tire and
"Status: Active" is displayed.
If a flat tire is detected during initialization,
a message appears on the Control Display.
When driving with snow chains, do
not initialize the system.<
Page 96 of 216
Practical interior accessories
94
Practical interior accessories
Integrated universal remote
control*
The concept
The integrated universal remote control
replaces up to three different hand-held
transmitters for various items of radio-con-
trolled equipment such as door openers
and house alarm systems. The integrated
universal remote control registers and
stores signals from the original hand-held
transmitters.
The signal of an original hand-held trans-
mitter can be programmed on one of the
three memory buttons 1. Then the respec-
tive device can be actuated with the mem-
ory button 1 programmed for its use with
the ignition key in position 2. The indicator
lamp 2 flashes to confirm transmission of
the signal.
If you sell your vehicle one day, delete the
saved programs beforehand for your own
security, refer to page 95.
To prevent possible damage or injury,
before programming or using the inte-
grated universal remote control, always
inspect the immediate area to make certain
that no people, animals or objects are
within the travel range of the device. Also,
comply with the safety precautions of the
original hand-held transmitter.<
Checking compatibility
If you see this symbol on the pack-
aging or in the manual supplied with
the original hand-held transmitter, it
is safe to assume that it is compatible with
the integrated universal remote control.
If you have additional questions, please
consult your BMW Sports Activity Vehicle
Center or call 1-800-355-3515.
You can also visit these websites:
www.bmwusa.com or
www.homelink.com. HomeLink is a registered trademark owned
by Johnson Controls, Inc.
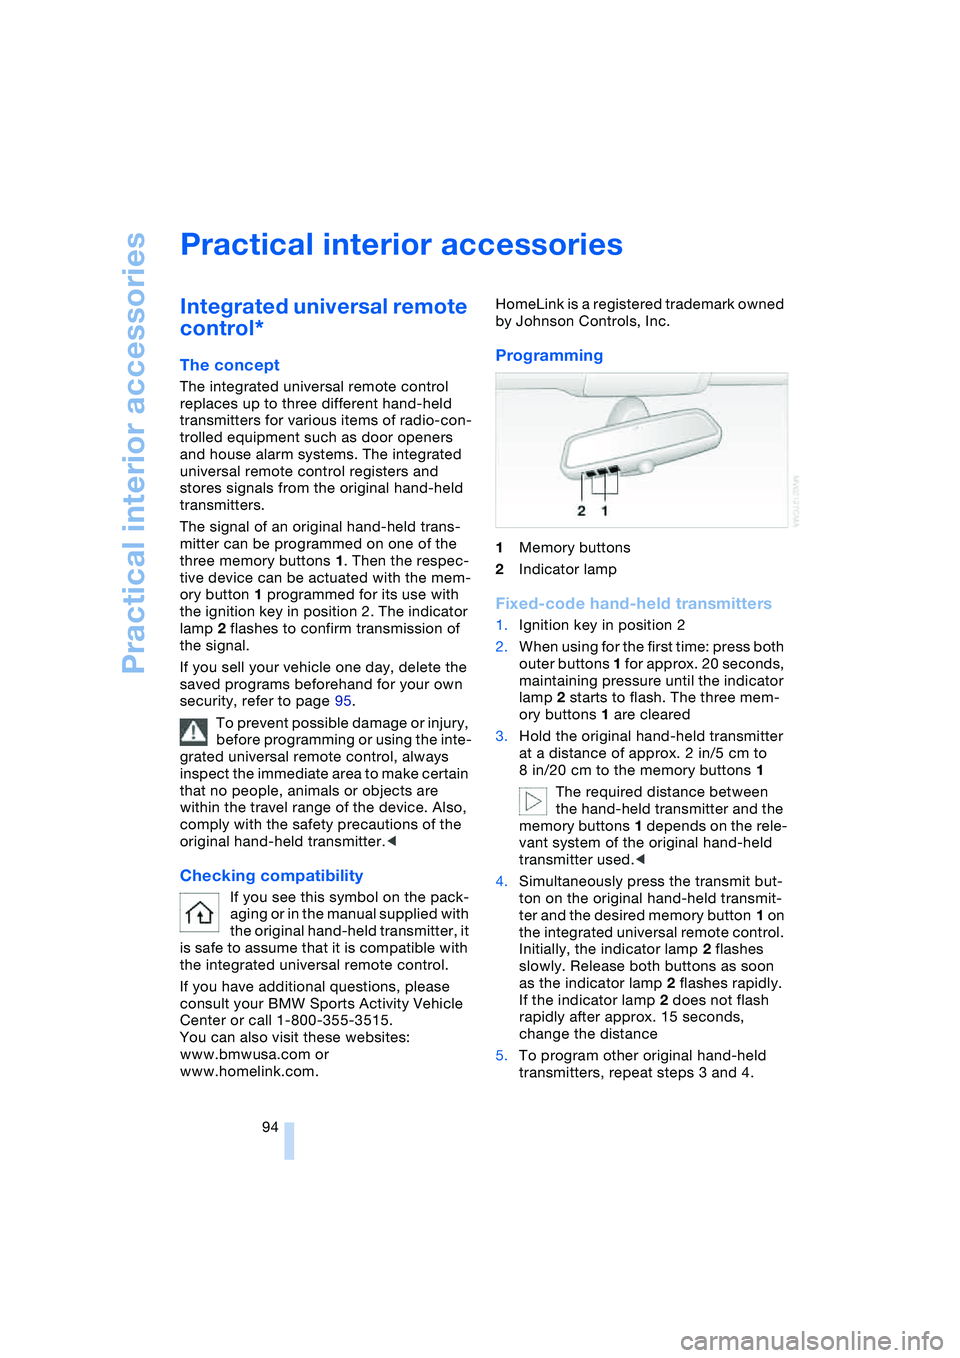
Programming
1Memory buttons
2Indicator lamp
Fixed-code hand-held transmitters
1.Ignition key in position 2
2.When using for the first time: press both
outer buttons 1 for approx. 20 seconds,
maintaining pressure until the indicator
lamp 2 starts to flash. The three mem-
ory buttons 1 are cleared
3.Hold the original hand-held transmitter
at a distance of approx. 2 in/5 cm to
8 in/20 cm to the memory buttons 1
The required distance between
the hand-held transmitter and the
memory buttons 1 depends on the rele-
vant system of the original hand-held
transmitter used.<
4.Simultaneously press the transmit but-
ton on the original hand-held transmit-
ter and the desired memory button 1 on
the integrated universal remote control.
Initially, the indicator lamp 2 flashes
slowly. Release both buttons as soon
as the indicator lamp 2 flashes rapidly.
If the indicator lamp 2 does not flash
rapidly after approx. 15 seconds,
change the distance
5.To program other original hand-held
transmitters, repeat steps 3 and 4.