2004 BMW 645CI COUPE&CONVERTIBLE light
[x] Cancel search: lightPage 13 of 216
At a glance
11Reference
Controls
Driving tips
Communications
Navigation
Entertainment
Mobility
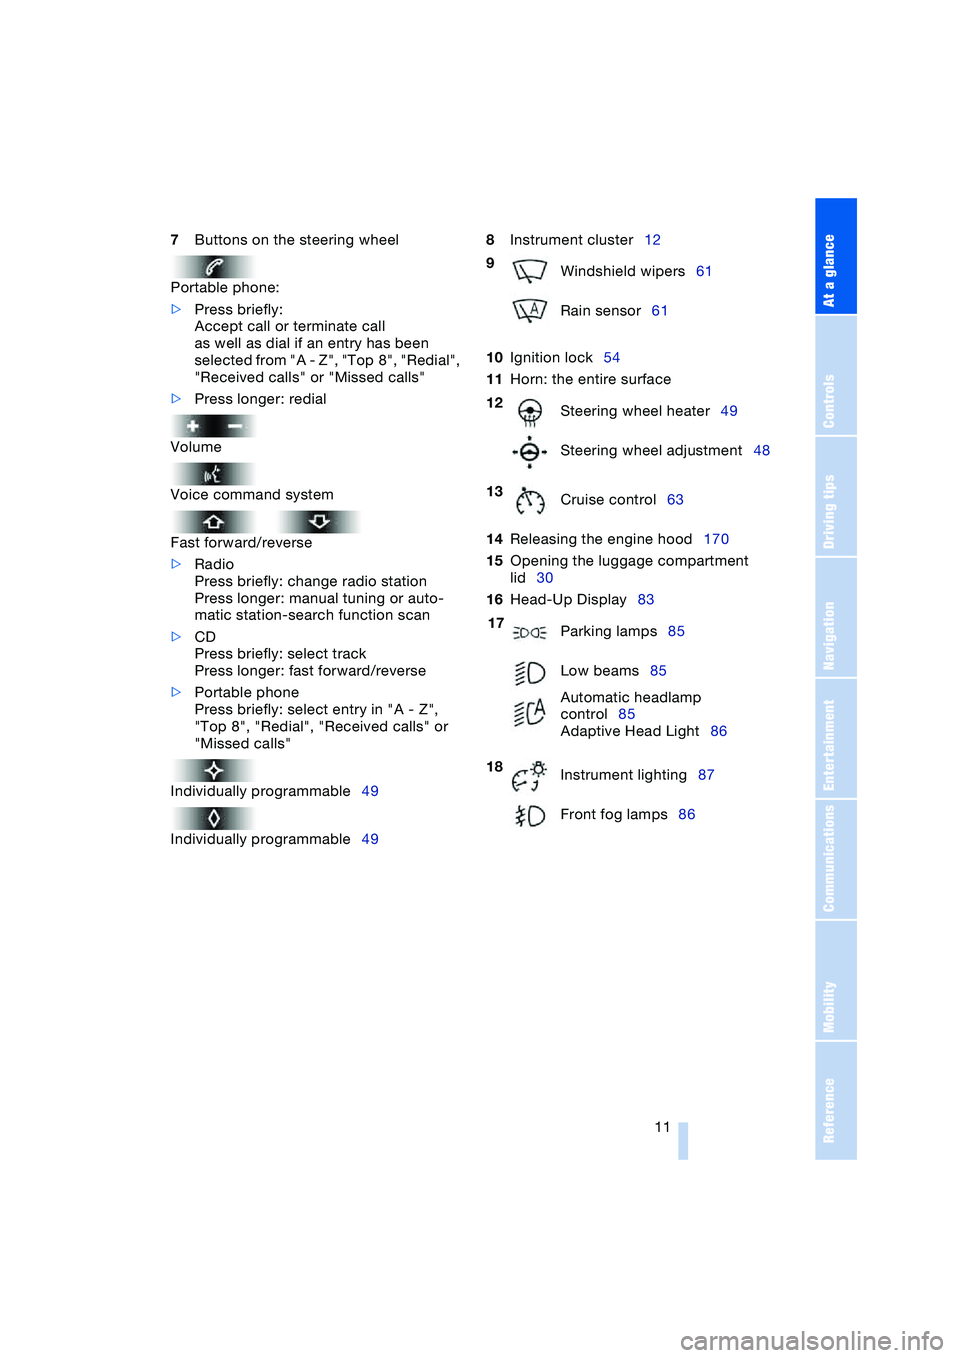
7Buttons on the steering wheel
Portable phone:
>Press briefly:
Accept call or terminate call
as well as dial if an entry has been
selected from "A - Z", "Top 8", "Redial",
"Received calls" or "Missed calls"
>Press longer: redial
Volume
Voice command system
Fast forward/reverse
>Radio
Press briefly: change radio station
Press longer: manual tuning or auto-
matic station-search function scan
>CD
Press briefly: select track
Press longer: fast forward/reverse
>Portable phone
Press briefly: select entry in "A - Z",
"Top 8", "Redial", "Received calls" or
"Missed calls"
Individually programmable49
Individually programmable498Instrument cluster12
10Ignition lock54
11Horn: the entire surface
14Releasing the engine hood170
15Opening the luggage compartment
lid30
16Head-Up Display83
9
Windshield wipers61
Rain sensor61
12
Steering wheel heater49
Steering wheel adjustment48
13
Cruise control63
17
Parking lamps85
Low beams85
Automatic headlamp
control85
Adaptive Head Light86
18
Instrument lighting87
Front fog lamps86
Page 15 of 216
At a glance
13Reference
Controls
Driving tips
Communications
Navigation
Entertainment
Mobility
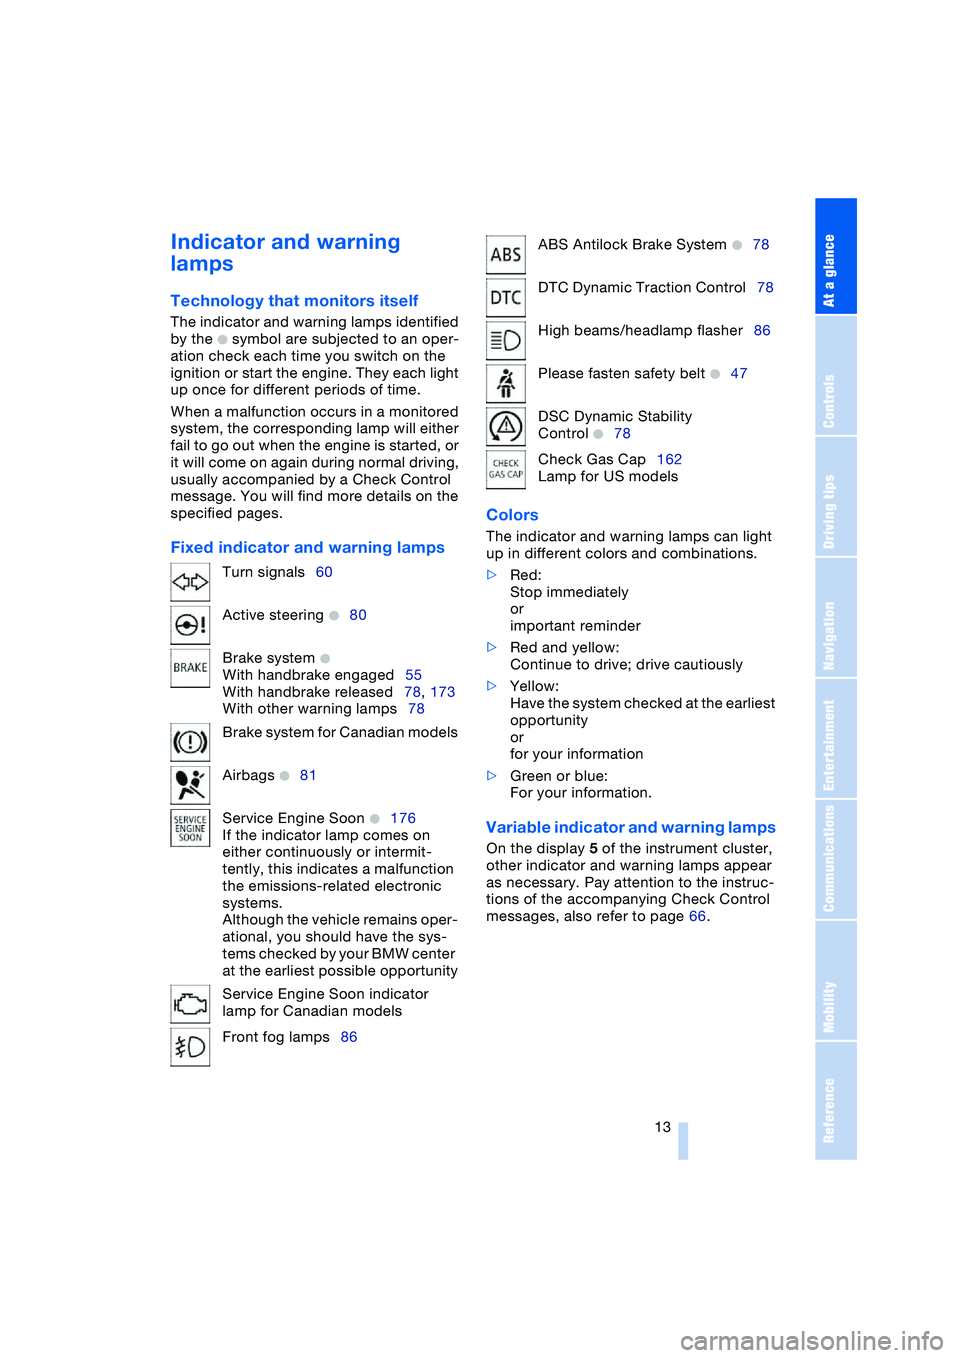
Indicator and warning
lamps
Technology that monitors itself
The indicator and warning lamps identified
by the
+ symbol are subjected to an oper-
ation check each time you switch on the
ignition or start the engine. They each light
up once for different periods of time.
When a malfunction occurs in a monitored
system, the corresponding lamp will either
fail to go out when the engine is started, or
it will come on again during normal driving,
usually accompanied by a Check Control
message. You will find more details on the
specified pages.
Fixed indicator and warning lampsColors The indicator and warning lamps can light
up in different colors and combinations.
>Red:
Stop immediately
or
important reminder
>Red and yellow:
Continue to drive; drive cautiously
>Yellow:
Have the system checked at the earliest
opportunity
or
for your information
>Green or blue:
For your information.
Variable indicator and warning lamps
On the display 5 of the instrument cluster,
other indicator and warning lamps appear
as necessary. Pay attention to the instruc-
tions of the accompanying Check Control
messages, also refer to page 66. Turn signals60
Active steering
+80
Brake system
+
With handbrake engaged55
With handbrake released78, 173
With other warning lamps78
Brake system for Canadian models
Airbags
+81
Service Engine Soon
+176
If the indicator lamp comes on
either continuously or intermit-
tently, this indicates a malfunction
the emissions-related electronic
systems.
Although the vehicle remains oper-
ational, you should have the sys-
tems checked by your BMW center
at the earliest possible opportunity
Service Engine Soon indicator
lamp for Canadian models
Front fog lamps86
ABS Antilock Brake System +78
DTC Dynamic Traction Control78
High beams/headlamp flasher86
Please fasten safety belt
+47
DSC Dynamic Stability
Control
+78
Check Gas Cap162
Lamp for US models
Page 35 of 216
Controls
33Reference
At a glance
Driving tips
Communications
Navigation
Entertainment
Mobility
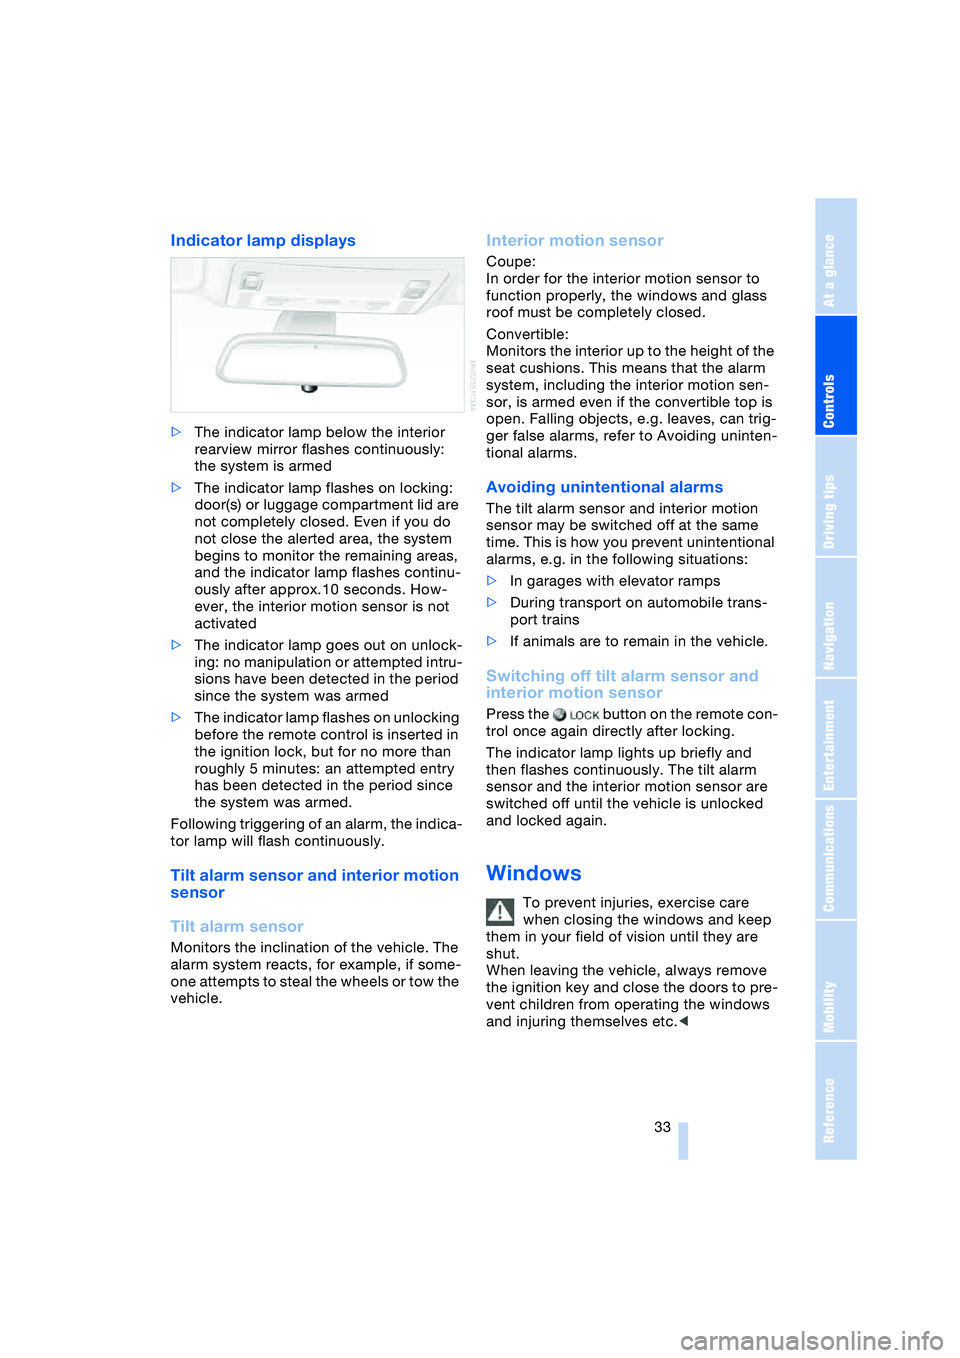
Indicator lamp displays
>The indicator lamp below the interior
rearview mirror flashes continuously:
the system is armed
>The indicator lamp flashes on locking:
door(s) or luggage compartment lid are
not completely closed. Even if you do
not close the alerted area, the system
begins to monitor the remaining areas,
and the indicator lamp flashes continu-
ously after approx.10 seconds. How-
ever, the interior motion sensor is not
activated
>The indicator lamp goes out on unlock-
ing: no manipulation or attempted intru-
sions have been detected in the period
since the system was armed
>The indicator lamp flashes on unlocking
before the remote control is inserted in
the ignition lock, but for no more than
roughly 5 minutes: an attempted entry
has been detected in the period since
the system was armed.
Following triggering of an alarm, the indica-
tor lamp will flash continuously.
Tilt alarm sensor and interior motion
sensor
Tilt alarm sensor
Monitors the inclination of the vehicle. The
alarm system reacts, for example, if some-
one attempts to steal the wheels or tow the
vehicle.
Interior motion sensor
Coupe:
In order for the interior motion sensor to
function properly, the windows and glass
roof must be completely closed.
Convertible:
Monitors the interior up to the height of the
seat cushions. This means that the alarm
system, including the interior motion sen-
sor, is armed even if the convertible top is
open. Falling objects, e.g. leaves, can trig-
ger false alarms, refer to Avoiding uninten-
tional alarms.
Avoiding unintentional alarms
The tilt alarm sensor and interior motion
sensor may be switched off at the same
time. This is how you prevent unintentional
alarms, e.g. in the following situations:
>In garages with elevator ramps
>During transport on automobile trans-
port trains
>If animals are to remain in the vehicle.
Switching off tilt alarm sensor and
interior motion sensor
Press the button on the remote con-
trol once again directly after locking.
The indicator lamp lights up briefly and
then flashes continuously. The tilt alarm
sensor and the interior motion sensor are
switched off until the vehicle is unlocked
and locked again.
Windows
To prevent injuries, exercise care
when closing the windows and keep
them in your field of vision until they are
shut.
When leaving the vehicle, always remove
the ignition key and close the doors to pre-
vent children from operating the windows
and injuring themselves etc.<
Page 36 of 216
Opening and closing
34
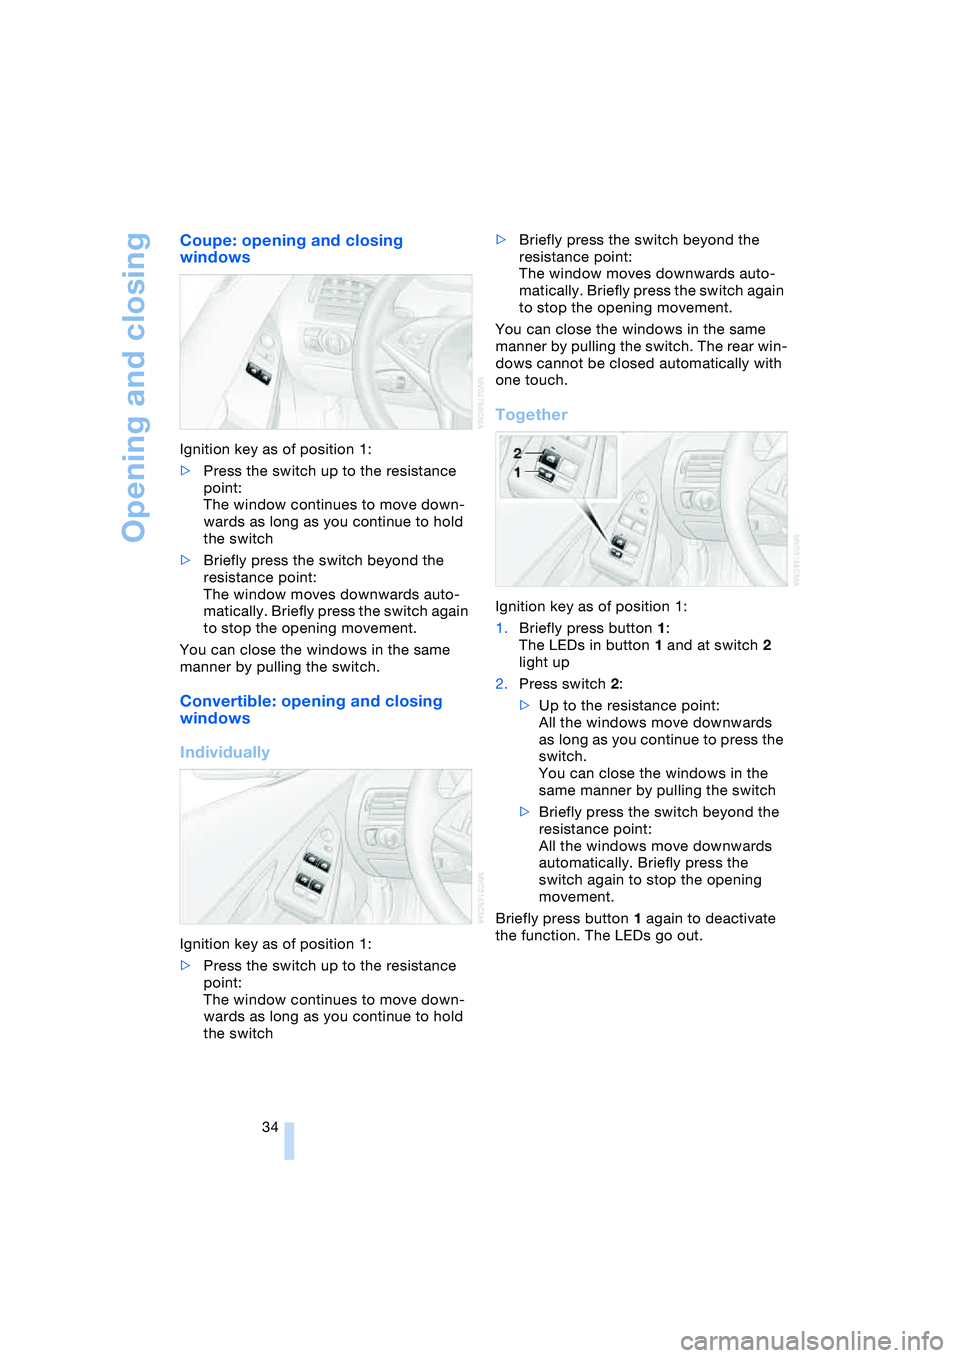
Coupe: opening and closing
windows
Ignition key as of position 1:
>Press the switch up to the resistance
point:
The window continues to move down-
wards as long as you continue to hold
the switch
>Briefly press the switch beyond the
resistance point:
The window moves downwards auto-
matically. Briefly press the switch again
to stop the opening movement.
You can close the windows in the same
manner by pulling the switch.
Convertible: opening and closing
windows
Individually
Ignition key as of position 1:
>Press the switch up to the resistance
point:
The window continues to move down-
wards as long as you continue to hold
the switch>Briefly press the switch beyond the
resistance point:
The window moves downwards auto-
matically. Briefly press the switch again
to stop the opening movement.
You can close the windows in the same
manner by pulling the switch. The rear win-
dows cannot be closed automatically with
one touch.
Together
Ignition key as of position 1:
1.Briefly press button 1:
The LEDs in button 1 and at switch 2
light up
2.Press switch 2:
>Up to the resistance point:
All the windows move downwards
as long as you continue to press the
switch.
You can close the windows in the
same manner by pulling the switch
>Briefly press the switch beyond the
resistance point:
All the windows move downwards
automatically. Briefly press the
switch again to stop the opening
movement.
Briefly press button 1 again to deactivate
the function. The LEDs go out.
Page 37 of 216
Controls
35Reference
At a glance
Driving tips
Communications
Navigation
Entertainment
Mobility
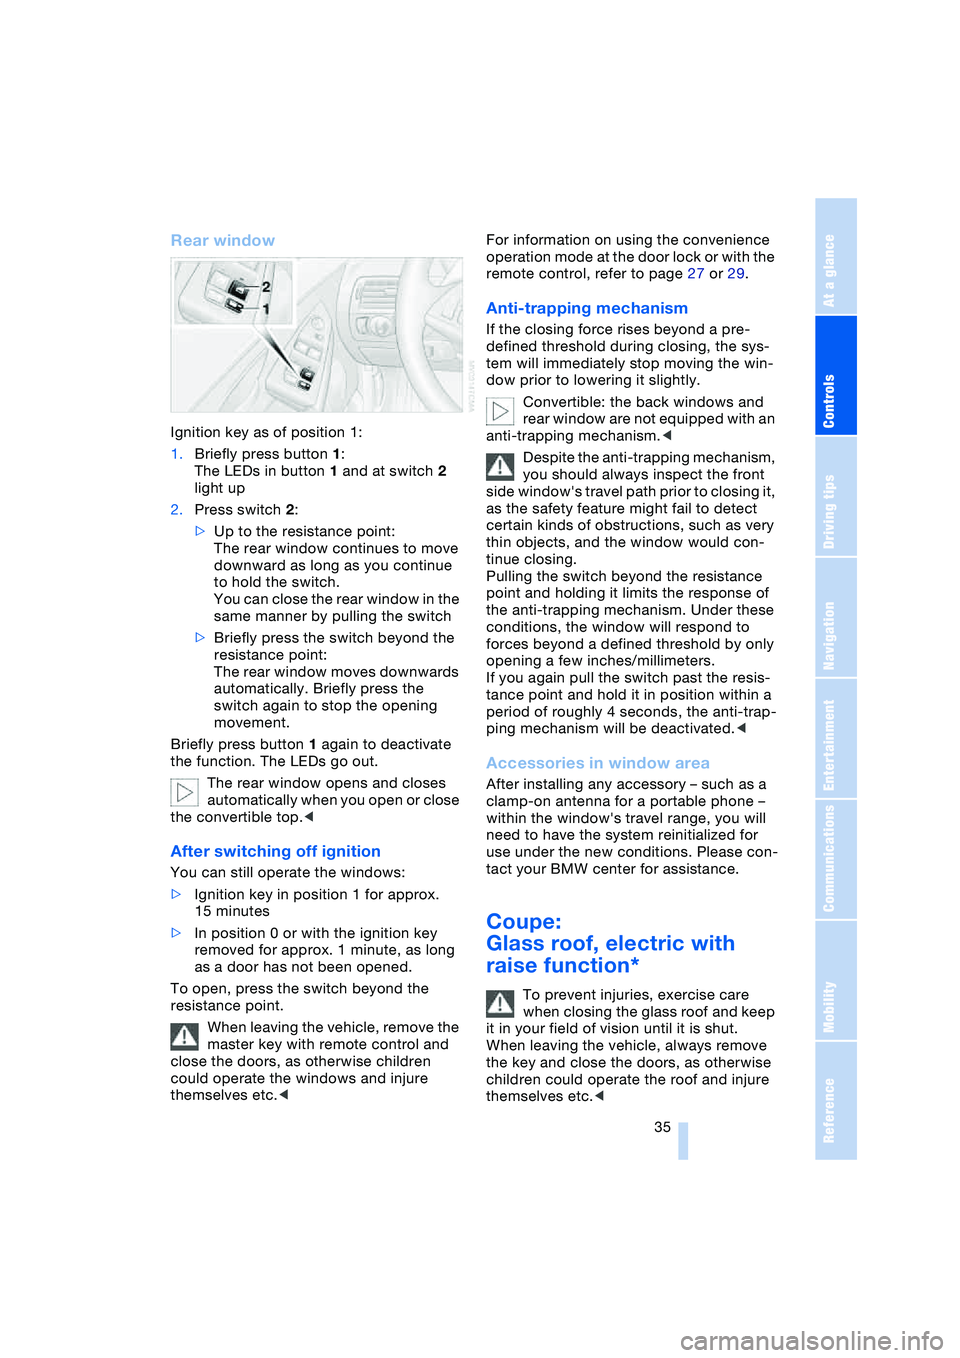
Rear window
Ignition key as of position 1:
1.Briefly press button 1:
The LEDs in button 1 and at switch 2
light up
2.Press switch 2:
>Up to the resistance point:
The rear window continues to move
downward as long as you continue
to hold the switch.
You can close the rear window in the
same manner by pulling the switch
>Briefly press the switch beyond the
resistance point:
The rear window moves downwards
automatically. Briefly press the
switch again to stop the opening
movement.
Briefly press button 1 again to deactivate
the function. The LEDs go out.
The rear window opens and closes
automatically when you open or close
the convertible top.<
After switching off ignition
You can still operate the windows:
>Ignition key in position 1 for approx.
15 minutes
>In position 0 or with the ignition key
removed for approx. 1 minute, as long
as a door has not been opened.
To open, press the switch beyond the
resistance point.
When leaving the vehicle, remove the
master key with remote control and
close the doors, as otherwise children
could operate the windows and injure
themselves etc.
remote control, refer to page 27 or 29.
Anti-trapping mechanism
If the closing force rises beyond a pre-
defined threshold during closing, the sys-
tem will immediately stop moving the win-
dow prior to lowering it slightly.
Convertible: the back windows and
rear window are not equipped with an
anti-trapping mechanism.<
Despite the anti-trapping mechanism,
you should always inspect the front
side window's travel path prior to closing it,
as the safety feature might fail to detect
certain kinds of obstructions, such as very
thin objects, and the window would con-
tinue closing.
Pulling the switch beyond the resistance
point and holding it limits the response of
the anti-trapping mechanism. Under these
conditions, the window will respond to
forces beyond a defined threshold by only
opening a few inches/millimeters.
If you again pull the switch past the resis-
tance point and hold it in position within a
period of roughly 4 seconds, the anti-trap-
ping mechanism will be deactivated.<
Accessories in window area
After installing any accessory – such as a
clamp-on antenna for a portable phone –
within the window's travel range, you will
need to have the system reinitialized for
use under the new conditions. Please con-
tact your BMW center for assistance.
Coupe:
Glass roof, electric with
raise function*
To prevent injuries, exercise care
when closing the glass roof and keep
it in your field of vision until it is shut.
When leaving the vehicle, always remove
the key and close the doors, as otherwise
children could operate the roof and injure
themselves etc.<
Page 39 of 216
Controls
37Reference
At a glance
Driving tips
Communications
Navigation
Entertainment
Mobility
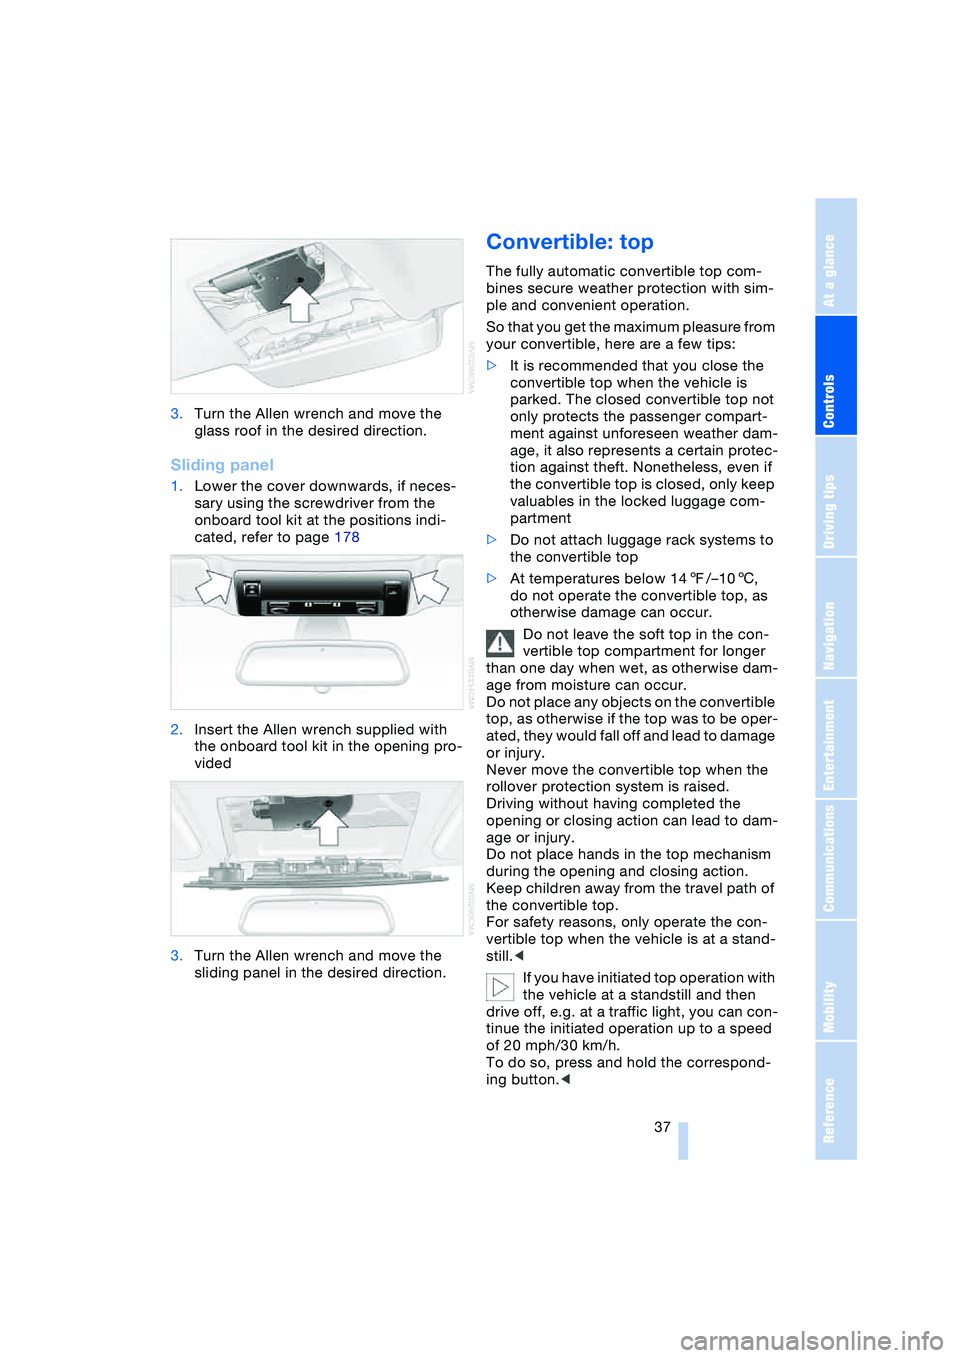
3.Turn the Allen wrench and move the
glass roof in the desired direction.
Sliding panel
1.Lower the cover downwards, if neces-
sary using the screwdriver from the
onboard tool kit at the positions indi-
cated, refer to page 178
2.Insert the Allen wrench supplied with
the onboard tool kit in the opening pro-
vided
3.Turn the Allen wrench and move the
sliding panel in the desired direction.
Convertible: top
The fully automatic convertible top com-
bines secure weather protection with sim-
ple and convenient operation.
So that you get the maximum pleasure from
your convertible, here are a few tips:
>It is recommended that you close the
convertible top when the vehicle is
parked. The closed convertible top not
only protects the passenger compart-
ment against unforeseen weather dam-
age, it also represents a certain protec-
tion against theft. Nonetheless, even if
the convertible top is closed, only keep
valuables in the locked luggage com-
partment
>Do not attach luggage rack systems to
the convertible top
>At temperatures below 147/–106,
do not operate the convertible top, as
otherwise damage can occur.
Do not leave the soft top in the con-
vertible top compartment for longer
than one day when wet, as otherwise dam-
age from moisture can occur.
Do not place any objects on the convertible
top, as otherwise if the top was to be oper-
ated, they would fall off and lead to damage
or injury.
Never move the convertible top when the
rollover protection system is raised.
Driving without having completed the
opening or closing action can lead to dam-
age or injury.
Do not place hands in the top mechanism
during the opening and closing action.
Keep children away from the travel path of
the convertible top.
For safety reasons, only operate the con-
vertible top when the vehicle is at a stand-
still.<
If you have initiated top operation with
the vehicle at a standstill and then
drive off, e.g. at a traffic light, you can con-
tinue the initiated operation up to a speed
of 20 mph/30 km/h.
To do so, press and hold the correspond-
ing button.<
Page 40 of 216
Opening and closing
38 Partial vacuums that occur at higher
speeds in the passenger compart-
ment can make the convertible top flap.
Use the ventilation controls to increase the
air supply so that no partial vacuum occurs
in the vehicle.<
To close the electrically activated side
windows while the vehicle is being
driven, always close the rear windows or
all four windows simultaneously first, as
otherwise the windows cannot close tightly
at higher speeds.<
Prior to opening and closing
>Read carefully and comply with the
safety precautions that appear above
>Ensure that the convertible top com-
partment floor in the luggage compart-
ment is folded down, refer to page 32,
as otherwise the convertible top cannot
be opened
>Ensure that the luggage compartment
lid is closed.
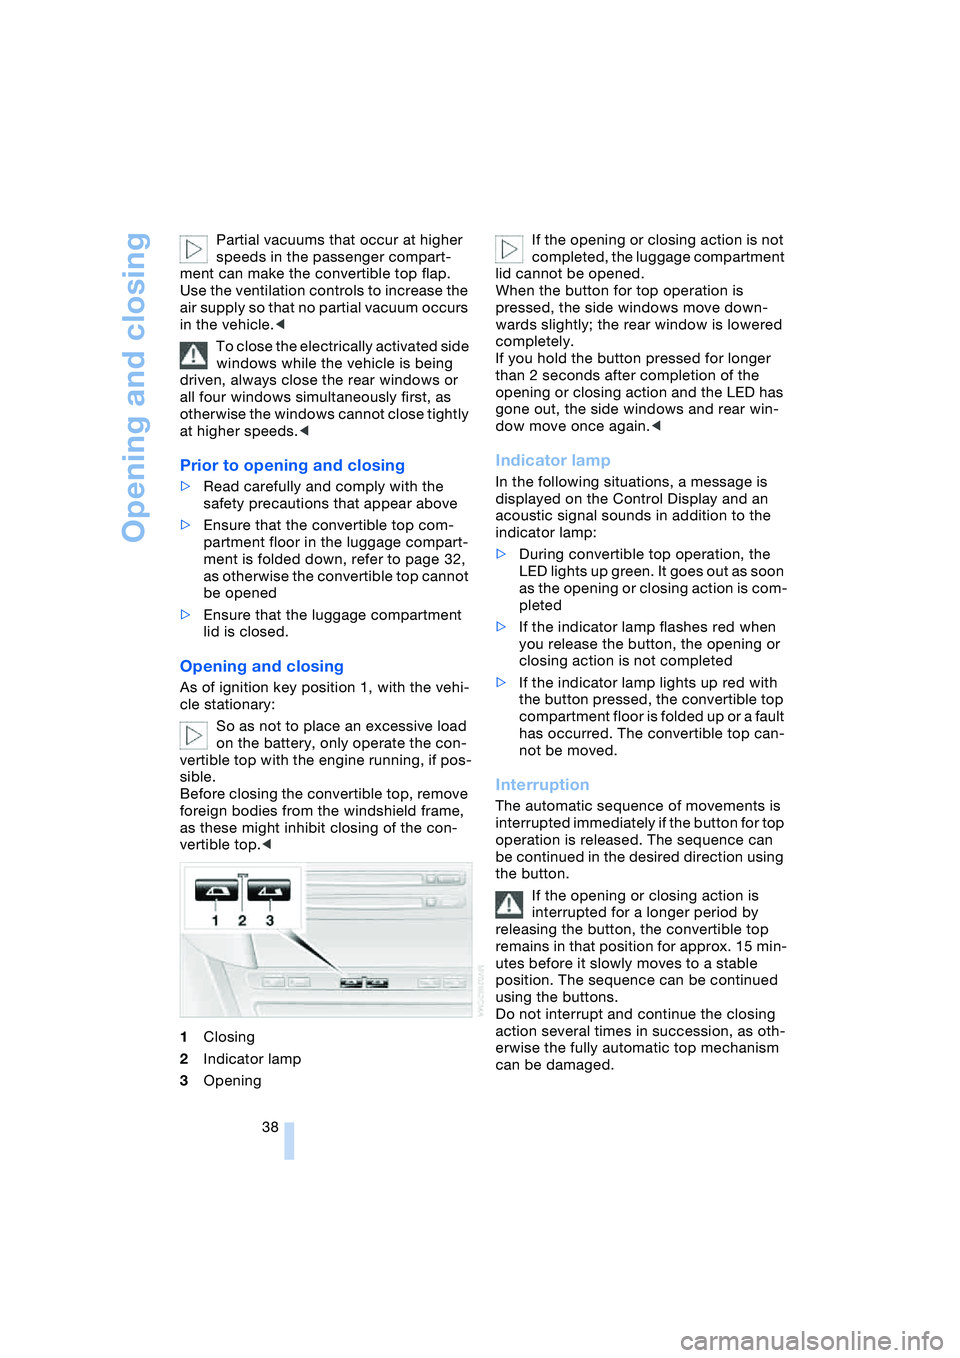
Opening and closing
As of ignition key position 1, with the vehi-
cle stationary:
So as not to place an excessive load
on the battery, only operate the con-
vertible top with the engine running, if pos-
sible.
Before closing the convertible top, remove
foreign bodies from the windshield frame,
as these might inhibit closing of the con-
vertible top.<
1Closing
2Indicator lamp
3OpeningIf the opening or closing action is not
completed, the luggage compartment
lid cannot be opened.
When the button for top operation is
pressed, the side windows move down-
wards slightly; the rear window is lowered
completely.
If you hold the button pressed for longer
than 2 seconds after completion of the
opening or closing action and the LED has
gone out, the side windows and rear win-
dow move once again.<
Indicator lamp
In the following situations, a message is
displayed on the Control Display and an
acoustic signal sounds in addition to the
indicator lamp:
>During convertible top operation, the
LED lights up green. It goes out as soon
as the opening or closing action is com-
pleted
>If the indicator lamp flashes red when
you release the button, the opening or
closing action is not completed
>If the indicator lamp lights up red with
the button pressed, the convertible top
compartment floor is folded up or a fault
has occurred. The convertible top can-
not be moved.
Interruption
The automatic sequence of movements is
interrupted immediately if the button for top
operation is released. The sequence can
be continued in the desired direction using
the button.
If the opening or closing action is
interrupted for a longer period by
releasing the button, the convertible top
remains in that position for approx. 15 min-
utes before it slowly moves to a stable
position. The sequence can be continued
using the buttons.
Do not interrupt and continue the closing
action several times in succession, as oth-
erwise the fully automatic top mechanism
can be damaged.
Page 41 of 216
Controls
39Reference
At a glance
Driving tips
Communications
Navigation
Entertainment
Mobility
If the opening or closing action is inter-
rupted, it can happen that the luggage
compartment lid cannot be opened.<
Convenience operation using remote
control and driver's door lock
Refer to pages 27 and 29.
Manual closing in the event of an
electrical malfunction
Only close the convertible top manu-
ally if absolutely necessary; never
open it manually. The convertible top com-
partment lid cannot be locked in the event
of an electrical malfunction and would
open while the vehicle is being driven.
Improper handling can lead to damage.<
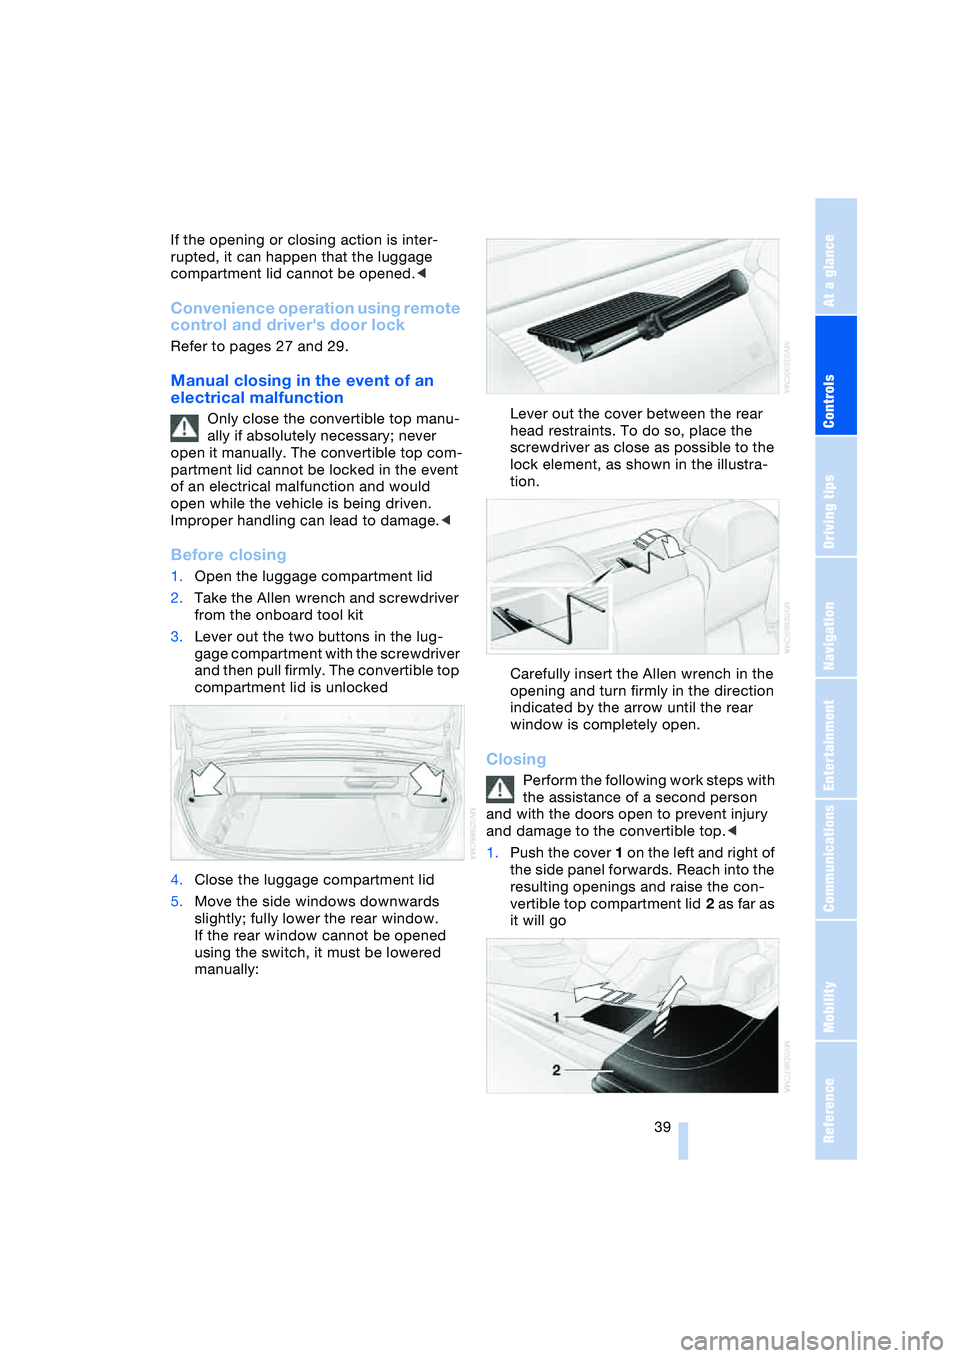
Before closing
1.Open the luggage compartment lid
2.Take the Allen wrench and screwdriver
from the onboard tool kit
3.Lever out the two buttons in the lug-
gage compartment with the screwdriver
and then pull firmly. The convertible top
compartment lid is unlocked
4.Close the luggage compartment lid
5.Move the side windows downwards
slightly; fully lower the rear window.
If the rear window cannot be opened
using the switch, it must be lowered
manually:Lever out the cover between the rear
head restraints. To do so, place the
screwdriver as close as possible to the
lock element, as shown in the illustra-
tion.
Carefully insert the Allen wrench in the
opening and turn firmly in the direction
indicated by the arrow until the rear
window is completely open.
Closing
Perform the following work steps with
the assistance of a second person
and with the doors open to prevent injury
and damage to the convertible top.<
1.Push the cover 1 on the left and right of
the side panel forwards. Reach into the
resulting openings and raise the con-
vertible top compartment lid 2 as far as
it will go