2004 BMW 525I SEDAN ECU
[x] Cancel search: ECUPage 111 of 220
Driving tips
109Reference
At a glance
Controls
Communications
Navigation
Entertainment
Mobility
Stowing cargo
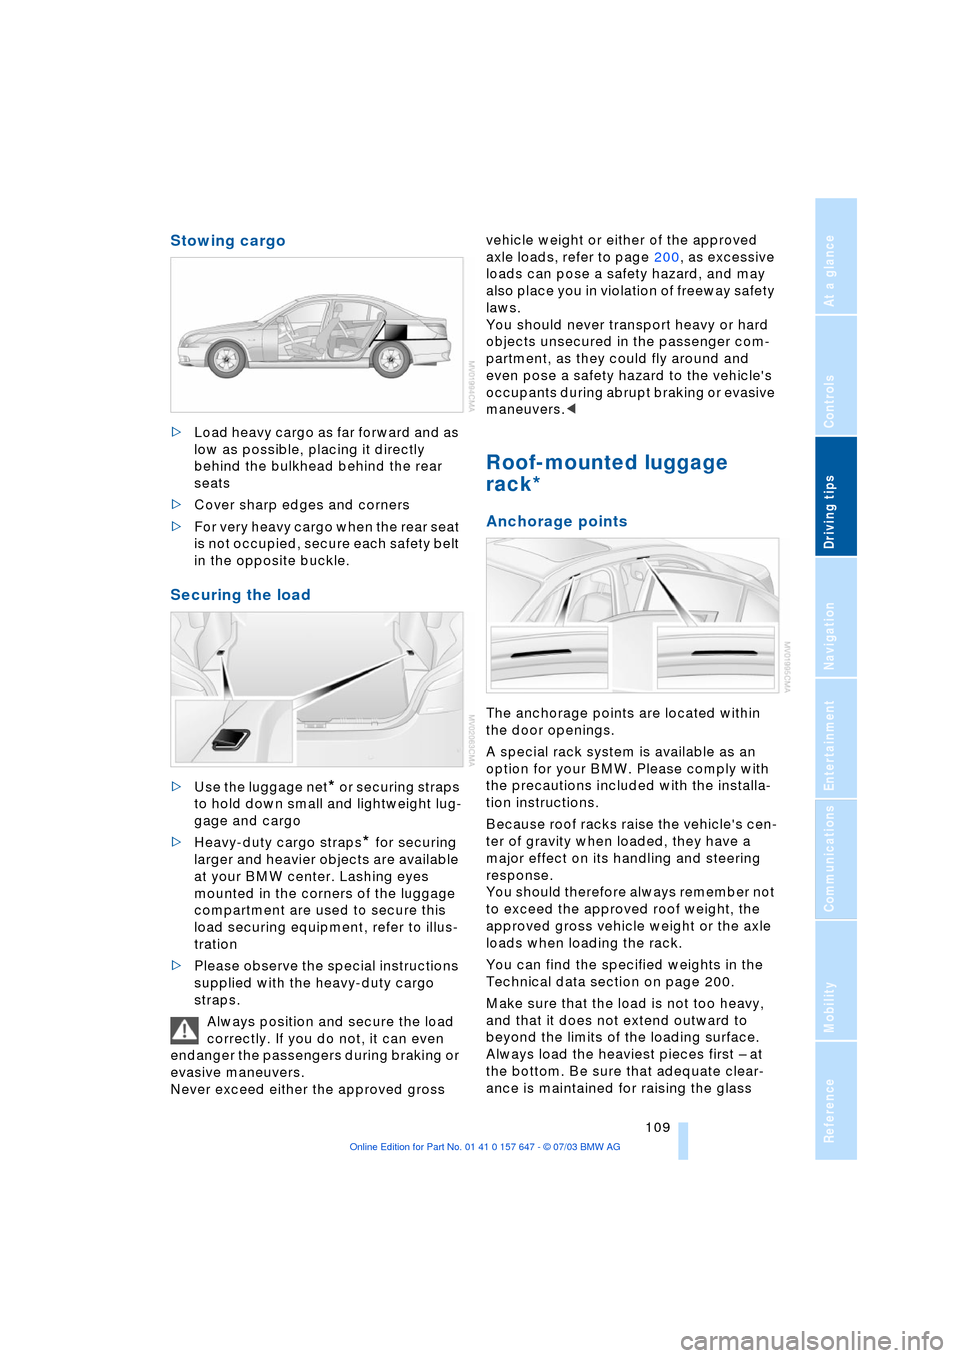
>Load heavy cargo as far forward and as
low as possible, placing it directly
behind the bulkhead behind the rear
seats
>Cover sharp edges and corners
>For very heavy cargo when the rear seat
is not occupied, secure each safety belt
in the opposite buckle.
Securing the load
>Use the luggage net* or securing straps
to hold down small and lightweight lug-
gage and cargo
>Heavy-duty cargo straps
* for securing
larger and heavier objects are available
at your BMW center. Lashing eyes
mounted in the corners of the luggage
compartment are used to secure this
load securing equipment, refer to illus-
tration
>Please observe the special instructions
supplied with the heavy-duty cargo
straps.
Always position and secure the load
correctly. If you do not, it can even
endanger the passengers during braking or
evasive maneuvers.
Never exceed either the approved gross vehicle weight or either of the approved
axle loads, refer to page 200, as excessive
loads can pose a safety hazard, and may
also place you in violation of freeway safety
laws.
You should never transport heavy or hard
objects unsecured in the passenger com-
partment, as they could fly around and
even pose a safety hazard to the vehicle's
occupants during abrupt braking or evasive
maneuvers.<
Roof-mounted luggage
rack*
Anchorage points
The anchorage points are located within
the door openings.
A special rack system is available as an
option for your BMW. Please comply with
the precautions included with the installa-
tion instructions.
Because roof racks raise the vehicle's cen-
ter of gravity when loaded, they have a
major effect on its handling and steering
response.
You should therefore always remember not
to exceed the approved roof weight, the
approved gross vehicle weight or the axle
loads when loading the rack.
You can find the specified weights in the
Technical data section on page 200.
Make sure that the load is not too heavy,
and that it does not extend outward to
beyond the limits of the loading surface.
Always load the heaviest pieces first Ð at
the bottom. Be sure that adequate clear-
ance is maintained for raising the glass
Page 112 of 220
Things to remember when driving
110 roof, and that objects do not project into
the opening path of the luggage compart-
ment lid.
Secure roof-mounted cargo correctly and
securely to prevent it from shifting or being
lost during the trip.
Drive smoothly. Avoid sudden acceleration
and braking maneuvers. Take corners gen-
tly.
Page 179 of 220
Mobility
177Reference
At a glance
Controls
Driving tips
Communications
Navigation
Entertainment
Under the hood
Hood
Unlocking
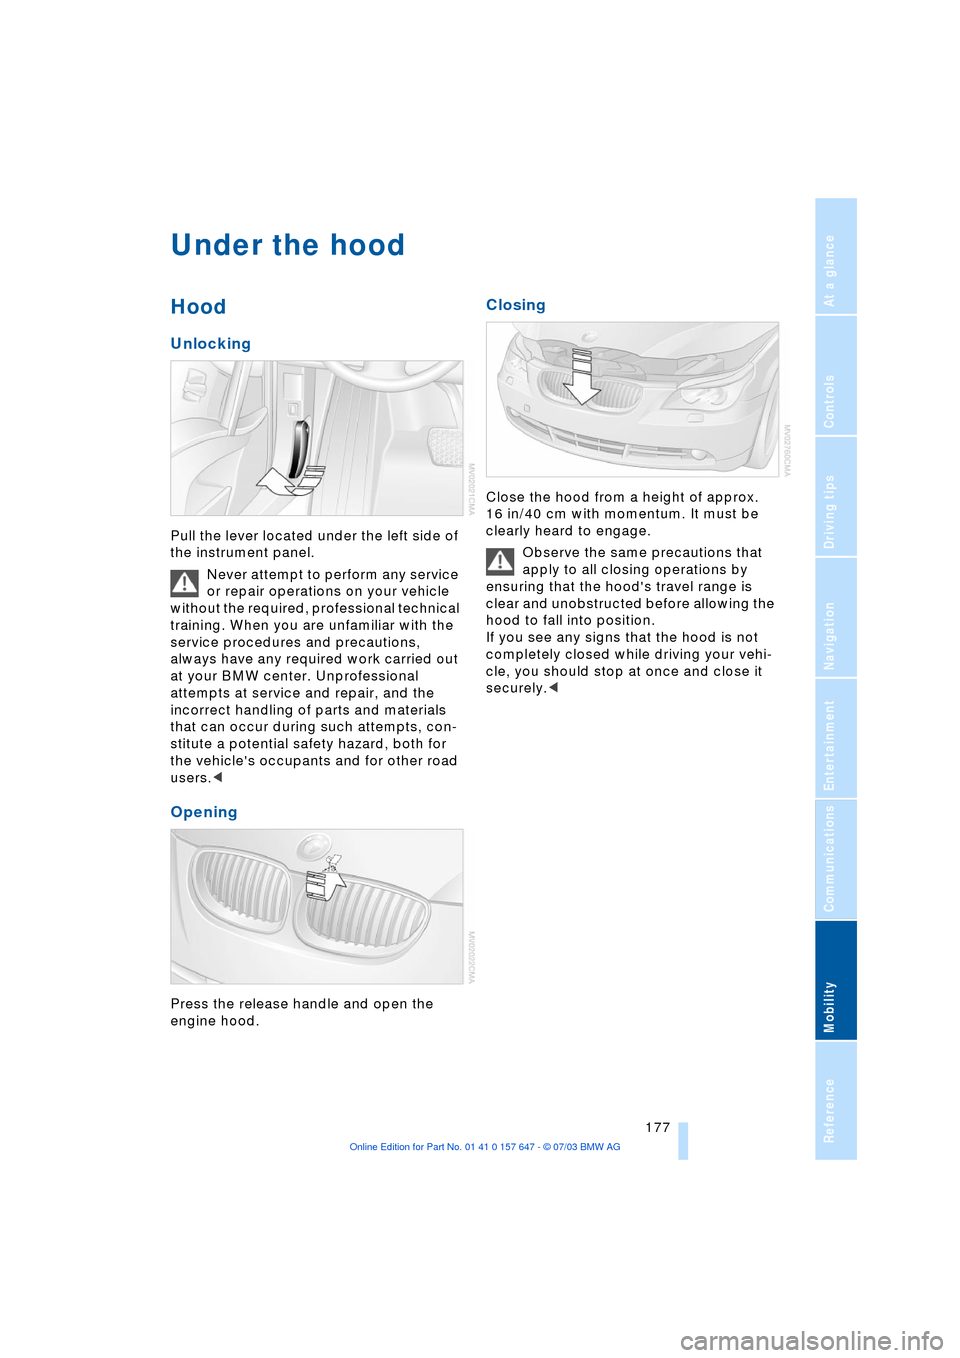
Pull the lever located under the left side of
the instrument panel.
Never attempt to perform any service
or repair operations on your vehicle
without the required, professional technical
training. When you are unfamiliar with the
service procedures and precautions,
always have any required work carried out
at your BMW center. Unprofessional
attempts at service and repair, and the
incorrect handling of parts and materials
that can occur during such attempts, con-
stitute a potential safety hazard, both for
the vehicle's occupants and for other road
users.<
Opening
Press the release handle and open the
engine hood.
Closing
Close the hood from a height of approx.
16 in/40 cm with momentum. It must be
clearly heard to engage.
Observe the same precautions that
apply to all closing operations by
ensuring that the hood's travel range is
clear and unobstructed before allowing the
hood to fall into position.
If you see any signs that the hood is not
completely closed while driving your vehi-
cle, you should stop at once and close it
securely.<
Page 189 of 220
Mobility
187Reference
At a glance
Controls
Driving tips
Communications
Navigation
Entertainment
Changing a wheel
Safety measures in the event of a
breakdown or wheel change:
Park the vehicle as far away as possible
from moving traffic and on firm ground.
Switch on the hazard warning flashers.
Lock the steering wheel in straight-ahead
setting of the wheels. Apply the handbrake
and engage first gear, reverse gear or
selector lever to position P.
Have all vehicle occupants get out of the
vehicle and ensure that they remain outside
the immediate area in a safe place, such as
behind a guardrail.
If a warning triangle or portable hazard
warning lamp is required, set it up on the
roadside at an appropriate distance from
the rear of the vehicle.
Comply with all safety guidelines and regu-
lations.
Change the wheel only on a level, firm sur-
face which is not slippery.
The vehicle or the jack could slip to the side
if you attempt to raise the vehicle on a soft
or slippery surface such as snow, ice, tiles,
etc.
Position the jack on a firm support surface.
Do not use a wooden block or similar
object as a support base for the jack, as
this would prevent it from extending to its
full support height and reduce its load-car-
rying capacity.
To avoid serious or fatal injury: never lie
under the vehicle, and never start the
engine while it is supported by the jack.<
What you will need
To avoid rattling noises later on, note the
positions of the tools before removing
them, then return them to their initial posi-
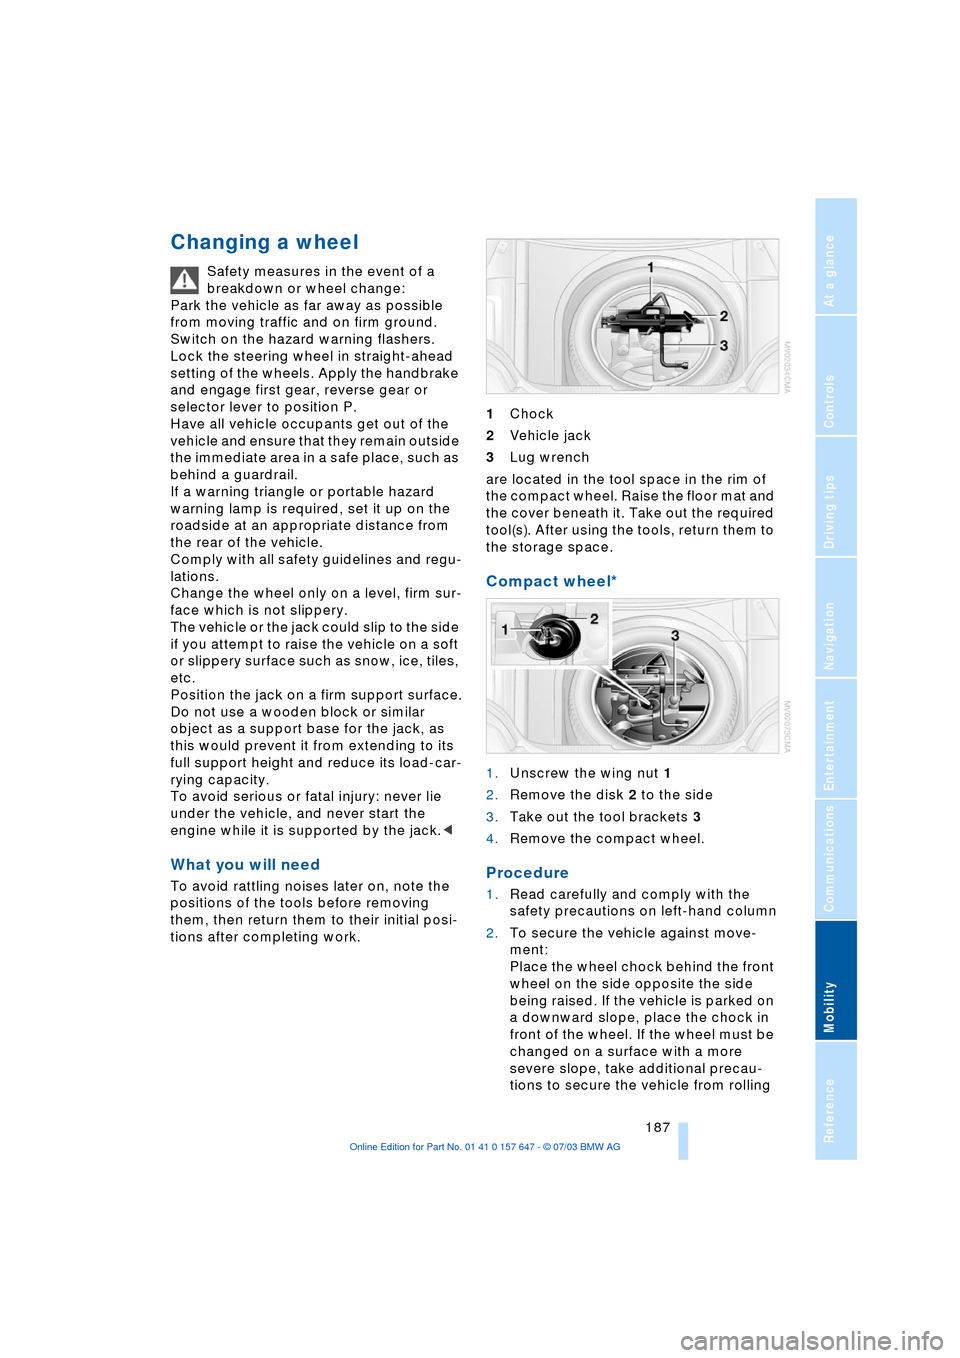
tions after completing work.1Chock
2Vehicle jack
3Lug wrench
are located in the tool space in the rim of
the compact wheel. Raise the floor mat and
the cover beneath it. Take out the required
tool(s). After using the tools, return them to
the storage space.
Compact wheel*
1.Unscrew the wing nut 1
2.Remove the disk 2 to the side
3.Take out the tool brackets 3
4.Remove the compact wheel.
Procedure
1.Read carefully and comply with the
safety precautions on left-hand column
2.To secure the vehicle against move-
ment:
Place the wheel chock behind the front
wheel on the side opposite the side
being raised. If the vehicle is parked on
a downward slope, place the chock in
front of the wheel. If the wheel must be
changed on a surface with a more
severe slope, take additional precau-
tions to secure the vehicle from rolling
Page 190 of 220
Replacing components
188 3.Loosen the lug bolts 1/2 a turn
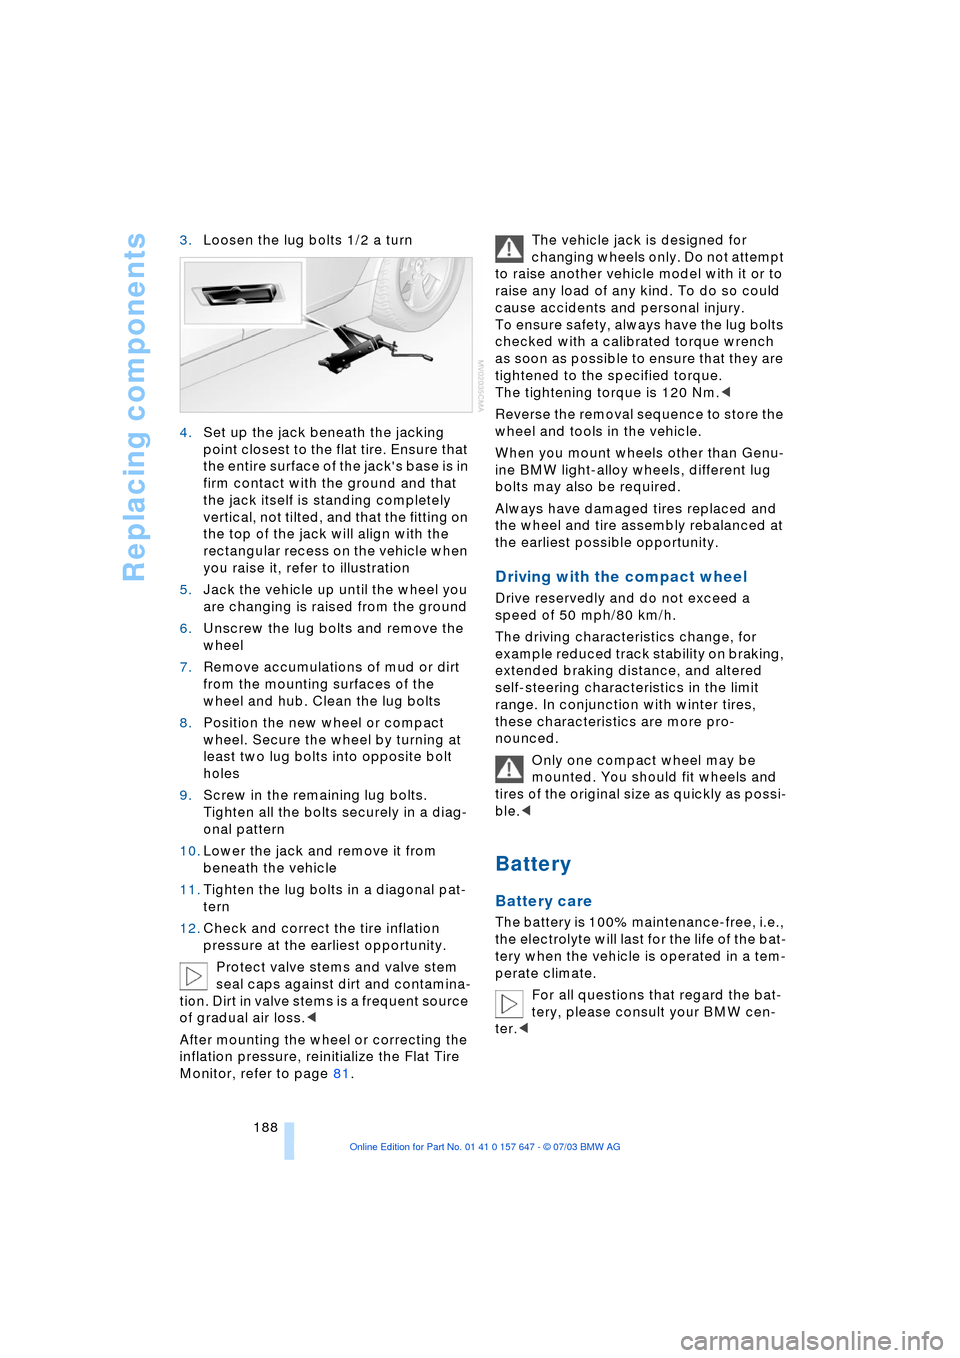
4.Set up the jack beneath the jacking
point closest to the flat tire. Ensure that
the entire surface of the jack's base is in
firm contact with the ground and that
the jack itself is standing completely
vertical, not tilted, and that the fitting on
the top of the jack will align with the
rectangular recess on the vehicle when
you raise it, refer to illustration
5.Jack the vehicle up until the wheel you
are changing is raised from the ground
6.Unscrew the lug bolts and remove the
wheel
7.Remove accumulations of mud or dirt
from the mounting surfaces of the
wheel and hub. Clean the lug bolts
8.Position the new wheel or compact
wheel. Secure the wheel by turning at
least two lug bolts into opposite bolt
holes
9.Screw in the remaining lug bolts.
Tighten all the bolts securely in a diag-
onal pattern
10.Lower the jack and remove it from
beneath the vehicle
11.Tighten the lug bolts in a diagonal pat-
tern
12.Check and correct the tire inflation
pressure at the earliest opportunity.
Protect valve stems and valve stem
seal caps against dirt and contamina-
tion. Dirt in valve stems is a frequent source
of gradual air loss.<
After mounting the wheel or correcting the
inflation pressure, reinitialize the Flat Tire
Monitor, refer to page 81.The vehicle jack is designed for
changing wheels only. Do not attempt
to raise another vehicle model with it or to
raise any load of any kind. To do so could
cause accidents and personal injury.
To ensure safety, always have the lug bolts
checked with a calibrated torque wrench
as soon as possible to ensure that they are
tightened to the specified torque.
The tightening torque is 120 Nm.<
Reverse the removal sequence to store the
wheel and tools in the vehicle.
When you mount wheels other than Genu-
ine BMW light-alloy wheels, different lug
bolts may also be required.
Always have damaged tires replaced and
the wheel and tire assembly rebalanced at
the earliest possible opportunity.
Driving with the compact wheel
Drive reservedly and do not exceed a
speed of 50 mph/80 km/h.
The driving characteristics change, for
example reduced track stability on braking,
extended braking distance, and altered
self-steering characteristics in the limit
range. In conjunction with winter tires,
these characteristics are more pro-
nounced.
Only one compact wheel may be
mounted. You should fit wheels and
tires of the original size as quickly as possi-
ble.<
Battery
Battery care
The battery is 100% maintenance-free, i.e.,
the electrolyte will last for the life of the bat-
tery when the vehicle is operated in a tem-
perate climate.
For all questions that regard the bat-
tery, please consult your BMW cen-
ter.<
Page 206 of 220

Everything from A to Z
204 Cargo, securing 109
Cargo area
Ð locking separately 31
Caring for artificial leather,
refer to Caring for your
vehicle brochure
Caring for leather, refer to
Caring for your vehicle
brochure
Caring for light-alloy
wheels, refer to Caring for
your vehicle brochure
Caring for plastic, refer to
Caring for your vehicle
brochure
Caring for the carpet, refer
to Caring for your vehicle
brochure
Caring for the vehicle finish,
refer to Caring for your
vehicle brochure
Car jack
Ð jacking points 188
Car keys, refer to Central
keys with remote
control 26
Car phone 151
Ð installation location, refer
to Center armrest 98
Ð refer to Portable
phone 150
Ð refer to separate Owner's
Manual
Car radio, refer to
Radio 134
Car wash 106
Ð refer also to Caring for
your vehicle brochure
Catalytic converter, refer to
High temperatures 106
"Categories" 138
CBC Cornering Brake
Control 78
CBS Condition Based
Service 181
"CD" 130CD changer 144
Ð adjusting the tone 131
Ð controls 130
Ð fast forward/reverse 146
Ð installation location 144
Ð listening to a CD 144
Ð playing a track 145
Ð random order 146
Ð repeating a track 145
Ð selecting track 145
Ð switching on/off 130
Ð volume 131
CD for navigation 114
CD player 141
Ð adjusting the tone 131
Ð controls 130
Ð fast forward/reverse 142
Ð playing a track 142
Ð random order 142
Ð repeating a track 142
Ð selecting tracks 141
Ð switching on/off 130
Ð volume 131
Center armrest 98
Center console, refer to
Comfort area 14
Central keys with remote
control 26
"Central locking" 38
Central locking system 27
Ð from inside vehicle 30
Ð from outside vehicle 27
Changes, technical, refer to
Parts and accessories 6
Changing a wheel 187
Changing selector-lever
positions 55
Changing the direction
display for navigation 124
Changing the language on
the Control Display 74
Changing the
measurement units on the
Control Display 74
Changing wheels 174
CHECK button 69
Check Control 68
"Check Control
messages" 69
Check Gas Cap 168Checking the air pressure,
refer to Tire inflation
pressure 170
Child's seat 45
Child-restraint fixing
LATCH 47
Child restraints 45
Child-restraint system 45
Child-safety lock 48
Chock 187
Chrome parts, care, refer to
Caring for your vehicle
brochure
Cigarette lighter 100
Circulation of air, refer to
Recirculated-air mode 91
"City" for destination
entry 117
Cleaning, refer to Caring for
your vehicle brochure
Cleaning headlamps
Ð washer fluid 57
Cleaning windshield 57
"Climate" 41
Clock 65
Ð 12/24 hour mode 74
Ð setting the time and
date 74
Closing
Ð from inside 30
Ð from outside 27
Cockpit 10
Comfort area 14
Comfort seat 37
"Communication" 152
"Communication
interface" 161
Compact Disc
Ð refer to CD changer 144
Ð refer to CD player 141
Compact wheel
Ð inflation pressure 171
Ð wheel change 187
Compression ratio, refer to
Engine data 198
Computer 70
Ð clock, 12/24 hour
mode 74
Ð displays on the Control
Display 70
Page 210 of 220
Everything from A to Z
208 Heating 90
Ð mirrors 43
Ð steering wheel 44
Heating while stopped 92
Heavy cargo, refer to
Stowing cargo 109
Height, refer to
Dimensions 199
Height adjustment
Ð head restraints 39
Ð seats 37
Ð steering wheel 43
High beams 88
Ð headlight flasher 88
Ð indicator lamp 13
Ð replacing the bulbs 185
Hills 107
Holder for beverages 99
"Horn" 44
Horn 10
"Hour memo" 75
"House number" for
destination entry 117
Hydraulic brake assistant,
refer to DBC 79
Hydroplaning 106, 174
I
Ice warning 65
iDrive, refer to Control
Center 16
Ignition key 26
Ignition key positions, refer
to Ignition lock 49
Ignition lock 49
Independent ventilation
Ð switching on and off
directly 94
Independent ventilation/
heating
Ð entering switch-on
times 95
Ð preselecting switch-on
times 95Indicator/warning lamp
Ð active steering 82
Ð airbags 84
Ð Flat Tire Monitor 81
Ð front fog lamps 11
Ð overview 13
Ð safety belt warning 40
Individual air distribution 93
Individual button
assignment options on
steering wheel 44
Individual settings, refer to
Key Memory 26
Inflation pressure, refer to
Tire inflation
pressure 170
"Information" for
navigation 118
Information for navigation
Ð on a different city 118
Ð on city of destination 118
Ð on current position 118
"Information on
destination" 119
"Input map" 118
Installation location
Ð CD changer 144
Ð navigation computer 114
Ð portable phone 151
Instructions for navigation
system, refer to Voice
instructions 124
Instrument cluster 12
Instrument combination,
refer to Instrument
cluster 12
Instrument lighting 88
Instrument panel, refer to
Instrument cluster 10
Integrated universal remote
control 96
Interesting destination 118
"Interim time" 73
Interior lamps 89
Ð remote control 28
Interior mirror, refer to
Interior rearview mirror 43
Interior motion sensor 33
Ð switching off 28Interior rearview mirror 43
Ð automatic dimming
feature 43
Interlock, refer to Steering
locked 49
Intermittent mode of the
wipers 57
J
Jacking points 188
Joystick, refer to Control
Center 16
Jump-starting 192
K
Key Memory 26
"Keypad" 156
Keys 26
Key set, refer Central keys
with remote control 26
Kickdown 55
Knock control 169
L
Lamps and bulbs 184
"Languages" 74
"Languages" for
navigation 124
Lashing eyes, refer to
Securing the load 109
"Last seat position" 38
LATCH child-restraint
fixing 47
LEDs light-emitting
diodes 89
Length, refer to
Dimensions 199
Letter symbol on portable
phone 156
License plate light
Ð replacing the bulbs 186
Light-emitting diodes
LEDs 89
Lighter 100
Ð socket 100
"Lighting" 56, 87
Page 211 of 220
Reference 209
At a glance
Controls
Driving tips
Communications
Navigation
Entertainment
Mobility
Lighting
Ð instruments 88
Ð of the vehicle, refer to
Lamps 87
Lighting of the instruments,
refer to Instrument
lighting 88
Lights, refer to Parking
lamps/low beams 87
Lights on warning 87
Light switch 87
Limit speed, refer to
Limit 72
Loading
Ð securing the load 109
Ð stowing cargo 109
Ð vehicle 108
"Lock after driving off" 30
"Lock button" 28
Locking
Ð from inside 30
Ð from outside 28
Locking and unlocking
doors
Ð from inside 30
Ð from outside 27
Ð setting confirmation
signals 28
"LOGIC7", audio
systems 132
Low beams 87
Ð automatic 87
Ð replacing the bulbs 185
Lower back support, refer
to Lumbar support 38
Lug bolts 188
Ð wrench 187
Luggage compartment 31
Ð capacity 200
Ð locking separately 31
Ð opening/closing, refer to
Luggage compartment
lid 31
Ð opening from the
inside 31
Ð opening from the
outside 31
Ð opening with remote
control 28
Ð socket 100
Ð volume 200Luggage compartment
lid 31
Ð emergency release from
inside luggage
compartment 32
Ð locking separately 31
Ð manual operation 31
Ð opening from the
inside 31
Ð opening from the
outside 31
Ð opening with remote
control 28
Ð unlocking manually 31
Luggage rack, refer to
Roof-mounted luggage
rack 109
Lumbar support 38
LW, waveband 134
M
M+S tires, refer to Winter
tires 175
Maintenance, refer also to
Service and Warranty
Information Booklet for
US models or Warranty
and Service Guide
Booklet for Canadian
models
Maintenance system 181
Malfunction
Ð automatic
transmission 56
Ð Sequential manual
transmission SMG 53
Malfunction warnings, refer
to Check Control 68
Manually controlled
recirculated air 91
"Manual" on the radio 135
Manual operation
Ð door lock 29
Ð fuel filler door 168
Ð glass roof 35
Ð luggage compartment
lid 31
Manual operation with
automatic
transmission 55Manual release, refer to
Manual operation
Manual station tuning 135
Manual transmission 51
"Map, arrow display" 123
"Map, direction of
travel" 124
"Map, facing north" 124
Maximum cooling 91
Maximum roof weight 200
Maximum speed
Ð for winter tires 175
Ð with compact wheel 188
Memory
Ð refer to Key Memory 26
Ð refer to Seat, mirror and
steering wheel
memory 38
Menus, refer to Control
Center 16
Message list of traffic
information 126
Microphone for hands-free
system 151
Mirrors 42
Ð automatic curb
monitor 39
Ð dimming feature 43
Ð heating 43
Ð memory, refer to Seat,
mirror and steering wheel
memory 38
"Missed calls" 155
Missed calls 154
Mobile communications in
the vehicle 108
Mobile Service, refer to
Roadside Assistance 191
Monitor, refer to Control
Center 16
"Monitor display on" 77
Monitoring inflation
pressure, refer to Flat Tire
Monitor 80
Multifunction switch
Ð refer to Turn signal
indicators/headlamp
flasher 56
Ð refer to Wiper/washer
system 57