2004 BMW 525I SEDAN steering wheel
[x] Cancel search: steering wheelPage 51 of 220
Controls
49Reference
At a glance
Driving tips
Communications
Navigation
Entertainment
Mobility
Driving
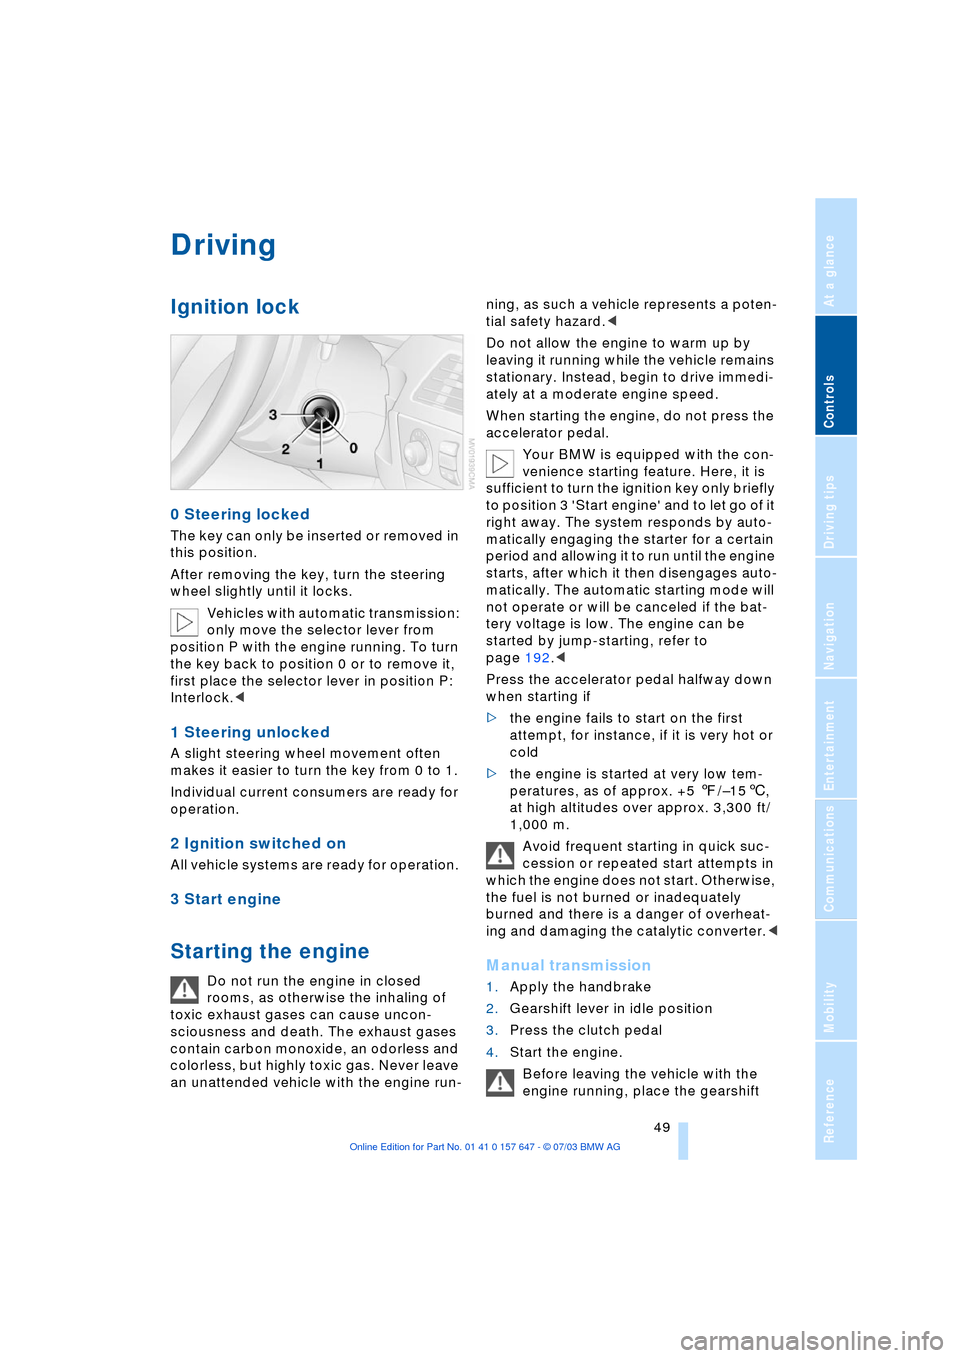
Ignition lock
0 Steering locked
The key can only be inserted or removed in
this position.
After removing the key, turn the steering
wheel slightly until it locks.
Vehicles with automatic transmission:
only move the selector lever from
position P with the engine running. To turn
the key back to position 0 or to remove it,
first place the selector lever in position P:
Interlock.<
1 Steering unlocked
A slight steering wheel movement often
makes it easier to turn the key from 0 to 1.
Individual current consumers are ready for
operation.
2 Ignition switched on
All vehicle systems are ready for operation.
3 Start engine
Starting the engine
Do not run the engine in closed
rooms, as otherwise the inhaling of
toxic exhaust gases can cause uncon-
sciousness and death. The exhaust gases
contain carbon monoxide, an odorless and
colorless, but highly toxic gas. Never leave
an unattended vehicle with the engine run-ning, as such a vehicle represents a poten-
tial safety hazard.<
Do not allow the engine to warm up by
leaving it running while the vehicle remains
stationary. Instead, begin to drive immedi-
ately at a moderate engine speed.
When starting the engine, do not press the
accelerator pedal.
Your BMW is equipped with the con-
venience starting feature. Here, it is
sufficient to turn the ignition key only briefly
to position 3 'Start engine' and to let go of it
right away. The system responds by auto-
matically engaging the starter for a certain
period and allowing it to run until the engine
starts, after which it then disengages auto-
matically. The automatic starting mode will
not operate or will be canceled if the bat-
tery voltage is low. The engine can be
started by jump-starting, refer to
page 192.<
Press the accelerator pedal halfway down
when starting if
>the engine fails to start on the first
attempt, for instance, if it is very hot or
cold
>the engine is started at very low tem-
peratures, as of approx. +5 7/Ð156,
at high altitudes over approx. 3,300 ft/
1,000 m.
Avoid frequent starting in quick suc-
cession or repeated start attempts in
which the engine does not start. Otherwise,
the fuel is not burned or inadequately
burned and there is a danger of overheat-
ing and damaging the catalytic converter.
2.Gearshift lever in idle position
3.Press the clutch pedal
4.Start the engine.
Before leaving the vehicle with the
engine running, place the gearshift
Page 52 of 220
Driving
50 lever in idle position and apply the hand-
brake.
Never leave an unattended vehicle with the
engine running, as such a vehicle repre-
sents a potential safety hazard.<
Automatic transmission
1.Press the brake pedal
2.Place the selector lever in position P
or N
3.Start the engine.
To prevent the vehicle from rolling,
always select position P or N and
engage the handbrake before leaving the
vehicle with the engine running.
Never leave an unattended vehicle with the
engine running, as such a vehicle repre-
sents a potential safety hazard.<
Sequential manual transmission
SMG
1.Press the brake pedal
2.Place the selector lever in the idle posi-
tion N
3.Start the engine.
If the engine does not start, engage
the last gear selected, refer to Display
in the instrument cluster, and return the
selector lever to the idle position N.<
Before leaving the vehicle with the
engine running, place the selector
lever in position N and apply the hand-
brake.
Never leave an unattended vehicle with the
engine running, as such a vehicle repre-
sents a potential safety hazard.<
Switching off engine
Do not remove the ignition key while
the vehicle is rolling, as otherwise the
steering wheel lock would engage while
steering.
When leaving the vehicle, always remove
the ignition key and lock the steering.
When parking on downward inclines, apply
the handbrake.<
Manual transmission
Turn the ignition key to position 1 or 0.
Automatic transmission
1.Engage selector-lever position P
2.Turn the ignition key to position 1 or 0.
Sequential manual transmission
SMG
If the selector lever is in position R or in the
sequential mode and you turn the ignition
key to position 1 or 0, the gear remains
engaged automatically.
If the selector lever is in the idle position N
and you turn the ignition key to position 1
or 0, an acoustic signal and the flashing
gear indicator in the display reminds you
that the vehicle is not secured against roll-
ing away.
The warning stops sounding after approx.
9 seconds.
When parking on downward inclines,
apply the handbrake. Engaging a gear
is not sufficient to secure the vehicle from
rolling away under certain circumstances.<
Handbrake
The handbrake is primarily intended to pre-
vent the vehicle from rolling while parked; it
brakes the rear wheels.
Indicator lamp
The indicator lamp lights up with
the handbrake applied, and an
acoustic signal also sounds when
starting off.
Indicator lamp for Canadian mod-
els.
Applying
The lever locks into place automatically;
the indicator lamp in the instrument cluster
lights up in ignition key position 2.
Page 53 of 220
Controls
51Reference
At a glance
Driving tips
Communications
Navigation
Entertainment
Mobility
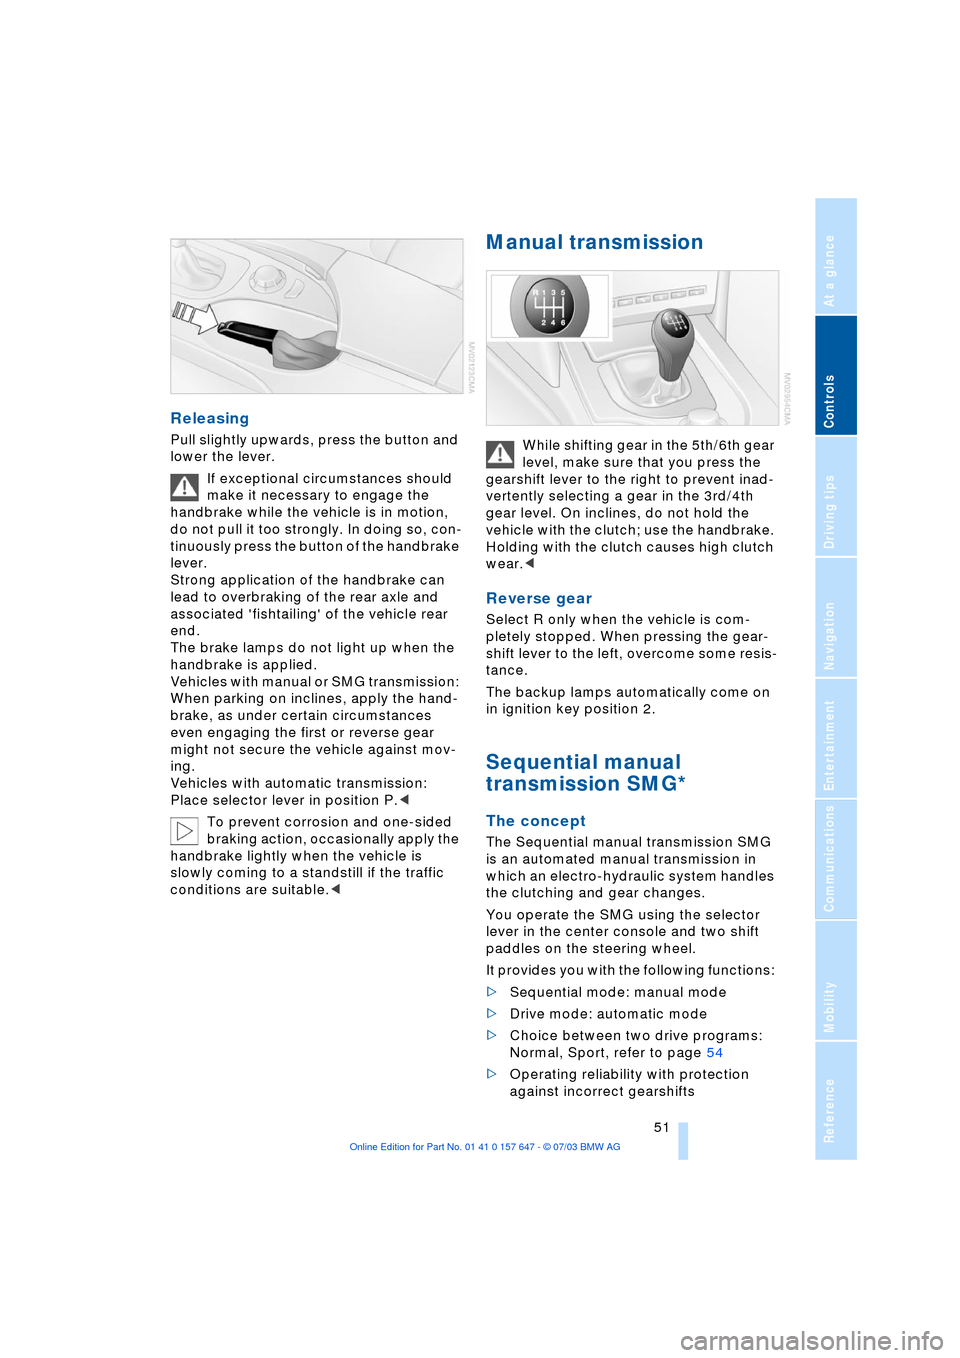
Releasing
Pull slightly upwards, press the button and
lower the lever.
If exceptional circumstances should
make it necessary to engage the
handbrake while the vehicle is in motion,
do not pull it too strongly. In doing so, con-
tinuously press the button of the handbrake
lever.
Strong application of the handbrake can
lead to overbraking of the rear axle and
associated 'fishtailing' of the vehicle rear
end.
The brake lamps do not light up when the
handbrake is applied.
Vehicles with manual or SMG transmission:
When parking on inclines, apply the hand-
brake, as under certain circumstances
even engaging the first or reverse gear
might not secure the vehicle against mov-
ing.
Vehicles with automatic transmission:
Place selector lever in position P.<
To prevent corrosion and one-sided
braking action, occasionally apply the
handbrake lightly when the vehicle is
slowly coming to a standstill if the traffic
conditions are suitable.<
Manual transmission
While shifting gear in the 5th/6th gear
level, make sure that you press the
gearshift lever to the right to prevent inad-
vertently selecting a gear in the 3rd/4th
gear level. On inclines, do not hold the
vehicle with the clutch; use the handbrake.
Holding with the clutch causes high clutch
wear.<
Reverse gear
Select R only when the vehicle is com-
pletely stopped. When pressing the gear-
shift lever to the left, overcome some resis-
tance.
The backup lamps automatically come on
in ignition key position 2.
Sequential manual
transmission SMG*
The concept
The Sequential manual transmission SMG
is an automated manual transmission in
which an electro-hydraulic system handles
the clutching and gear changes.
You operate the SMG using the selector
lever in the center console and two shift
paddles on the steering wheel.
It provides you with the following functions:
>Sequential mode: manual mode
>Drive mode: automatic mode
>Choice between two drive programs:
Normal, Sport, refer to page 54
>Operating reliability with protection
against incorrect gearshifts
Page 55 of 220
Controls
53Reference
At a glance
Driving tips
Communications
Navigation
Entertainment
Mobility
towards D or change the current gear using
the shift paddles or selector lever.
Gear changes
Using selector lever
>To shift up, briefly press the selector
lever towards +
>To shift down, briefly press towards Ñ.
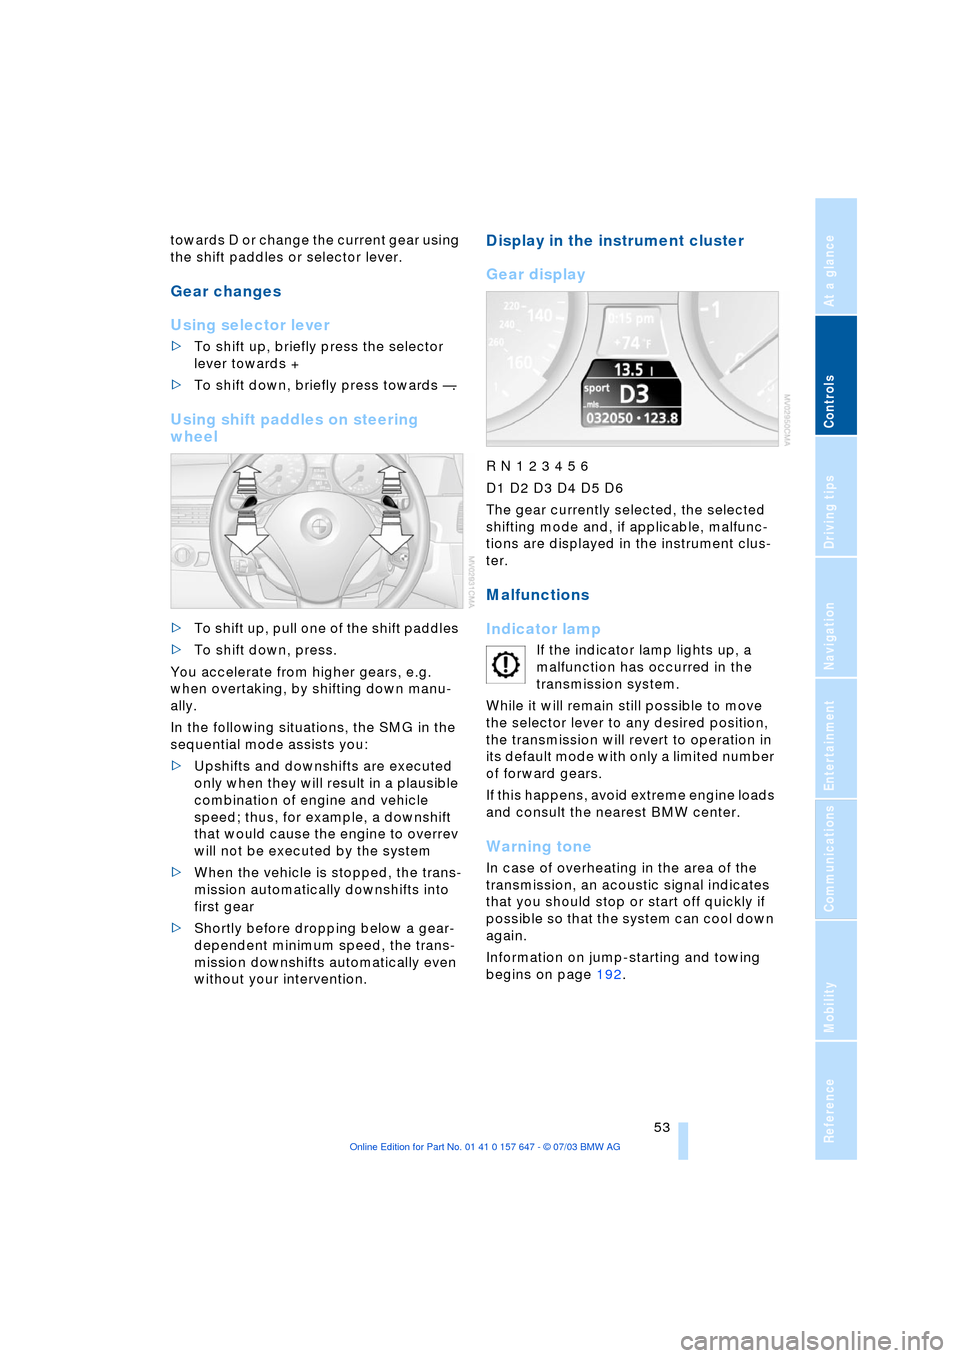
Using shift paddles on steering
wheel
>To shift up, pull one of the shift paddles
>To shift down, press.
You accelerate from higher gears, e.g.
when overtaking, by shifting down manu-
ally.
In the following situations, the SMG in the
sequential mode assists you:
>Upshifts and downshifts are executed
only when they will result in a plausible
combination of engine and vehicle
speed; thus, for example, a downshift
that would cause the engine to overrev
will not be executed by the system
>When the vehicle is stopped, the trans-
mission automatically downshifts into
first gear
>Shortly before dropping below a gear-
dependent minimum speed, the trans-
mission downshifts automatically even
without your intervention.
Display in the instrument cluster
Gear display
R N 1 2 3 4 5 6
D1 D2 D3 D4 D5 D6
The gear currently selected, the selected
shifting mode and, if applicable, malfunc-
tions are displayed in the instrument clus-
ter.
Malfunctions
Indicator lamp
If the indicator lamp lights up, a
malfunction has occurred in the
transmission system.
While it will remain still possible to move
the selector lever to any desired position,
the transmission will revert to operation in
its default mode with only a limited number
of forward gears.
If this happens, avoid extreme engine loads
and consult the nearest BMW center.
Warning tone
In case of overheating in the area of the
transmission, an acoustic signal indicates
that you should stop or start off quickly if
possible so that the system can cool down
again.
Information on jump-starting and towing
begins on page 192.
Page 80 of 220

Technology for comfort, convenience and safety
78
CBC Cornering Brake Control
CBC is a supplement to ABS. It provides
further enhancements in vehicle stability
and steering response during lane changes
and cornering at high rates of lateral accel-
eration.
EBV Electronic Brake Force
Distribution
EBV controls the brake system's applica-
tion pressure at the rear wheels to ensure
stable deceleration.
In case of malfunction
If the brake system warning lamp
lights up in red, appearing together
with the yellow indicator lamps for
ABS and DSC:
The driving stability control has
failed.
If all three lamps light up yellow:
Fault in the driving stability control.
The EBV electronic brake-force distribution
is active.
While you may continue, you should
remember to proceed cautiously and drive
defensively while avoiding full brake appli-
cations.
Please have the system checked at the
nearest BMW center.
If a message appears on the Control Dis-
play, please note the supplementary infor-
mation.
You can find more information on the
Check Control starting on page 68.
Indicator and warning lamps for
Canadian models.
Driving stability control/
DSC Dynamic Stability
Control
The concept
DSC maintains vehicle stability, even in
critical driving situations.
The DSC is operational every time you start
the engine. DSC includes the functionality
of the DTC Dynamic Traction Control and
DBC Dynamic Brake Control, refer to
page 79.
The system optimizes vehicle stability dur-
ing acceleration and when starting from a
full stop, as well as optimizing traction. The
system recognizes any tendency for the
vehicle to assume an unstable attitude
such as oversteer or understeer; it then
counteracts this tendency with a combina-
tion of graduated reductions in engine
torque and selective braking intervention at
individual wheels. DSC provides optimal
stability within the limits defined by the
laws of physics.
Indicator lamps
The indicator lamp in the instrument
cluster goes out soon after you start
the engine.
If the indicator lamp flashes:
DSC is regulating the drive and braking
forces.
If the indicator lamp lights up permanently:
DSC has been switched off using the but-
ton.
If the indicator lamp and the brake
warning lamp light up permanently:
Malfunction in DSC, DTC and DBC.
When the system is off, the stability main-
tenance functions described above are no
longer available. The vehicle will remain
completely operational, however, without
DSC.
Please respond to any malfunctions by
referring the problem to your BMW center.
Page 83 of 220

Controls
81Reference
At a glance
Driving tips
Communications
Navigation
Entertainment
Mobility
natural, even pressure drop in all four
tires.<
In the following situations, on the other
hand, there can be delays in detecting tire
pressure losses, and even system failure:
>When you are driving on snow-covered
or slippery road surfaces
>If you are using a sports driving style:
slip on the drive wheels, high lateral
acceleration
>False alarms and undetected loss of
pressure may occur when you are driv-
ing with snow chains fitted
>When you are driving with the compact
wheel, the Flat Tire Monitor is unable to
function.
Initializing the system
Perform the initialization immediately
after correcting the inflation pressure,
after changing a tire or changing a wheel or
all wheels. A drive is necessary for this pur-
pose.<
Control Center, for principle details, refer to
page 16:
1.Before beginning driving, start the
engine, but do not drive off
2.Open the menu
3.Select "Vehicle settings" and press the
controller
4.Select "FTM" and press the controller
5.Select "Set tire pressure" and press the
controller
6.Select "Yes" and press the controller
7.Drive off.
The message "Initializing" is displayed.It takes a few minutes before the Flat Tire
Monitor can detect and report a flat tire.
After the initialization is completed, the
message "Active" is displayed.
If a flat tire is detected during initialization,
a message appears on the Control Display.
When driving with snow chains or
with the compact wheel, do not initial-
ize the system.<
Flat tire
Indicator lamp
The symbol in the instrument clus-
ter lights up in red and a simulta-
neous message appears on the
Control Display. In addition, an acoustic
signal sounds.
Please note any supplementary information
that appears on the Control Display. You
can find more information on the Check
Control starting on page 68.
1.Reduce speed and stop the vehicle
carefully. Avoid sudden braking and
steering maneuvers
2.Identify damaged tire
If identification is not possible,
contact your BMW center.<
3.Replace the damaged wheel, refer to
Changing a tire on page 187.
Vehicles with run-flat tires:
1.Cautiously reduce the vehicle speed to
below 50 mph/80 km/h. Avoid sudden
braking and steering maneuvers. Do
not exceed a vehicle speed of 50 mph/
80 km/h
Due to the reinforcement on the
edges of the run-flat tires, inflation
pressure loss can not usually be recog-
nized from the outside, refer to Run-flat
tires on page 175.<
2.To continue driving, comply with the
instructions for driving with damaged
tires on page 175.
Page 84 of 220
Technology for comfort, convenience and safety
82
System malfunctions
Indicator lamp
The symbol in the instrument clus-
ter lights up yellow and a message
appears on the Control Display.
Please contact your BMW center.
Please note any supplementary information
that appears on the Control Display.
Active steering*
The concept
The active steering is a system that actively
varies the steering angle of the front wheels
in relation to the steering wheel move-
ments.
When you are driving in the low road speed
range, e.g. in a town or when parking, the
steering angle is reinforced, i.e. the steer-
ing becomes very direct and significantly
improves the handling capability of your
BMW.
In the higher road speed range, on the
other hand, the steering angle is reduced,
also optimizing the handling capability.
In critical situations, the system can make
targeted changes to the steering angle pro-
vided by the driver and thus stabilize the
vehicle before the driver intervenes.
Indicator lamp
The indicator lamp lights up perma-
nently: malfunction in the system.
Please have the system inspected
at your BMW center.
Conventional steering efficiency remains
available without limitations.
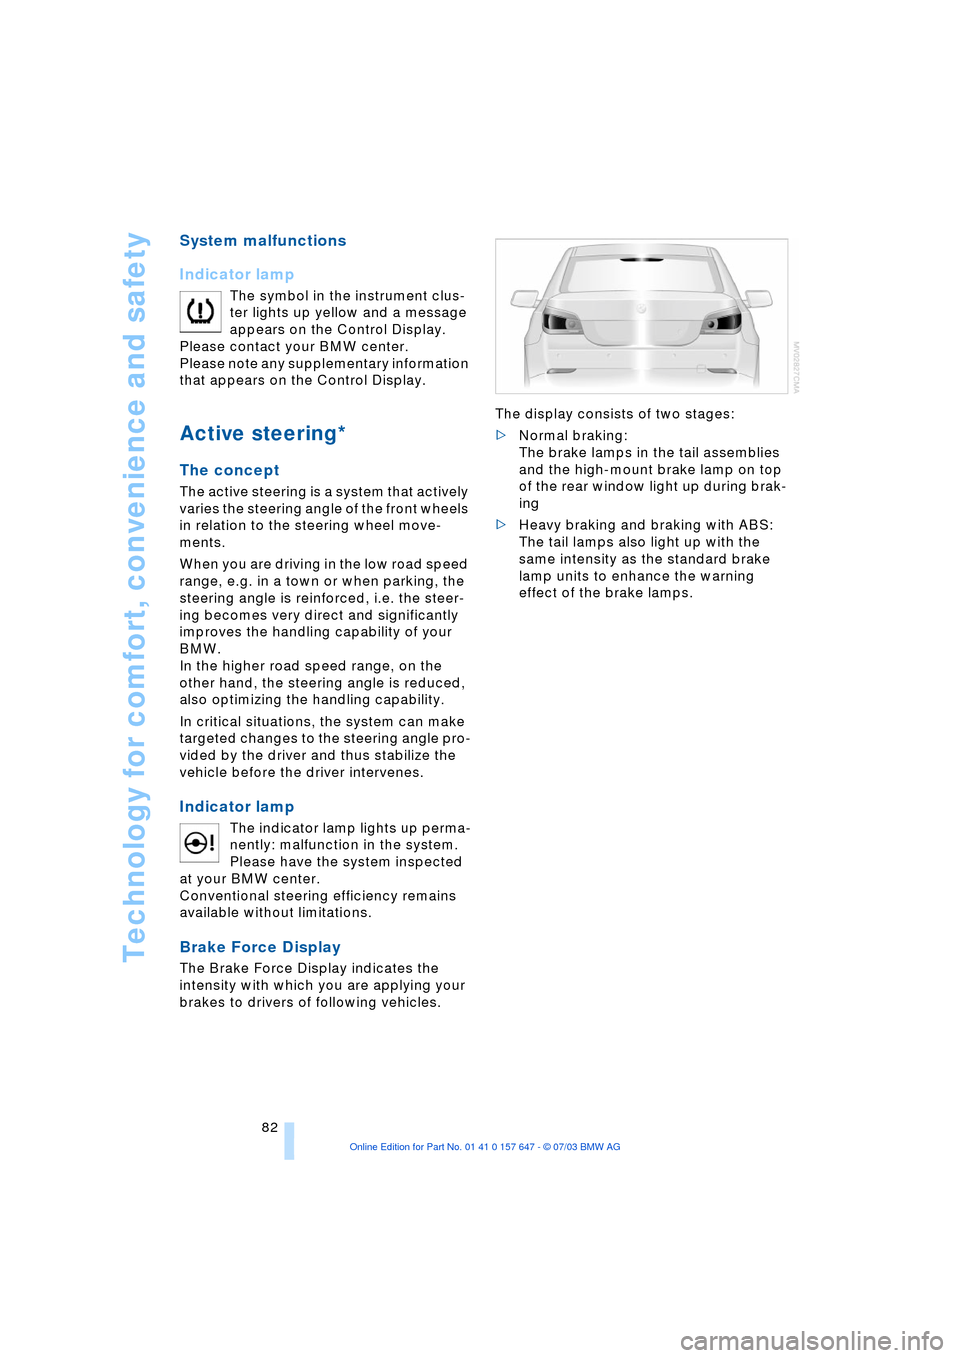
Brake Force Display
The Brake Force Display indicates the
intensity with which you are applying your
brakes to drivers of following vehicles. The display consists of two stages:
>Normal braking:
The brake lamps in the tail assemblies
and the high-mount brake lamp on top
of the rear window light up during brak-
ing
>Heavy braking and braking with ABS:
The tail lamps also light up with the
same intensity as the standard brake
lamp units to enhance the warning
effect of the brake lamps.
Page 85 of 220
Controls
83Reference
At a glance
Driving tips
Communications
Navigation
Entertainment
Mobility
Airbags
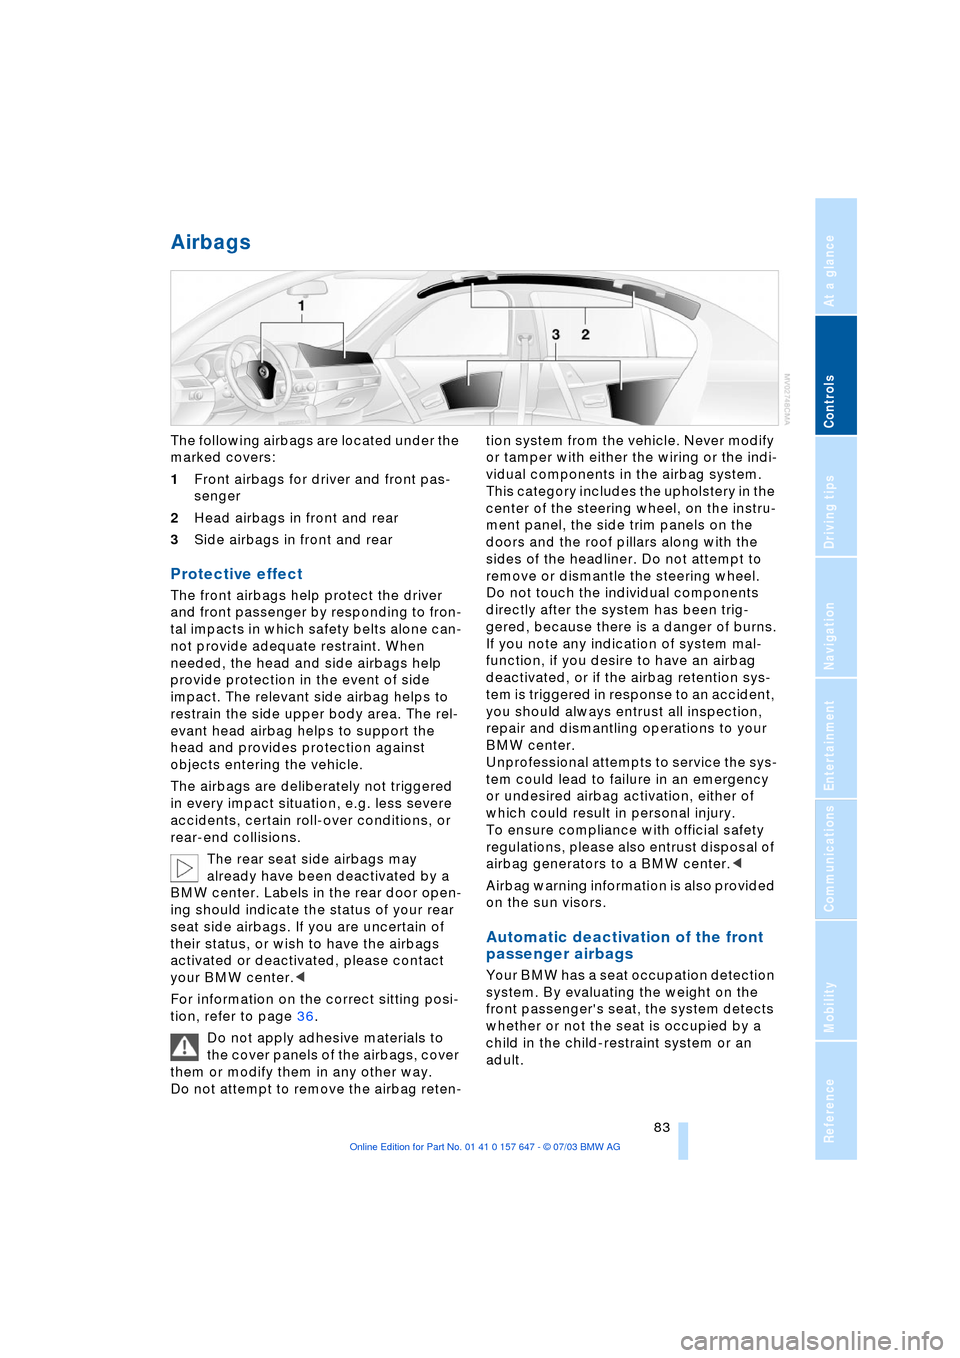
The following airbags are located under the
marked covers:
1Front airbags for driver and front pas-
senger
2Head airbags in front and rear
3Side airbags in front and rear
Protective effect
The front airbags help protect the driver
and front passenger by responding to fron-
tal impacts in which safety belts alone can-
not provide adequate restraint. When
needed, the head and side airbags help
provide protection in the event of side
impact. The relevant side airbag helps to
restrain the side upper body area. The rel-
evant head airbag helps to support the
head and provides protection against
objects entering the vehicle.
The airbags are deliberately not triggered
in every impact situation, e.g. less severe
accidents, certain roll-over conditions, or
rear-end collisions.
The rear seat side airbags may
already have been deactivated by a
BMW center. Labels in the rear door open-
ing should indicate the status of your rear
seat side airbags. If you are uncertain of
their status, or wish to have the airbags
activated or deactivated, please contact
your BMW center.<
For information on the correct sitting posi-
tion, refer to page 36.
Do not apply adhesive materials to
the cover panels of the airbags, cover
them or modify them in any other way.
Do not attempt to remove the airbag reten-tion system from the vehicle. Never modify
or tamper with either the wiring or the indi-
vidual components in the airbag system.
This category includes the upholstery in the
center of the steering wheel, on the instru-
ment panel, the side trim panels on the
doors and the roof pillars along with the
sides of the headliner. Do not attempt to
remove or dismantle the steering wheel.
Do not touch the individual components
directly after the system has been trig-
gered, because there is a danger of burns.
If you note any indication of system mal-
function, if you desire to have an airbag
deactivated, or if the airbag retention sys-
tem is triggered in response to an accident,
you should always entrust all inspection,
repair and dismantling operations to your
BMW center.
Unprofessional attempts to service the sys-
tem could lead to failure in an emergency
or undesired airbag activation, either of
which could result in personal injury.
To ensure compliance with official safety
regulations, please also entrust disposal of
airbag generators to a BMW center.<
Airbag warning information is also provided
on the sun visors.
Automatic deactivation of the front
passenger airbags
Your BMW has a seat occupation detection
system. By evaluating the weight on the
front passenger's seat, the system detects
whether or not the seat is occupied by a
child in the child-restraint system or an
adult.