2004 BMW 525I SEDAN steering wheel
[x] Cancel search: steering wheelPage 87 of 220
Controls
85Reference
At a glance
Driving tips
Communications
Navigation
Entertainment
Mobility
Head-Up Display*
The concept
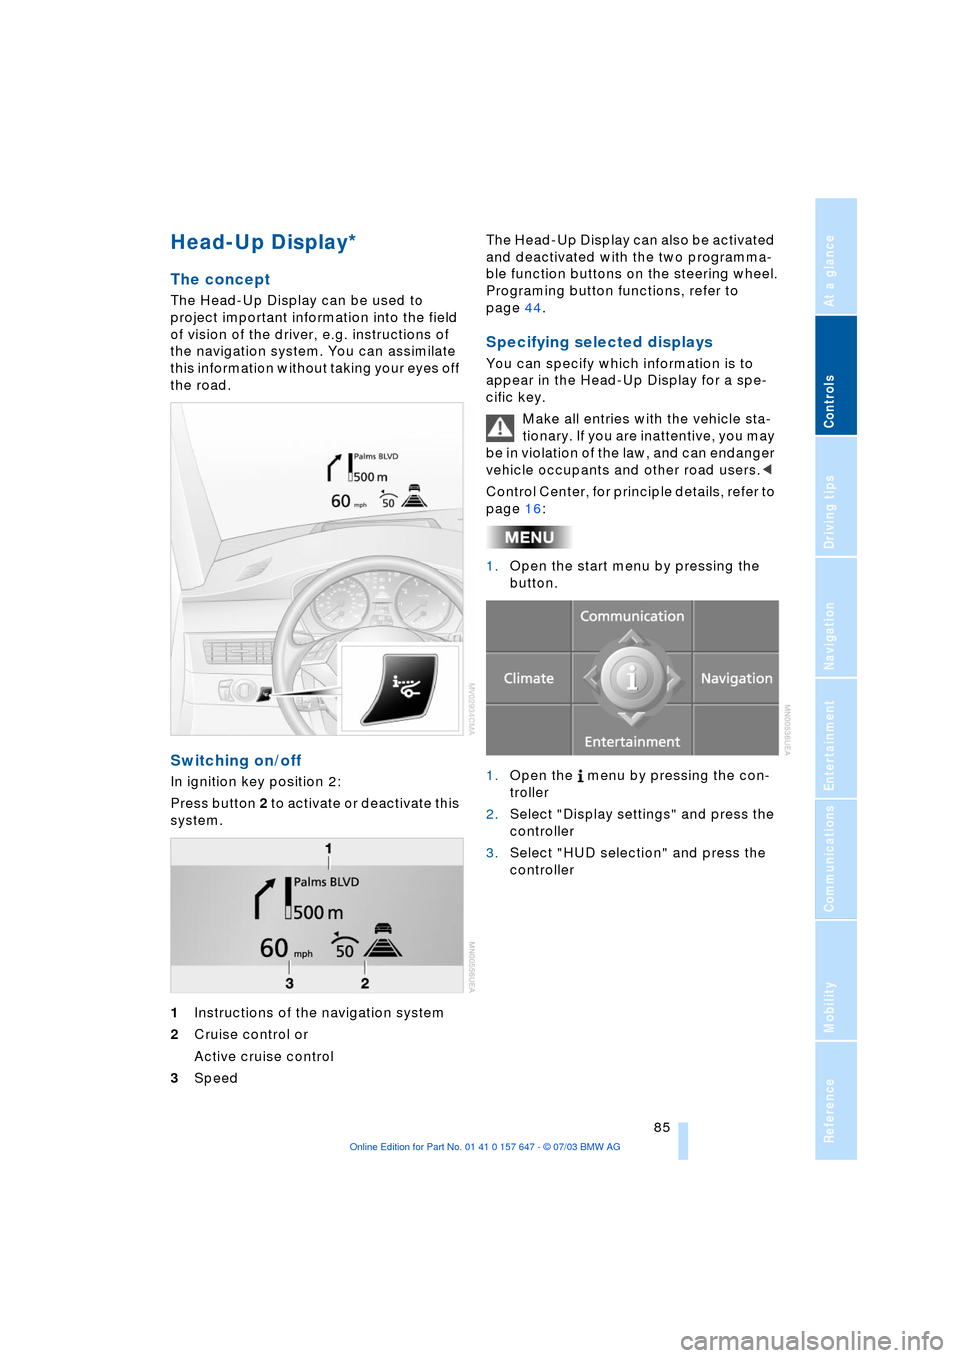
The Head-Up Display can be used to
project important information into the field
of vision of the driver, e.g. instructions of
the navigation system. You can assimilate
this information without taking your eyes off
the road.
Switching on/off
In ignition key position 2:
Press button 2 to activate or deactivate this
system.
1Instructions of the navigation system
2Cruise control or
Active cruise control
3Speed The Head-Up Display can also be activated
and deactivated with the two programma-
ble function buttons on the steering wheel.
Programing button functions, refer to
page 44.
Specifying selected displays
You can specify which information is to
appear in the Head-Up Display for a spe-
cific key.
Make all entries with the vehicle sta-
tionary. If you are inattentive, you may
be in violation of the law, and can endanger
vehicle occupants and other road users.<
Control Center, for principle details, refer to
page 16:
1.Open the start menu by pressing the
button.
1.Open the menu by pressing the con-
troller
2.Select "Display settings" and press the
controller
3.Select "HUD selection" and press the
controller
Page 127 of 220
Navigation
Driving tips
125Reference
At a glance
Controls
Communications
Entertainment
Mobility
or press
on the steering wheel for a longer period.
Programing button functions, refer to
page 44.
Repeating an instruction
To repeat the last voice instruction:
or press
on the steering wheel briefly.
Programing button functions, refer to
page 44.
Suppressing voice instructions
To prevent the navigation system from
interrupting other audio sources, such as a
news program or traffic bulletin, you can
deactivate the voice instructions.
During an instruction, press
or press
on the steering wheel briefly.
Programing button functions, refer to
page 44.
Adjusting volume
You can adjust the volume of the voice
instructions for each specific key:
1.To repeat the last voice instruction, if
required:
or press
on the steering wheel briefly.2.Turn the button during an instruction to
select the desired volume.
The navigation system's voice guidance
will continue to issue instructions at this
volume level, even if the radio is set to min-
imum volume.
Blocking sections of a route
During destination guidance you can revise
the navigation system's route recommen-
dations to avoid particular stretches of
road. Enter the number of miles/kilometers
that you want to travel before returning to
the original route.
Control Center, for principle details, refer to
page 16:
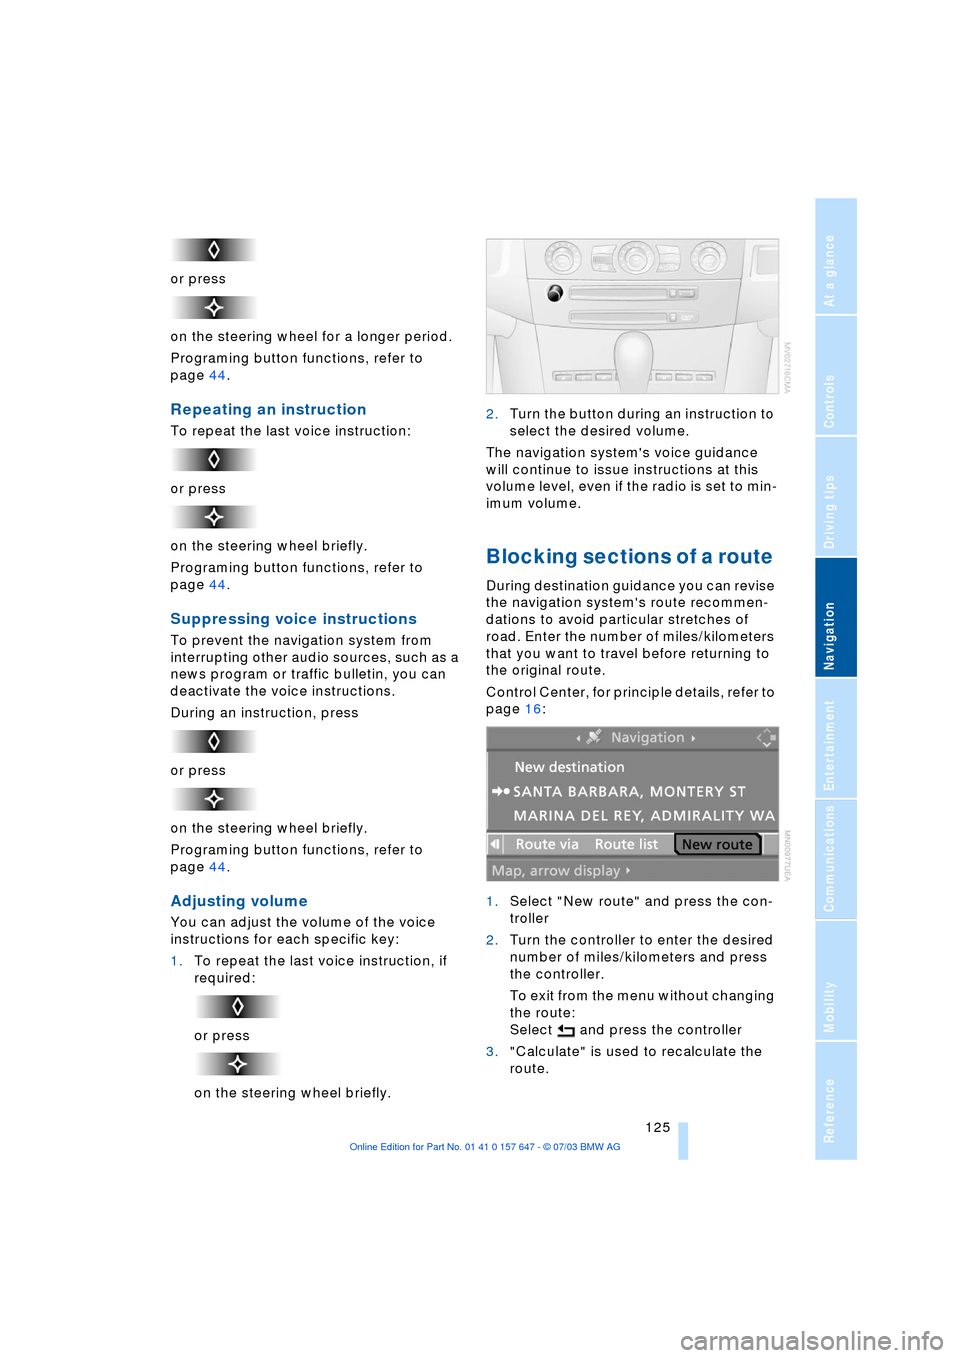
1.Select "New route" and press the con-
troller
2.Turn the controller to enter the desired
number of miles/kilometers and press
the controller.
To exit from the menu without changing
the route:
Select and press the controller
3."Calculate" is used to recalculate the
route.
Page 132 of 220
On/off, tone
130
On/off, tone
Depending on the equipment options you
have chosen, the following audio sources
are available:
>Radio Business
>CD player
>CD changer.
The following section summarizes the com-
mon controls and setting options for the
audio sources. Thereafter, the individual
audio sources are described in detail.
Controls
The audio sources can be operated using:
>The center console
>The Control Center
>Buttons on the steering wheel, refer to
page 11.
Operation using the center console
The layout of the buttons can vary depend-
ing on your vehicle's equipment.
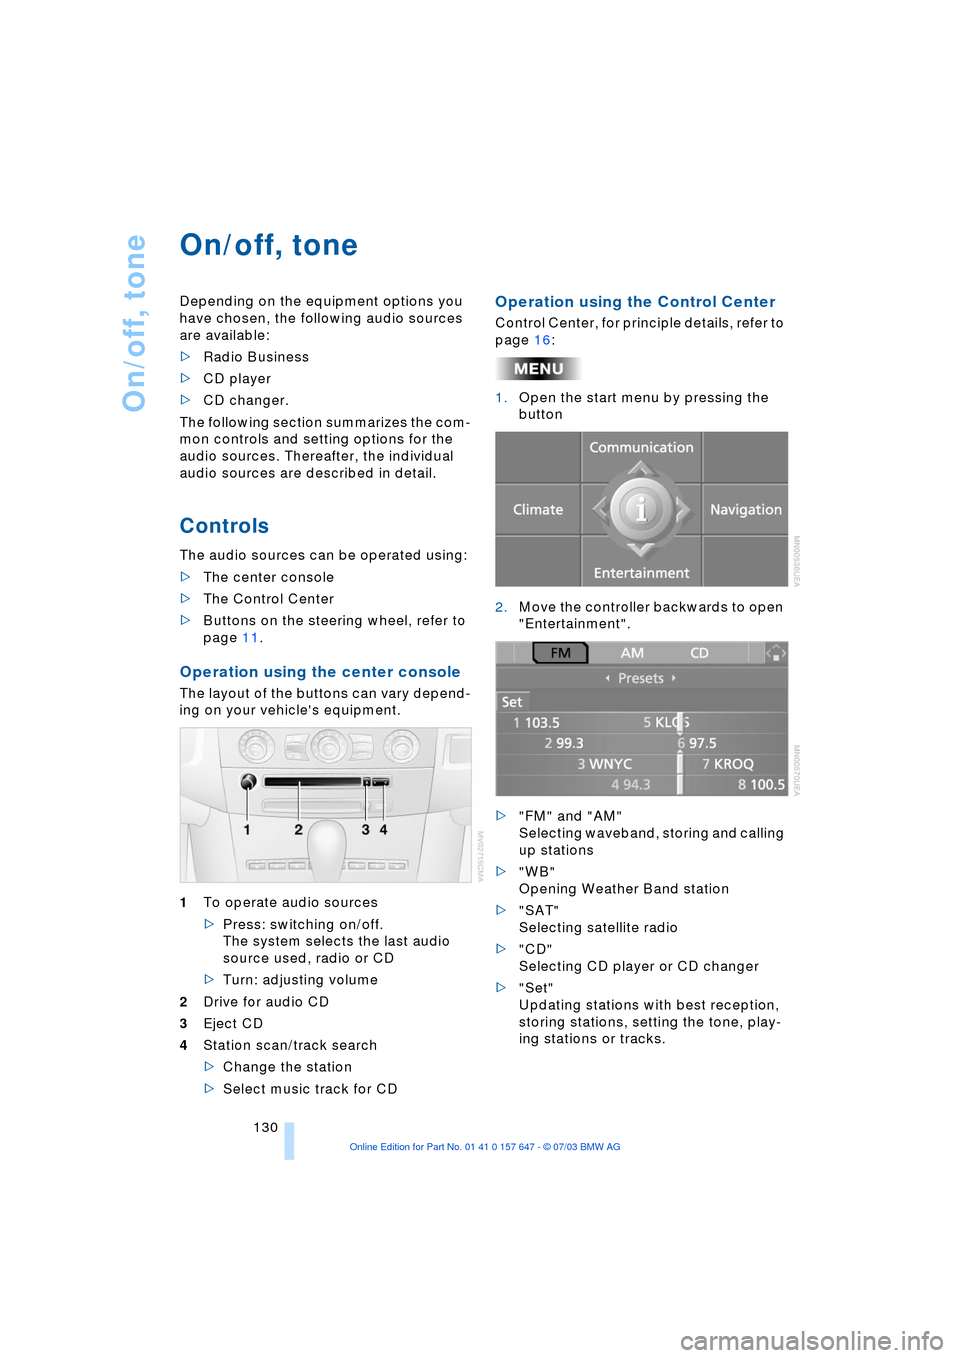
1To operate audio sources
>Press: switching on/off.
The system selects the last audio
source used, radio or CD
>Turn: adjusting volume
2Drive for audio CD
3Eject CD
4Station scan/track search
>Change the station
>Select music track for CD
Operation using the Control Center
Control Center, for principle details, refer to
page 16:
1.Open the start menu by pressing the
button
2.Move the controller backwards to open
"Entertainment".
>"FM" and "AM"
Selecting waveband, storing and calling
up stations
>"WB"
Opening Weather Band station
>"SAT"
Selecting satellite radio
>"CD"
Selecting CD player or CD changer
>"Set"
Updating stations with best reception,
storing stations, setting the tone, play-
ing stations or tracks.
Page 153 of 220
151
Entertainment
Reference
At a glance
Controls
Driving tips Communications
Navigation
Mobility
Batteries
Never attempt to disassemble your
BMW portable phone or its battery.
Use only approved battery types Ð the
wrong battery can destroy your portable
phone.
To avoid possible short circuits, after
removing a battery you should never allow
it to come into contact with metallic sur-
faces of any kind.<
Disposing of used batteries
Return used batteries to a recycling
collection point or to your BMW cen-
ter.<
Care instructions
You can find useful information on caring
for your portable phone in the separate
portable phone Owner's Manual and in the
separate Caring for your vehicle brochure.
Controls
You can operate the BMW portable phone*
using:
>The steering wheel, refer to page 11
>The Control Center, refer to page 152
>The voice control, refer to page 157.
You can use the car phone via the hands-
free unit for BMW Assist calls.
The Control Display indicates which tele-
phone you are using to establish a connec-
tion.
Telephoning with the
car phone: BMW Assist calls
You can use the car phone via the hands-
free unit for BMW Assist calls.
The car phone must have been
enabled prior to initial use. In this con-
nection, please contact your BMW cen-
ter.<
Starting the BMW portable phone*
Before starting off, place the BMW portable
phone in the cradle. If you are making a call
using the car phone, you can only use the
BMW portable phone once you have termi-
nated this call.
Inserting the portable phone
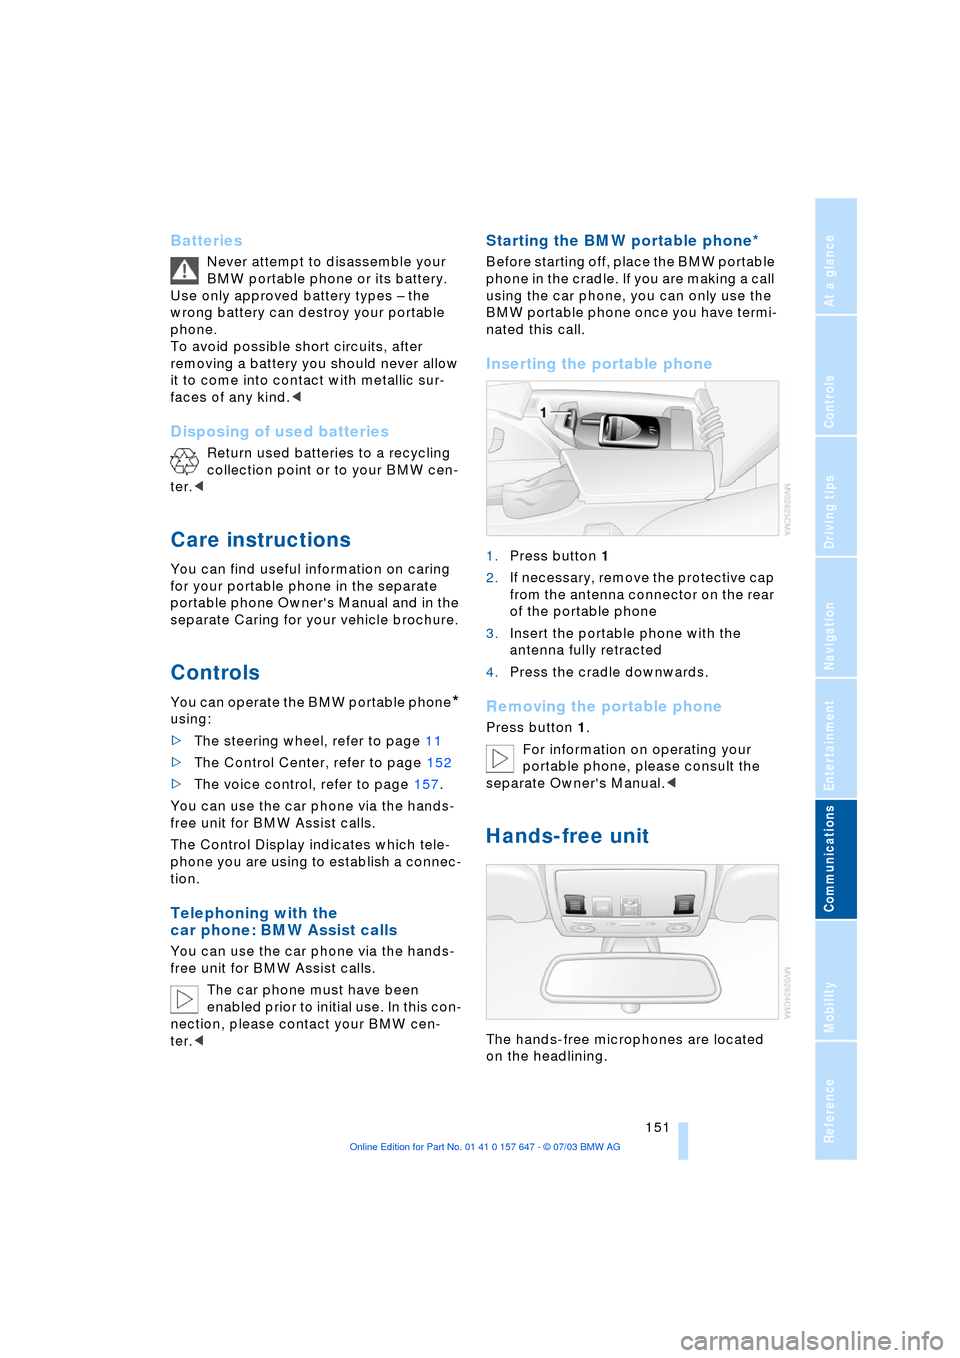
1.Press button 1
2.If necessary, remove the protective cap
from the antenna connector on the rear
of the portable phone
3.Insert the portable phone with the
antenna fully retracted
4.Press the cradle downwards.
Removing the portable phone
Press button 1.
For information on operating your
portable phone, please consult the
separate Owner's Manual.<
Hands-free unit
The hands-free microphones are located
on the headlining.
Page 154 of 220
Telephoning
152 The hands-free unit is activated whenever
you establish or receive a call using:
>The buttons on the steering wheel
>The Control Center
>Voice control.
To continue a call on the portable phone
using hands-free unit:
Insert the portable phone with the lid
opened in the cradle.
To continue a call on the hands-free unit
using the portable phone:
Take the portable phone with the lid
opened out of the cradle.
The call is ended as soon as you take the
phone from the cradle with a closed lid.
Volume adjustment
You can adjust the volume for the hands-
free unit for each individual key:
Turn the button during a call to select the
desired volume.
The hands-free unit will remain at this vol-
ume level, even if the other audio sources
are set to minimum volume.
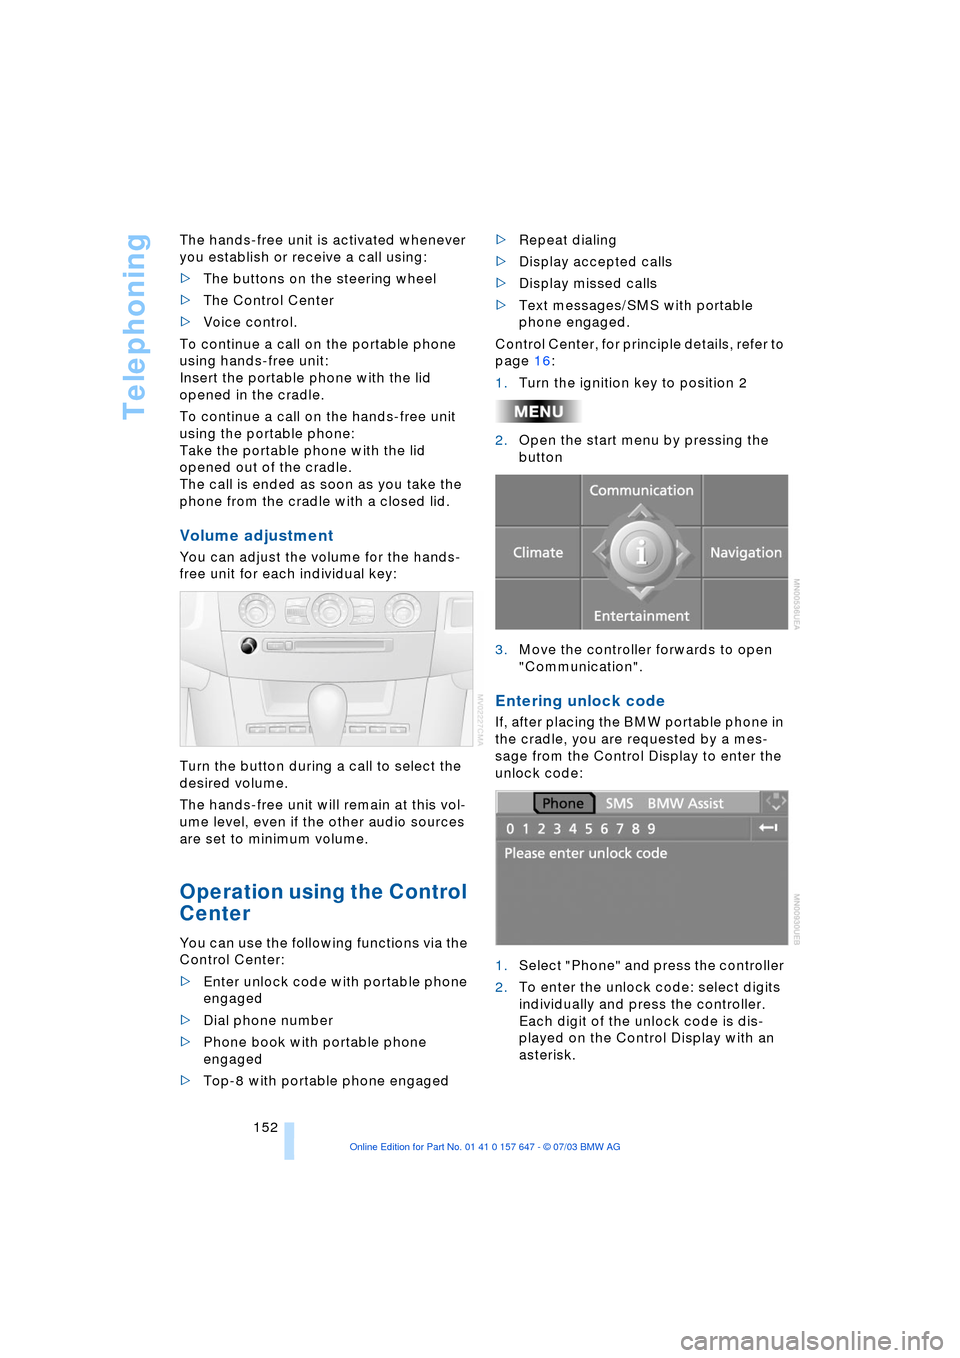
Operation using the Control
Center
You can use the following functions via the
Control Center:
>Enter unlock code with portable phone
engaged
>Dial phone number
>Phone book with portable phone
engaged
>Top-8 with portable phone engaged>Repeat dialing
>Display accepted calls
>Display missed calls
>Text messages/SMS with portable
phone engaged.
Control Center, for principle details, refer to
page 16:
1.Turn the ignition key to position 2
2.Open the start menu by pressing the
button
3.Move the controller forwards to open
"Communication".
Entering unlock code
If, after placing the BMW portable phone in
the cradle, you are requested by a mes-
sage from the Control Display to enter the
unlock code:
1.Select "Phone" and press the controller
2.To enter the unlock code: select digits
individually and press the controller.
Each digit of the unlock code is dis-
played on the Control Display with an
asterisk.
Page 159 of 220
157
Entertainment
Reference
At a glance
Controls
Driving tips Communications
Navigation
Mobility
Operation by voice control*
The concept
You can operate your phone without having
to remove your hands from the steering
wheel. The system operates on the basis of
voice commands that you will learn easily
after using them a few times. In addition,
you are also supported by instructions or
questions.
Symbols used
Voice commands
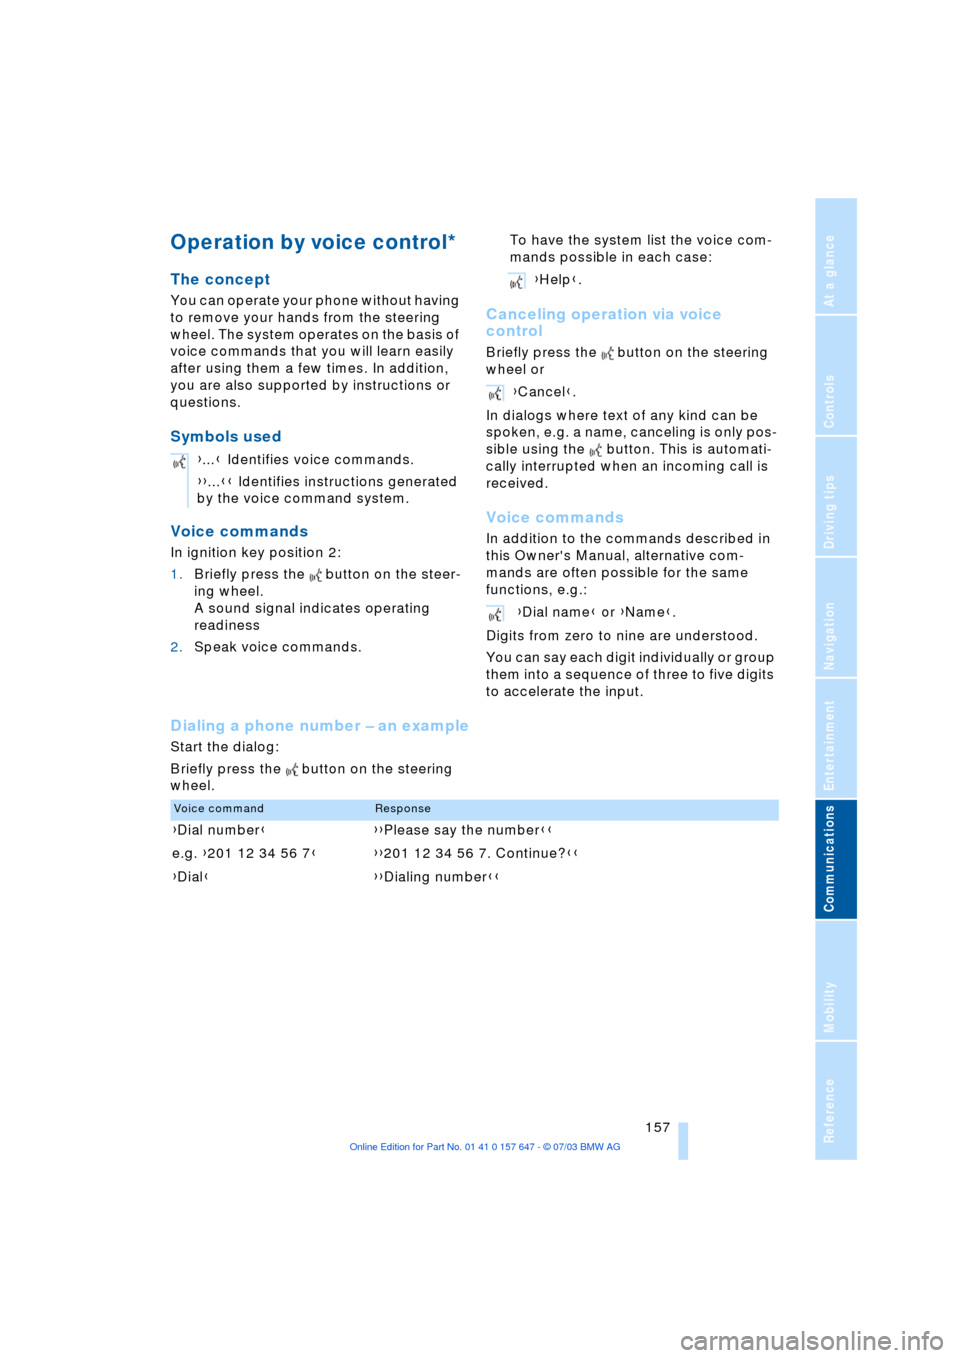
In ignition key position 2:
1.Briefly press the button on the steer-
ing wheel.
A sound signal indicates operating
readiness
2.Speak voice commands.To have the system list the voice com-
mands possible in each case:
Canceling operation via voice
control
Briefly press the button on the steering
wheel or
In dialogs where text of any kind can be
spoken, e.g. a name, canceling is only pos-
sible using the button. This is automati-
cally interrupted when an incoming call is
received.
Voice commands
In addition to the commands described in
this Owner's Manual, alternative com-
mands are often possible for the same
functions, e.g.:
Digits from zero to nine are understood.
You can say each digit individually or group
them into a sequence of three to five digits
to accelerate the input.
Dialing a phone number Ð an example
Start the dialog:
Briefly press the button on the steering
wheel.{...} Identifies voice commands.
{{...}} Identifies instructions generated
by the voice command system.
{Help}.
{Cancel}.
{Dial name} or {Name}.
Voice commandResponse
{Dial number}{{Please say the number}}
e.g. {201 12 34 56 7}{{201 12 34 56 7. Continue?}}
{Dial}{{Dialing number}}
Page 178 of 220
Wheels and tires
176 can estimate the possible distance for con-
tinued driving on the basis of the following
guide values:
>With low load:
1 to 2 persons without luggage:
Approx. 155 miles/250 km
>With medium load:
2 persons, luggage compartment full, or
4 persons without luggage:
Approx. 90 miles/150 km
>With full load:
4 persons or more, luggage compart-
ment full:
Approx. 30 miles/50 km.
Drive reservedly and do not exceed a
speed of 50 mph/80 km/h. With infla-
tion pressure loss, the driving characteris-
tics change, for example reduced track sta-
bility on braking, extended braking
distance, and altered self-steering charac-
teristics.
For safety reasons, BMW recommends that
you do not have damaged run-flat tires
repaired and that you consult your BMW
center in this case.<
Snow chains*
BMW only tests certain snow chains, clas-
sifies them as road-safe and approves
them. Consult your BMW center for more
information. BMW recommends only using
these approved, narrow-link snow chains.
These snow chains are approved exclu-
sively for use on summer or winter tires in
pairs on the rear wheels.
Observe the manufacturer's instructions
when installing snow chains.
Do not exceed a vehicle speed of 30 mph/
50 km/h with the chains mounted.
After mounting snow chains, do not
activate the Flat Tire Monitor.
When you are driving with snow chains, it
can be beneficial to switch off DSC briefly,
refer to page 78.<
Page 189 of 220
Mobility
187Reference
At a glance
Controls
Driving tips
Communications
Navigation
Entertainment
Changing a wheel
Safety measures in the event of a
breakdown or wheel change:
Park the vehicle as far away as possible
from moving traffic and on firm ground.
Switch on the hazard warning flashers.
Lock the steering wheel in straight-ahead
setting of the wheels. Apply the handbrake
and engage first gear, reverse gear or
selector lever to position P.
Have all vehicle occupants get out of the
vehicle and ensure that they remain outside
the immediate area in a safe place, such as
behind a guardrail.
If a warning triangle or portable hazard
warning lamp is required, set it up on the
roadside at an appropriate distance from
the rear of the vehicle.
Comply with all safety guidelines and regu-
lations.
Change the wheel only on a level, firm sur-
face which is not slippery.
The vehicle or the jack could slip to the side
if you attempt to raise the vehicle on a soft
or slippery surface such as snow, ice, tiles,
etc.
Position the jack on a firm support surface.
Do not use a wooden block or similar
object as a support base for the jack, as
this would prevent it from extending to its
full support height and reduce its load-car-
rying capacity.
To avoid serious or fatal injury: never lie
under the vehicle, and never start the
engine while it is supported by the jack.<
What you will need
To avoid rattling noises later on, note the
positions of the tools before removing
them, then return them to their initial posi-
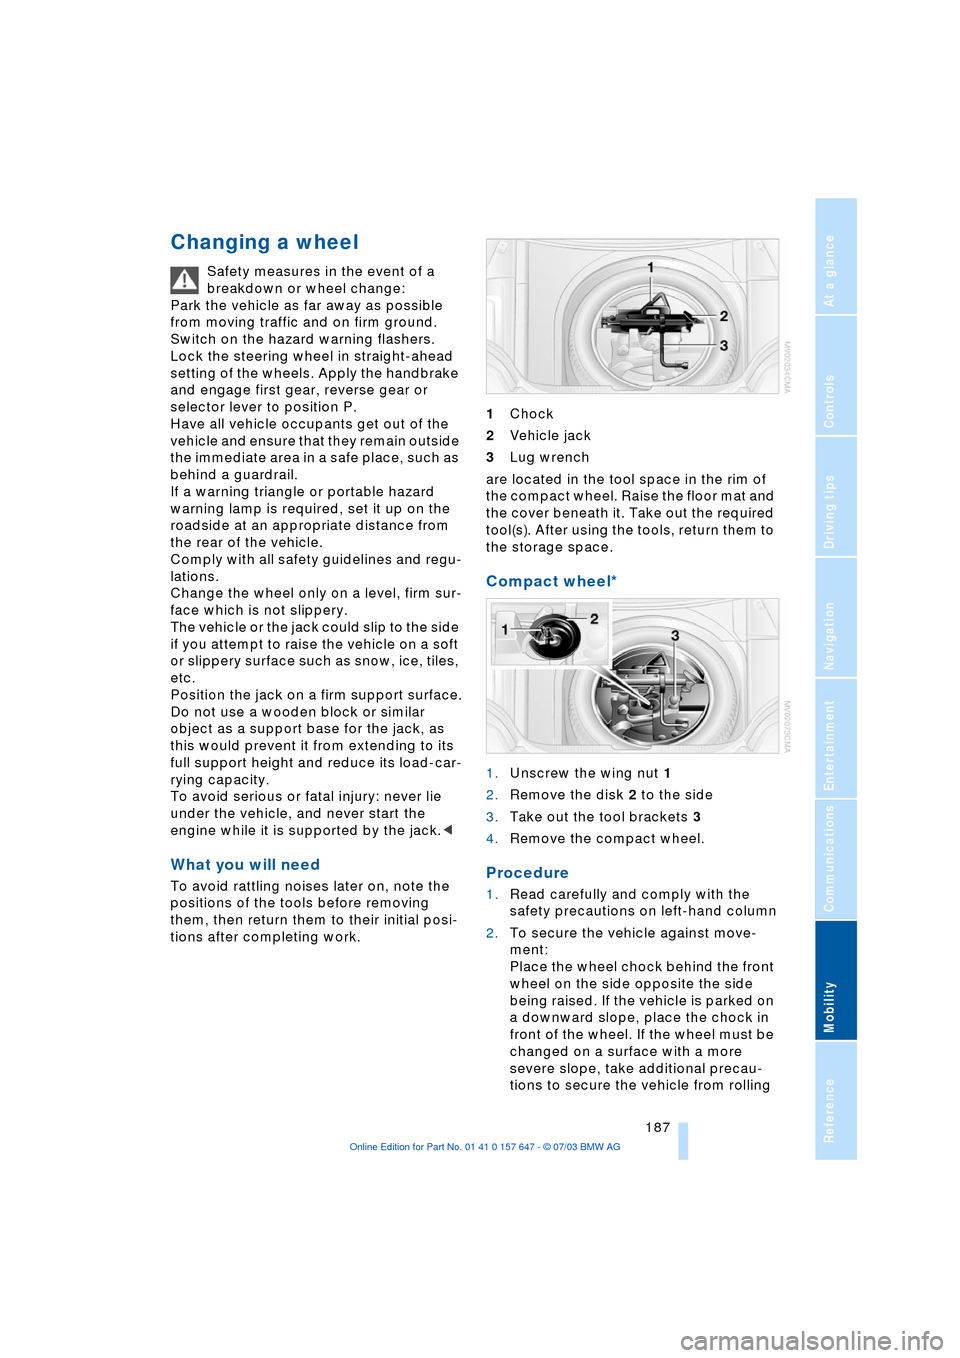
tions after completing work.1Chock
2Vehicle jack
3Lug wrench
are located in the tool space in the rim of
the compact wheel. Raise the floor mat and
the cover beneath it. Take out the required
tool(s). After using the tools, return them to
the storage space.
Compact wheel*
1.Unscrew the wing nut 1
2.Remove the disk 2 to the side
3.Take out the tool brackets 3
4.Remove the compact wheel.
Procedure
1.Read carefully and comply with the
safety precautions on left-hand column
2.To secure the vehicle against move-
ment:
Place the wheel chock behind the front
wheel on the side opposite the side
being raised. If the vehicle is parked on
a downward slope, place the chock in
front of the wheel. If the wheel must be
changed on a surface with a more
severe slope, take additional precau-
tions to secure the vehicle from rolling