Page 19 of 284
This could cause
very serious injuries in a crash.
If a seat belt does not seem to work
as it should, it may not protect the
occupant in a crash.
If the seat belt touches or crosses
your neck, or if it crosses your arm
instead of your shoulder, you need to
adjust the seat belt anchor height.
To adjust the height of a f ront seat
belt anchor, squeeze the two release
buttons and slide the anchor up or
down as needed (it has f our
positions).
See page f or additional
inf ormation about your seat belts
and how to take care of them.Anyone using a
seat belt that is not working properly
can be seriously injured or killed.
Have your Acura dealer check the
belt as soon as possible.
19
Protecting A dults and Teens
Driver and Passenger Saf ety
Never place t he shoulder port ion of alap/shoulder belt under your arm orbehind your back.
No one should sit in a seat wit h aninoperat ive seat belt .
15
RELEASE
BUTTONS
Page 69 of 284

Between 6,000 miles (9,600 km) and
7,500 miles (12,000 km), it will light
f or 2 seconds when you f irst turn the
ignition switch to ON (II), and then
f lash f or 10 seconds.
If you exceed 7,500 miles (12,000
km) without having the scheduled
maintenance perf ormed, this
indicator will remain on as a constant
reminder.
Your dealer will reset this indicator
af ter completing the scheduled
maintenance. If this maintenance is
done by someone other than your
Acura dealer, reset the indicator as
f ollows.
This indicator reminds you that it is
time to take your vehicle in for
scheduled maintenance.
Ref er to the Maintenance Schedules
f or Normal and Severe Driving
Conditions on pages and .
For the f irst 6,000 miles (9,600 km)
af ter the Maintenance Required
Indicator is reset, it will come on f or
2 seconds when you turn the ignition
switch to ON (II).
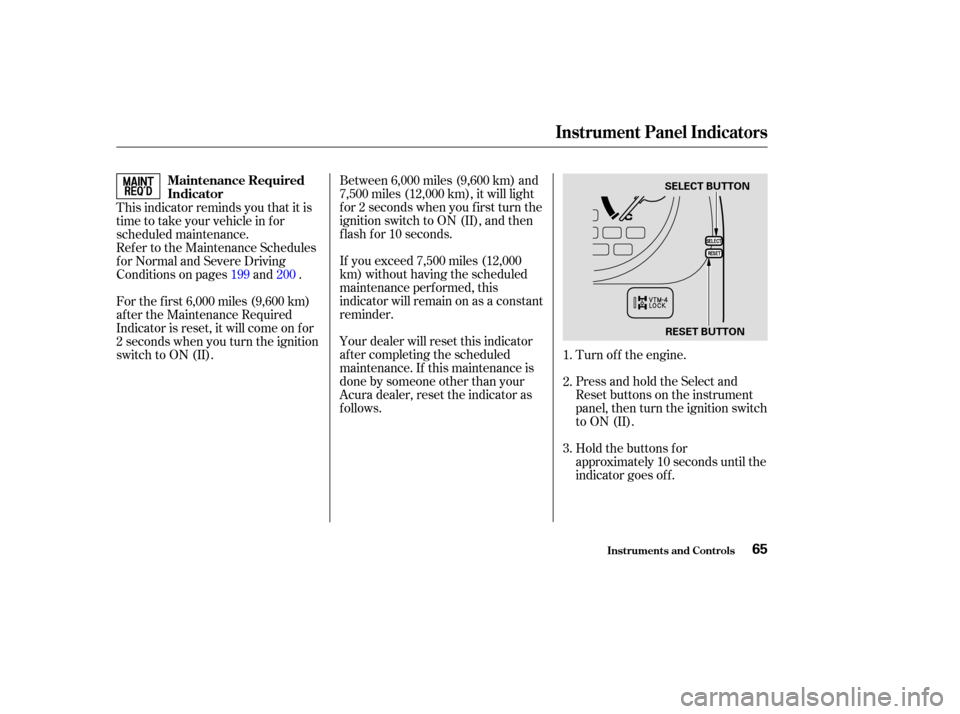
Turn of f the engine.
Press and hold the Select and
Reset buttons on the instrument
panel, then turn the ignition switch
to ON (II).
Hold the buttons for
approximately 10 seconds until the
indicator goes of f .
1.
2.
3.
199 200
Inst rument s and Cont rols
Instrument Panel Indicators
Maintenance Required
Indicator
65
RESET BUTTON
SELECT BUTTON
Page 87 of 284

On Touring Model
You can turn the driving position
memory activation off and on. To
turn it of f , press and hold the LOCK
and UNLOCK buttons at the same
time f or about one second. The LED
in the remote transmitter will blink
twice. Then release the buttons.
To turn it back on, repeat this
procedure. The LED will come on
f or one second to indicate the
f eature has been turned on.
Each remote transmitter will also
activate the Driving Position
Memory System (see page ).
When you unlock the driver’s door
with the remote transmitter, you will
hear a beep. The driver’s seat and
outside mirrors move to the
positions stored in that memory
location. You will hear two beeps
when the movement is complete. If the seat and mirrors are already in
the proper positions, you will hear
three beeps when you open the door.
The driving position memory
activated (Memory 1, Memory 2) is
shownonthebackof each
transmitter. Make sure you store
your desired driving position in the
memory that is activated by the
transmitter you normally carry.
94
Inst rument s and Cont rols
Remote Transmitter
Recalling a Memorized Driving Position
83
With Memory 1 With Memory 2
Page 92 of 284

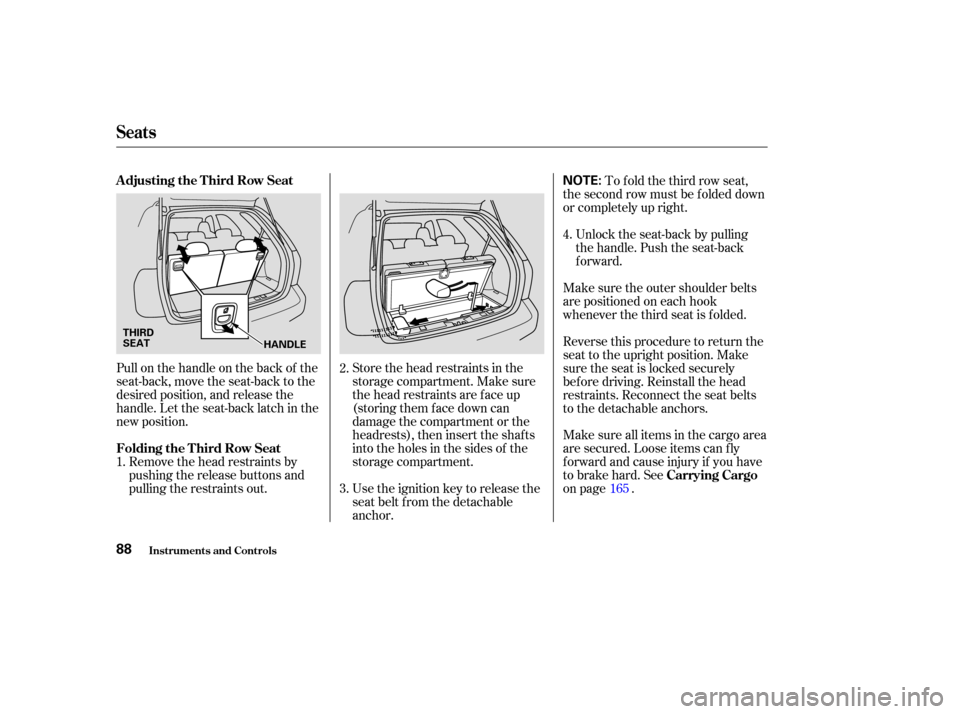
Store the head restraints in the
storage compartment. Make sure
the head restraints are f ace up
(storing them face down can
damage the compartment or the
headrests), then insert the shaf ts
into the holes in the sides of the
storage compartment.
Pull on the handle on the back of the
seat-back, move the seat-back to the
desired position, and release the
handle. Let the seat-back latch in the
new position.
Use the ignition key to release the
seat belt from the detachable
anchor.Unlock the seat-back by pulling
the handle. Push the seat-back
forward.
Make sure the outer shoulder belts
are positioned on each hook
whenever the third seat is f olded.
Remove the head restraints by
pushing the release buttons and
pulling the restraints out. To f old the third row seat,
the second row must be f olded down
or completely up right.
Reverse this procedure to return the
seat to the upright position. Make
sure the seat is locked securely
bef ore driving. Reinstall the head
restraints. Reconnect the seat belts
to the detachable anchors.
Make sure all items in the cargo area
are secured. Loose items can f ly
f orward and cause injury if you have
to brake hard. See
on page .
1. 2.
3.4.
165
Seats
Inst rument s and Cont rols
A djusting the T hird Row Seat
Folding the T hird Row Seat Carrying Cargo
88
NOTE:
HANDLE
THIRD
SEAT
Page 98 of 284

Touring Model
Seat and outside mirror positions,
canbestoredinseparatememories.
Youselectamemorizedpositionby
pushing the appropriate button or
using the appopriate remote
transmitter (Memory 1 or Memory2).Store a driving position only when
the vehicle is parked.
Turn the ignition switch to ON (II).
You cannot add a new driving
position in the memory unless the
ignition switch is the ON (II)
position. You can recall a
memorized position with the
ignition switch in any position.
Adjust the seat to a comfortable
position (see page ).
Adjust the outside mirrors f or best
visibility (see page ). Press and release the MEMO
buttononthecontrolpanel.You
will hear a beep. Immediately
press and hold one of the memory
buttons (1 or 2) until you hear two
beeps. The indicator in the
memory button will come on. The
current positions of the driver’s
seat and outside mirrors are now
stored.
Your Acura has a memory f eature
f or the driver’s seat and outside
mirror positions.
3.
1.
2.
84
93
St oring a Driving Posit ion in Memory
Inst rument s and Cont rols
Driving Posit ion Memory Syst em
94
MEMO BUTTON
MEMORY BUTTONS
Page 107 of 284

The climate control system in your
Acura provides a comf ortable driving
environment in all weather
conditions.
The standard audio system has
many f eatures. This section de-
scribes those f eatures and how to
use them. (If you selected an
optional audio system, ref er to the
operating instructions that came
with it.)
Your Acura has an anti-theft audio
system that requires a code number
to enable it..............
Vents, Heating, and A/C . 104
.............................
Airflow Buttons .105
...................
Rear Climate Control . 109
..............
Climate Control Sensors . 109
..........................
Playing the Radio .110
............................
Radio Reception .113
..................................
Playing a CD .115
....................
Protecting Your CDs .119
.........
CD Player Error Messages . 120
.....
CD Changer Error Messages . 122
...............................
Playing a Tape .125
.............
Steering Wheel Controls . 128
.................
Radio Thef t Protection . 129
..........................
Setting the Clock .130
........
Rear Entertainment System . 131
............................
Security System .143
...............................
Cruise Control .144
..............................
Trip Computer .146
........................
Rear View Camera .152
HomeLink Universal ................................
Transceiver .153
Comf ort and Convenience Features
Comf ort and Convenience Feat ures103
Page 108 of 284
Vents, Heating, and A/C
Comf ort and Convenience Feat ures104
RECIRCULATION BUTTONTEMPERATURE BUTTONSTEMPERATURE DISPLAY
AUTO BUTTON
OFF BUTTON
DEFROST BUTTON REAR A/C CONTROL
(Without Navigation System) (With Navigation System)
A/C
BUTTON
MODE
BUTTON FAN SPEED
BUTTON A/C
ICON
MODE
ICON
FAN SPEED
ICONS
Page 109 of 284

�Ú�Ü
�Û
�Ý
Push the button to increase the
temperature of air f low. Push the
button to decrease it. When you set
the temperature to its lower limit or
its upper limit, the system runs at f ull
cooling or heating only. It does not
regulate the interior temperature.
This button or icon turns the air
conditioningonandoff.Youwillsee
A/C ON or A/C OFF in the display. The outside air intakes f or the
heating and cooling system are at
the base of the windshield. Keep this
area clear of leaves and other debris.
ThesystemshouldbeleftinFresh
Air mode under almost all conditions.
Keeping the system in Recirculation
mode, particularly with the A/C of f ,
can cause the windows to fog up.
Switch to Recirculation mode when
driving through dusty or smoky
conditions, then return to Fresh Air
mode.
This button turns the rear window
def ogger on and of f (see page ). When the indicator in the button is
on, air f rom the vehicle’s interior is
recirculated throughout the system.
When the indicator is off, air is
brought in f rom the outside of the
vehicle (Fresh Air mode).
Push the button or icon to
increase the f an speed and air f low.
Push the button or icon to
decrease it.
Use the mode control button or icon
to select the vents the air flows from.
Air flows from the center
and corner vents in the dashboard.
Airf low is divided between
the vents in the dashboard and the
f loor vents.
Air f lows f rom the f loor
vents.
Airf low is divided between
the f loor vents and the def roster
vents at the base of the windshield.
Air f lows f rom the def roster
vents at the base of the windshield.
When you select , the system
automatically switches to Fresh Air
mode and turns on the A/C.
75
Comf ort and Convenience Feat ures
Fan Control Button/Icon
Temperature Control Buttons
Air Conditioning (A/C) Button/
Icon Recirculation Button
Rear Window Def ogger Button Mode Control Button/Icon
Airf low Buttons
105