Page 511 of 2234
A77399
Seal Packing
A77400NutNut
A
BC
A A
AAB
14±152
±
ENGINE MECHANICALCHAIN SUB±ASSY(1AZ±FE)
AVENSIS REPAIR MANUAL (RM1018E)
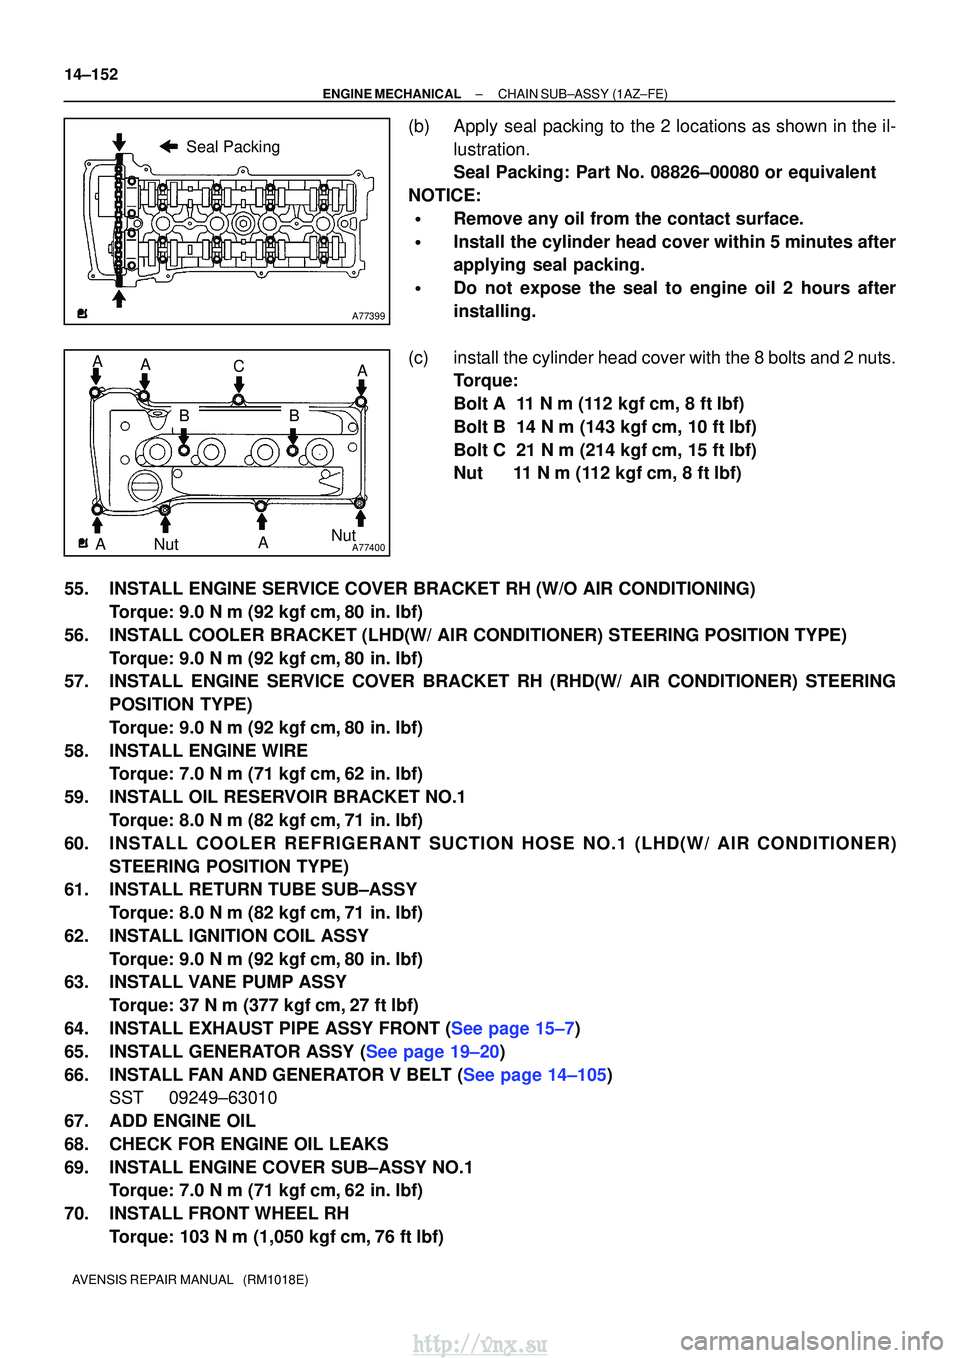
(b)Apply seal packing to the 2 locations as shown in the il- lustration.
Seal Packing: Part No. 08826±00080 or equivalent
NOTICE:
�Remove any oil from the contact surface.
�Install the cylinder head cover within 5 minutes after
applying seal packing.
�Do not expose the seal to engine oil 2 hours after
installing.
(c)install the cylinder head cover with the 8 bolts and 2 nuts. Torque:
Bolt A 11 N�m (112 kgf�cm, 8 ft�lbf)
Bolt B 14 N�m (143 kgf�cm, 10 ft�lbf)
Bolt C 21 N�m (214 kgf�cm, 15 ft�lbf)
Nut 11 N �m (112 kgf�cm, 8 ft �lbf)
55.INSTALL ENGINE SERVICE COVER BRACKET RH (W/O AIR CONDITIONING) Torque: 9.0 N �m (92 kgf�cm,80 in. �lbf)
56.INSTALL COOLER BRACKET (LHD(W/ AIR CONDITIONER) STEERING POSITION TYPE) Torque: 9.0 N �m (92 kgf�cm,80 in. �lbf)
57.INSTALL ENGINE SERVICE COVER BRACKET RH (RHD(W/ AIR CONDITIONER) STEERING
POSITION TYPE)
Torque: 9.0 N �m (92 kgf�cm,80 in. �lbf)
58.INSTALL ENGINE WIRE Torque: 7.0 N �m (71 kgf�cm,62 in. �lbf)
59.INSTALL OIL RESERVOIR BRACKET NO.1 Torque: 8.0 N �m (82 kgf�cm,71 in. �lbf)
60.IN STALL COOL ER REFRIGERANT SUCTION HOSE NO.1 (LHD(W/ AIR CONDITION ER)
STEERING POSITION TYPE)
61.INSTALL RETURN TUBE SUB±ASSY
Torque: 8.0 N �m (82 kgf�cm,71 in. �lbf)
62.INSTALL IGNITION COIL ASSY Torque: 9.0 N �m (92 kgf�cm,80 in. �lbf)
63.INSTALL VANE PUMP ASSY
Torque: 37 N �m (377 kgf�cm,27 ft�lbf)
64.INSTALL EXHAUST PIPE ASSY FRONT (See page 15±7)
65.INSTALL GENERATOR ASSY (See page 19±20)
66.INSTALL FAN AND GENERATOR V BELT (See page 14±105) SST 09249±63010
67. ADD ENGINE OIL
68. CHECK FOR ENGINE OIL LEAKS
69. INSTALL ENGINE COVER SUB±ASSY NO.1 Torque: 7.0 N �m (71 kgf �cm, 62 in. �lbf)
70. INSTALL FRONT WHEEL RH Torque: 103 N� m (1,050 kgf�cm, 76 ft �lbf)
http://vnx.su
Page 514 of 2234
A77283
A77284
A77285
Unleaded Gasoline
Timing
Marks
�eaded Gasoline
Timing
Marks
Timing
Marks
Timing
Marks
±
ENGINE MECHANICAL CHAIN SUB±ASSY (1AZ±FE)
14±141
AVENSIS REPAIR MANUAL (RM1018E)
19. REMOVE ENGINE SERVICE COVER BRACKET RH (RHD(W/ AIR CONDITIONER) STEERING
POSITION TYPE)
(a) Remove the bolt and the engine service cover bracket RH.
20. REMOVE IGNITION COIL ASSY
(a) Remove the 4 bolts and 4 ignition coils.
21. REMOVE CYLINDER HEAD COVER SUB±ASSY
(a) Disconnect the 2 PCV hoses from the cylinder head cov-er.
(b) Remove the 8 bolts and 2 nuts, and then remove the cylin- der head cover and gasket.
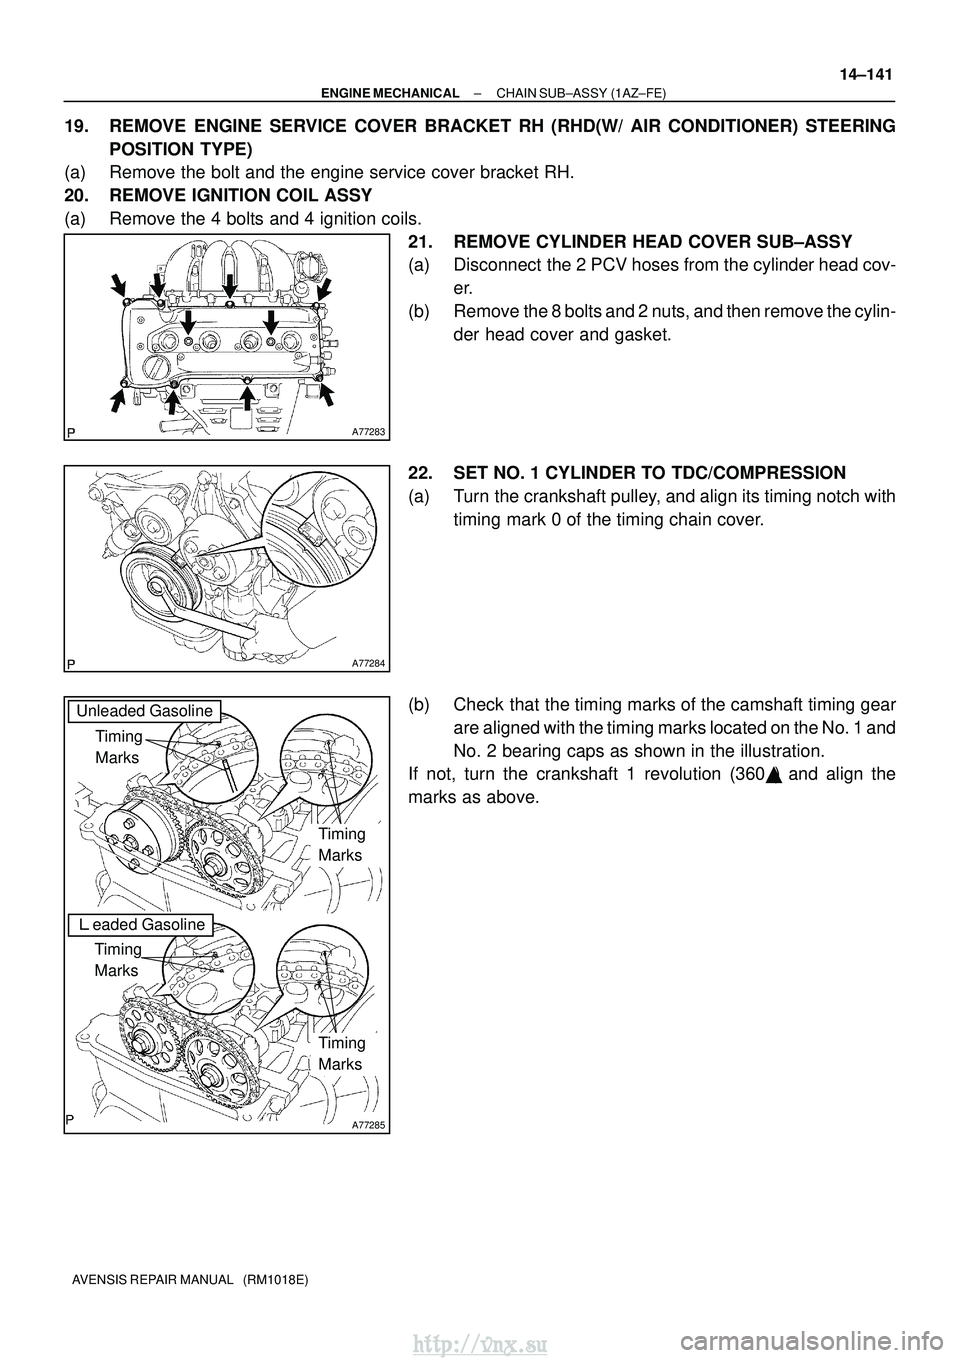
22. SET NO. 1 CYLINDER TO TDC/COMPRESSION
(a) Turn the crankshaft pulley, and align its timing notch with timing mark 0 of the timing chain cover.
(b) Check that the timing marks of the camshaft timing gear are aligned with the timing marks located on the No. 1 and
No. 2 bearing caps as shown in the illustration.
If not, turn the crankshaft 1 revolution (360 �) and align the
marks as above.
http://vnx.su
Page 521 of 2234
A77389
Timing MarksMark Links
Timing Mark
A77290
Hold
Stopper
A32629
A77390Seal Packing
14±148
±
ENGINE MECHANICAL CHAIN SUB±ASSY (1AZ±FE)
AVENSIS REPAIR MANUAL (RM1018E)
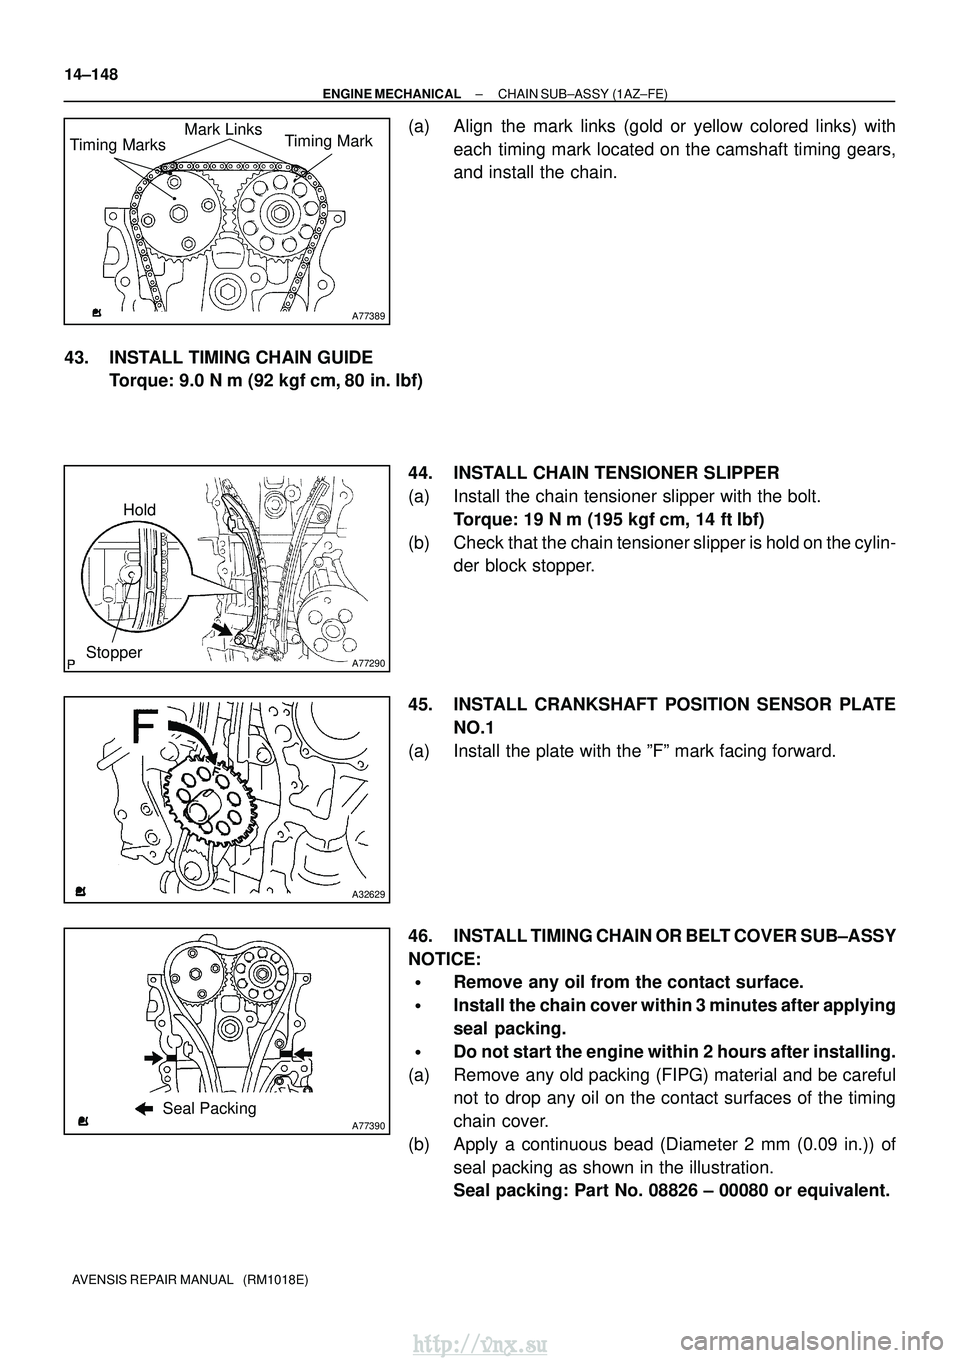
(a) Align the mark links (gold or yellow colored links) with each timing mark located on the camshaft timing gears,
and install the chain.
43. INSTALL TIMING CHAIN GUIDE Torque: 9.0 N �m (92 kgf �cm, 80 in. �lbf)
44. INSTALL CHAIN TENSIONER SLIPPER
(a) Install the chain tensioner slipper with the bolt. Torque: 19 N �m (195 kgf� cm, 14 ft�lbf)
(b) Check that the chain tensioner slipper is hold on the cylin- der block stopper.
45. INSTALL CRANKSHAFT POSITION SENSOR PLATE NO.1
(a) Install the plate with the ºFº mark facing forward.
46. INSTALL TIMING CHAIN OR BELT COVER SUB±ASSY
NOTICE:
�Remove any oil from the contact surface.
�Install the chain cover within 3 minutes after applying
seal packing.
�Do not start the engine within 2 hours after installing.
(a) Remove any old packing (FIPG) material and be careful not to drop any oil on the contact surfaces of the timing
chain cover.
(b) Apply a continuous bead (Diameter 2 mm (0.09 in.)) of seal packing as shown in the illustration.
Seal packing: Part No. 08826 ± 00080 or equivalent.
http://vnx.su
Page 524 of 2234
A77395
Engine
Front
A77396
Hook
PinTurn
Disconnect
A77397
Push Turn
Plunger
A77398
A
B
A
A
±
ENGINE MECHANICAL CHAIN SUB±ASSY (1AZ±FE)
14±151
AVENSIS REPAIR MANUAL (RM1018E)
(b) Install a new gasket chain tensioner with the 2 nuts.
Torque: 9.0 N �m (92 kgf �cm, 80 in. �lbf)
NOTICE:
If the hook is released wile inserting, apply the hook again,
and insert the chain tensioner.
(c) Turn the crankshaft counterclockwise, and check that the
hook is disengaged from the plunger knock pin.
(d) Turn the crankshaft clockwise, and check that the plunger is extended.
52. INSTALL TRANSVERSE ENGINE ENGINE MOUNTING INSULATOR Torque: 52 N �m (530 kgf� cm, 38 ft�lbf)
53. INSTALL ENGINE MOUNTING BRACKET NO.2 RH Torque:
A 52 N� m (530 kgf� cm, 38 ft�lbf)
B 113 N� m (1,152 kgf �cm, 83 ft �lbf)
54. INSTALL CYLINDER HEAD COVER SUB±ASSY
(a) Remove any old seal packing (FIPG) material.
http://vnx.su
Page 525 of 2234
A77399
Seal Packing
A77400NutNut
A
BC
A A
AAB
14±152
±
ENGINE MECHANICALCHAIN SUB±ASSY(1AZ±FE)
AVENSIS REPAIR MANUAL (RM1018E)
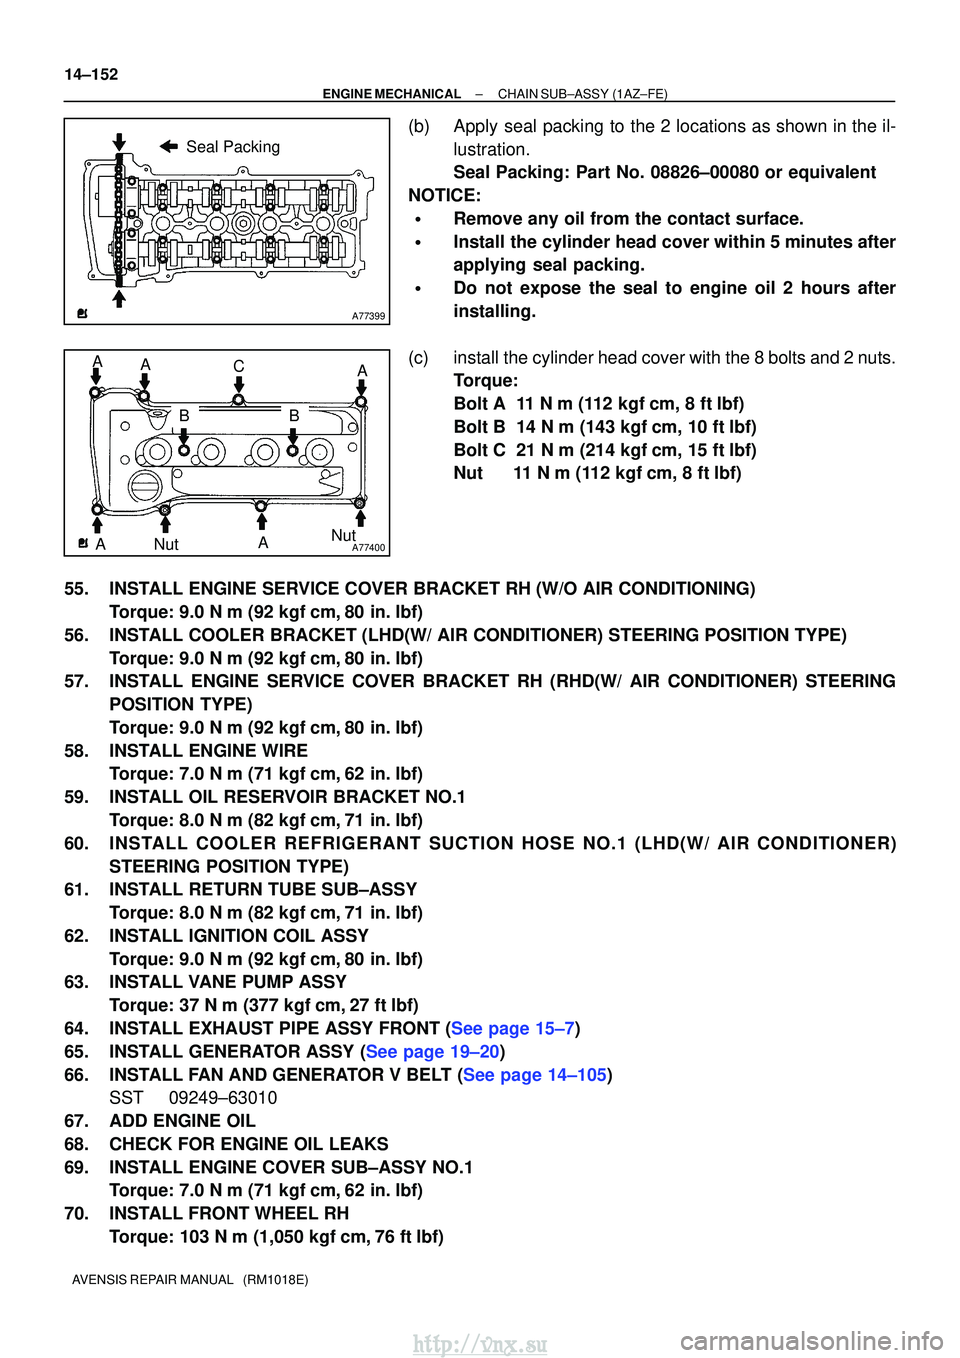
(b)Apply seal packing to the 2 locations as shown in the il- lustration.
Seal Packing: Part No. 08826±00080 or equivalent
NOTICE:
�Remove any oil from the contact surface.
�Install the cylinder head cover within 5 minutes after
applying seal packing.
�Do not expose the seal to engine oil 2 hours after
installing.
(c)install the cylinder head cover with the 8 bolts and 2 nuts. Torque:
Bolt A 11 N�m (112 kgf�cm, 8 ft�lbf)
Bolt B 14 N�m (143 kgf�cm, 10 ft�lbf)
Bolt C 21 N�m (214 kgf�cm, 15 ft�lbf)
Nut 11 N �m (112 kgf�cm, 8 ft �lbf)
55.INSTALL ENGINE SERVICE COVER BRACKET RH (W/O AIR CONDITIONING) Torque: 9.0 N �m (92 kgf�cm,80 in. �lbf)
56.INSTALL COOLER BRACKET (LHD(W/ AIR CONDITIONER) STEERING POSITION TYPE) Torque: 9.0 N �m (92 kgf�cm,80 in. �lbf)
57.INSTALL ENGINE SERVICE COVER BRACKET RH (RHD(W/ AIR CONDITIONER) STEERING
POSITION TYPE)
Torque: 9.0 N �m (92 kgf�cm,80 in. �lbf)
58.INSTALL ENGINE WIRE Torque: 7.0 N �m (71 kgf�cm,62 in. �lbf)
59.INSTALL OIL RESERVOIR BRACKET NO.1 Torque: 8.0 N �m (82 kgf�cm,71 in. �lbf)
60.IN STALL COOL ER REFRIGERANT SUCTION HOSE NO.1 (LHD(W/ AIR CONDITION ER)
STEERING POSITION TYPE)
61.INSTALL RETURN TUBE SUB±ASSY
Torque: 8.0 N �m (82 kgf�cm,71 in. �lbf)
62.INSTALL IGNITION COIL ASSY Torque: 9.0 N �m (92 kgf�cm,80 in. �lbf)
63.INSTALL VANE PUMP ASSY
Torque: 37 N �m (377 kgf�cm,27 ft�lbf)
64.INSTALL EXHAUST PIPE ASSY FRONT (See page 15±7)
65.INSTALL GENERATOR ASSY (See page 19±20)
66.INSTALL FAN AND GENERATOR V BELT (See page 14±105) SST 09249±63010
67. ADD ENGINE OIL
68. CHECK FOR ENGINE OIL LEAKS
69. INSTALL ENGINE COVER SUB±ASSY NO.1 Torque: 7.0 N �m (71 kgf �cm, 62 in. �lbf)
70. INSTALL FRONT WHEEL RH Torque: 103 N� m (1,050 kgf�cm, 76 ft �lbf)
http://vnx.su
Page 535 of 2234
SST
A09582
B07973
Cut PositionPry
SST
A08528
SST
A09583
Angle
SensorInward
±
ENGINE MECHANICALCRANKSHAFT SEAL(1CD±FTV)
14±343
AVENSIS REPAIR MANUAL (RM1018E)
20.REMOVE TIMING BELT(See page 14±307)
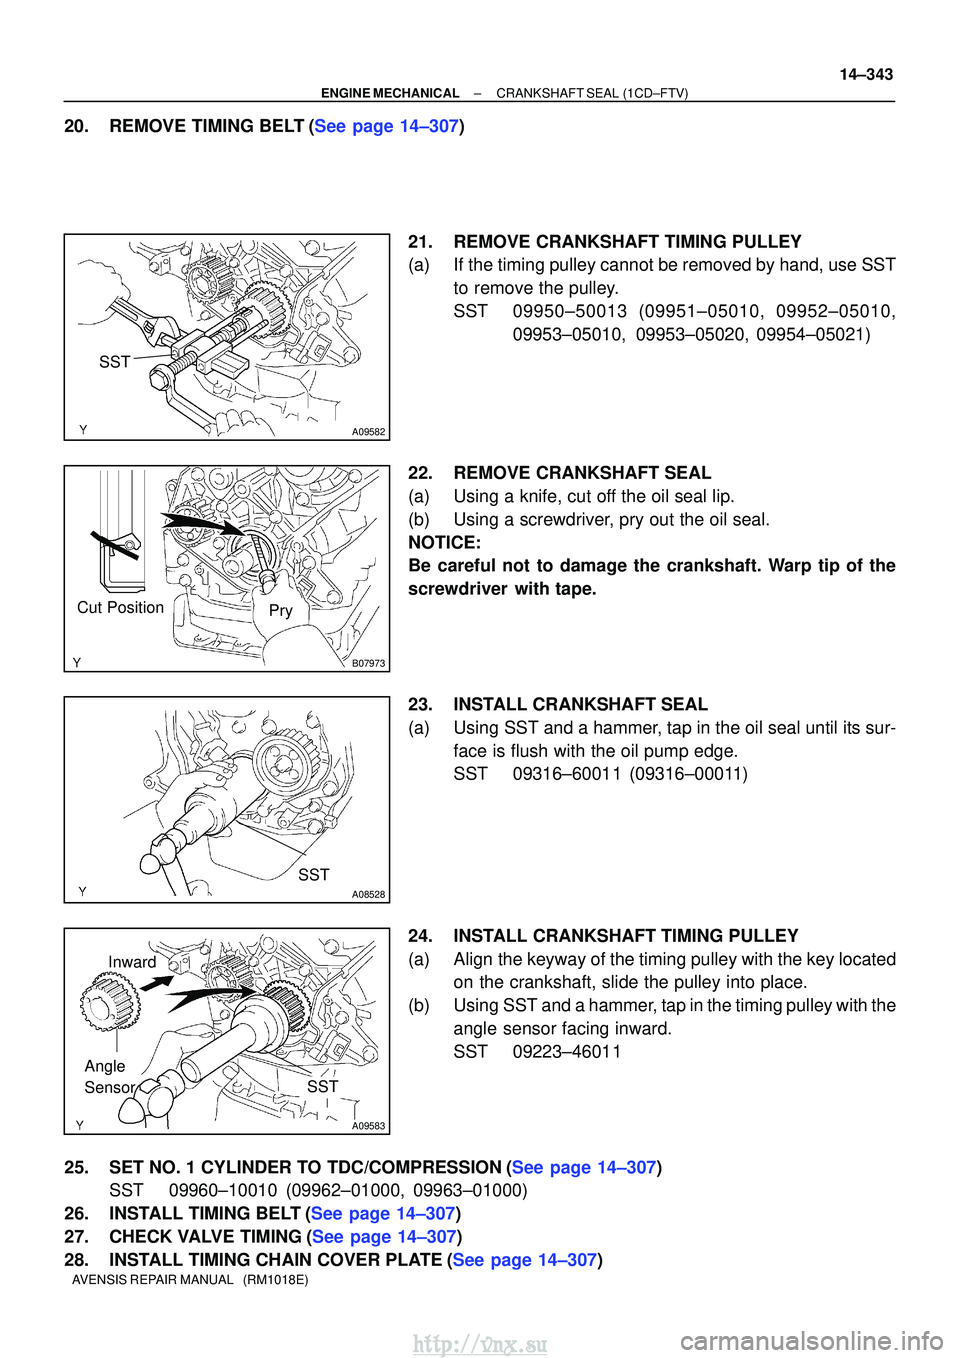
21.REMOVE CRANKSHAFT TIMING PULLEY
(a)If the timing pulley cannot be removed by hand, use SSTto remove the pulley.
SST09950±50013 (09951±05010, 09952±05010, 09953±05010, 09953±05020, 09954±05021)
22.REMOVE CRANKSHAFT SEAL
(a)Using a knife, cut off the oil seal lip.
(b)Using a screwdriver, pry out the oil seal.
NOTICE:
Be careful not to damage the crankshaft. Warp tip of the
screwdriver with tape.
23.INSTALL CRANKSHAFT SEAL
(a)Using SST and a hammer, tap in the oil seal until its sur- face is flush with the oil pump edge.
SST09316±60011 (09316±00011)
24.INSTALL CRANKSHAFT TIMING PULLEY
(a)Align the keyway of the timing pulley with the key located on the crankshaft, slide the pulley into place.
(b)Using SST and a hammer, tap in the timing pulley with the angle sensor facing inward.
SST09223±46011
25.SET NO. 1 CYLINDER TO TDC/COMPRESSION(See page 14±307) SST 09960±10010 (09962±01000, 09963±01000)
26.INSTALL TIMING BELT(See page 14±307)
27.CHECK VALVE TIMING(See page 14±307)
28.INSTALL TIMING CHAIN COVER PLATE(See page 14±307)
http://vnx.su
Page 536 of 2234
14±344
±
ENGINE MECHANICAL CRANKSHAFT SEAL (1CD±FTV)
AVENSIS REPAIR MANUAL (RM1018E)
29.INSTALL TRANSVERSE ENGINE ENGINE MOUNTING BRACKET(See page 14±307)
30.INSTALL TIMING BELT GUIDE(See page 14±307)
31.INSTALL TIMING BELT NO.1 COVER(See page 14±307)
32.INSTALL TIMING BELT NO.2 COVER(See page 14±307)
33.INSTALL IDLER PULLEY SUB±ASSY(See page 14±307)
34.INSTALL CRANKSHAFT PULLEY(See page 14±307) SST 09213±54015 (90105±08076), 09330±00021
35.INSTALL ENGINE MOUNTING INSULATOR SUB±ASSY RH(See page 14±307)
36.INSTALL POWER STEERING IDLE PULLEY BRACKET (See page 14±286)
37. ADJUST V (COOLER COMPRESSOR TO CRANKSHAFT PULLEY) BELT NO.1 (See page 14±269)
38.INSTALL INJECTOR DRIVER (See page 14±286)
39. INSTALL ENGINE COVER NO.1
Torque: 8.0 N �m (82 kgf �cm, 71 in. �lbf)
40. INSTALL FRONT WHEEL RH Torque: 103 N� m (1,050 kgf�cm, 76 ft �lbf)
41. ADD ENGINE OIL
42. CHECK FOR ENGINE OIL LEAKS
http://vnx.su
Page 549 of 2234
A77408
Lot No.
A77437
Cylinder Head
Cylinder Block
Seal Packing
Cylinder
Head Gasket� 2.5 to 3 mm
12.5 to 1.5 mm
A7741012
3
4
10 9
85
67
A00976A77411
90�
Engine
Front Paint Mark
±
ENGINE MECHANICAL CYLINDER HEAD GASKET (1AZ±FE)
14±165
AVENSIS REPAIR MANUAL (RM1018E)
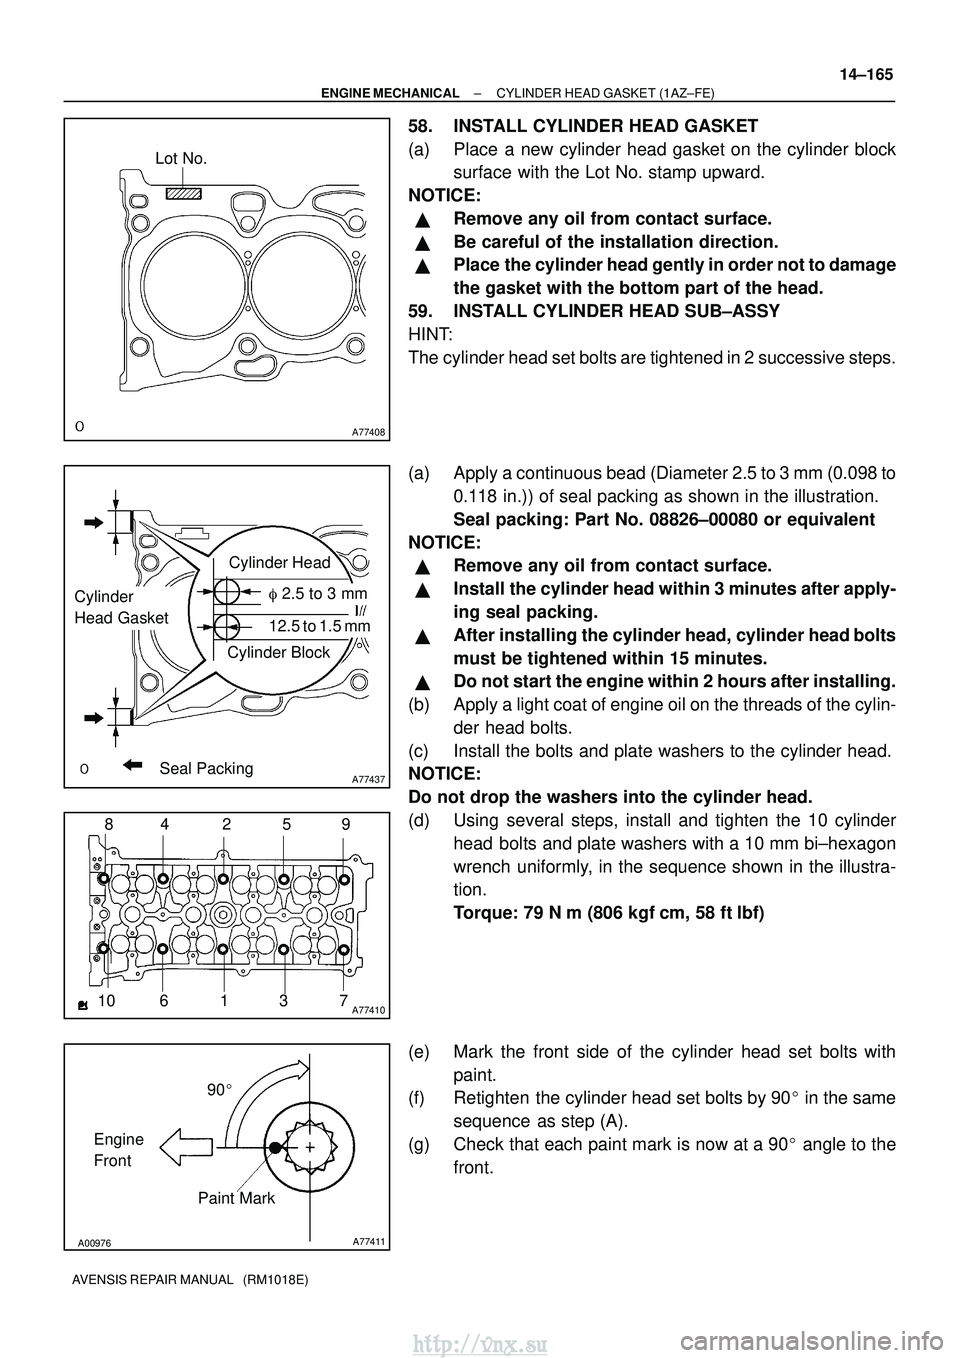
58. INSTALL CYLINDER HEAD GASKET
(a) Place a new cylinder head gasket on the cylinder block
surface with the Lot No. stamp upward.
NOTICE:
�Remove any oil from contact surface.
�Be careful of the installation direction.
�Place the cylinder head gently in order not to damage
the gasket with the bottom part of the head.
59. INSTALL CYLINDER HEAD SUB±ASSY
HINT:
The cylinder head set bolts are tightened in 2 successive steps.
(a) Apply a continuous bead (Diameter 2.5 to 3 mm (0.098 to 0.118 in.)) of seal packing as shown in the illustration.
Seal packing: Part No. 08826±00080 or equivalent
NOTICE:
�Remove any oil from contact surface.
�Install the cylinder head within 3 minutes after apply-
ing seal packing.
�After installing the cylinder head, cylinder head bolts
must be tightened within 15 minutes.
�Do not start the engine within 2 hours after installing.
(b) Apply a light coat of engine oil on the threads of the cylin- der head bolts.
(c) Install the bolts and plate washers to the cylinder head.
NOTICE:
Do not drop the washers into the cylinder head.
(d) Using several steps, install and tighten the 10 cylinder head bolts and plate washers with a 10 mm bi±hexagon
wrench uniformly, in the sequence shown in the illustra-
tion.
Torque: 79 N �m (806 kgf� cm, 58 ft�lbf)
(e) Mark the front side of the cylinder head set bolts with paint.
(f) Retighten the cylinder head set bolts by 90� in the same
sequence as step (A).
(g) Check that each paint mark is now at a 90 � angle to the
front.
http://vnx.su