Page 1136 of 1574

TRANSFER CASE (TOD) 5D2-47
Assembly Procedure Assembly
Before assembly, lubricate all parts with Automatic Transmission Fluid or equivalent.
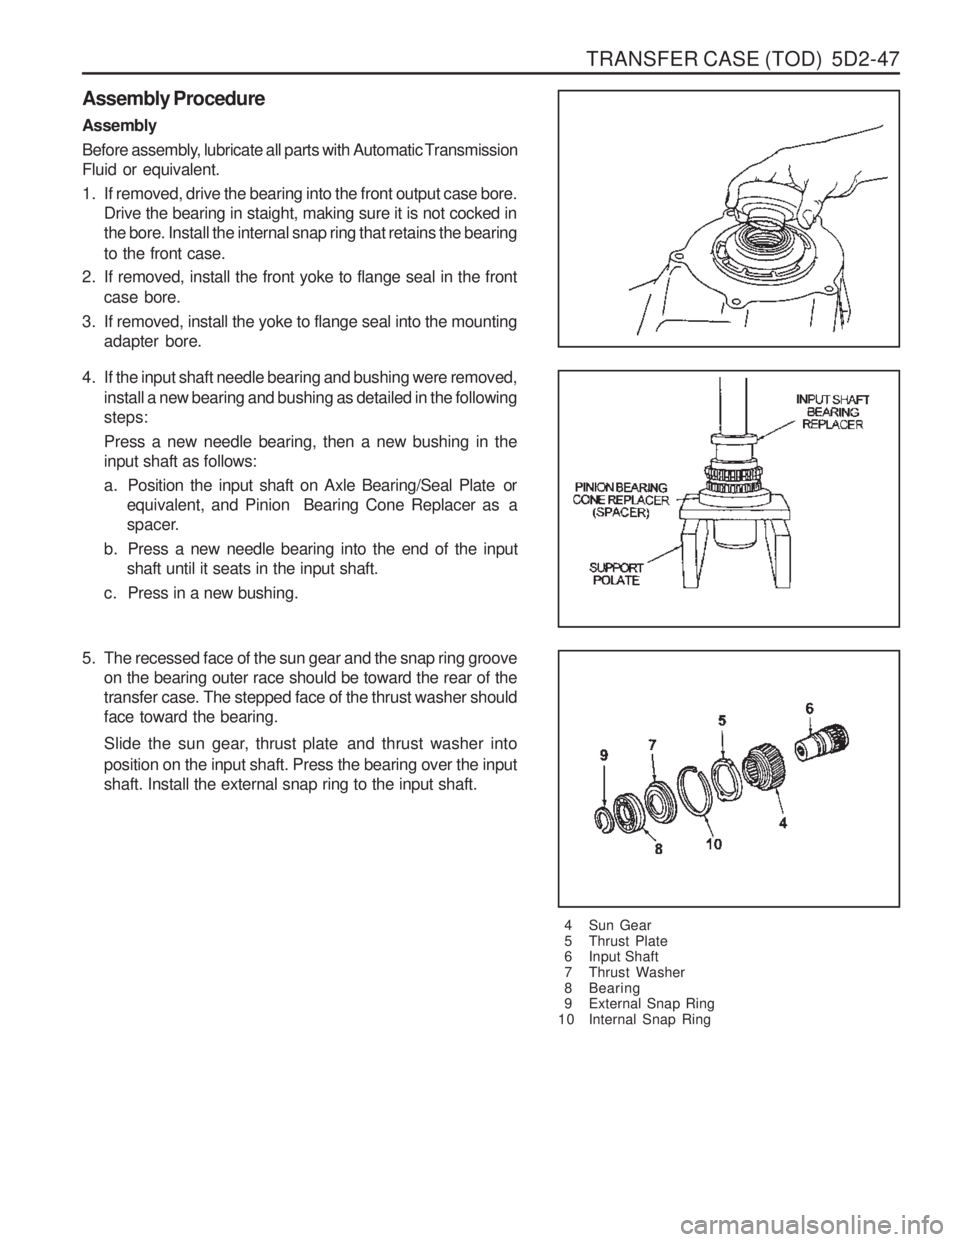
1. If removed, drive the bearing into the front output case bore.Drive the bearing in staight, making sure it is not cocked in the bore. Install the internal snap ring that retains the bearing to the front case.
2. If removed, install the front yoke to flange seal in the front case bore.
3. If removed, install the yoke to flange seal into the mounting adapter bore.
4 Sun Gear
5 Thrust Plate
6 Input Shaft
7 Thrust Washer
8 Bearing
9 External Snap Ring
10 Internal Snap Ring
4. If the input shaft needle bearing and bushing were removed,
install a new bearing and bushing as detailed in the following steps: Press a new needle bearing, then a new bushing in the input shaft as follows:
a. Position the input shaft on Axle Bearing/Seal Plate or equivalent, and Pinion Bearing Cone Replacer as a
spacer.
b. Press a new needle bearing into the end of the input shaft until it seats in the input shaft.
c. Press in a new bushing.
5. The recessed face of the sun gear and the snap ring groove on the bearing outer race should be toward the rear of thetransfer case. The stepped face of the thrust washer shouldface toward the bearing.
Slide the sun gear, thr ust plate and thrust washer into
position on the input shaft. Press the bearing over the input shaft. Install the external snap ring to the input shaft.
Page 1137 of 1574

5D2-48 TRANSFER CASE (TOD)
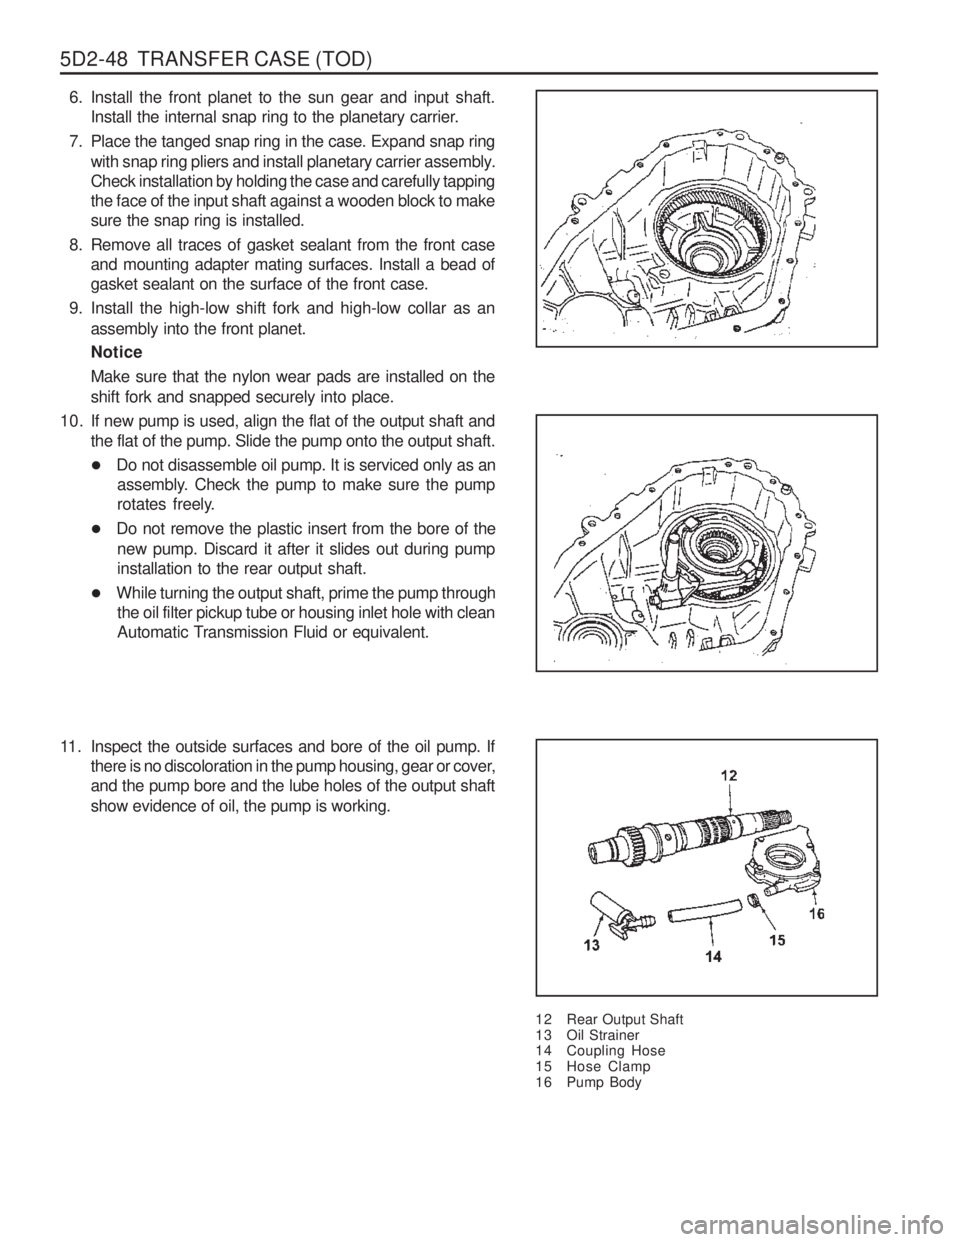
6. Install the front planet to the sun gear and input shaft.Install the internal snap ring to the planetary carrier.
7. Place the tanged snap ring in the case. Expand snap ring with snap ring pliers and install planetary carrier assembly. Check installation by holding the case and carefully tappingthe face of the input shaft against a wooden block to makesure the snap ring is installed.
8. Remove all traces of gasket sealant from the front case and mounting adapter mating surfaces. Install a bead ofgasket sealant on the surface of the front case.
9. Install the high-low shift fork and high-low collar as an assembly into the front planet. Notice Make sure that the nylon wear pads are installed on the shift fork and snapped securely into place.
12 Rear Output Shaft
13 Oil Strainer
14 Coupling Hose
15 Hose Clamp
16 Pump Body
10. If new pump is used, align the flat of the output shaft and
the flat of the pump. Slide the pump onto the output shaft.
�Do not disassemble oil pump. It is serviced only as an
assembly. Check the pump to make sure the pump
rotates freely.
� Do not remove the plastic insert from the bore of the
new pump. Discard it after it slides out during pumpinstallation to the rear output shaft.
� While turning the output shaft, prime the pump through
the oil filter pickup tube or housing inlet hole with clean
Automatic Transmission Fluid or equivalent.
11. Inspect the outside surfaces and bore of the oil pump. If there is no discoloration in the pump housing, gear or cover,and the pump bore and the lube holes of the output shaft show evidence of oil, the pump is working.
Page 1142 of 1574
TRANSFER CASE (TOD) 5D2-53
40. Install the rear case flange on the output shaft. Install therubber seal, output shaft yoke washer and nut. Tighten the nut.
Tightening Torque 137 - 196 Nm
41. Install the drainplug and tighten.
42. Fill the transfer case with 1.4 liters of Automatic Transmission Fluid or equivalent. NoticeFluid level should be just below the filler plug hole.
Tightening Torque 19 - 30 Nm
Tightening Torque 19 - 30 Nm
43. Install the fill pulg and tighten.
44. Install the transfer case as outlined in removal and
Installation, transfer case in the section. NoticeMake sure proper drain and fill plugs are installed if case is replaced.