Page 642 of 1574
1F3-32 OM600 ENGINE CONTROLS
5. Remove the plug (6) and seal (5) from the fuel injection pump and collect oil in a suitable vessel. Installation Notice
Notice Replace the seal.
Tightening Torque 30 Nm
6. Install the locking screw (18) into the injection pump. Notice Before tightening the bolts for the injection timing device and the camshaft sprocket, always remove the locking screw from the injection pump and reinstall the plug.
Locking Screw 601 589 05 21 00
7. Place alignment marks (arrow) on the timing chain (12) and camshaft sprocket (15).
4. Position the no.1 cylinder at A
TDC 15°.
Notice Do not rotate the engine with camshaft sprocket bolt or opposite direction of the engine rotation.
Page 643 of 1574
OM600 ENGINE CONTROLS 1F3-33
9. Pull out the 12-sided stretch bolt (14) and washer andremove the camshaft sprocket (12).
Tightening Torque 46 Nm
11. Using special tool (24, 25), remove the locking pin (8). Sliding Hammer 116 589 20 33 00Threaded Bolt 116 589 02 34 00
8. Remove the chain tensioner (17).
Installation Notice
Tightening Torque 80 Nm
Notice Replace the seal (16).
10. Pull out the bolt (11) and washer (10). Notice Be careful that the bolt is left-hand thread. Installation Notice
Page 656 of 1574
1F3-46 OM600 ENGINE CONTROLS
Tools Required 000 589 77 03 00 Box Wrench Insert 601 589 00 08 00 Flange 601 589 05 21 00 Locking Screw601 589 05 14 00 Assembly CageRemoval
FUEL INJECTION PUMP
Preceding Work : Removal of vacuum pump
Removal of air cleaner housing Removal of intake manifold
18 Chain Tensioner ......................................... 80Nm
19 Seal ....................................................... Replace
20 Bolt(Left-Hand Thread) ..............................46Nm
21 Washer
22 Bolt ............................................................ 23Nm
23 Seal ....................................................... Replace 24 Oil Pan
25 Fuel Injection Pump
26 Seal
....................................................... Replace
27 Screw Plug ................................................. 30Nm
28 Square Nut
Page 659 of 1574
OM600 ENGINE CONTROLS 1F3-49
Installation Procedure
1. Remove the screw plug (27) and seal (26) and collect oil ina vessel.
2. Insert flange (31) onto the injection pump camshaft and turn until the cam of the governor is visible in the hole.
Flange 601 589 00 08 00
3. Tighten the locking screw. Locking Screw 601 589 05 21 00
4. Ensure that the No.1 cylinder is positioned at A TDC 15°.
Page 660 of 1574
1F3-50 OM600 ENGINE CONTROLS
10. Connect the fuel pipesNotice Replace the seal. Box Wrench Insert 000 589 77 03 00
Return Line Fuel Injection LineFuel feed LineSuction and Pressure Line 46 Nm18 Nm13 Nm13 Nm
5. Coat the new seal (23) with engine oil and install it.
6. Insert the fuel injection pump (25) and tighten the bolts
(22).
7. Remove the locking screw (32).
Tightening Torque 23 Nm
8. Tighten the bolt(12).
9. Insert the washer (21) and tighten the bolts (20) and then remove the assembly cage (29).
Tightening Torque 23 Nm
Tightening Torque 46 Nm
Page 684 of 1574

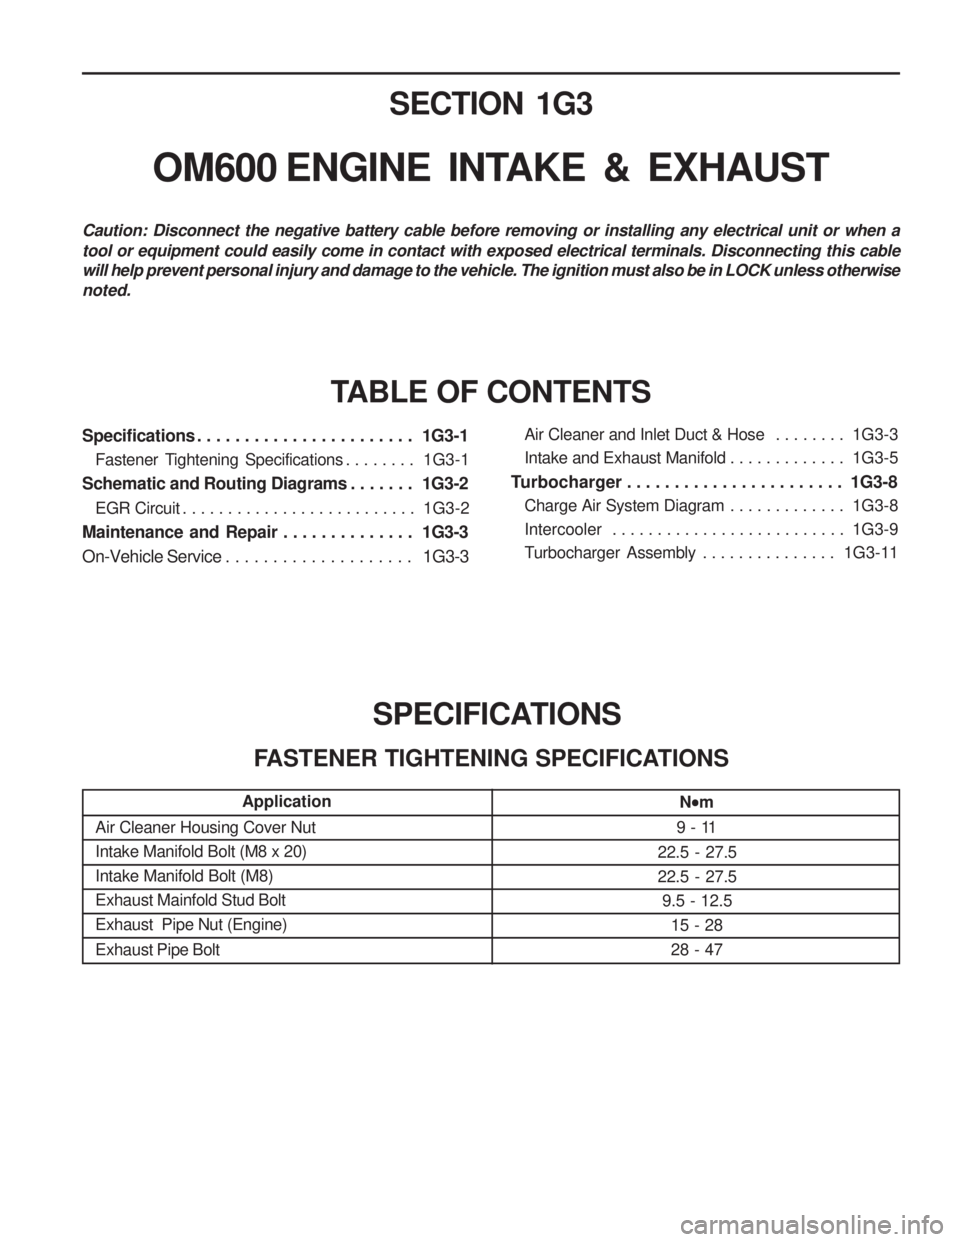
SECTION 1G3
OM600 ENGINE INTAKE & EXHAUST
Specifications . . . . . . . . . . . . . . . . . . . . . . . 1G3-1Fastener Tightening Specifications . . . . . . . . 1G3-1
Schematic and Routing Diagrams . . . . . . . 1G3-2 EGR Circuit . . . . . . . . . . . . . . . . . . . . . . . . . . 1G3-2
Maintenance and Repair . . . . . . . . . . . . . . 1G3-3
On-Vehicle Service . . . . . . . . . . . . . . . . . . . . 1G3-3 TABLE OF CONTENTS
Caution: Disconnect the negative battery cable before removing or installing any electrical unit or when a tool or equipment could easily come in contact with exposed electrical terminals. Disconnecting this cable will help prevent personal injury and damage to the vehicle. The ignition must also be in LOCK unless otherwisenoted.
SPECIFICATIONS
FASTENER TIGHTENING SPECIFICATIONS
Application
Air Cleaner Housing Cover Nut Intake Manifold Bolt (M8 x 20)Intake Manifold Bolt (M8)Exhaust Mainfold Stud BoltExhaust Pipe Nut (Engine) Exhaust Pipe Bolt
N
m
9 - 11
22.5 - 27.5 22.5 - 27.5 9.5 - 12.5 15 - 2828 - 47
Air Cleaner and Inlet Duct & Hose . . . . . . . . 1G3-3
Intake and Exhaust Manifold . . . . . . . . . . . . . 1G3-5
Turbocharger . . . . . . . . . . . . . . . . . . . . . . . 1G3-8
Charge Air System Diagram . . . . . . . . . . . . . 1G3-8
Intercooler . . . . . . . . . . . . . . . . . . . . . . . . . . 1G3-9
Turbocharger Assembly . . . . . . . . . . . . . . . 1G3-11
Page 712 of 1574

2B-2 WHEEL ALIGNMENT
DIAGNOSIS
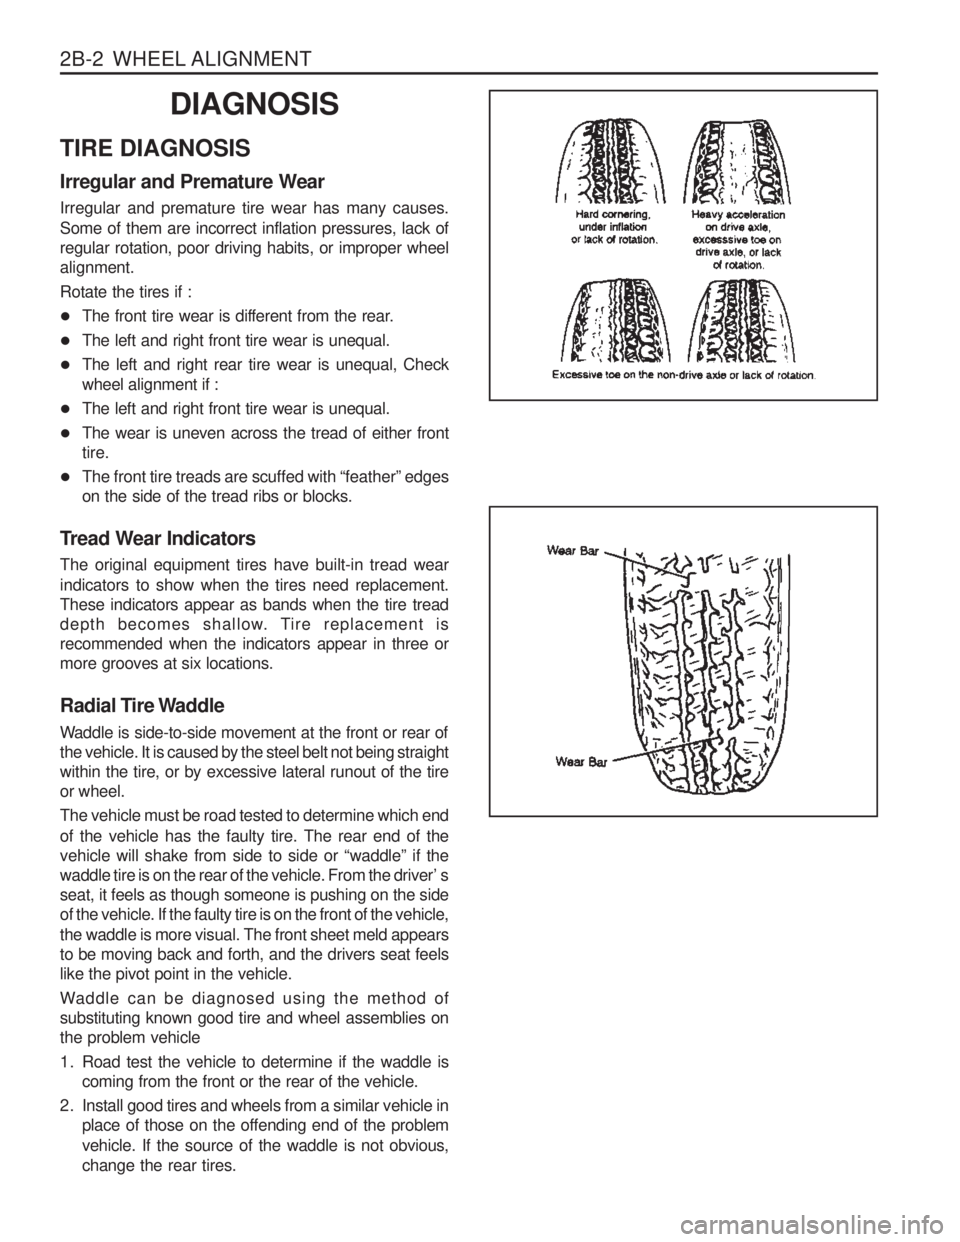
TIRE DIAGNOSIS Irregular and Premature Wear Irregular and premature tire wear has many causes. Some of them are incorrect inflation pressures, lack of regular rotation, poor driving habits, or improper wheelalignment. Rotate the tires if :
� The front tire wear is different from the rear.
� The left and right front tire wear is unequal.
� The left and right rear tire wear is unequal, Check wheel alignment if :
� The left and right front tire wear is unequal.
� The wear is uneven across the tread of either fronttire.
� The front tire treads are scuffed with “feather” edgeson the side of the tread ribs or blocks.
Tread Wear Indicators The original equipment tires have built-in tread wear indicators to show when the tires need replacement. These indicators appear as bands when the tire tread
depth becomes shallow. Tire replacement isrecommended when the indicators appear in three ormore grooves at six locations.
Radial Tire Waddle
Waddle is side-to-side movement at the front or rear of the vehicle. It is caused by the steel belt not being straightwithin the tire, or by excessive lateral runout of the tireor wheel. The vehicle must be road tested to determine which end of the vehicle has the faulty tire. The rear end of the vehicle will shake from side to side or “waddle” if the
waddle tire is on the rear of the vehicle. From the driver’ sseat, it feels as though someone is pushing on the sideof the vehicle. If the faulty tire is on the front of the vehicle, the waddle is more visual. The front sheet meld appears to be moving back and forth, and the drivers seat feelslike the pivot point in the vehicle.
Waddle can be diagnosed using the method of substituting known good tire and wheel assemblies onthe problem vehicle
1. Road test the vehicle to determine if the waddle is coming from the front or the rear of the vehicle.
2. Install good tires and wheels from a similar vehicle in place of those on the offending end of the problem vehicle. If the source of the waddle is not obvious, change the rear tires.
Page 751 of 1574

M/T M/TA/T (MB)M/TA/T (BTRA) M/T A/T (BTRA)M/TA/T (MB)M/T A/T (MB) A/T (BTRA)M/TA/T (MB)A/T (BTRA)
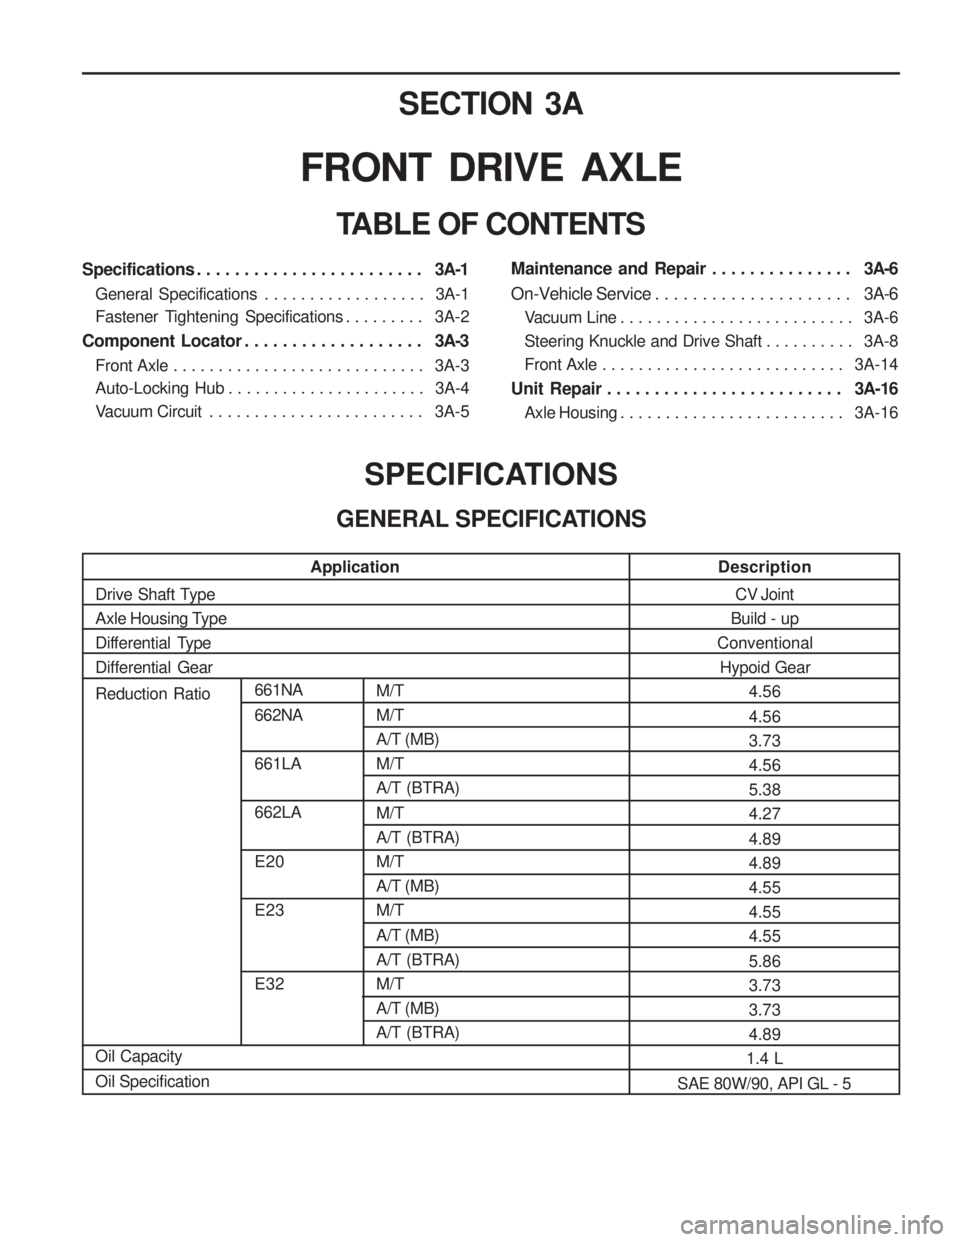
SECTION 3A
FRONT DRIVE AXLE
TABLE OF CONTENTSSPECIFICATIONS
GENERAL SPECIFICATIONS
Specifications . . . . . . . . . . . . . . . . . . . . . . . .
3A-1
General Specifications . . . . . . . . . . . . . . . . . . 3A-1
Fastener Tightening Specifications . . . . . . . . . 3A-2
Component Locator . . . . . . . . . . . . . . . . . . . 3A-3
Front Axle . . . . . . . . . . . . . . . . . . . . . . . . . . . . 3A-3
Auto-Locking Hub . . . . . . . . . . . . . . . . . . . . . . 3A-4
Vacuum Circuit . . . . . . . . . . . . . . . . . . . . . . . . 3A-5Maintenance and Repair . . . . . . . . . . . . . . .
3A-6
On-Vehicle Service . . . . . . . . . . . . . . . . . . . . . 3A-6
Vacuum Line . . . . . . . . . . . . . . . . . . . . . . . . . . 3A-6
Steering Knuckle and Drive Shaft . . . . . . . . . . 3A-8
Front Axle . . . . . . . . . . . . . . . . . . . . . . . . . . . 3A-14
Unit Repair . . . . . . . . . . . . . . . . . . . . . . . . . 3A-16
Axle Housing . . . . . . . . . . . . . . . . . . . . . . . . . 3A-16
Application
Drive Shaft Type
Axle Housing Type
Differential TypeDifferential Gear
CV Joint
Build - up
Conventional
Hypoid Gear 4.56 4.56 3.734.565.384.27 4.89 4.894.554.554.55 5.86 3.733.734.89
1.4 L
SAE 80W/90, API GL - 5
Description
661NA 662NA 661LA662LA E20 E23 E32
Reduction Ratio Oil Capacity Oil Specification