2003 Oldsmobile Alero radio
[x] Cancel search: radioPage 169 of 354
TP CD (Tape): Press this button to play a cassette
tape or a CD when listening to the radio. Press TP CD
to switch between the tape and compact disc
if both
are loaded. The inactive tape or CD will remain safely
inside the radio for future listening. The display will
show the
TAPE and CD symbols.
4 (Eject): Press this button to eject a CD. Eject may
be activated with either the ignition or radio
off. CDs
may be loaded with the radio and ignition
off if this
button is pressed first.
Compact Disc Messages
CHECK CD: If this message appears on the radio
display and the disc comes out,
it could be one of the
following reasons:
You’re driving on a very rough road. When the road
The disc is dirty, scratched, wet or upside down.
0 The air is very humid. If so, wait about an hour and
becomes
smoother, the disc should play.
try again.
If the CD is not playing correctly, for any other reason,
try a known good CD.
If any error occurs repeatedly or
if an error can’t be
corrected, contact your dealer.
If your radio displays an
error message, write it down and provide it to your
dealer when reporting the problem.
Theft-Deterrent Feature
(Non-RDS Radios)
THEFTLOCK@ is designed to discourage theft of your
radio. The feature works automatically by learning
a portion of the Vehicle Identification Number (VIN).
If
the radio is moved to a different vehicle, it will not
operate and LOC will be displayed.
With THEFTLOCK@ activated, your radio will not operate
if stolen.
Theft-Deterrent Feature
(RDS Radios)
THEFTLOCK@ is designed to discourage theft of your
radio. The feature works automatically by learning
a portion of the Vehicle Identification Number (VIN).
It
the radio is moved to a different vehicle, it will not
operate and LOCKED will be displayed.
When the radio and vehicle are turned off, the blinking
red light indicates that THEFTLOCK@ is armed.
With THEFTLOCK@ activated, your radio will not operate
if stolen.
3-64
Page 170 of 354
Understanding Radio Reception
AM
The range for most AM stations is greater than for FM,
especially at night. The longer range, however, can
cause stations to interfere with each other. AM can pick
up noise from things like storms and power lines. Try
reducing the treble to reduce this noise
if you ever get it.
FM Stereo
FM stereo will give you the best sound, but FM signals
will reach only about
10 to 40 miles (16 to 65 km).
Tall buildings or hills can interfere with FM signals,
causing the sound to come and go.
XMTM Satellite Radio Service
XMTM Satellite Radio gives you digital radio reception
from coast to coast. Just as with FM, tall buildings
or hills can interfere with Satellite radio signals, causing
the sound to come and
so. Your radio may display
“NO SIGNAL” to indicate interference.
DAB Radio
DAB gives you digital radio reception. Just as with FM,
tall buildings or hills can interfere with radio signals,
causing the sound to come and go. Your radio
may display “NO
SIGNAL” to indicate interference,
Care of Your Cassette Tape Player
A tape player that is not cleaned regularly can cause
reduced sound quality, ruined cassettes or a damaged
mechanism. Cassette tapes should be stored in their
cases away from contaminants, direct sunlight and
extreme heat.
If they aren’t, they may not operate
properly or may cause failure of the tape player.
Your tape player should be cleaned regularly after every
50 hours of use. Your radio may display CLEAN
PLAYR to indicate that you have used your tape player
for 50 hours without resetting the tape clean timer.
If
this message appears on the display, your cassette tape
player needs to be cleaned. It will still play tapes, but
you should clean
it as soon as possible to prevent
damage to your tapes and player.
If you notice a
reduction in sound quality, try a known good cassette to
see
if the tape or the tape player is at fault. If this
other cassette has no improvement in sound quality,
clean the tape player.
For best results, use a scrubbing action, non-abrasive
head as the hubs of the cleaner cassette turn. The
recommended cleaning cassette is available through
your dealership.
WGUI III ty baaacttc VVILI I paua VVI IILI I X,IUIJ LI te tape nlhnn;,..r* ,-..-..-.--++e ... :rL ...-A- ..,L:-L *I- - I-.- -
3-65
Page 171 of 354
The cut tape detection feature of your cassette tape
player may identify the cleaning cassette as a damaged
tape, in error. To prevent the cleaning cassette from
being ejected, use the following steps.
1. Turn the ignition on.
2. Turn the radio off.
3. Press and hold the TP CD button for five seconds.
4. Insert the scrubbing action cleaning cassette.
5. Eject the cleaning cassette after the manufacturer’s
recommended cleaning time.
You may also choose a non-scrubbing action, wet-type
cleaner which uses a cassette with a fabric belt to
clean the tape head. This type
of cleaning cassette will
not eject on its own. A non-scrubbing action cleaner
may not clean as thoroughly as the scrubbing type
cleaner. The use of a non-scrubbing action, dry-type
cleaning cassette is not recommended.
After you clean the player, press and hold the eject
button for five seconds to reset the CLEAN PLAYR
indicator. The radio will display CLEANED to show the
indicator was reset.
Cassettes are subject to wear and the sound quality
may degrade over time. Always make sure the cassette
tape is in good condition before you have your tape
player serviced.
Care of Your CDs
Handle discs carefully. Store them in their original cases
or other protective cases and away from direct sunlight
and dust.
If the surface of a disc is soiled, dampen
a clean, soft cloth in a mild, neutral detergent solution
and clean
it, wiping from the center to the edge.
Be sure never to touch the side without writing when
handling discs. Pick up discs by grasping the outer
edges or the edge of the hole and the outer edge.
Care of Your CD Player
The use of CD lens cleaner discs is not advised, due to
the risk of contaminating the lens of the CD optics
with lubricants internal to the CD mechanism.
Backglass Antenna
Your AM-FM antenna is integrated with your rear
window defogger, located in the rear window. Be sure
that the inside surface of the rear window is not
scratched and that the lines on the glass are not
damaged.
If the inside surface is damaged, it could
interfere with radio reception.
3-66
Page 172 of 354
Notice; Do not try to clear frost or other material
from the inside
of the rear window with a razor blade
or anything else that
is sharp. This may damage
the rear defogger grid and affect your radio’s ability
to pick up stations clearly. The repairs wouldn’t
be covered by your warranty.
Because this antenna is built into your rear window,
there is a reduced risk of damage caused by car washes
and vandals.
If you choose to add a cellular telephone to your
vehicle, and the antenna needs to be attached to the
glass, be sure that you do not damage the grid lines for
the AM-FM antenna. There is enough space between
the lines to attach a cellular telephone antenna
without interfering with radio reception.
XM Satellite Radio Antenna System
Your XMTM Satellite Radio antenna is located on the
roof of your vehicle. Keep this antenna clear of
snow and ice build up for clear radio reception.
The performance of your
XM system may be affected if
your sunroof is open.
DAB Radio Antenna System
Your DAB antenna is located on the roof of your
vehicle. Keep this antenna clear of snow and ice build
up for clear radio reception.
If your vehicle is purchased in Canada and driven into
the United Stated the DAB radio antenna system will
not function. DAB radio reception is available in
Canada only.
The performance of your DAB antenna may be affected
if your sunroof is open.
Chime Level Adjustment
Chime level adjustment is only available on RDS radios.
The radio is the vehicle chime producer. The chime is
produced from the driver’s side front door speakers.
To change the volume level, press and hold
pushbutton 6 with the ignition on and the radio power
off. The chime volume level will change from the normal
level to loud, and
LOUD will be displaved on the
radio. To change back to the default or normal setting,
press and hold pushbutton
6 again. The chime level
will change from the loud level to normal, and
NORMAL
will be displayed. Each time the chime volume is
changed, three chimes will sound as an example of the
new volume selected.
Removing the radio and net
replacing it with a factory radio or chime module will
disable vehicle chimes.
3-67
Page 256 of 354
Replacing Brake System Parts
The braking system on a vehicle is complex. Its many
parts have
to be of top quality and work well together if
the vehicle is to have really good braking. Your
vehicle was designed and tested with top-quality
GM
brake parts. When you replace parts of your braking
system
- for example, when your brake linings
wear down and you need new ones put in
- be sure
you get new approved replacement parts. If you
don’t, your brakes may no longer work properly. For
example,
if someone puts in brake linings that are wrong
for your vehicle, the balance between your front and
rear brakes can change
- for the worse. The braking
performance you’ve come
to expect can change in
replacement brake parts.
many other ways if someone puts in the wrong
Battery
Your new vehicle comes with a maintenance free
ACDelco@ battery. When it’s time for a new battery, get
one that has the replacement number shown on the
original battery’s label. We recommend an ACDelcoC”-‘
battery. See
Engine Compartment Overview on
page
5- 12 for battery location.
Warning; Battery posts, terminals and related
accessories contain lead and lead compounds,
chemicals known to the State of California to cause
cancer and reproductive harm. Wash hands after
handling.
Vehicle Storage
If you’re not going to drive your vehicle for 25 days or
more, remove the black, negative
(-) cable from
the battery. This will help keep your battery from
running down.
Batteries have acic bat can burn you and gas
that can explode. You can be badly hurt
if you
aren’t careful. See “Jump Starting” in the Index
for tips
on working around a battery without
I 3--L ’ =
rrnttjqrr hl Irt.
Contact your dealer to learn how to prepare your
vehicle for longer storage periods.
Also, for your audio system, see
Theft-Deterrent
Feature (Non-RDS Radios) on page
3-64 or
I nefi-Deterrent Feature (RDS RaQiosj on page 3-64. -.
5-41
Page 257 of 354
Jump Starting
If your battery has run down, you may want to use
another vehicle and some jumper cables to start your
vehicle. Be sure to follow the steps below to do it safely.
I- Ba..,ries can hi.- - you. ’_ --?y cal. Je c-.lgerous
because:
They contain acid that can burn you.
They contain gas that can explode or
They contain enough electricity to
ignite.
burn you.
If you don’t follow these steps exactly, some
or all of these things can hurt you.
Notice: Ignoring these steps could result in costly
damage to your vehicle that wouldn’t be covered
by your warranty.
Trying to start your vehicle by pushing or pulling
it
won’t work, and it could damage your vehicle.
1. Check the other vehicle. It must have a 12-volt
battery with a negative ground system.
Notice: If the other system isn’t a 12-volt system
with a negative ground, both vehicles can be
damaged.
2. Get the vehicles close enough so the jumper cables
can reach, but be sure the vehicles aren’t touching
each other.
If they are, it could cause a ground
connection you don’t want.
You wouldn’t be able to
start your vehicle, and the bad grounding could
damage the electrical systems.
To avoid the possibility of the vehicles rolling, set
the parking brake firmly on both vehicles involved in
the jump start procedure. Put an automatic
transaxle in PARK (P) or a manual transaxle in
NEUTRAL before setting the parking brake.
Notice: If you leave your radio on, it could be badly
damaged. The repairs wouldn’t be covered by
your warranty.
3. Turn off the ignition on both vehicles. Unplug
unnecessary accessories plugged into the cigarette
lighter. Turn
off the radio and all lamps that aren’t
needed. This will avoid sparks and help save
both batteries. And it could save your radio!
4. Open the hoods and locate the batteries. Find the
positive
(+) and negative (-) terminal locations on
each vehicle. See
Engine Compartment Overview
on page
5-12 for more information on location.
5-42
Page 297 of 354
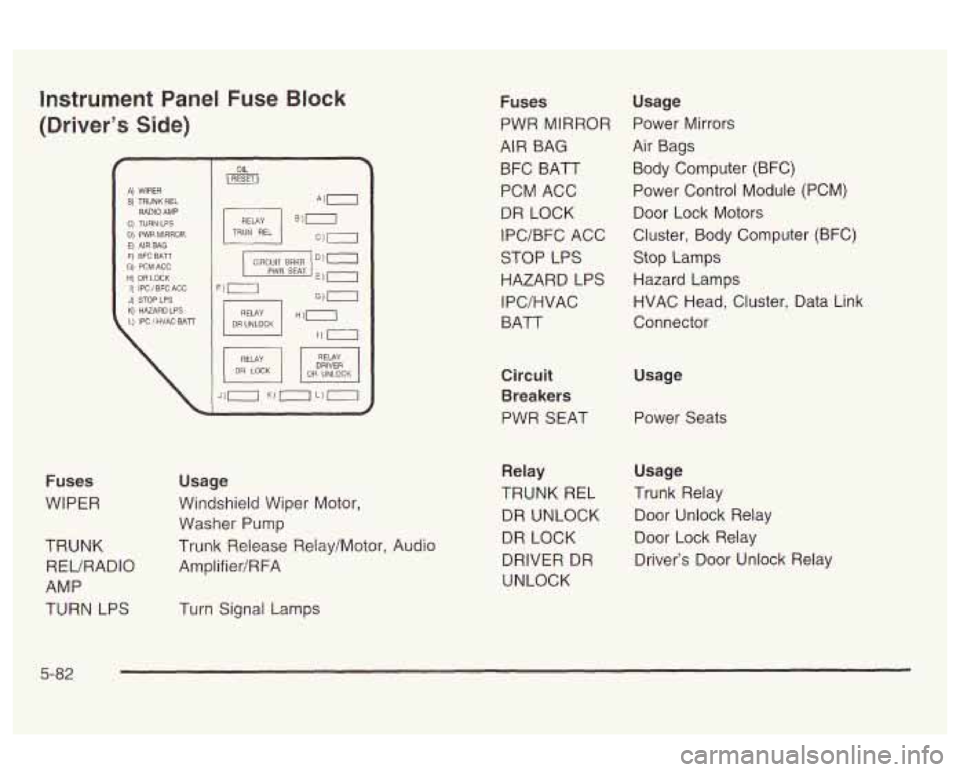
Instrument Panel Fuse Block
(Driver's Side)
f I A) WIPER I
F) EFC BATT G) PCMACC I ti: DALOCK I PWR SEAT E) 0 I) IPC / BFC ACG F) .
DRIVER
Fuses
WIPER
TRUNK REURADIO
AMP
TURN LPS Usage
Windshield Wiper Motor,
Washer Pump
Trunk Release Relay/Motor, Audio
Amplifier/RFA
Turn Signal Lamps
Fuses
PWR MIRROR
AIR BAG
BFC BATT
PCM ACC
DR LOCK
IPC/BFC ACC
STOP LPS
HAZARD LPS
I PC/HVAC
BATT
Circuit Breakers
PWR SEAT Usage
Power Mirrors
Air Bags Body Computer (BFC)
Power Control Module (PCM) Door Lock Motors
Cluster, Body Computer (BFC) Stop Lamps
Hazard Lamps
HVAC Head, Cluster, Data Link
Connector
Usage Power Seats
Relay Usage
TRUNK
REL Trunk Relay
DR UNLOCK Door Unlock Relay
DR LOCK Door Lock Relay
DRIVER DR Driver's Door Unlock Relay
UNLOCK
5-82
Page 298 of 354
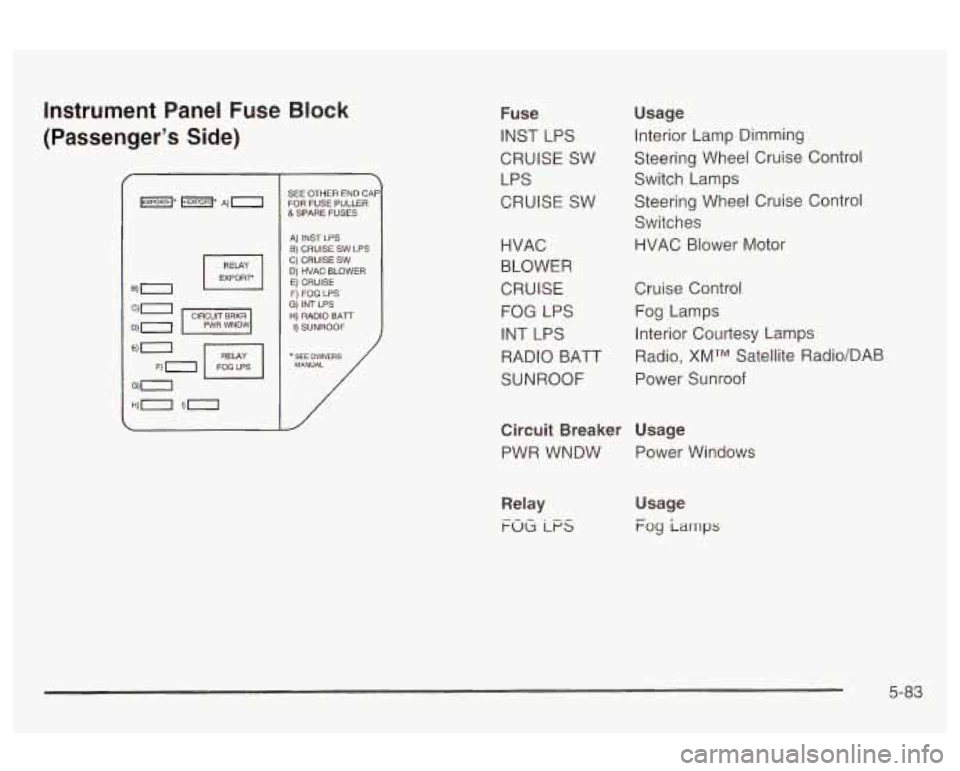
Instrument Panel Fuse Block
(Passenger’s Side)
SEE OTHER END CAF FOR FUSE PULLER &SPARE FUSES
A) INST LPS
C) CRUISE
SW B) CRUISE SW LPS
0) HVAC BLOWER E) CRUISE F) FOG LPS G) INT LPS H) RADIO BATr I) SUNROOF
* SEE OWNERS MANUAL /
1’
Fuse
INST LPS
CRUISE SW LPS
CRUISE SW Usage
Interior Lamp Dimming
Steering Wheel Cruise Control
Switch Lamps
Steering Wheel Cruise Control
Switches
HVAC Blower Motor
HVAC
BLOWER
CRUISE Cruise Control
FOG LPS
Fog Lamps
INT LPS Interior Courtesy Lamps
RADIO BAT Radio, XMTM Satellite Radio/DAB
SUNROOF Power Sunroof
Circuit Breaker Usage
PWR WNDW Power Windows
Relay
FOG LFS
Usage
Fog iarnps
5-83