Page 3668 of 4179
SC-24
STARTING SYSTEM
Trouble DiagnosesEKS0031I
If any malfunction is found, immediately disconnect the battery cable from the negative terminal.
SEL761W
Page 3669 of 4179

STARTING SYSTEM
SC-25
C
D
E
F
G
H
I
J
L
MA
B
SC
Removal and Installation EKS0031J
REMOVAL
M/T models
1. Disconnect the battery cable from the negative terminal.
2. Remove air duct. Refer to EM-15, "
AIR CLEANER AND AIR
DUCT" (QR engine models) or EM-133, "AIR CLEANER AND
AIR DUCT" (YD engine models).
3. Disconnect S connector and B terminal from starter motor.
4. Remove starter motor mounting bolts.
5. Remove starter motor upward.
A/T models
1. Disconnect the battery cable from the negative terminal.
2. Remove air duct and air cleaner assembly. Refer to EM-15, "
AIR
CLEANER AND AIR DUCT" (QR engine models) or EM-133,
"AIR CLEANER AND AIR DUCT" (YD engine models).
3. Remove A/T selector cable and harness from bracket.
4. Disconnect S connector and B terminal from starter motor.
5. Remove starter motor upward.
INSTALLATION
Installation is the reverse order of removal.
QR engine models (M/T)
QR engine models (A/T)
YD22 engine models
PKIA2741E
PKIA2742E
B terminal nut:
:9.81 - 11.8 N·m (1.0 - 1.2 kg-m, 87 - 112 in-lb)
Starter motor mounting bolt:
: 98.1 - 127.0 N·m (10.0 - 13.0 kg-m, 73 - 94 ft-lb)
B terminal nut:
: 7.3 - 9.8 N·m (0.75 - 1.00 kg-m, 65 - 87 in-lb)
Starter motor mounting bolt:
Upper side:
: 41.2 - 52.0 N·m (4.2 - 5.3 kg-m, 31 - 38 ft - lb)
Lower side:
: 98.1 - 127.0 N·m (10.0 -13.0 kg-m, 73 -94 ft-lb)
B terminal nut:
: 9.81 - 11.8 N·m (1.0 - 1.2 kg-m, 87 - 112 in-lb)
Starter motor mounting bolt:
: 41.2 - 52.0 N·m (4.2 - 5.3 kg-m, 31 - 38 ft-lb)
Page 3673 of 4179
STARTING SYSTEM
SC-29
C
D
E
F
G
H
I
J
L
MA
B
SC
InspectionEKS0031L
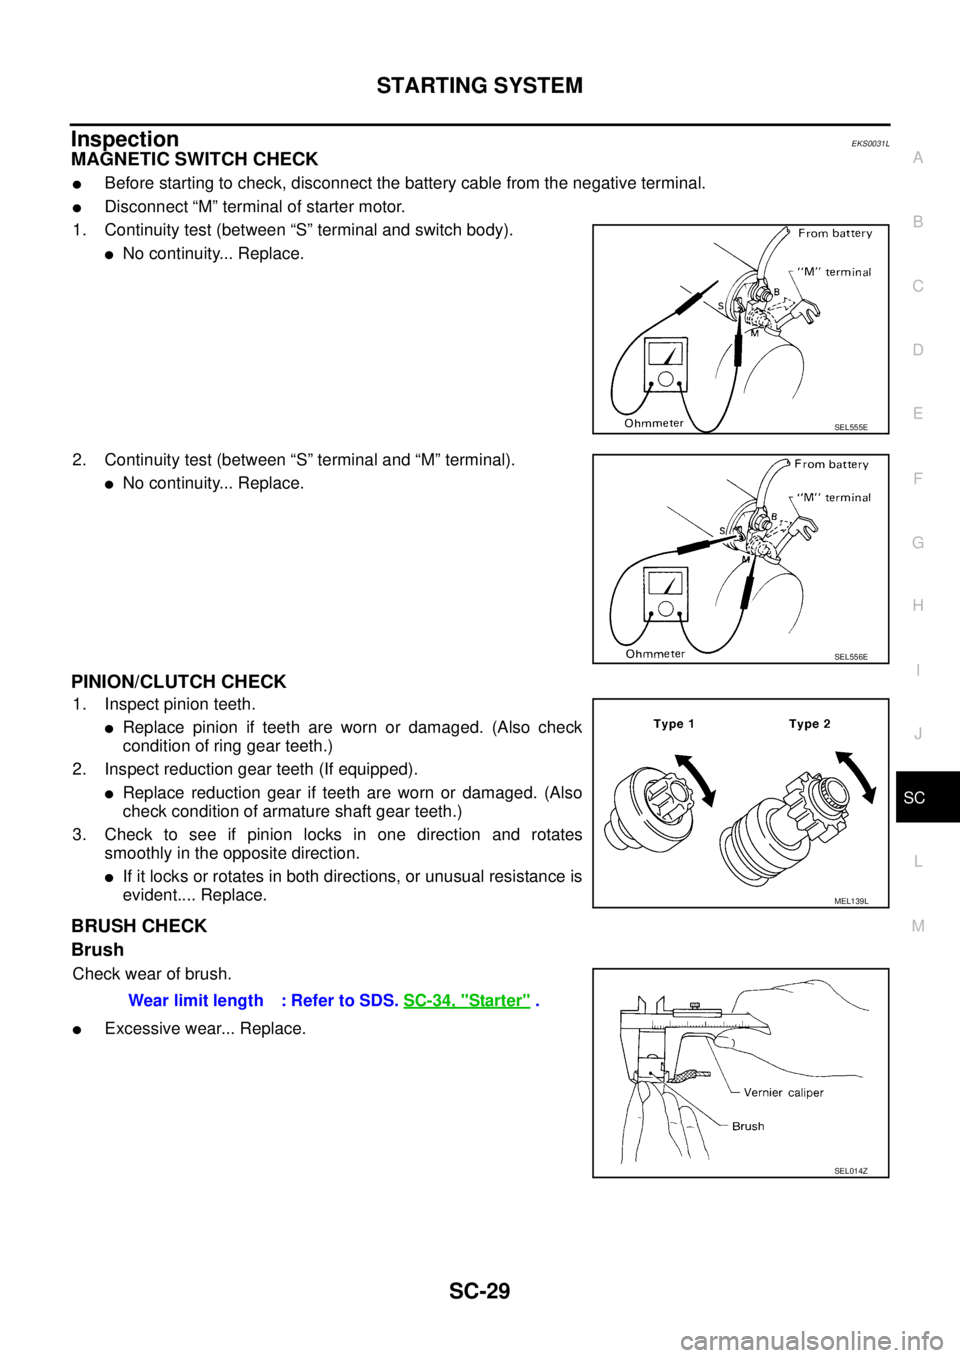
MAGNETIC SWITCH CHECK
�Before starting to check, disconnect the battery cable from the negative terminal.
�Disconnect “M” terminal of starter motor.
1. Continuity test (between “S” terminal and switch body).
�No continuity... Replace.
2. Continuity test (between “S” terminal and “M” terminal).
�No continuity... Replace.
PINION/CLUTCH CHECK
1. Inspect pinion teeth.
�Replace pinion if teeth are worn or damaged. (Also check
condition of ring gear teeth.)
2. Inspect reduction gear teeth (If equipped).
�Replace reduction gear if teeth are worn or damaged. (Also
check condition of armature shaft gear teeth.)
3. Check to see if pinion locks in one direction and rotates
smoothly in the opposite direction.
�If it locks or rotates in both directions, or unusual resistance is
evident.... Replace.
BRUSH CHECK
Brush
Check wear of brush.
�Excessive wear... Replace.
SEL555E
SEL556E
MEL139L
Wear limit length : Refer to SDS. SC-34, "Starter" .
SEL014Z
Page 3678 of 4179
SC-34
SERVICE DATA AND SPECIFICATIONS (SDS)
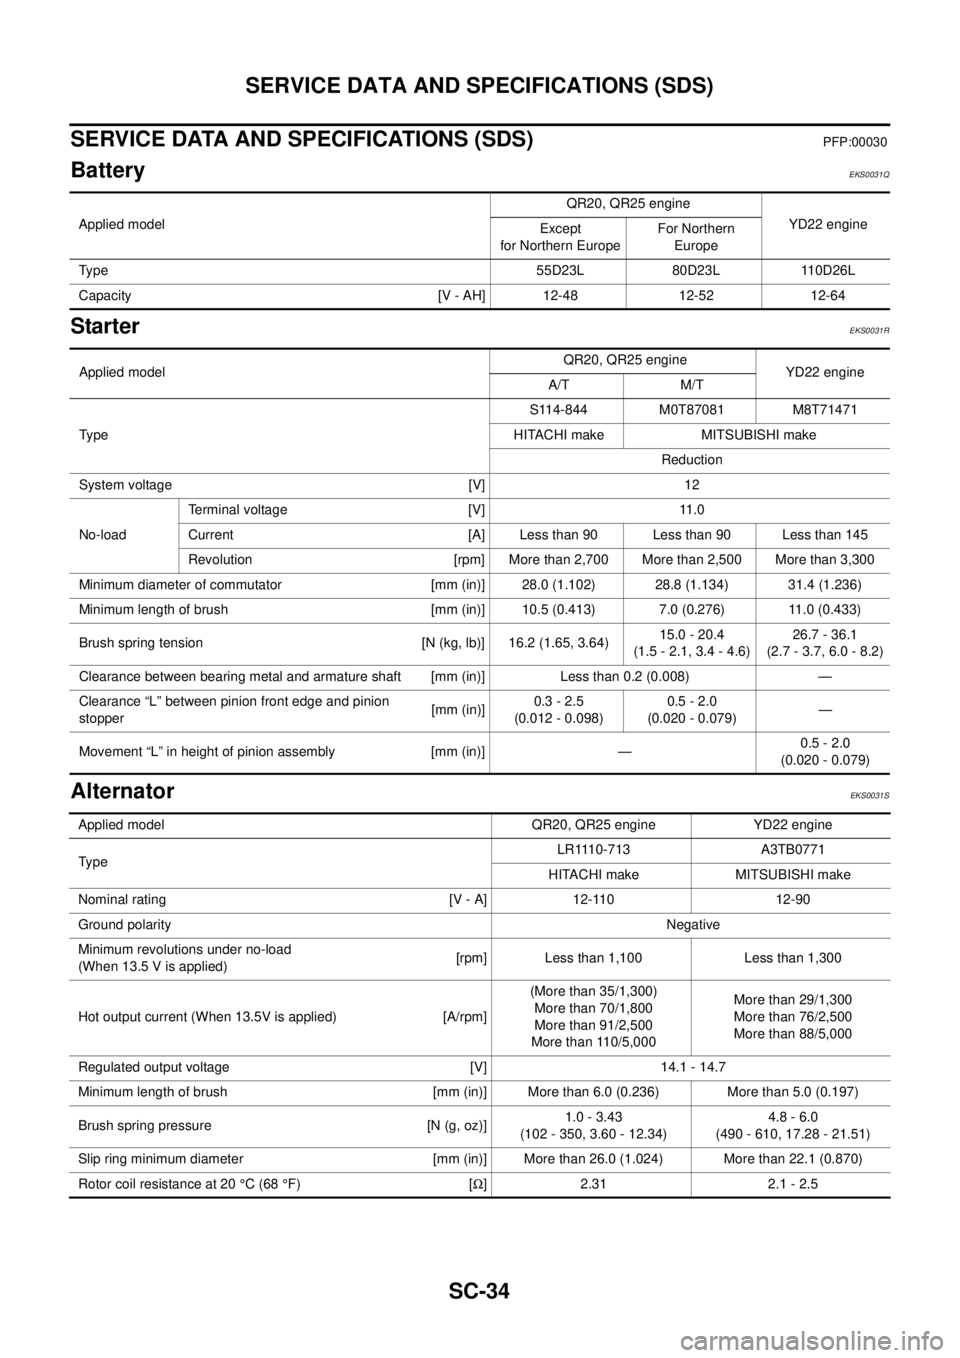
SERVICE DATA AND SPECIFICATIONS (SDS)PFP:00030
BatteryEKS0031Q
StarterEKS0031R
AlternatorEKS0031S
Applied modelQR20, QR25 engine
YD22 engine
Except
for Northern EuropeFor Northern
Europe
Type 55D23L 80D23L 110D26L
Capacity [V - AH] 12-48 12-52 12-64
Applied modelQR20, QR25 engine
YD22 engine
A/T M/T
Ty p eS114-844 M0T87081 M8T71471
HITACHI make MITSUBISHI make
Reduction
System voltage [V] 12
No-loadTerminal voltage [V] 11.0
Current [A] Less than 90 Less than 90 Less than 145
Revolution [rpm] More than 2,700 More than 2,500 More than 3,300
Minimum diameter of commutator [mm (in)] 28.0 (1.102) 28.8 (1.134) 31.4 (1.236)
Minimum length of brush [mm (in)] 10.5 (0.413) 7.0 (0.276) 11.0 (0.433)
Brush spring tension [N (kg, lb)] 16.2 (1.65, 3.64)15.0 - 20.4
(1.5 - 2.1, 3.4 - 4.6)26.7 - 36.1
(2.7 - 3.7, 6.0 - 8.2)
Clearance between bearing metal and armature shaft [mm (in)] Less than 0.2 (0.008) —
Clearance “L” between pinion front edge and pinion
stopper[mm (in)]0.3 - 2.5
(0.012 - 0.098)0.5 - 2.0
(0.020 - 0.079)—
Movement “L” in height of pinion assembly [mm (in)] —0.5 - 2.0
(0.020 - 0.079)
Applied model QR20, QR25 engine YD22 engine
Ty p eLR1110-713 A3TB0771
HITACHI make MITSUBISHI make
Nominal rating [V - A] 12-110 12-90
Ground polarityNegative
Minimum revolutions under no-load
(When 13.5 V is applied)[rpm] Less than 1,100 Less than 1,300
Hot output current (When 13.5V is applied) [A/rpm](More than 35/1,300)
More than 70/1,800
More than 91/2,500
More than 110/5,000More than 29/1,300
More than 76/2,500
More than 88/5,000
Regulated output voltage [V] 14.1 - 14.7
Minimum length of brush [mm (in)] More than 6.0 (0.236) More than 5.0 (0.197)
Brush spring pressure [N (g, oz)]1.0 - 3.43
(102 - 350, 3.60 - 12.34)4.8 - 6.0
(490 - 610, 17.28 - 21.51)
Slip ring minimum diameter [mm (in)] More than 26.0 (1.024) More than 22.1 (0.870)
Rotor coil resistance at 20 °C (68 °F) [Ω] 2.31 2.1 - 2.5
Page 3682 of 4179
DI-4
COMBINATION METERS
COMBINATION METERSPFP:24814
System DescriptionEKS00EGZ
UNIFIED CONTROL METER
�Speedometer, odo/trip meter, tachometer, fuel gauge and water temperature gauge are controlled by the
unified meter control unit, which is built into the combination meter.
�Digital meter is adopted for odo/trip meter.*
*The record of the odo meter is kept even if the battery cable is disconnected. The record of the trip meter
is erased when the battery cable is disconnected.
�Odo/trip meter segments can be checked in diagnosis mode.
�Meter/gauge can be checked in diagnosis mode.
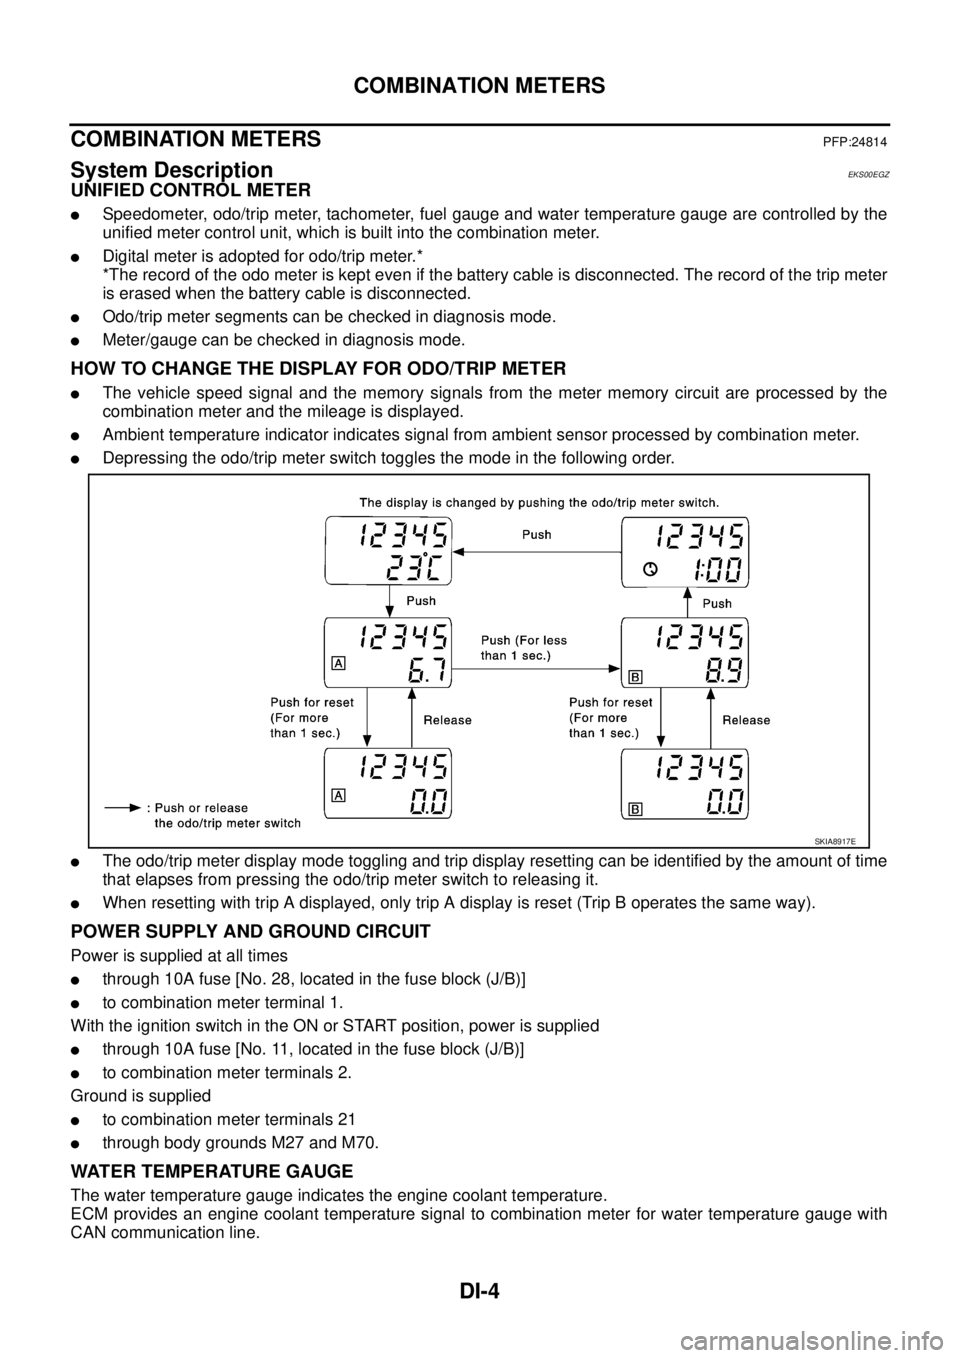
HOW TO CHANGE THE DISPLAY FOR ODO/TRIP METER
�The vehicle speed signal and the memory signals from the meter memory circuit are processed by the
combination meter and the mileage is displayed.
�Ambient temperature indicator indicates signal from ambient sensor processed by combination meter.
�Depressing the odo/trip meter switch toggles the mode in the following order.
�The odo/trip meter display mode toggling and trip display resetting can be identified by the amount of time
that elapses from pressing the odo/trip meter switch to releasing it.
�When resetting with trip A displayed, only trip A display is reset (Trip B operates the same way).
POWER SUPPLY AND GROUND CIRCUIT
Power is supplied at all times
�through 10A fuse [No. 28, located in the fuse block (J/B)]
�to combination meter terminal 1.
With the ignition switch in the ON or START position, power is supplied
�through 10A fuse [No. 11, located in the fuse block (J/B)]
�to combination meter terminals 2.
Ground is supplied
�to combination meter terminals 21
�through body grounds M27 and M70.
WATER TEMPERATURE GAUGE
The water temperature gauge indicates the engine coolant temperature.
ECM provides an engine coolant temperature signal to combination meter for water temperature gauge with
CAN communication line.
SKIA8917E
Page 3697 of 4179

COMBINATION METERS
DI-19
C
D
E
F
G
H
I
J
L
MA
B
DI
Terminals and Reference Value for Combination MeterEKS00EH6
NOTE:
*1:With auto A/C
Meter/Gauges Operation and Odo/Trip MeterEKS00EH7
SELF-DIAGNOSIS FUNCTION
�Odo/trip meter segment operation can be checked in self-diagnosis mode.
�Meters/gauges can be checked in self-diagnosis mode.
HOW TO ALTERNATE DIAGNOSIS MODE
1. Turn the ignition switch ON, and switch the odo/trip meter to “trip A” or “trip B”.
NOTE:
If the diagnosis function is activated with the trip meter A displayed, the mileage on the trip meter A will
indicate 0.0 miles, but the actual trip mileage will be retained. (Trip B operates the same way.)
2. Turn ignition switch OFF.
3. While pushing the odo/trip meter switch, turn ignition switch ON again.
4. Make sure that the trip meter displays “0.0”.
5. Push the odo/trip meter switch at least 3 times. (Within 7 seconds after the ignition switch is turned ON.)
6. All the segments on the odo/trip meter illuminate, and simultaneously the low-fuel warning lamp indicator
illuminates. At this time, the unified meter control unit is turned to diagnosis mode.
NOTE:
If any of the segments is not displayed, replace the combination
meter.
Terminal
No.Wire
ColorItemCondition
Reference Value
Ignition
switchOperation or condition
1 L Battery power supply OFF — Battery voltage
2 Y/G Ignition switch (ON) ON — Battery voltage
8 G Fuel level sensor signal — —Refer to DI-30, "
FUEL LEVEL SEN-
SOR UNIT CHECK/GASOLINE
ENGINE MODELS" or DI-30,
"FUEL LEVEL SENSOR UNIT
CHECK/DIESEL ENGINE MOD-
ELS" .
21 B Ground — — Approx. 0 V
22 W CAN H — — —
23 R CAN L — — —
27 R/B Ambient sensor signal — —Refer to DI-31, "
AMBIENT SENSOR
CHECK"
28 B/Y Ambient sensor ground — — —
29
*1Y VAC signal ON — Approx. 5 V
SKIA8920E
Page 3698 of 4179

DI-20
COMBINATION METERS
7. Push the odo/trip meter switch. Each meter/gauge should indi-
cate as shown in the figure while pushing odo/trip meter switch.
(At this time, the low-fuel warning lamp goes off.)
How to Proceed With Trouble DiagnosisEKS00EH8
1. Confirm the symptom or customer complaint.
2. Perform diagnosis according to diagnosis flow. Refer to DI-20, "
Diagnosis Flow" .
3. According to the trouble diagnosis chart, repair or replace the cause of the symptom. Refer to DI-22,
"Trouble Diagnosis Chart for Symptom" .
4. Does the meter operate normally? If so, go to 5. If not, go to 2.
5. INSPECTION END
Diagnosis FlowEKS00EH9
1. CHECK WARNING LAMP ILLUMINATION
1. Turn ignition switch ON.
2. Make sure that warning lamp (such as MIL and oil pressure warning lamp) illuminate.
Does warning lamp illuminate?
YES >> GO TO 2.
NO >> Check ignition power supply circuit of combination meter. Refer to DI-21, "
Power Supply and
Ground Circuit Inspection" .
2. CHECK SELF-DIAGNOSIS OPERATION
Perform combination meter self-diagnosis. Refer to DI-19, "
SELF-DIAGNOSIS FUNCTION" .
Does self-diagnosis function operate?
YES >> GO TO 3.
NO >> Check battery power supply of combination meter and ground system. Refer to PG-75, "
FUSE
BLOCK - JUNCTION BOX (J/B)" .
3. CHECK ODO/TRIP METER OPERATION
Check segment display status of odo/trip meter.
Is the display normal?
YES >> GO TO 4.
NO >> Replace combination meter.
SKIA8921E
SKIA8920E
Page 3699 of 4179
COMBINATION METERS
DI-21
C
D
E
F
G
H
I
J
L
MA
B
DI
4. CHECK LOW-FUEL WARNING LAMP ILLUMINATION
During fuel warning lamp check, confirm illumination of low-fuel warning lamp.
OK or NG
OK >> GO TO 5.
NG >> Replace combination meter.
5. CHECK METER CIRCUIT
Check indication of each meter/gauge in self-diagnosis mode.
OK or NG
OK >> Go to diagnosis results. Refer to DI-22, "Trouble Diag-
nosis Chart for Symptom" .
NG >> Replace combination meter.
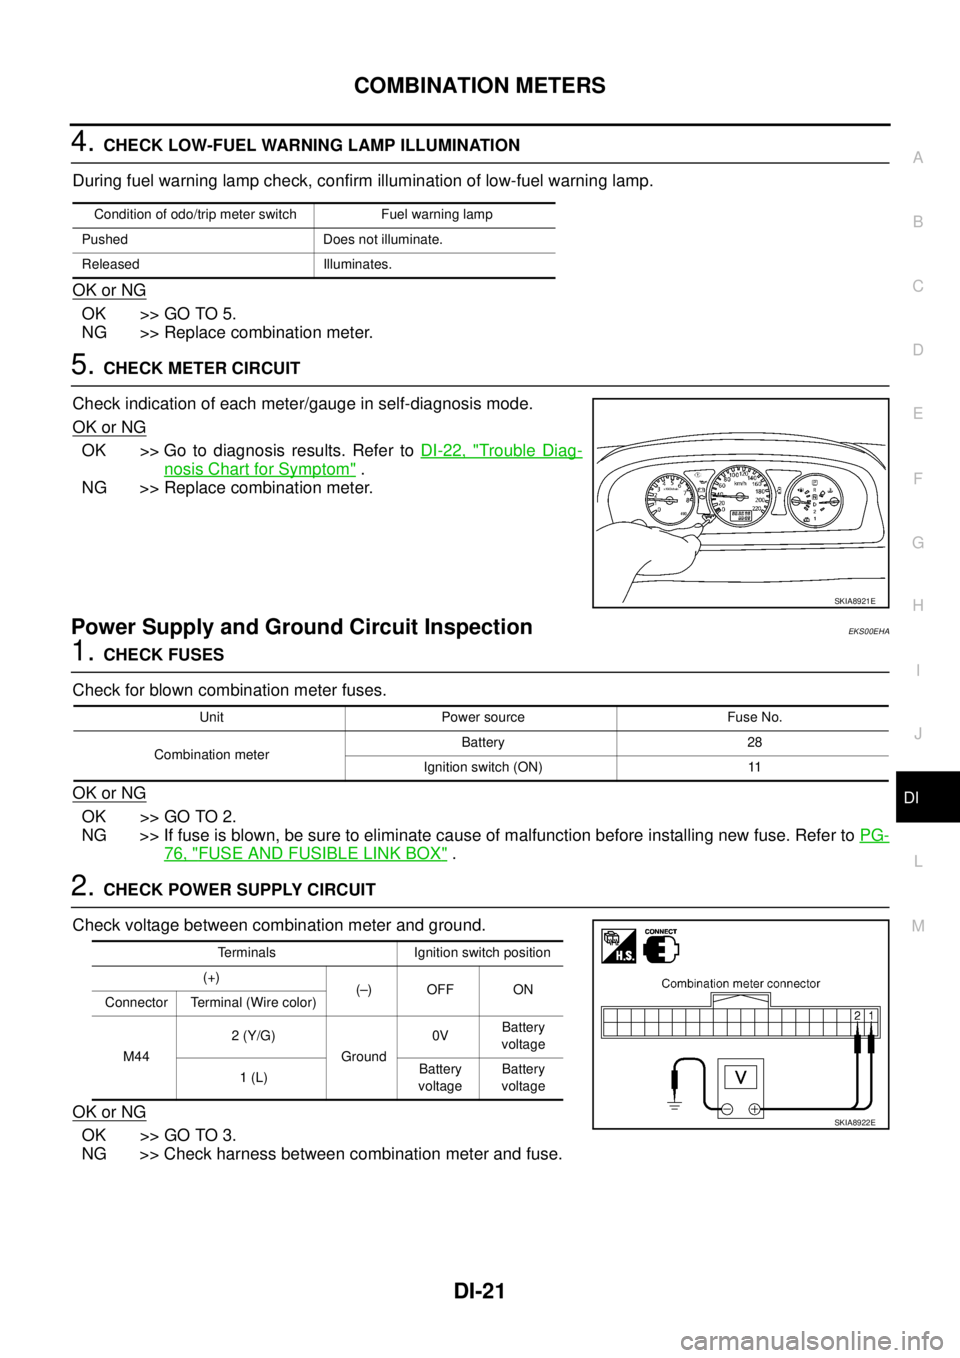
Power Supply and Ground Circuit InspectionEKS00EHA
1. CHECK FUSES
Check for blown combination meter fuses.
OK or NG
OK >> GO TO 2.
NG >> If fuse is blown, be sure to eliminate cause of malfunction before installing new fuse. Refer to PG-
76, "FUSE AND FUSIBLE LINK BOX" .
2. CHECK POWER SUPPLY CIRCUIT
Check voltage between combination meter and ground.
OK or NG
OK >> GO TO 3.
NG >> Check harness between combination meter and fuse.
Condition of odo/trip meter switch Fuel warning lamp
Pushed Does not illuminate.
Released Illuminates.
SKIA8921E
Unit Power source Fuse No.
Combination meterBattery 28
Ignition switch (ON) 11
Terminals Ignition switch position
(+)
(–) OFF ON
Connector Terminal (Wire color)
M442 (Y/G)
Ground0VBattery
voltage
1 (L)Battery
voltageBattery
voltage
SKIA8922E
