Page 24 of 3502
AT-16
A/T CONTROL SYSTEM
A/T CONTROL SYSTEMPFP:31036
Cross-Sectional View BCS000ZN
1. Band servo piston 2. Reverse clutch drum 3. Converter housing
4. Oil pump 5. Brake band 6. Reverse clutch
7. High clutch 8. Front planetary gear 9. Rear planetary gear
10. Forward clutch 11. Overrun clutch 12. Output gear
13. Side cover 14. Idler gear 15. Transaxle case
16. Low & reverse brake 17. Forward one-way clutch 18. Low one-way clutch
19. Reduction pinion gear 20. Final gear 21. Differential case
22. Input shaft 23. Torque converter
SCIA7734E
Page 234 of 3502

AT-226
ON-VEHICLE SERVICE
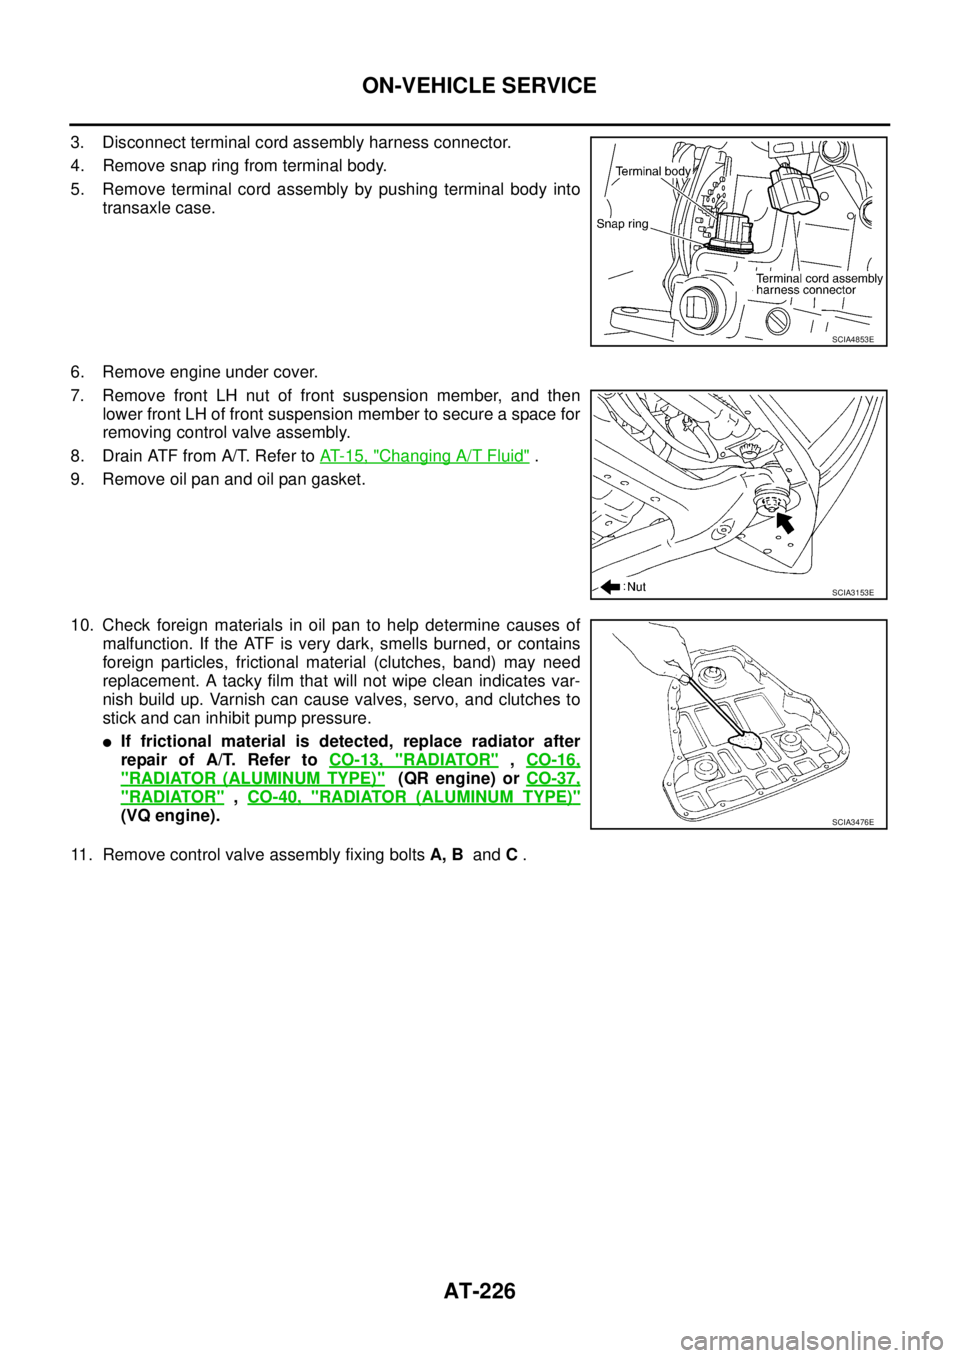
3. Disconnect terminal cord assembly harness connector.
4. Remove snap ring from terminal body.
5. Remove terminal cord assembly by pushing terminal body into
transaxle case.
6. Remove engine under cover.
7. Remove front LH nut of front suspension member, and then
lower front LH of front suspension member to secure a space for
removing control valve assembly.
8. Drain ATF from A/T. Refer to AT- 1 5 , "
Changing A/T Fluid" .
9. Remove oil pan and oil pan gasket.
10. Check foreign materials in oil pan to help determine causes of
malfunction. If the ATF is very dark, smells burned, or contains
foreign particles, frictional material (clutches, band) may need
replacement. A tacky film that will not wipe clean indicates var-
nish build up. Varnish can cause valves, servo, and clutches to
stick and can inhibit pump pressure.
�If frictional material is detected, replace radiator after
repair of A/T. Refer to CO-13, "
RADIATOR" , CO-16,
"RADIATOR (ALUMINUM TYPE)" (QR engine) or CO-37,
"RADIATOR" , CO-40, "RADIATOR (ALUMINUM TYPE)"
(VQ engine).
11. Remove control valve assembly fixing bolts A, B and C .
SCIA4853E
SCIA3153E
SCIA3476E
Page 238 of 3502
AT-230
ON-VEHICLE SERVICE
Park/Neutral Position (PNP) SwitchBCS00155
COMPONENTS
REMOVAL AND INSTALLATION
Removal
1. Set selector lever in “N” position.
2. Remove front tire LH from vehicle.
3. Remove LH splash guard. (Front fender side)
4. Remove engine under cover.
5. Remove control cable from manual shaft.
6. Remove PNP switch fixing bolts.
7. Remove PNP switch from transaxle assembly.
Installation
Note the following, and install in the reverse order of removal.
�Align PNP switch position when installing.
�After installation is completed, adjust and check A/T position. Refer to AT- 2 1 5 , "Adjustment of A/T Posi-
tion" , AT- 2 1 5 , "Checking of A/T Position" .
1. A/T 2. PNP switch
Refer to GI section to make sure icons (symbol marks) in the figure. Refer to GI-10, "
Components" .
SCIA7833E
SCIA2783E
SCIA3156E
Page 250 of 3502

AT-242
TRANSAXLE ASSEMBLY
COMPONENTS (FOR VQ23DE ENGINE MODELS)
REMOVAL
CAUTION:
Transaxle assembly it self cannot be removed from vehicle. Remove transaxle assembly and engine
assembly together from vehicle.
1. Disconnect the battery cable from negative terminal.
2. Remove exhaust front tube with power tool. Refer to EX-2, "
Removal and Installation" .
3. Remove rear plate cover from oil pan (upper). Refer to EM-26, "
OIL PAN AND OIL STRAINER" (QR
engine) or EM-145, "
OIL PAN AND OIL STRAINER" (VQ engine).
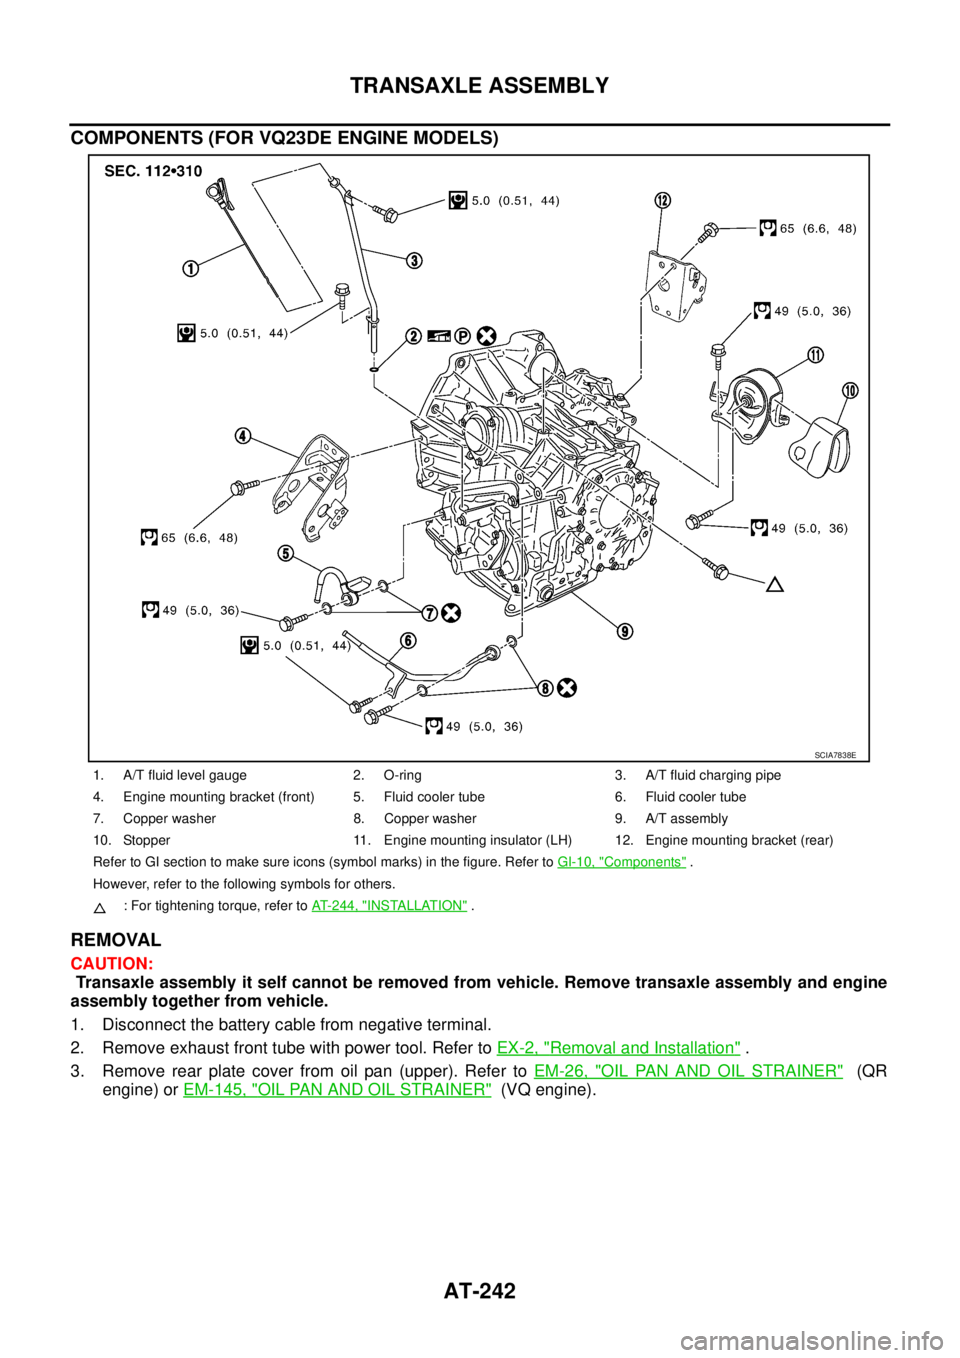
1. A/T fluid level gauge 2. O-ring 3. A/T fluid charging pipe
4. Engine mounting bracket (front) 5. Fluid cooler tube 6. Fluid cooler tube
7. Copper washer 8. Copper washer 9. A/T assembly
10. Stopper 11. Engine mounting insulator (LH) 12. Engine mounting bracket (rear)
Refer to GI section to make sure icons (symbol marks) in the figure. Refer to GI-10, "
Components" .
However, refer to the following symbols for others.
: For tightening torque, refer to AT-244, "
INSTALLATION" .
SCIA7838E
Page 360 of 3502
AT-352
ASSEMBLY
18. Install reverse clutch assembly on input shaft assembly (high
clutch drum).
Adjustment (2)BCS001OZ
When any parts listed below are replaced, adjust total end play and reverse clutch end play.
TOTAL END PLAY
�Measure clearance between reverse clutch drum and needle
bearing for oil pump cover.
�Select proper thickness of bearing race so that end play is within
specifications.
1. Measure dimensions “K” and “L” and then calculate dimension
“J”.
SCIA4461E
Part name Total end play Reverse clutch end play
transaxle case��
Overrun clutch hub��
Rear internal gear��
Rear planetary carrier��
Rear sun gear��
Front planetary carrier��
Front sun gear��
High clutch hub��
Input shaft assembly (high clutch drum)��
Oil pump cover��
Reverse clutch drum —�
SCIA3661E
SCIA3662E
Page 518 of 3502

ATC-140
REFRIGERANT LINES
Removal and Installation of Low-pressure Pipe 2 and High-pressure Pipe 2BJS000HU
REMOVAL
1. Set the temperature (passenger side) at 18°C, and then disconnect the battery cable from the negative
terminal.
2. Use a refrigerant collecting equipment (for HFC-134a) to discharge the refrigerant.
3. Remove extension cowl top lower panel. Refer to EI-21, "
COWL TOP" .
4. Remove mounting bolt from low-pressure pipe 1 bracket.
5. Remove high-pressure pipe 1 from vehicle clips.
6. Disconnect one-touch joints of low-pressure pipe 1, and high-
pressure pipe 1.
a. Set a disconnector [high-pressure side (SST: 9253089908), low-
pressure side (SST: 9253089916)] on A/C piping.
b. Slide a disconnector toward vehicle front until it clicks.
c. Slide A/C piping toward vehicle front and disconnect it.
CAUTION:
Cap or wrap the joint of the pipe with suitable material such
as vinyl tape to avoid the entry of air.
7. Remove blower unit. Refer to AT C - 11 3 , "
BLOWER UNIT" .
8. Remove mounting screws, and then remove air mix door motor
(passenger side).
9. Disconnect air mix door motor connector.
10. Remove intake sensor connector from foot duct (right).
11. Remove mounting screws, and then remove foot duct (right).
12. Remove mounting screws, and then remove heater core cover.
RJIA3322E
RJIA3300E
RJIA3308E
RJIA3323E
Page 565 of 3502
AUDIO (WITH INTEGRATED COLOR DISPLAY SYSTEM)
AV-37
C
D
E
F
G
H
I
J
L
MA
B
AV
Removal and Installation of Front Door SpeakerBKS0028Y
REMOVAL
1. Remove front door finisher. Refer to EI-35, "DOOR FINISHER" .
2. Remove screws (3) and remove front door speaker.
INSTALLATION
Installation is the reverse order of removal.
Removal and Installation of Rear Door SpeakerBKS0028Z
REMOVAL
1. Remove rear door finisher. Refer to EI-35, "DOOR FINISHER" .
2. Remove screws (3) and remove rear door speaker.
INSTALLATION
Installation is the reverse order of removal.
Removal and Installation of TweeterBKS00290
REMOVAL
1. Remove corner cover inner.
2. Remove screws (2) and remove tweeter.
INSTALLATION
Installation is the reverse order of removal.
SKIB0882E
SKIB0883E
SKIB0884E
Page 639 of 3502

INTEGRATED COLOR DISPLAY SYSTEM
AV-111
C
D
E
F
G
H
I
J
L
MA
B
AV
Example of Symptoms Possible No MalfunctionBKS0028D
For system operation information, refer to Owner's Manual.
DISPLAY
REAR VIEW MONITOR
Symptom Possible cause Possible solution
No image is displayed.The brightness is at the lowest setting. Adjust the brightness of the display.
The display is turned off. Turn on the display.
The screen is too dim. The move-
ment is slow.The temperature in the interior of the vehicle is
low.Wait until the interior of the vehicle has
warmed up.
Some pixels in the display are
darker or brighter than others.This condition is an inherent characteristic of
liquid crystal displays.This is not a malfunction.
Some menu items cannot be
selected.Some menu items become unavailable while
the vehicle is driven.Park the vehicle in a safe location, then oper-
ate the system.
Symptom Possible cause Possible solution
Rear view monitor image is not
shown.Selector lever is not set to R position. Shift the selector lever to R position.
Rear view monitor image is fuzzy.The front glass of the camera lens is dirty. Wipe it with a soft wet cloth lightly.
Adherence of raindrops or snow. Wipe it with a soft cloth lightly.
The lens is illuminated directly by sunlight or light
from headlight of cars behind.The fuzzy image recovers when the light is
covered.