Page 2400 of 3502
FAX-18
FRONT DRIVE SHAFT
8. Secure the large and small ends of boot with new boot bands as
shown in the figure.
NOTE:
Do not reuse boot bands.
9. Secure housing and shaft, and then make sure that they are in
the correct position when rotating boot. Install them with new
boot band when boot installation positions become incorrect.
10. Install circular clip and dust shield to housing.
NOTE:
Do not reuse circular clip and dust shield.
Wheel Side
Assemble in step 14 to 32 of FA X - 8 , "DRIVE SHAFT BOOT REPLACEMENT" , “On-Vehicle Inspection and
Service”.
Dynamic Damper
Secure dynamic damper with bands in the following specified posi-
tion when removing.
NOTE:
Do not reuse bands.
SFA395
Dimension A : 205 - 215 mm (8.07 - 8.46 in)
Dimension B : 70 mm (2.76 in)
FAC0156D
Page 2401 of 3502
FRONT DRIVE SHAFT
FAX-19
C
E
F
G
H
I
J
K
L
MA
B
FA X
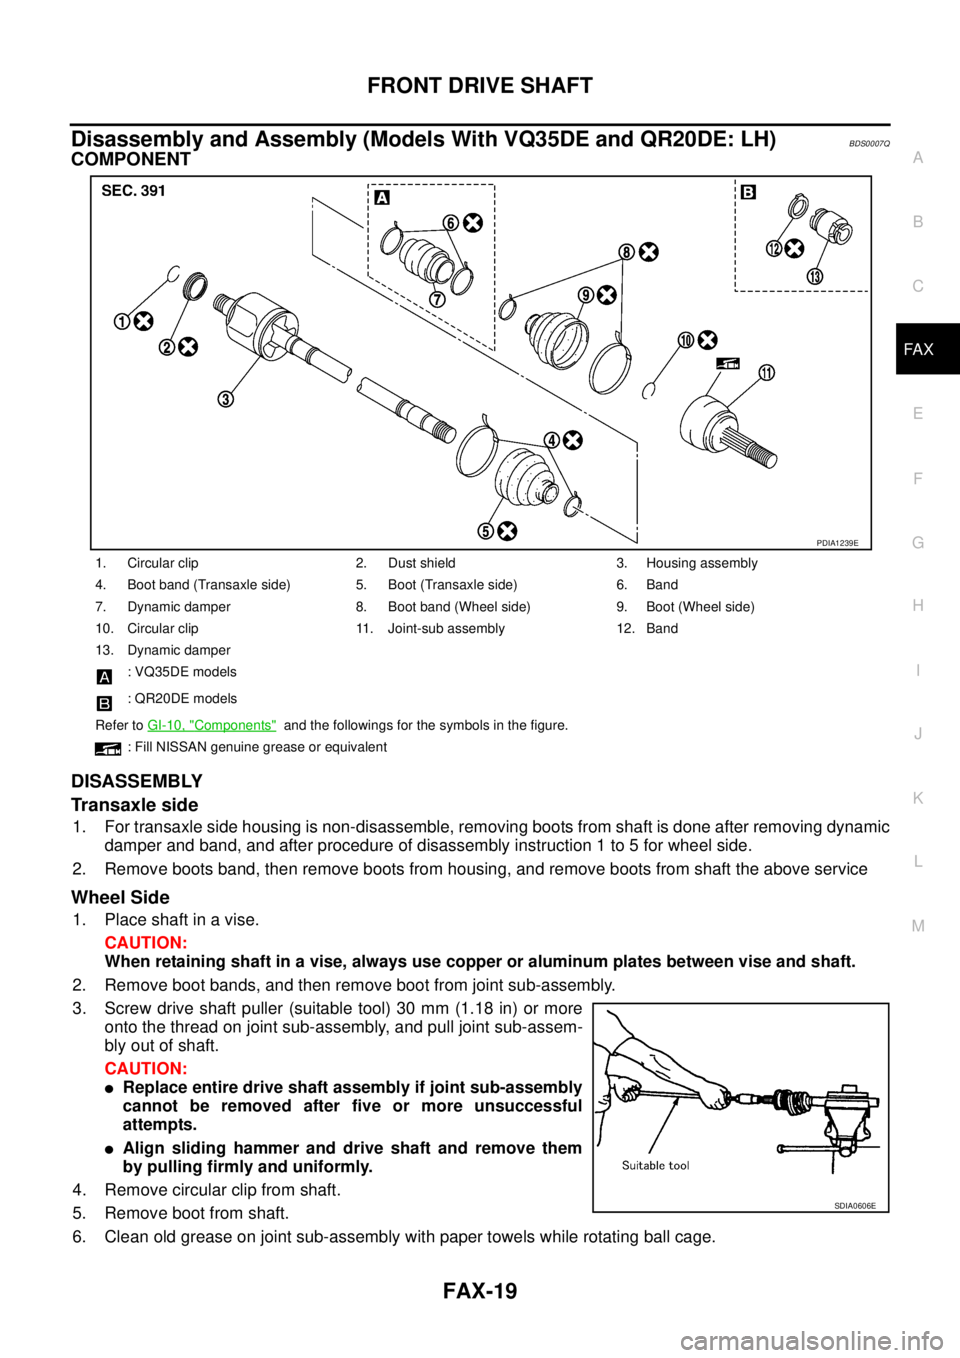
Disassembly and Assembly (Models With VQ35DE and QR20DE: LH)BDS0007Q
COMPONENT
DISASSEMBLY
Transaxle side
1. For transaxle side housing is non-disassemble, removing boots from shaft is done after removing dynamic
damper and band, and after procedure of disassembly instruction 1 to 5 for wheel side.
2. Remove boots band, then remove boots from housing, and remove boots from shaft the above service
Wheel Side
1. Place shaft in a vise.
CAUTION:
When retaining shaft in a vise, always use copper or aluminum plates between vise and shaft.
2. Remove boot bands, and then remove boot from joint sub-assembly.
3. Screw drive shaft puller (suitable tool) 30 mm (1.18 in) or more
onto the thread on joint sub-assembly, and pull joint sub-assem-
bly out of shaft.
CAUTION:
�Replace entire drive shaft assembly if joint sub-assembly
cannot be removed after five or more unsuccessful
attempts.
�Align sliding hammer and drive shaft and remove them
by pulling firmly and uniformly.
4. Remove circular clip from shaft.
5. Remove boot from shaft.
6. Clean old grease on joint sub-assembly with paper towels while rotating ball cage.
1. Circular clip 2. Dust shield 3. Housing assembly
4. Boot band (Transaxle side) 5. Boot (Transaxle side) 6. Band
7. Dynamic damper 8. Boot band (Wheel side) 9. Boot (Wheel side)
10. Circular clip 11. Joint-sub assembly 12. Band
13. Dynamic damper
: VQ35DE models
: QR20DE models
Refer to GI-10, "
Components" and the followings for the symbols in the figure.
: Fill NISSAN genuine grease or equivalent
PDIA1239E
SDIA0606E
Page 2403 of 3502
FRONT DRIVE SHAFT
FAX-21
C
E
F
G
H
I
J
K
L
MA
B
FA X
7. Put boot band in the groove on drive shaft boot. Then fit pawls
into holes to temporary installation.
8. Pinch projection on the band with suitable pliers to tighten band.
9. Insert tip of band below end of the pawl.
10. After installing housing and shaft, rotate boot to check whether
or not the actual position is correct. If boot position is not correct,
secure boot with new boot bands again.
11. Install circular clip and dust shield to housing.
NOTE:
Do not reuse circular clip and dust shield.
Wheel Side
Assemble in steps 14 to 32 of FAX-8, "DRIVE SHAFT BOOT REPLACEMENT" , “ON-Vehicle Inspection and
Service”.
Dynamic Damper
Secure dynamic damper with bands in the following specified posi-
tion when removing.
NOTE:
Do not reuse bands.
SDIA3053J
SDIA3054J
SDIA3055J
Dimension A : 205 – 215 mm (8.07 – 8.46 in)
Dimension B : 50 mm (1.97 in) (QR20DE models)
: 70 mm (2.76 in) (VQ35DE models)
FAC0156D
Page 2407 of 3502
FRONT DRIVE SHAFT
FAX-25
C
E
F
G
H
I
J
K
L
MA
B
FA X
ASSEMBLY
Transaxle Side
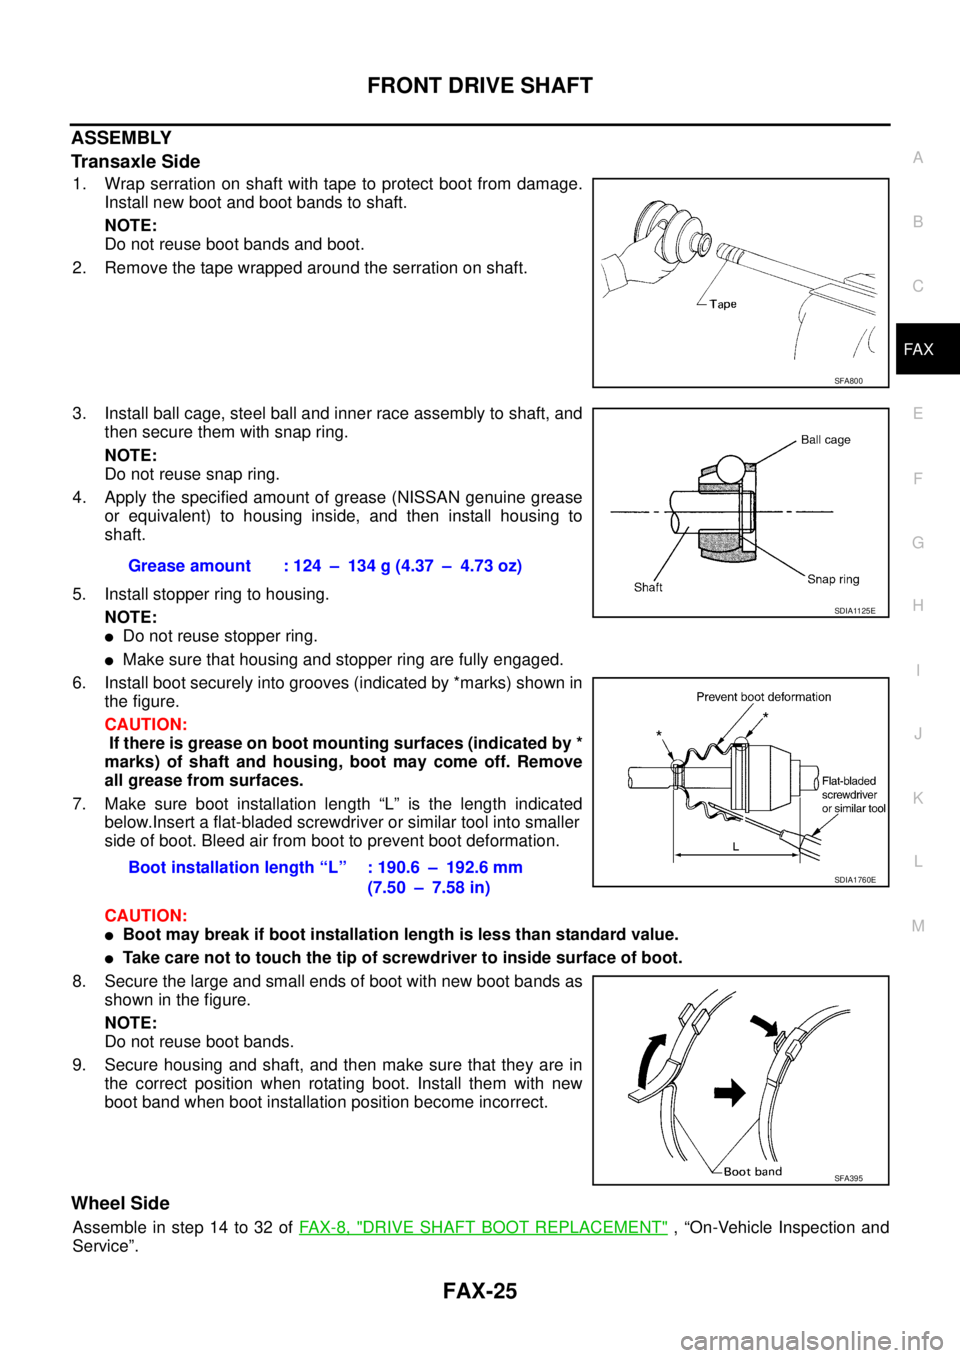
1. Wrap serration on shaft with tape to protect boot from damage.
Install new boot and boot bands to shaft.
NOTE:
Do not reuse boot bands and boot.
2. Remove the tape wrapped around the serration on shaft.
3. Install ball cage, steel ball and inner race assembly to shaft, and
then secure them with snap ring.
NOTE:
Do not reuse snap ring.
4. Apply the specified amount of grease (NISSAN genuine grease
or equivalent) to housing inside, and then install housing to
shaft.
5. Install stopper ring to housing.
NOTE:
�Do not reuse stopper ring.
�Make sure that housing and stopper ring are fully engaged.
6. Install boot securely into grooves (indicated by *marks) shown in
the figure.
CAUTION:
If there is grease on boot mounting surfaces (indicated by *
marks) of shaft and housing, boot may come off. Remove
all grease from surfaces.
7. Make sure boot installation length “L” is the length indicated
below.Insert a flat-bladed screwdriver or similar tool into smaller
side of boot. Bleed air from boot to prevent boot deformation.
CAUTION:
�Boot may break if boot installation length is less than standard value.
�Take care not to touch the tip of screwdriver to inside surface of boot.
8. Secure the large and small ends of boot with new boot bands as
shown in the figure.
NOTE:
Do not reuse boot bands.
9. Secure housing and shaft, and then make sure that they are in
the correct position when rotating boot. Install them with new
boot band when boot installation position become incorrect.
Wheel Side
Assemble in step 14 to 32 of FAX-8, "DRIVE SHAFT BOOT REPLACEMENT" , “On-Vehicle Inspection and
Service”.
SFA800
Grease amount : 124 – 134 g (4.37 – 4.73 oz)
Boot installation length “L” : 190.6 – 192.6 mm
(7.50 – 7.58 in)
SDIA1125E
SDIA1760E
SFA395
Page 2410 of 3502
FAX-28
FRONT DRIVE SHAFT
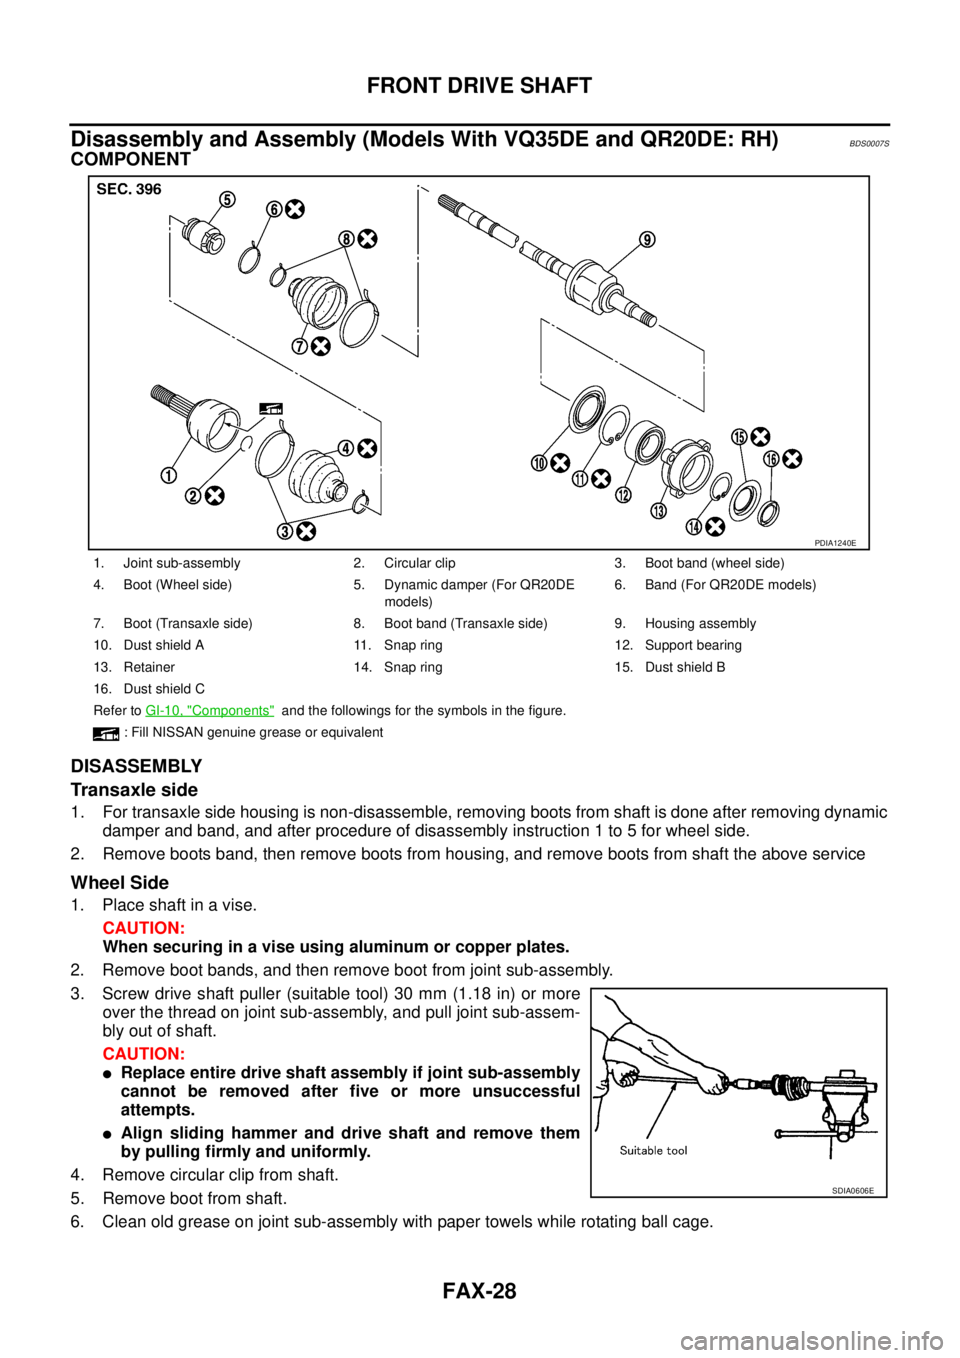
Disassembly and Assembly (Models With VQ35DE and QR20DE: RH)BDS0007S
COMPONENT
DISASSEMBLY
Transaxle side
1. For transaxle side housing is non-disassemble, removing boots from shaft is done after removing dynamic
damper and band, and after procedure of disassembly instruction 1 to 5 for wheel side.
2. Remove boots band, then remove boots from housing, and remove boots from shaft the above service
Wheel Side
1. Place shaft in a vise.
CAUTION:
When securing in a vise using aluminum or copper plates.
2. Remove boot bands, and then remove boot from joint sub-assembly.
3. Screw drive shaft puller (suitable tool) 30 mm (1.18 in) or more
over the thread on joint sub-assembly, and pull joint sub-assem-
bly out of shaft.
CAUTION:
�Replace entire drive shaft assembly if joint sub-assembly
cannot be removed after five or more unsuccessful
attempts.
�Align sliding hammer and drive shaft and remove them
by pulling firmly and uniformly.
4. Remove circular clip from shaft.
5. Remove boot from shaft.
6. Clean old grease on joint sub-assembly with paper towels while rotating ball cage.
1. Joint sub-assembly 2. Circular clip 3. Boot band (wheel side)
4. Boot (Wheel side) 5. Dynamic damper (For QR20DE
models)6. Band (For QR20DE models)
7. Boot (Transaxle side) 8. Boot band (Transaxle side) 9. Housing assembly
10. Dust shield A 11. Snap ring 12. Support bearing
13. Retainer 14. Snap ring 15. Dust shield B
16. Dust shield C
Refer to GI-10, "
Components" and the followings for the symbols in the figure.
: Fill NISSAN genuine grease or equivalent
PDIA1240E
SDIA0606E
Page 2413 of 3502
FRONT DRIVE SHAFT
FAX-31
C
E
F
G
H
I
J
K
L
MA
B
FA X
7. Put boot band in the groove on drive shaft boot. Then fit pawls
into holes to temporary installation.
8. Pinch projection on the band with suitable pliers to tighten band.
9. Insert tip of band below end of the pawl.
10. After installing housing and shaft, rotate boot to check whether
or not the actual position is correct. If boot position is not correct,
secure boot with new boot bands again.
11. Install circular clip and dust shield to housing.
NOTE:
Do not reuse circular clip and dust shield.
Wheel Side
Assemble in step 14 to 32 of FAX-8, "DRIVE SHAFT BOOT REPLACEMENT" , “On-Vehicle Inspection and
Service”.
SDIA3053J
SDIA3054J
SDIA3055J
Page 2416 of 3502
FAX-34
SERVICE DATA AND SPECIFICATIONS (SDS)
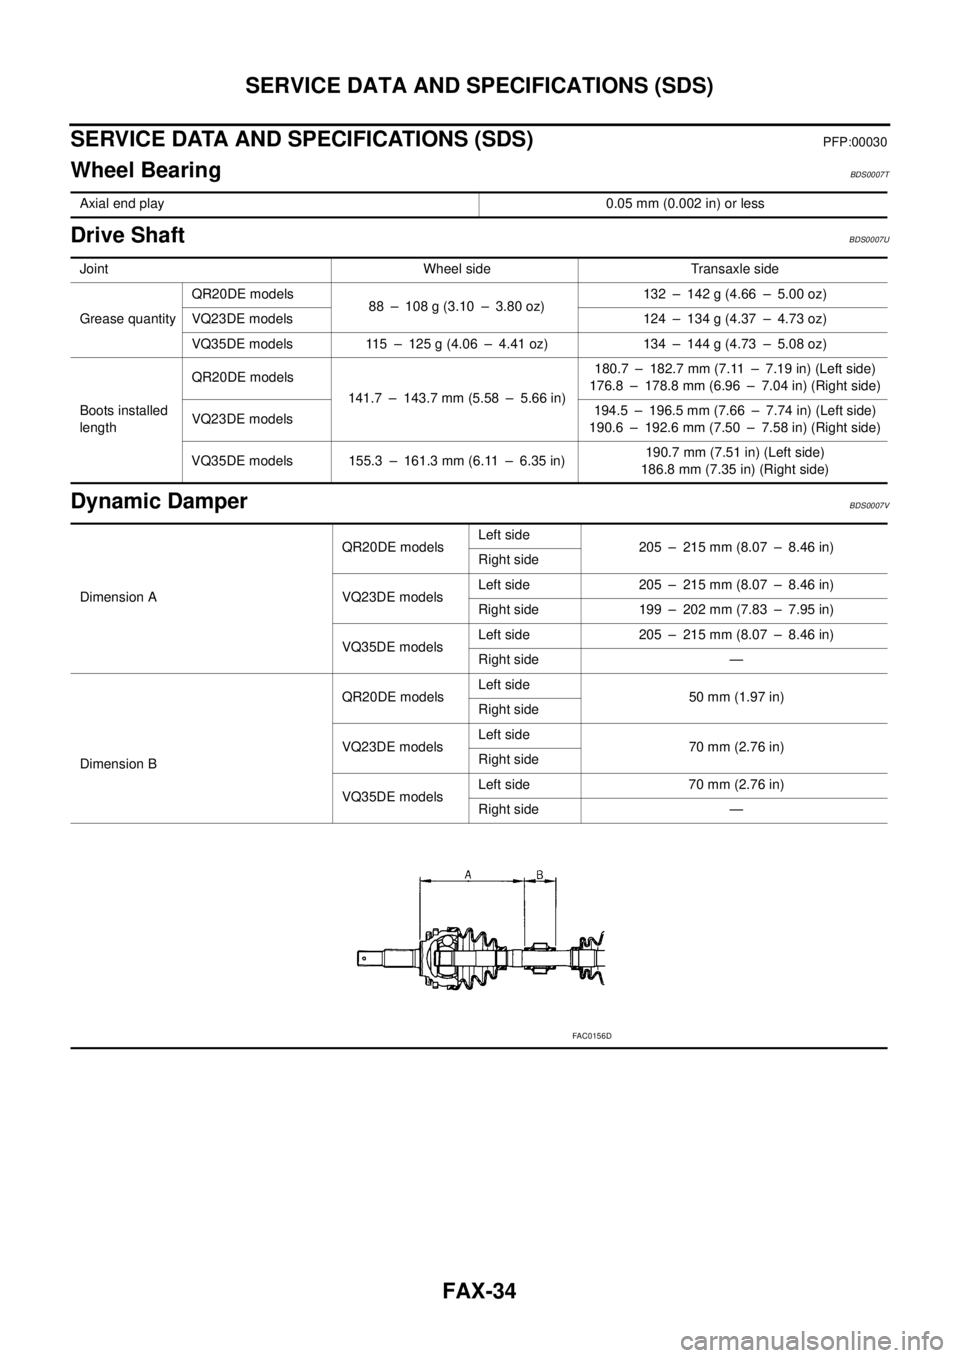
SERVICE DATA AND SPECIFICATIONS (SDS)PFP:00030
Wheel BearingBDS0007T
Drive ShaftBDS0007U
Dynamic DamperBDS0007V
Axial end play0.05 mm (0.002 in) or less
Joint Wheel side Transaxle side
Grease quantityQR20DE models
88 – 108 g (3.10 – 3.80 oz)132 – 142 g (4.66 – 5.00 oz)
VQ23DE models 124 – 134 g (4.37 – 4.73 oz)
VQ35DE models 115 – 125 g (4.06 – 4.41 oz) 134 – 144 g (4.73 – 5.08 oz)
Boots installed
lengthQR20DE models
141.7 – 143.7 mm (5.58 – 5.66 in)180.7 – 182.7 mm (7.11 – 7.19 in) (Left side)
176.8 – 178.8 mm (6.96 – 7.04 in) (Right side)
VQ23DE models194.5 – 196.5 mm (7.66 – 7.74 in) (Left side)
190.6 – 192.6 mm (7.50 – 7.58 in) (Right side)
VQ35DE models 155.3 – 161.3 mm (6.11 – 6.35 in)190.7 mm (7.51 in) (Left side)
186.8 mm (7.35 in) (Right side)
Dimension AQR20DE modelsLeft side
205 – 215 mm (8.07 – 8.46 in)
Right side
VQ23DE modelsLeft side 205 – 215 mm (8.07 – 8.46 in)
Right side 199 – 202 mm (7.83 – 7.95 in)
VQ35DE modelsLeft side 205 – 215 mm (8.07 – 8.46 in)
Right side —
Dimension BQR20DE modelsLeft side
50 mm (1.97 in)
Right side
VQ23DE modelsLeft side
70 mm (2.76 in)
Right side
VQ35DE modelsLeft side 70 mm (2.76 in)
Right side —
FAC0156D
Page 2417 of 3502
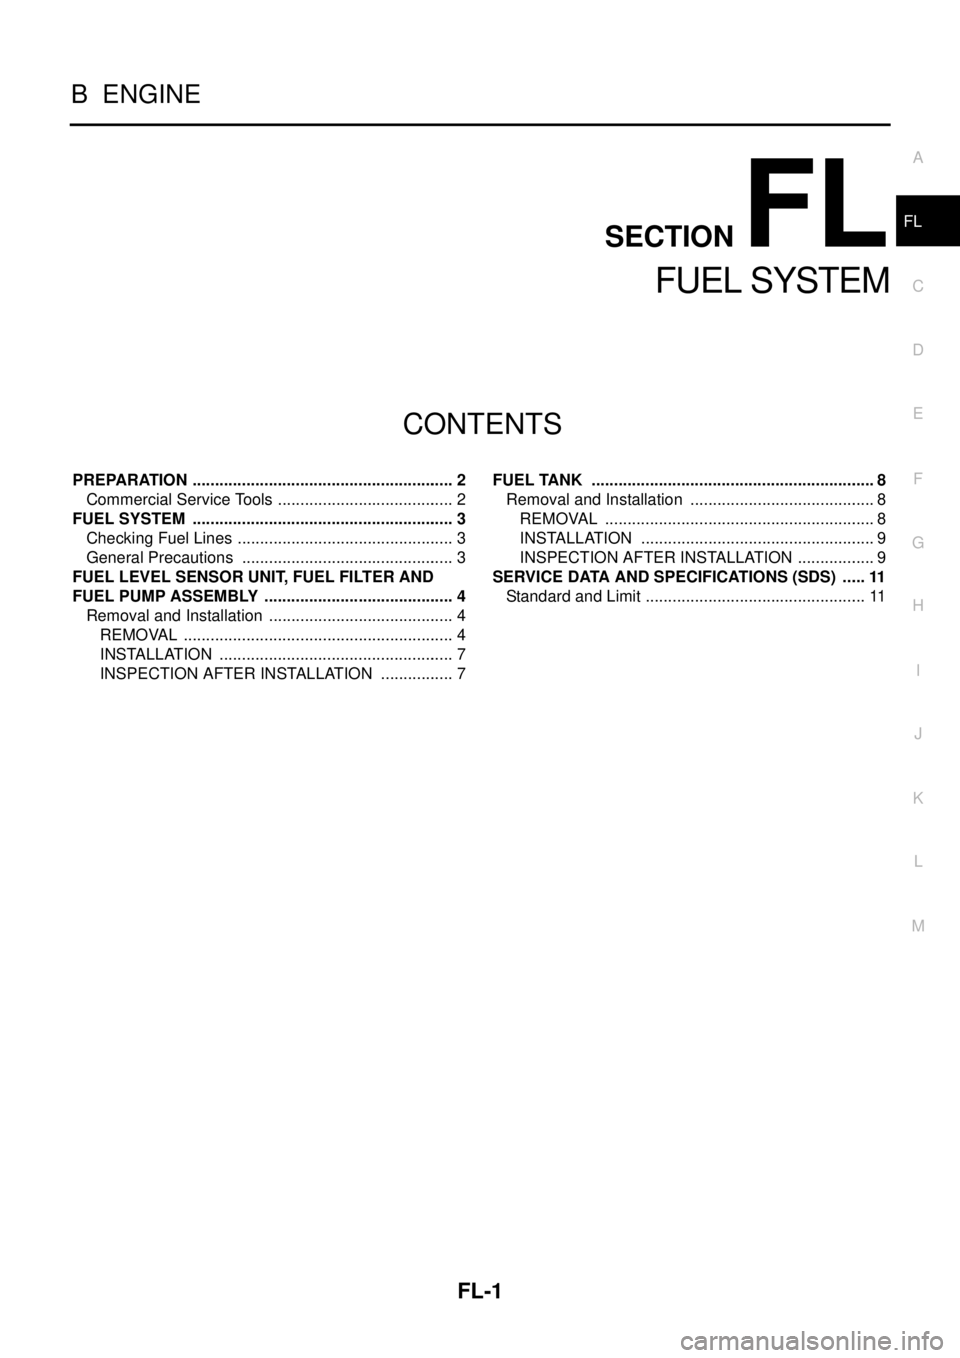
FL-1
FUEL SYSTEM
B ENGINE
CONTENTS
C
D
E
F
G
H
I
J
K
L
M
SECTION FL
A
FL
FUEL SYSTEM
PREPARATION ........................................................... 2
Commercial Service Tools ........................................ 2
FUEL SYSTEM ........................................................... 3
Checking Fuel Lines ................................................. 3
General Precautions ................................................ 3
FUEL LEVEL SENSOR UNIT, FUEL FILTER AND
FUEL PUMP ASSEMBLY ........................................... 4
Removal and Installation .......................................... 4
REMOVAL ............................................................. 4
INSTALLATION ..................................................... 7
INSPECTION AFTER INSTALLATION ................. 7FUEL TANK ................................................................ 8
Removal and Installation .......................................... 8
REMOVAL ............................................................. 8
INSTALLATION ..................................................... 9
INSPECTION AFTER INSTALLATION .................. 9
SERVICE DATA AND SPECIFICATIONS (SDS) ...... 11
Standard and Limit .................................................. 11