Page 2750 of 3502
LT-62
HEADLAMP - HALOGEN TYPE -
Bulb ReplacementBKS001O2
HEADLAMP (UPPER) HIGH BEAM
1. Turn lighting switch OFF.
2. Remove washer tank inlet when replacing bulb RH. Refer to WW-38, "
Removal and Installation of Washer
Ta n k" .
Remove air cleaner case when replacing bulb LH. Refer to EM-17, "
Removal and Installation" (models
with QR engine), or EM-131, "
Removal and Installation" (models with VQ engine).
3. Turn plastic cap counterclockwise and unlock it.
4. Remove the socket connected to the bulb.
5. Unlock retaining spring and remove bulb from headlamp.
HEADLAMP (LOWER) LOW BEAM
1. Turn lighting switch OFF.
2. Remove washer tank inlet when replacing bulb RH. Refer to WW-38, "
Removal and Installation of Washer
Ta n k" .
Remove air cleaner case when replacing bulb LH. Refer to EM-17, "
Removal and Installation" (models
with QR engine), or EM-131, "
Removal and Installation" (models with VQ engine).
3. Turn plastic cap counterclockwise and unlock it.
4. Remove the socket connected to the bulb.
5. Unlock retaining spring and remove bulb from headlamp.
PARKING LAMP
1. Turn lighting switch OFF.
2. Remove fender protector (front). Refer to EI-23, "
Removal and Installation" .
3. Turn bulb socket counterclockwise and unlock it.
4. Remove bulb from its socket.
FRONT TURN SIGNAL LAMP
1. Turn lighting switch OFF.
2. Remove fender protector (front). Refer to EI-23, "
Removal and Installation" .
3. Turn bulb socket counterclockwise and unlock it.
4. Remove bulb from its socket.
CAUTION:
After installing bulb, be sure to install plastic cap and bulb socket securely to ensure watertight-
ness.
Removal and InstallationBKS001O3
Refer to LT- 3 6 , "Removal and Installation" .
NOTE:
After installation, perform aiming adjustment. Refer to LT- 6 0 , "
Aiming Adjustment" . Headlamp (upper) high beam : 12V - 55W (H7)
Headlamp (lower) low beam : 12V - 55W (H11)
Parking lamp : 12V - 5W
Front turn signal lamp : 12V - 21W (amber)
Page 2751 of 3502
HEADLAMP - HALOGEN TYPE -
LT-63
C
D
E
F
G
H
I
J
L
MA
B
LT
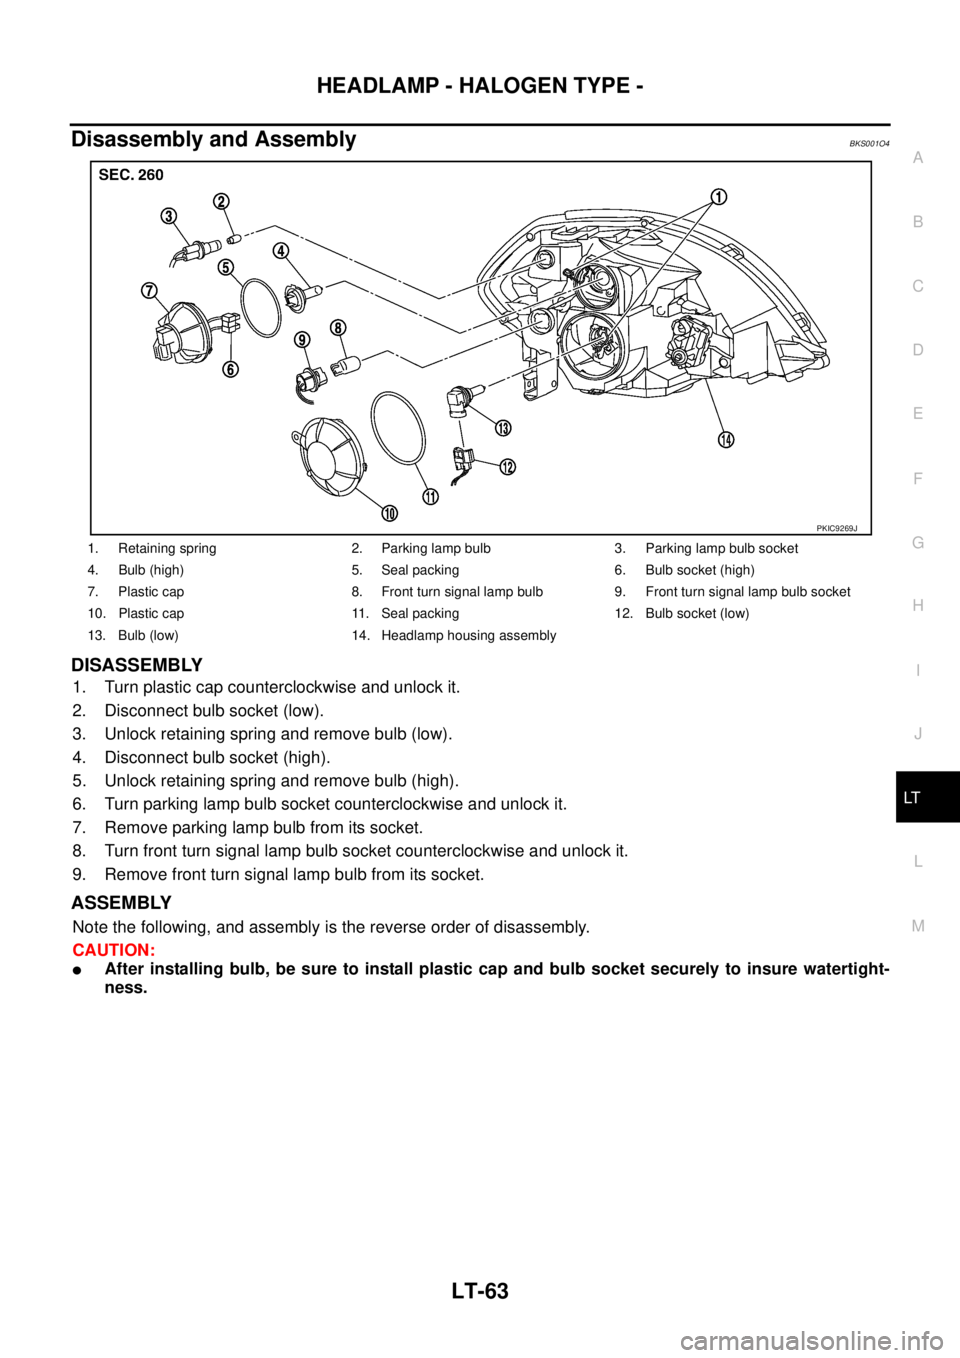
Disassembly and AssemblyBKS001O4
DISASSEMBLY
1. Turn plastic cap counterclockwise and unlock it.
2. Disconnect bulb socket (low).
3. Unlock retaining spring and remove bulb (low).
4. Disconnect bulb socket (high).
5. Unlock retaining spring and remove bulb (high).
6. Turn parking lamp bulb socket counterclockwise and unlock it.
7. Remove parking lamp bulb from its socket.
8. Turn front turn signal lamp bulb socket counterclockwise and unlock it.
9. Remove front turn signal lamp bulb from its socket.
ASSEMBLY
Note the following, and assembly is the reverse order of disassembly.
CAUTION:
�After installing bulb, be sure to install plastic cap and bulb socket securely to insure watertight-
ness.
1. Retaining spring 2. Parking lamp bulb 3. Parking lamp bulb socket
4. Bulb (high) 5. Seal packing 6. Bulb socket (high)
7. Plastic cap 8. Front turn signal lamp bulb 9. Front turn signal lamp bulb socket
10. Plastic cap 11. Seal packing 12. Bulb socket (low)
13. Bulb (low) 14. Headlamp housing assembly
PKIC9269J
Page 2838 of 3502
LT-150
REAR FOG LAMP
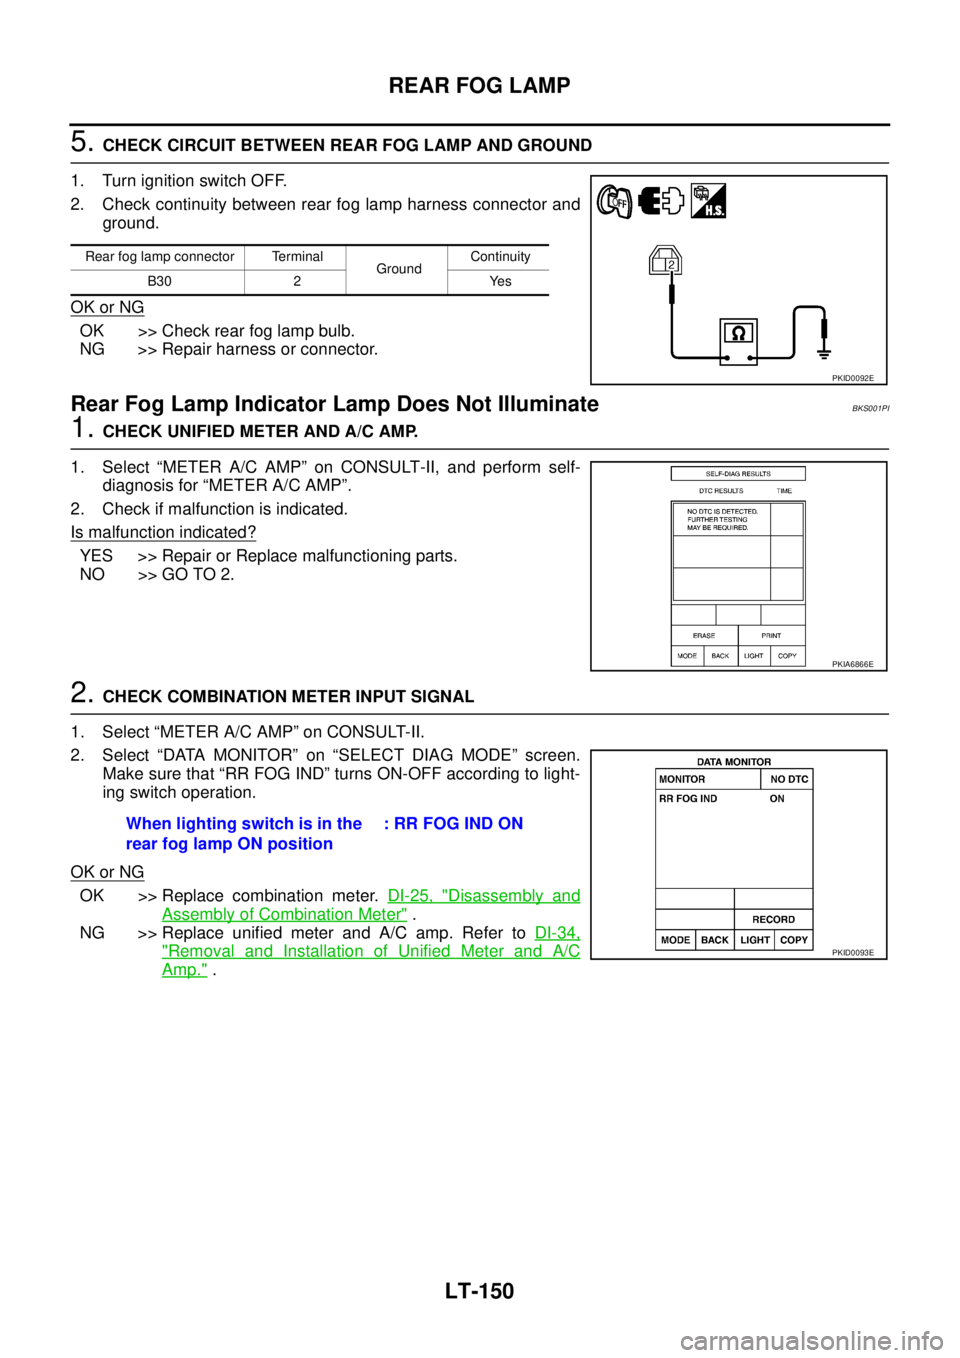
5. CHECK CIRCUIT BETWEEN REAR FOG LAMP AND GROUND
1. Turn ignition switch OFF.
2. Check continuity between rear fog lamp harness connector and
ground.
OK or NG
OK >> Check rear fog lamp bulb.
NG >> Repair harness or connector.
Rear Fog Lamp Indicator Lamp Does Not IlluminateBKS001PI
1. CHECK UNIFIED METER AND A/C AMP.
1. Select “METER A/C AMP” on CONSULT-II, and perform self-
diagnosis for “METER A/C AMP”.
2. Check if malfunction is indicated.
Is malfunction indicated?
YES >> Repair or Replace malfunctioning parts.
NO >> GO TO 2.
2. CHECK COMBINATION METER INPUT SIGNAL
1. Select “METER A/C AMP” on CONSULT-II.
2. Select “DATA MONITOR” on “SELECT DIAG MODE” screen.
Make sure that “RR FOG IND” turns ON-OFF according to light-
ing switch operation.
OK or NG
OK >> Replace combination meter. DI-25, "Disassembly and
Assembly of Combination Meter" .
NG >> Replace unified meter and A/C amp. Refer to DI-34,
"Removal and Installation of Unified Meter and A/C
Amp." .
Rear fog lamp connector Terminal
GroundContinuity
B30 2 Yes
PKID0092E
PKIA6866E
When lighting switch is in the
rear fog lamp ON position: RR FOG IND ON
PKID0093E
Page 2854 of 3502
LT-166
TURN SIGNAL AND HAZARD WARNING LAMPS
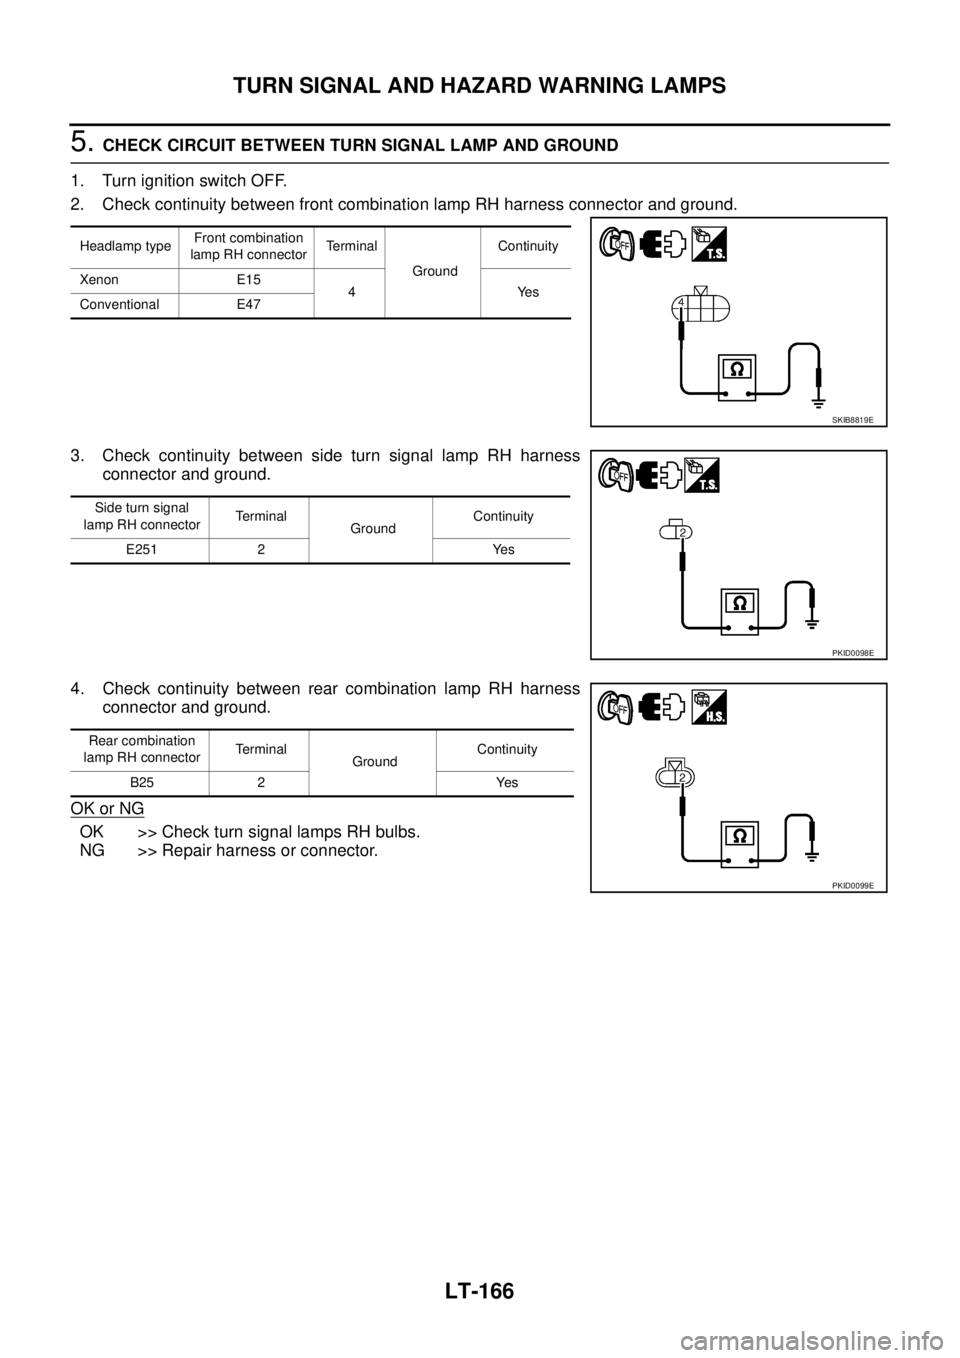
5. CHECK CIRCUIT BETWEEN TURN SIGNAL LAMP AND GROUND
1. Turn ignition switch OFF.
2. Check continuity between front combination lamp RH harness connector and ground.
3. Check continuity between side turn signal lamp RH harness
connector and ground.
4. Check continuity between rear combination lamp RH harness
connector and ground.
OK or NG
OK >> Check turn signal lamps RH bulbs.
NG >> Repair harness or connector.
Headlamp typeFront combination
lamp RH connectorTerminal
GroundContinuity
Xenon E15
4Yes
Conventional E47
SKIB8819E
Side turn signal
lamp RH connectorTerminal
GroundContinuity
E251 2 Yes
PKID0098E
Rear combination
lamp RH connectorTerminal
GroundContinuity
B25 2 Yes
PKID0099E
Page 2858 of 3502
LT-170
TURN SIGNAL AND HAZARD WARNING LAMPS
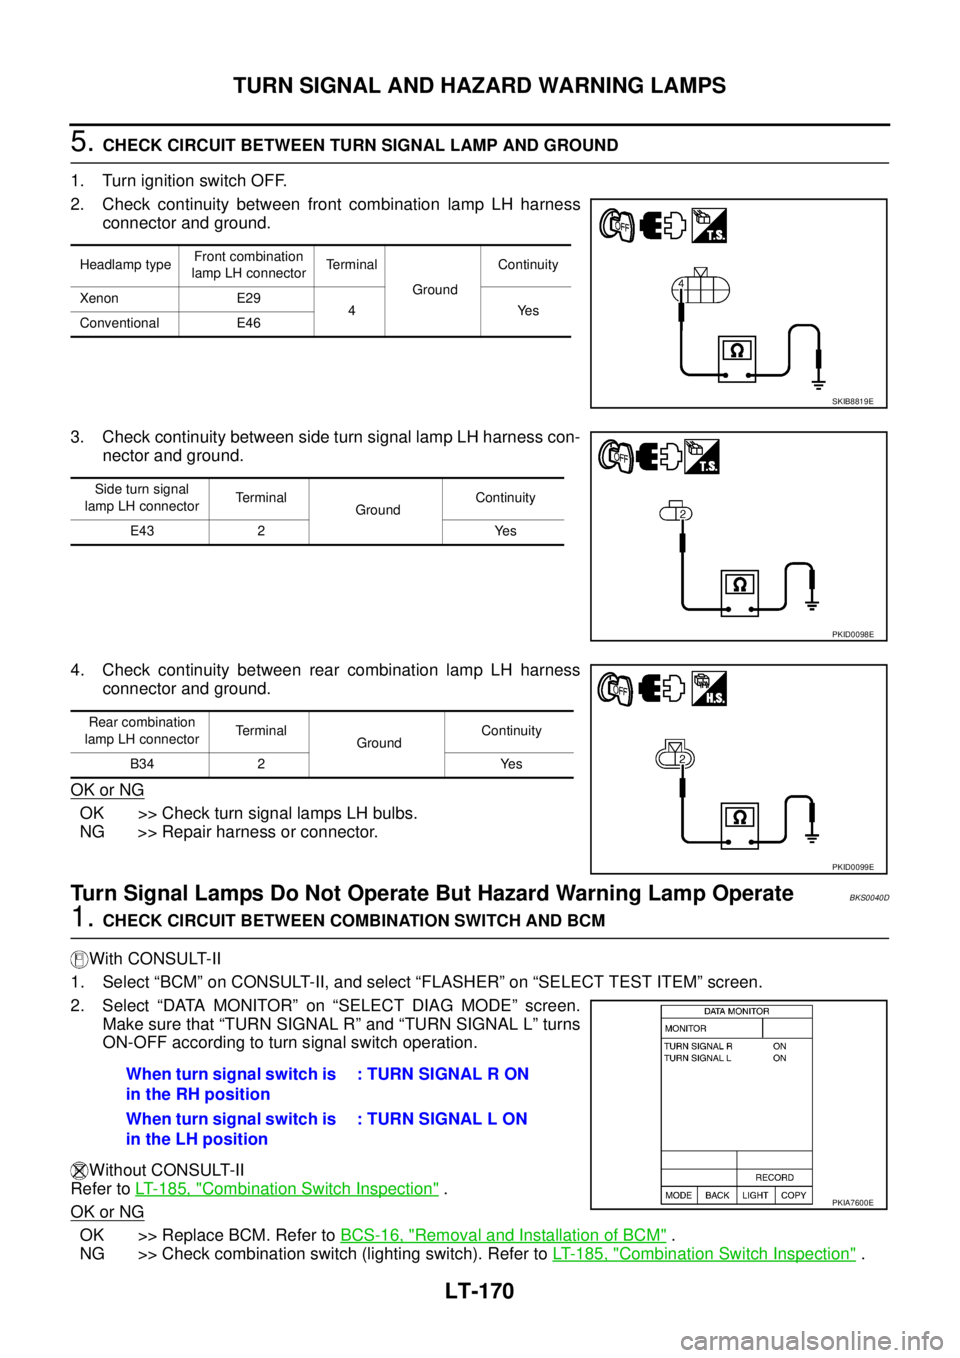
5. CHECK CIRCUIT BETWEEN TURN SIGNAL LAMP AND GROUND
1. Turn ignition switch OFF.
2. Check continuity between front combination lamp LH harness
connector and ground.
3. Check continuity between side turn signal lamp LH harness con-
nector and ground.
4. Check continuity between rear combination lamp LH harness
connector and ground.
OK or NG
OK >> Check turn signal lamps LH bulbs.
NG >> Repair harness or connector.
Turn Signal Lamps Do Not Operate But Hazard Warning Lamp OperateBKS0040D
1. CHECK CIRCUIT BETWEEN COMBINATION SWITCH AND BCM
With CONSULT-II
1. Select “BCM” on CONSULT-II, and select “FLASHER” on “SELECT TEST ITEM” screen.
2. Select “DATA MONITOR” on “SELECT DIAG MODE” screen.
Make sure that “TURN SIGNAL R” and “TURN SIGNAL L” turns
ON-OFF according to turn signal switch operation.
Without CONSULT-II
Refer to LT- 1 8 5 , "
Combination Switch Inspection" .
OK or NG
OK >> Replace BCM. Refer to BCS-16, "Removal and Installation of BCM" .
NG >> Check combination switch (lighting switch). Refer to LT- 1 8 5 , "
Combination Switch Inspection" .
Headlamp typeFront combination
lamp LH connectorTerminal
GroundContinuity
Xenon E29
4Yes
Conventional E46
SKIB8819E
Side turn signal
lamp LH connectorTerminal
GroundContinuity
E43 2 Yes
PKID0098E
Rear combination
lamp LH connectorTerminal
GroundContinuity
B34 2 Yes
PKID0099E
When turn signal switch is
in the RH position: TURN SIGNAL R ON
When turn signal switch is
in the LH position: TURN SIGNAL L ON
PKIA7600E
Page 2863 of 3502
TURN SIGNAL AND HAZARD WARNING LAMPS
LT-175
C
D
E
F
G
H
I
J
L
MA
B
LT
Bulb ReplacementBKS001PZ
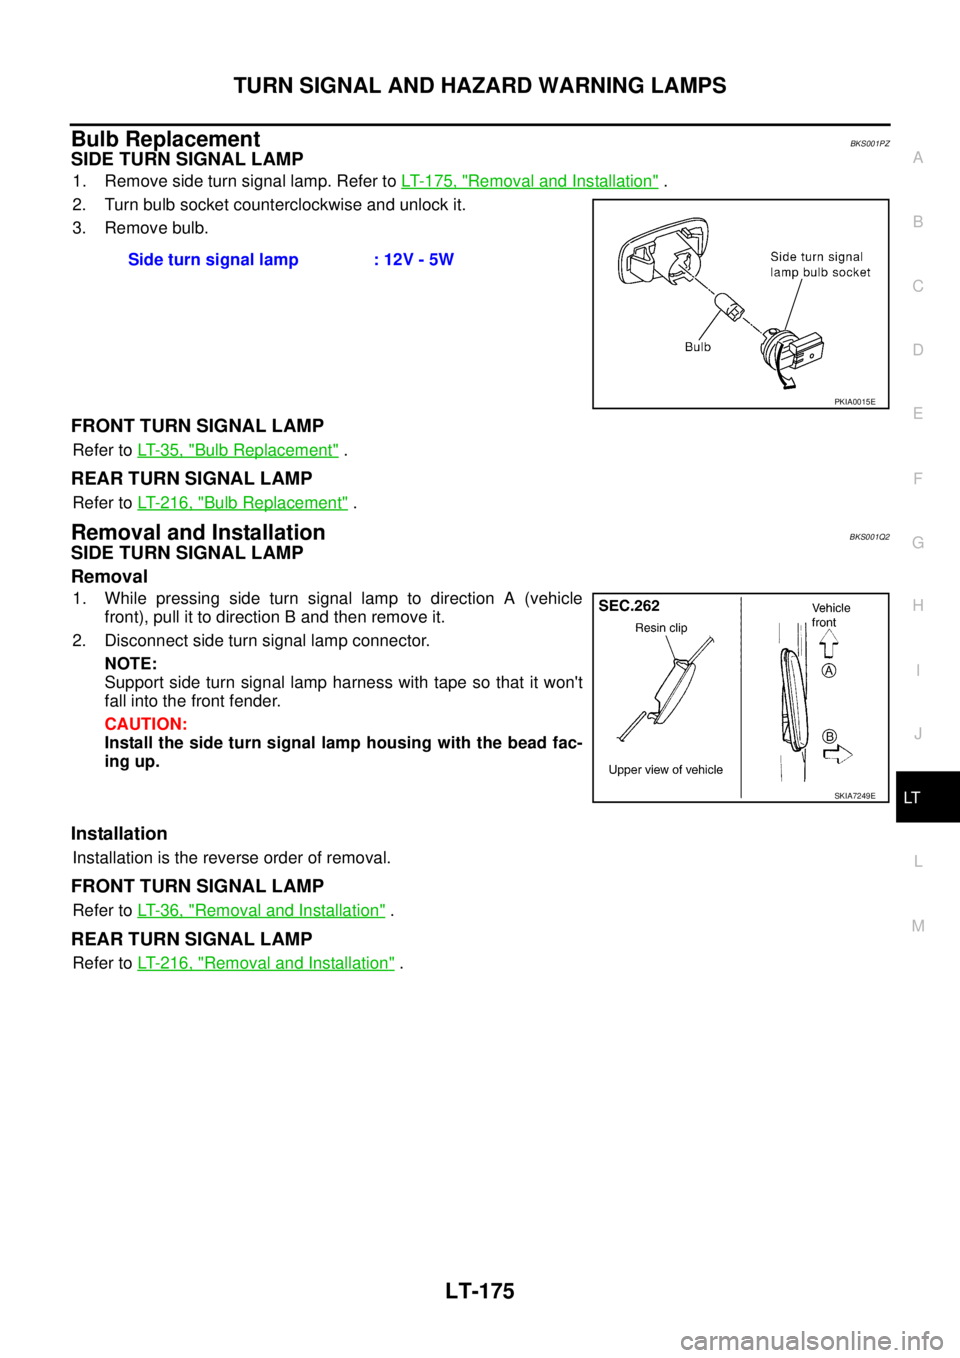
SIDE TURN SIGNAL LAMP
1. Remove side turn signal lamp. Refer to LT- 1 7 5 , "Removal and Installation" .
2. Turn bulb socket counterclockwise and unlock it.
3. Remove bulb.
FRONT TURN SIGNAL LAMP
Refer to LT- 3 5 , "Bulb Replacement" .
REAR TURN SIGNAL LAMP
Refer to LT- 2 1 6 , "Bulb Replacement" .
Removal and InstallationBKS001Q2
SIDE TURN SIGNAL LAMP
Removal
1. While pressing side turn signal lamp to direction A (vehicle
front), pull it to direction B and then remove it.
2. Disconnect side turn signal lamp connector.
NOTE:
Support side turn signal lamp harness with tape so that it won't
fall into the front fender.
CAUTION:
Install the side turn signal lamp housing with the bead fac-
ing up.
Installation
Installation is the reverse order of removal.
FRONT TURN SIGNAL LAMP
Refer to LT- 3 6 , "Removal and Installation" .
REAR TURN SIGNAL LAMP
Refer to LT- 2 1 6 , "Removal and Installation" . Side turn signal lamp : 12V - 5W
PKIA0015E
SKIA7249E
Page 2904 of 3502
LT-216
REAR COMBINATION LAMP
REAR COMBINATION LAMPPFP:26554
Bulb ReplacementBKS001R0
REAR TURN SIGNAL LAMP BULB, BACK-UP LAMP BULB AND STOP/TAIL LAMP BULB
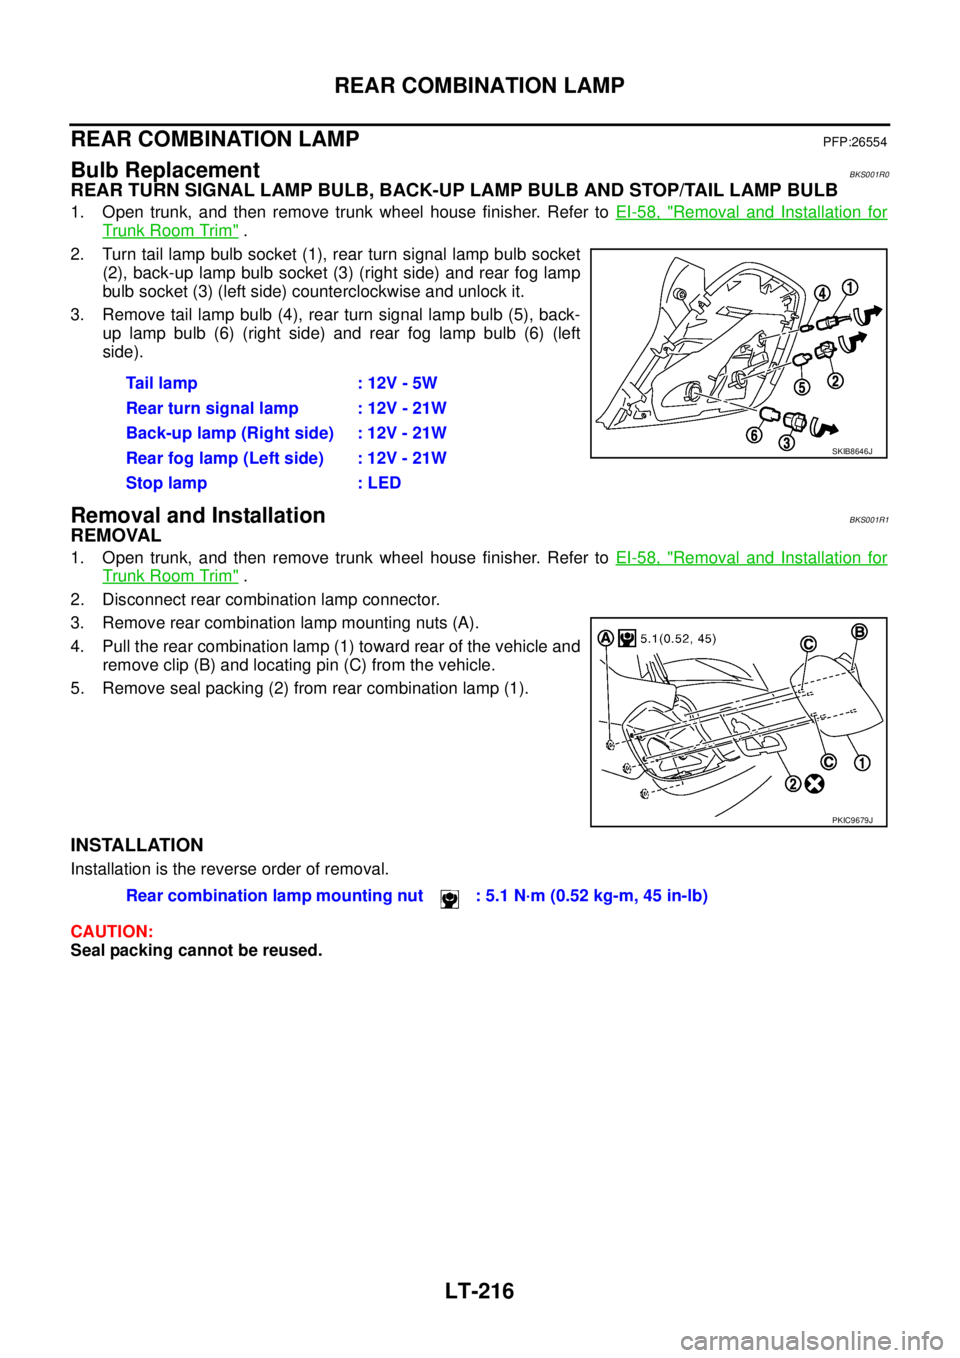
1. Open trunk, and then remove trunk wheel house finisher. Refer to EI-58, "Removal and Installation for
Trunk Room Trim" .
2. Turn tail lamp bulb socket (1), rear turn signal lamp bulb socket
(2), back-up lamp bulb socket (3) (right side) and rear fog lamp
bulb socket (3) (left side) counterclockwise and unlock it.
3. Remove tail lamp bulb (4), rear turn signal lamp bulb (5), back-
up lamp bulb (6) (right side) and rear fog lamp bulb (6) (left
side).
Removal and InstallationBKS001R1
REMOVAL
1. Open trunk, and then remove trunk wheel house finisher. Refer to EI-58, "Removal and Installation for
Trunk Room Trim" .
2. Disconnect rear combination lamp connector.
3. Remove rear combination lamp mounting nuts (A).
4. Pull the rear combination lamp (1) toward rear of the vehicle and
remove clip (B) and locating pin (C) from the vehicle.
5. Remove seal packing (2) from rear combination lamp (1).
INSTALLATION
Installation is the reverse order of removal.
CAUTION:
Seal packing cannot be reused.Tail lamp : 12V - 5W
Rear turn signal lamp : 12V - 21W
Back-up lamp (Right side) : 12V - 21W
Rear fog lamp (Left side) : 12V - 21W
Stop lamp : LED
SKIB8646J
PKIC9679J
Rear combination lamp mounting nut : 5.1 N·m (0.52 kg-m, 45 in-lb)
Page 2949 of 3502
BULB SPECIFICATIONS
LT-261
C
D
E
F
G
H
I
J
L
MA
B
LT
BULB SPECIFICATIONSPFP:26297
HeadlampBKS001RS
Exterior LampBKS001RT
Interior Lamp/IlluminationBKS001RU
Item Wattage (W)
Low/High (Xenon type)35 (D2S)
Low (Halogen type)55 (H11)
High (Halogen type)55 (H7)
Item Wattage (W)
Front combination lamp (Xenon type)Front turn signal lamp 21 (amber)
Parking lamp 5
Bending lamp 55 (H7)
Front combination lamp (Halogen type)Front turn signal lamp 21 (amber)
Parking lamp 5
Rear combination lampStop lamp LED
Tail lamp 5
Rear turn signal lamp 21
Back-up lamp 21
Rear fog lamp 21
Side turn signal lamp5
Front fog lamp35 (H8)
License plate lamp5
High-mounted stop lampLED
Item Wattage (W)
Map lamp8
Personal lamp8
Trunk room lamp3.4
Ashtray illumination1.4
Step lamp2.7
Vanity mirror lamp1.8
Ignition key hole illumination1.4
Glove box lamp1.4
Cigarette lighter illumination1.4