2003 NISSAN ALMERA N16 crankshaft
[x] Cancel search: crankshaftPage 252 of 3189
JEM193G
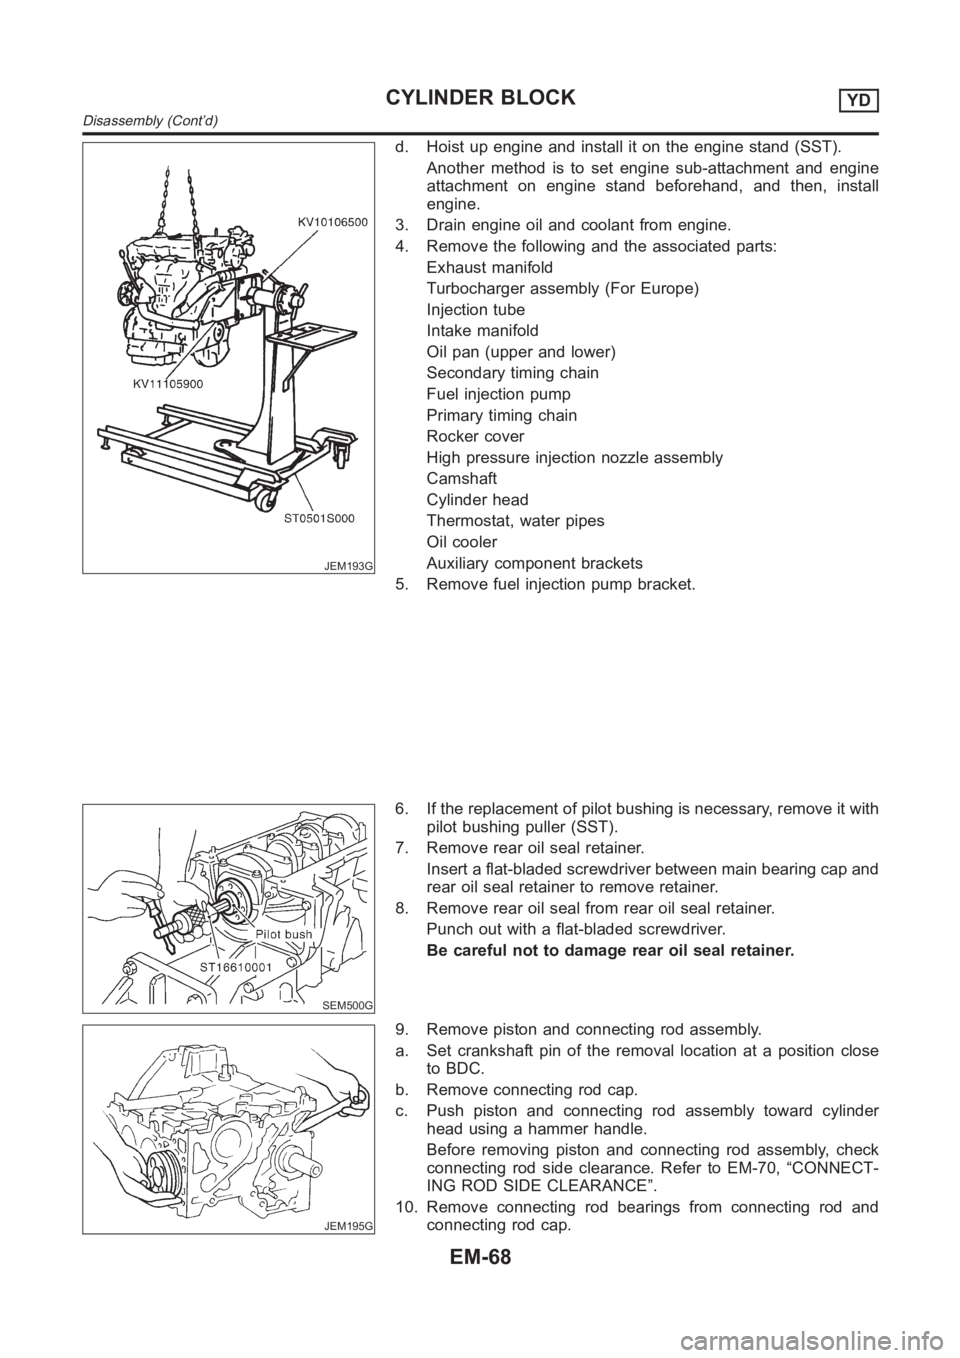
d. Hoist up engine and install it on the engine stand (SST).
Another method is to set engine sub-attachment and engine
attachment on engine stand beforehand, and then, install
engine.
3. Drain engine oil and coolant from engine.
4. Remove the following and the associated parts:
Exhaust manifold
Turbocharger assembly (For Europe)
Injection tube
Intake manifold
Oil pan (upper and lower)
Secondary timing chain
Fuel injection pump
Primary timing chain
Rocker cover
High pressure injection nozzle assembly
Camshaft
Cylinder head
Thermostat, water pipes
Oil cooler
Auxiliary component brackets
5. Remove fuel injection pump bracket.
SEM500G
6. If the replacement of pilot bushing is necessary, remove it with
pilot bushing puller (SST).
7. Remove rear oil seal retainer.
Insert a flat-bladed screwdriver between main bearing cap and
rear oil seal retainer to remove retainer.
8. Remove rear oil seal from rear oil seal retainer.
Punch out with a flat-bladed screwdriver.
Be careful not to damage rear oil seal retainer.
JEM195G
9. Remove piston and connecting rod assembly.
a. Set crankshaft pin of the removal location at a position close
to BDC.
b. Remove connecting rod cap.
c. Push piston and connecting rod assembly toward cylinder
head using a hammer handle.
Before removing piston and connecting rod assembly, check
connecting rod side clearance. Refer to EM-70, “CONNECT-
ING ROD SIDE CLEARANCE”.
10. Remove connecting rod bearings from connecting rod and
connecting rod cap.
CYLINDER BLOCKYD
Disassembly (Cont’d)
EM-68
Page 254 of 3189
JEM200G
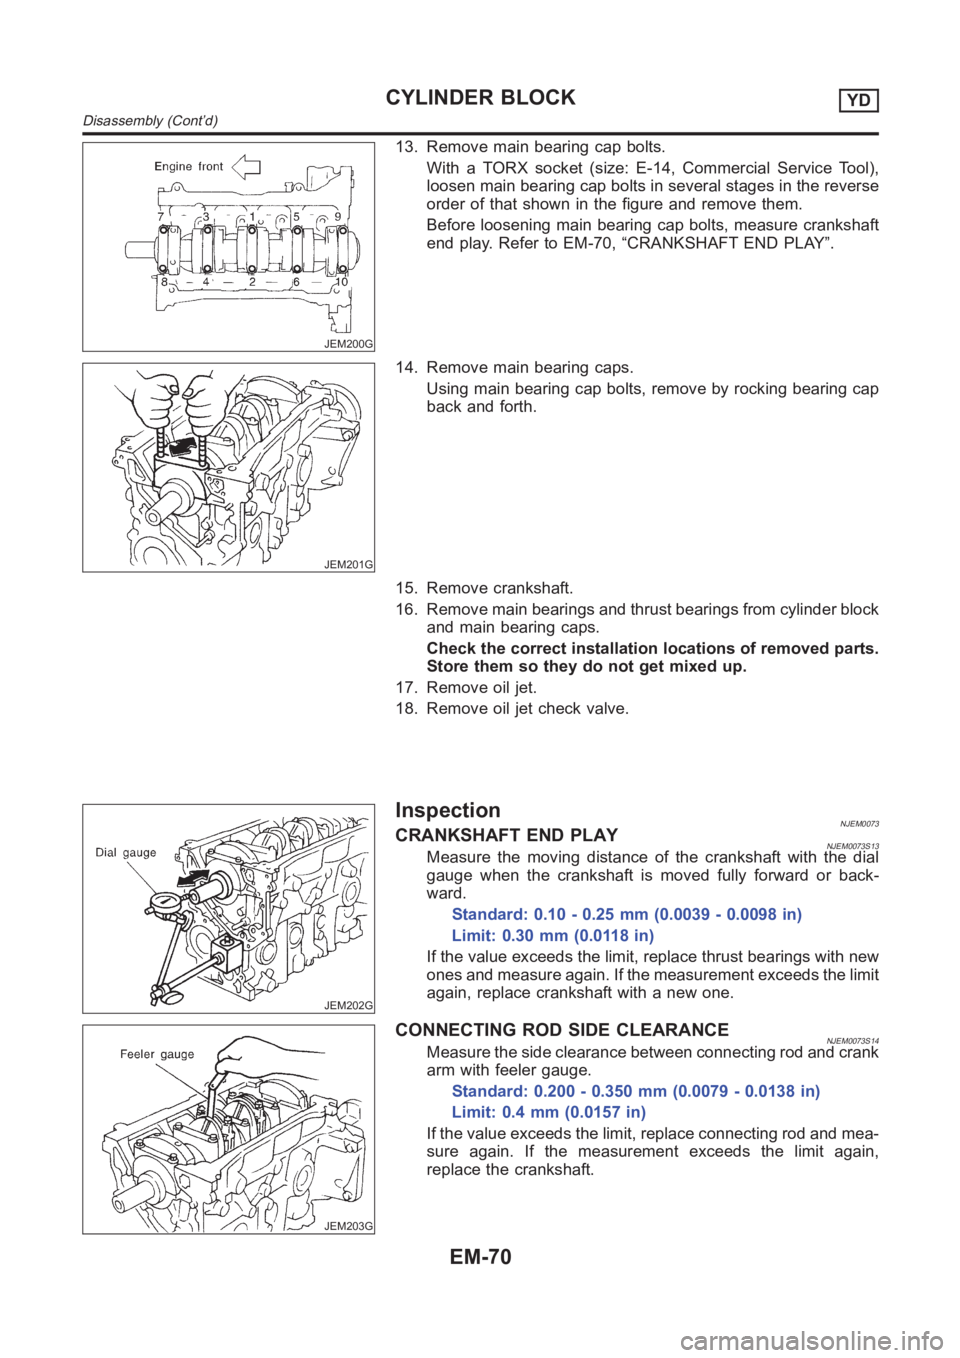
13. Remove main bearing cap bolts.
With a TORX socket (size: E-14, Commercial Service Tool),
loosen main bearing cap bolts in several stages in the reverse
order of that shown in the figure and remove them.
Before loosening main bearing cap bolts, measure crankshaft
end play. Refer to EM-70, “CRANKSHAFT END PLAY”.
JEM201G
14. Remove main bearing caps.
Using main bearing cap bolts, remove by rocking bearing cap
back and forth.
15. Remove crankshaft.
16. Remove main bearings and thrust bearings from cylinder block
and main bearing caps.
Check the correct installation locations of removed parts.
Store them so they do not get mixed up.
17. Remove oil jet.
18. Remove oil jet check valve.
JEM202G
InspectionNJEM0073CRANKSHAFT END PLAYNJEM0073S13Measure the moving distance of the crankshaft with the dial
gauge when the crankshaft is moved fully forward or back-
ward.
Standard: 0.10 - 0.25 mm (0.0039 - 0.0098 in)
Limit: 0.30 mm (0.0118 in)
If the value exceeds the limit, replace thrust bearings with new
ones and measure again. If the measurement exceeds the limit
again, replace crankshaft with a new one.
JEM203G
CONNECTING ROD SIDE CLEARANCENJEM0073S14Measure the side clearance between connecting rod and crank
arm with feeler gauge.
Standard: 0.200 - 0.350 mm (0.0079 - 0.0138 in)
Limit: 0.4 mm (0.0157 in)
If the value exceeds the limit, replace connecting rod and mea-
sure again. If the measurement exceeds the limit again,
replace the crankshaft.
CYLINDER BLOCKYD
Disassembly (Cont’d)
EM-70
Page 257 of 3189
Amount of cylinder block resurfacing is “B”.
The maximum limit is as follows:
A + B = 0.07mm (0.0028 in)
Nominal cylinder block height from crankshaft center:
252.95 - 253.05 mm (9.9586 - 9.9626 in)
If necessary, replace cylinder block.
JEM206G
JEM207G
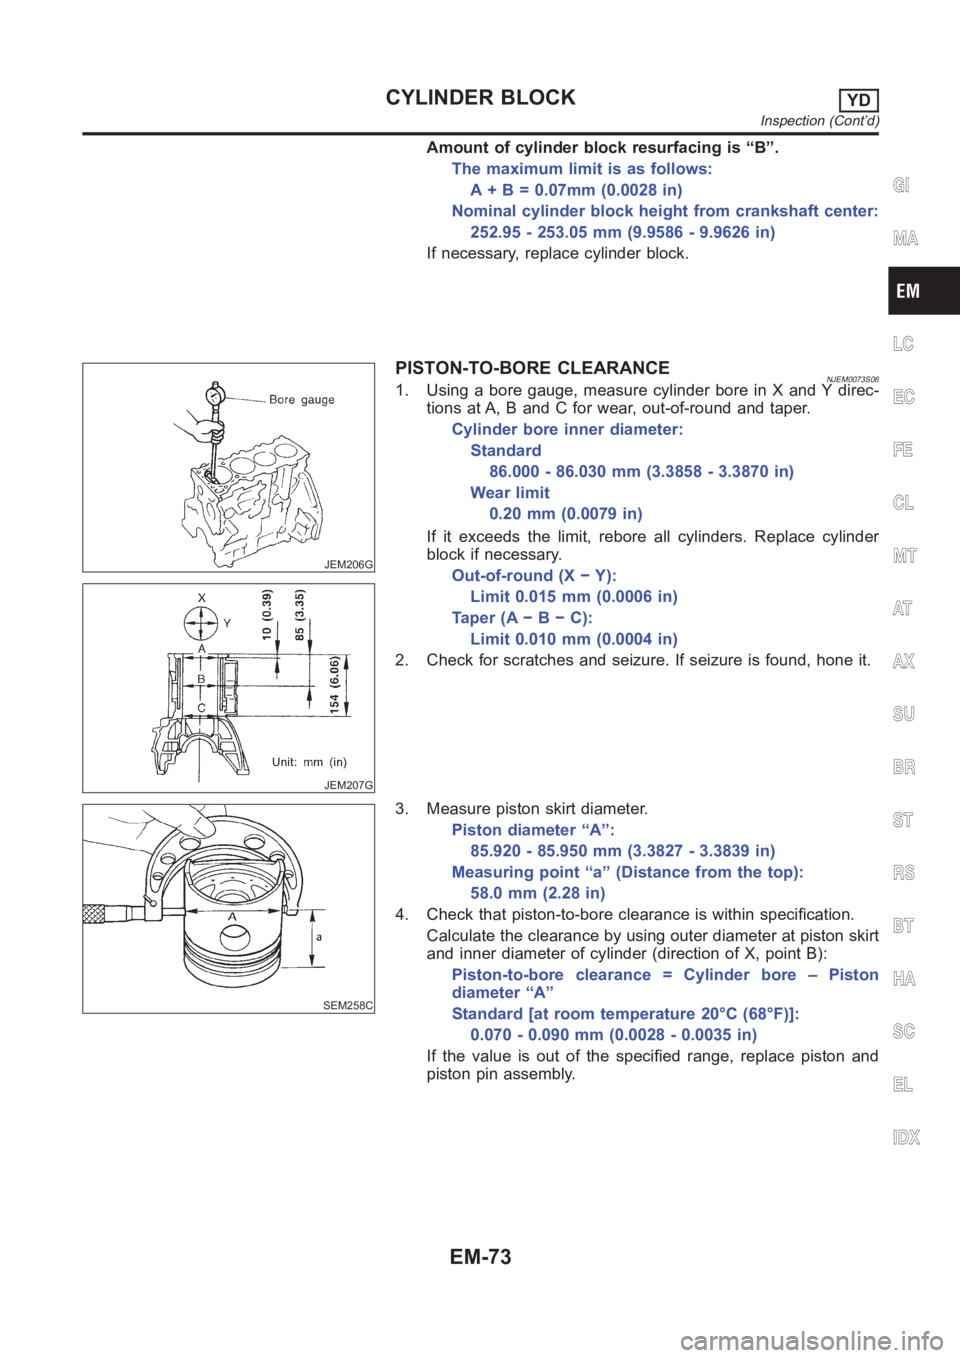
PISTON-TO-BORE CLEARANCENJEM0073S061. Using a bore gauge, measure cylinder bore in X and Y direc-
tions at A, B and C for wear, out-of-round and taper.
Cylinder bore inner diameter:
Standard
86.000 - 86.030 mm (3.3858 - 3.3870 in)
Wear limit
0.20 mm (0.0079 in)
If it exceeds the limit, rebore all cylinders. Replace cylinder
block if necessary.
Out-of-round (X − Y):
Limit 0.015 mm (0.0006 in)
Taper(A−B−C):
Limit 0.010 mm (0.0004 in)
2. Check for scratches and seizure. If seizure is found, hone it.
SEM258C
3. Measure piston skirt diameter.
Piston diameter “A”:
85.920 - 85.950 mm (3.3827 - 3.3839 in)
Measuring point “a” (Distance from the top):
58.0 mm (2.28 in)
4. Check that piston-to-bore clearance is within specification.
Calculate the clearance by using outer diameter at piston skirt
and inner diameter of cylinder (direction of X, point B):
Piston-to-bore clearance = Cylinder bore – Piston
diameter “A”
Standard [at room temperature 20°C (68°F)]:
0.070 - 0.090 mm (0.0028 - 0.0035 in)
If the value is out of the specified range, replace piston and
piston pin assembly.
GI
MA
LC
EC
FE
CL
MT
AT
AX
SU
BR
ST
RS
BT
HA
SC
EL
IDX
CYLINDER BLOCKYD
Inspection (Cont’d)
EM-73
Page 259 of 3189
SEM316A
CRANKSHAFTNJEM0073S071. Check crankshaft main and pin journals for score, wear or
cracks.
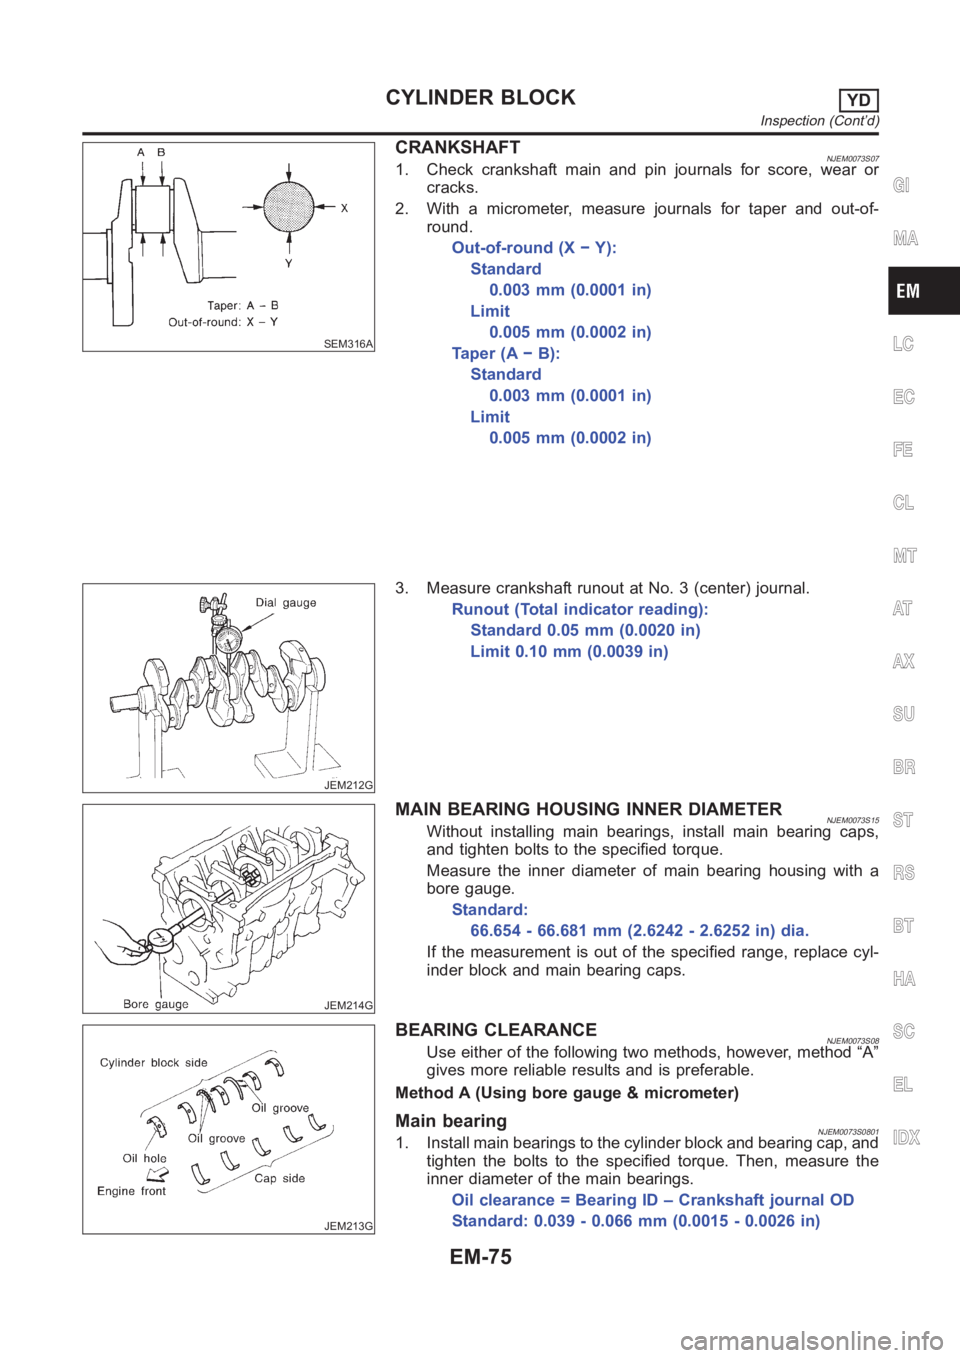
2. With a micrometer, measure journals for taper and out-of-
round.
Out-of-round (X − Y):
Standard
0.003 mm (0.0001 in)
Limit
0.005 mm (0.0002 in)
Ta p e r ( A − B ) :
Standard
0.003 mm (0.0001 in)
Limit
0.005 mm (0.0002 in)
JEM212G
3. Measure crankshaft runout at No. 3 (center) journal.
Runout (Total indicator reading):
Standard 0.05 mm (0.0020 in)
Limit 0.10 mm (0.0039 in)
JEM214G
MAIN BEARING HOUSING INNER DIAMETERNJEM0073S15Without installing main bearings, install main bearing caps,
and tighten bolts to the specified torque.
Measure the inner diameter of main bearing housing with a
bore gauge.
Standard:
66.654 - 66.681 mm (2.6242 - 2.6252 in) dia.
If the measurement is out of the specified range, replace cyl-
inder block and main bearing caps.
JEM213G
BEARING CLEARANCENJEM0073S08Use either of the following two methods, however, method “A”
gives more reliable results and is preferable.
Method A (Using bore gauge & micrometer)
Main bearingNJEM0073S08011. Install main bearings to the cylinder block and bearing cap, and
tighten the bolts to the specified torque. Then, measure the
inner diameter of the main bearings.
Oil clearance = Bearing ID – Crankshaft journal OD
Standard: 0.039 - 0.066 mm (0.0015 - 0.0026 in)
GI
MA
LC
EC
FE
CL
MT
AT
AX
SU
BR
ST
RS
BT
HA
SC
EL
IDX
CYLINDER BLOCKYD
Inspection (Cont’d)
EM-75
Page 260 of 3189
2. If the value is out of the specified range, select main bearings
to obtain the specified oil clearance, based on the measure-
ments of the main bearing housing inner diameter and crank-
shaft journal outer diameter.
JEM208G
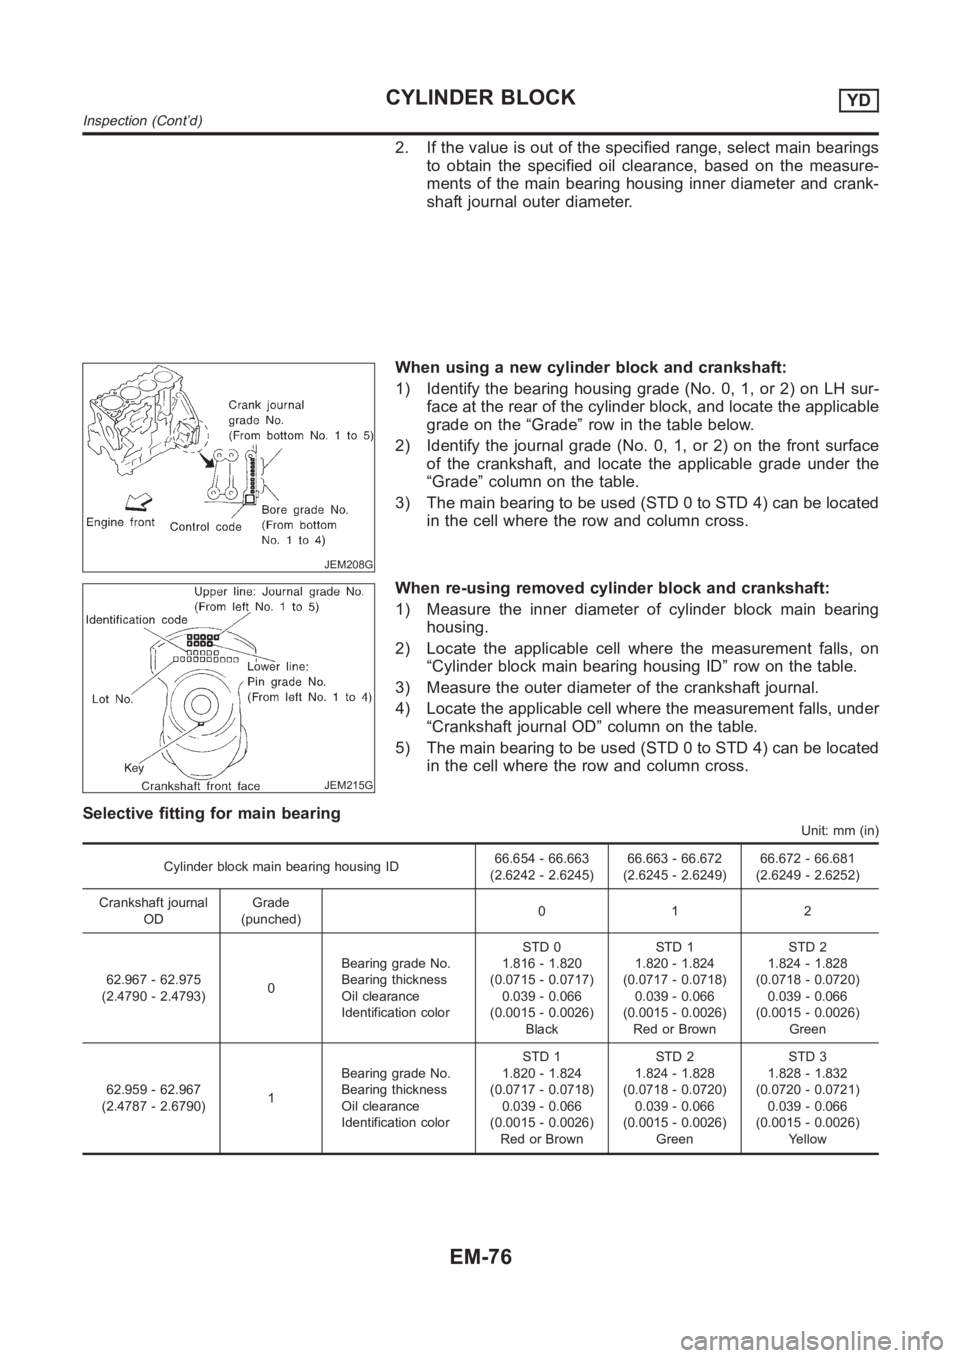
When using a new cylinder block and crankshaft:
1) Identify the bearing housing grade (No. 0, 1, or 2) on LH sur-
face at the rear of the cylinder block, and locate the applicable
grade on the “Grade” row in the table below.
2) Identify the journal grade (No. 0, 1, or 2) on the front surface
of the crankshaft, and locate the applicable grade under the
“Grade” column on the table.
3) The main bearing to be used (STD 0 to STD 4) can be located
in the cell where the row and column cross.
JEM215G
When re-using removed cylinder block and crankshaft:
1) Measure the inner diameter of cylinder block main bearing
housing.
2) Locate the applicable cell where the measurement falls, on
“Cylinder block main bearing housing ID” row on the table.
3) Measure the outer diameter of the crankshaft journal.
4) Locate the applicable cell where the measurement falls, under
“Crankshaft journal OD” column on the table.
5) The main bearing to be used (STD 0 to STD 4) can be located
in the cell where the row and column cross.
Selective fitting for main bearing
Unit: mm (in)
Cylinder block main bearing housing ID66.654 - 66.663
(2.6242 - 2.6245)66.663 - 66.672
(2.6245 - 2.6249)66.672 - 66.681
(2.6249 - 2.6252)
Crankshaft journal
ODGrade
(punched)012
62.967 - 62.975
(2.4790 - 2.4793)0Bearing grade No.
Bearing thickness
Oil clearance
Identification colorSTD 0
1.816 - 1.820
(0.0715 - 0.0717)
0.039 - 0.066
(0.0015 - 0.0026)
BlackSTD 1
1.820 - 1.824
(0.0717 - 0.0718)
0.039 - 0.066
(0.0015 - 0.0026)
Red or BrownSTD 2
1.824 - 1.828
(0.0718 - 0.0720)
0.039 - 0.066
(0.0015 - 0.0026)
Green
62.959 - 62.967
(2.4787 - 2.6790)1Bearing grade No.
Bearing thickness
Oil clearance
Identification colorSTD 1
1.820 - 1.824
(0.0717 - 0.0718)
0.039 - 0.066
(0.0015 - 0.0026)
Red or BrownSTD 2
1.824 - 1.828
(0.0718 - 0.0720)
0.039 - 0.066
(0.0015 - 0.0026)
GreenSTD 3
1.828 - 1.832
(0.0720 - 0.0721)
0.039 - 0.066
(0.0015 - 0.0026)
Yellow
CYLINDER BLOCKYD
Inspection (Cont’d)
EM-76
Page 261 of 3189
62.951 - 62.959
(2.4784 - 2.4787)2Bearing grade No.
Bearing thickness
Oil clearance
Identification colorSTD 2
1.824 - 1.828
(0.0718 - 0.0720)
0.039 - 0.066
(0.0015 - 0.0026)
GreenSTD 3
1.828 - 1.832
(0.0720 - 0.0721)
0.039 - 0.066
(0.0015 - 0.0026)
YellowSTD 4
1.832 - 1.836
(0.0721 - 0.0723)
0.039 - 0.066
(0.0015 - 0.0026)
Blue
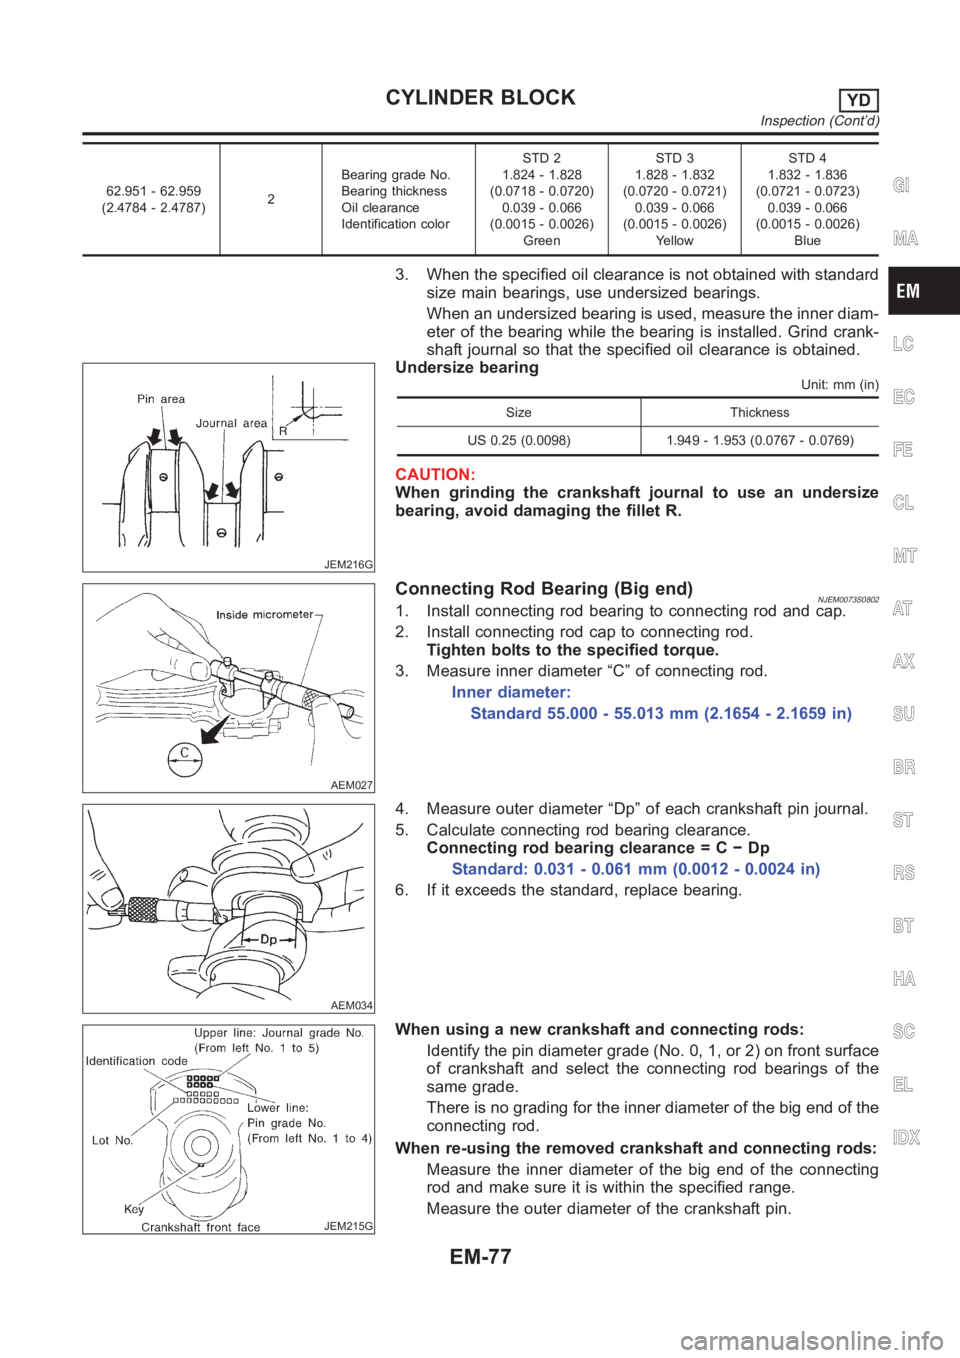
3. When the specified oil clearance is not obtained with standard
size main bearings, use undersized bearings.
When an undersized bearing is used, measure the inner diam-
eter of the bearing while the bearing is installed. Grind crank-
shaft journal so that the specified oil clearance is obtained.
JEM216G
Undersize bearingUnit: mm (in)
Size Thickness
US 0.25 (0.0098) 1.949 - 1.953 (0.0767 - 0.0769)
CAUTION:
When grinding the crankshaft journal to use an undersize
bearing, avoid damaging the fillet R.
AEM027
Connecting Rod Bearing (Big end)NJEM0073S08021. Install connecting rod bearing to connecting rod and cap.
2. Install connecting rod cap to connecting rod.
Tighten bolts to the specified torque.
3. Measure inner diameter “C” of connecting rod.
Inner diameter:
Standard 55.000 - 55.013 mm (2.1654 - 2.1659 in)
AEM034
4. Measure outer diameter “Dp” of each crankshaft pin journal.
5. Calculate connecting rod bearing clearance.
Connecting rod bearing clearance = C − Dp
Standard: 0.031 - 0.061 mm (0.0012 - 0.0024 in)
6. If it exceeds the standard, replace bearing.
JEM215G
When using a new crankshaft and connecting rods:
Identify the pin diameter grade (No. 0, 1, or 2) on front surface
of crankshaft and select the connecting rod bearings of the
same grade.
There is no grading for the inner diameter of the big end of the
connecting rod.
When re-using the removed crankshaft and connecting rods:
Measure the inner diameter of the big end of the connecting
rod and make sure it is within the specified range.
Measure the outer diameter of the crankshaft pin.
GI
MA
LC
EC
FE
CL
MT
AT
AX
SU
BR
ST
RS
BT
HA
SC
EL
IDX
CYLINDER BLOCKYD
Inspection (Cont’d)
EM-77
Page 262 of 3189
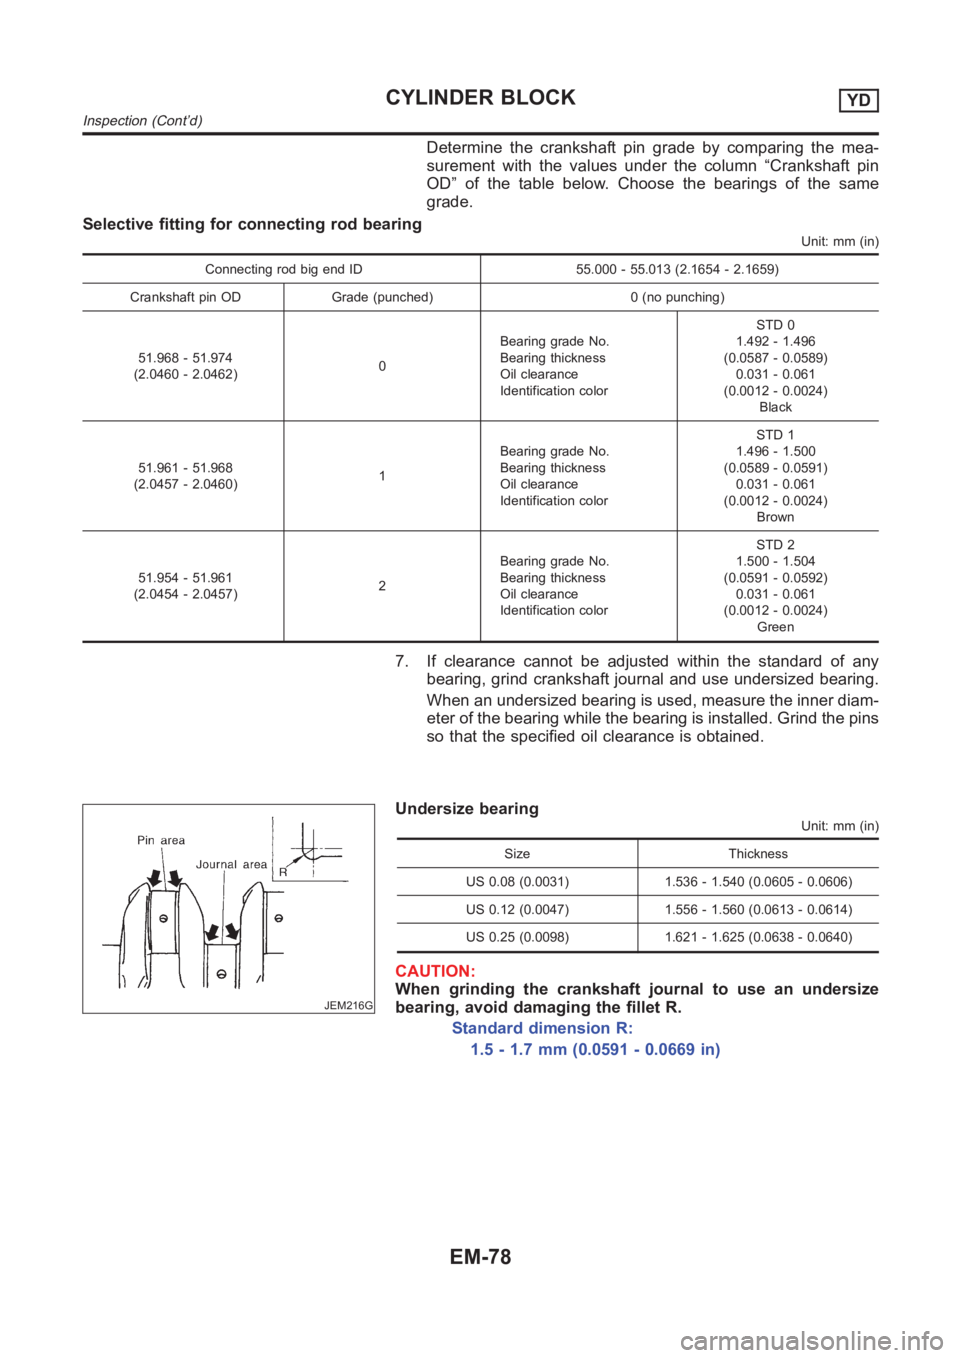
Determine the crankshaft pin grade by comparing the mea-
surement with the values under the column “Crankshaft pin
OD” of the table below. Choose the bearings of the same
grade.
Selective fitting for connecting rod bearing
Unit: mm (in)
Connecting rod big end ID 55.000 - 55.013 (2.1654 - 2.1659)
Crankshaft pin OD Grade (punched) 0 (no punching)
51.968 - 51.974
(2.0460 - 2.0462)0Bearing grade No.
Bearing thickness
Oil clearance
Identification colorSTD 0
1.492 - 1.496
(0.0587 - 0.0589)
0.031 - 0.061
(0.0012 - 0.0024)
Black
51.961 - 51.968
(2.0457 - 2.0460)1Bearing grade No.
Bearing thickness
Oil clearance
Identification colorSTD 1
1.496 - 1.500
(0.0589 - 0.0591)
0.031 - 0.061
(0.0012 - 0.0024)
Brown
51.954 - 51.961
(2.0454 - 2.0457)2Bearing grade No.
Bearing thickness
Oil clearance
Identification colorSTD 2
1.500 - 1.504
(0.0591 - 0.0592)
0.031 - 0.061
(0.0012 - 0.0024)
Green
7. If clearance cannot be adjusted within the standard of any
bearing, grind crankshaft journal and use undersized bearing.
When an undersized bearing is used, measure the inner diam-
eter of the bearing while the bearing is installed. Grind the pins
so that the specified oil clearance is obtained.
JEM216G
Undersize bearingUnit: mm (in)
Size Thickness
US 0.08 (0.0031) 1.536 - 1.540 (0.0605 - 0.0606)
US 0.12 (0.0047) 1.556 - 1.560 (0.0613 - 0.0614)
US 0.25 (0.0098) 1.621 - 1.625 (0.0638 - 0.0640)
CAUTION:
When grinding the crankshaft journal to use an undersize
bearing, avoid damaging the fillet R.
Standard dimension R:
1.5 - 1.7 mm (0.0591 - 0.0669 in)
CYLINDER BLOCKYD
Inspection (Cont’d)
EM-78
Page 263 of 3189
EM142
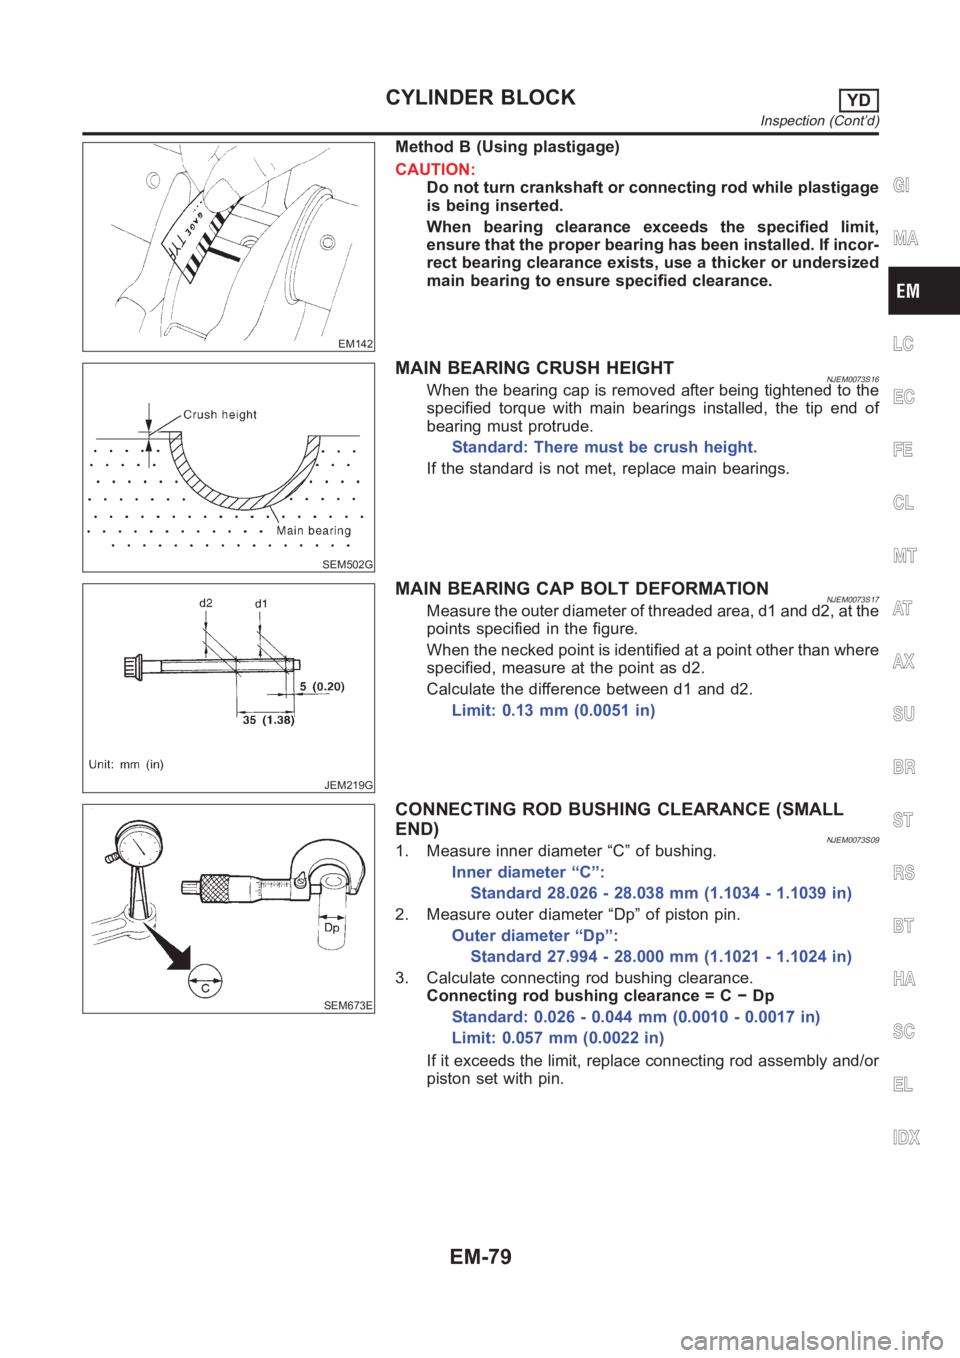
Method B (Using plastigage)
CAUTION:
Do not turn crankshaft or connecting rod while plastigage
is being inserted.
When bearing clearance exceeds the specified limit,
ensure that the proper bearing has been installed. If incor-
rect bearing clearance exists, use a thicker or undersized
main bearing to ensure specified clearance.
SEM502G
MAIN BEARING CRUSH HEIGHTNJEM0073S16When the bearing cap is removed after being tightened to the
specified torque with main bearings installed, the tip end of
bearing must protrude.
Standard: There must be crush height.
If the standard is not met, replace main bearings.
JEM219G
MAIN BEARING CAP BOLT DEFORMATIONNJEM0073S17Measure the outer diameter of threaded area, d1 and d2, at the
points specified in the figure.
When the necked point is identified at a point other than where
specified, measure at the point as d2.
Calculate the difference between d1 and d2.
Limit: 0.13 mm (0.0051 in)
SEM673E
CONNECTING ROD BUSHING CLEARANCE (SMALL
END)
NJEM0073S091. Measure inner diameter “C” of bushing.
Inner diameter “C”:
Standard 28.026 - 28.038 mm (1.1034 - 1.1039 in)
2. Measure outer diameter “Dp” of piston pin.
Outer diameter “Dp”:
Standard 27.994 - 28.000 mm (1.1021 - 1.1024 in)
3. Calculate connecting rod bushing clearance.
Connecting rod bushing clearance = C − Dp
Standard: 0.026 - 0.044 mm (0.0010 - 0.0017 in)
Limit: 0.057 mm (0.0022 in)
If it exceeds the limit, replace connecting rod assembly and/or
piston set with pin.
GI
MA
LC
EC
FE
CL
MT
AT
AX
SU
BR
ST
RS
BT
HA
SC
EL
IDX
CYLINDER BLOCKYD
Inspection (Cont’d)
EM-79