Page 1387 of 3189

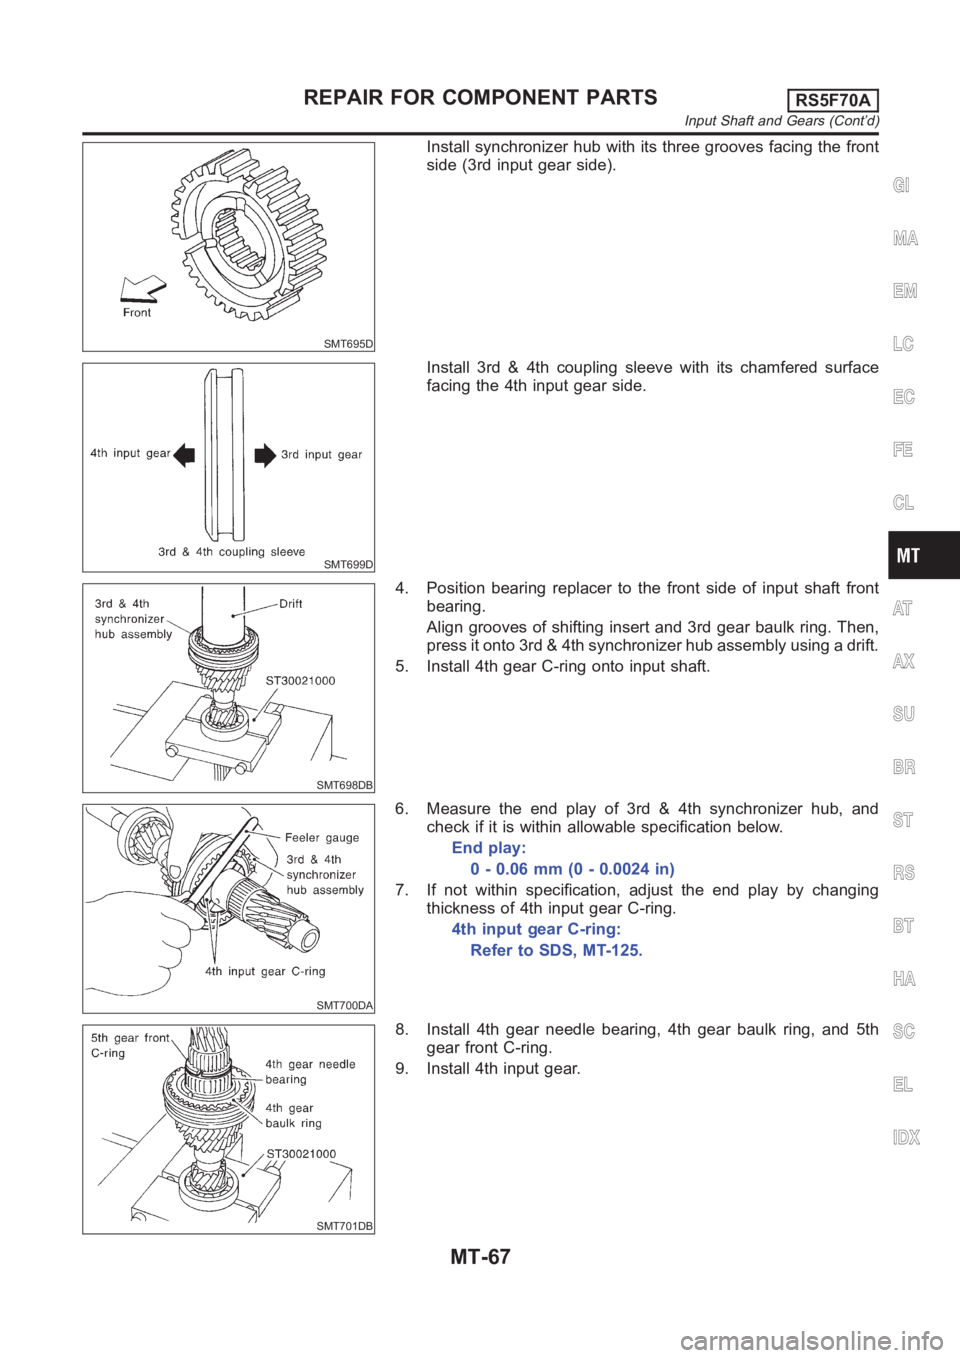
SMT695D
Install synchronizer hub with its three grooves facing the front
side (3rd input gear side).
SMT699D
Install 3rd & 4th coupling sleeve with its chamfered surface
facing the 4th input gear side.
SMT698DB
4. Position bearing replacer to the front side of input shaft front
bearing.
Align grooves of shifting insert and 3rd gear baulk ring. Then,
press it onto 3rd & 4th synchronizer hub assembly using a drift.
5. Install 4th gear C-ring onto input shaft.
SMT700DA
6. Measure the end play of 3rd & 4th synchronizer hub, and
check if it is within allowable specification below.
End play:
0 - 0.06 mm (0 - 0.0024 in)
7. If not within specification, adjust the end play by changing
thickness of 4th input gear C-ring.
4th input gear C-ring:
Refer to SDS, MT-125.
SMT701DB
8. Install 4th gear needle bearing, 4th gear baulk ring, and 5th
gear front C-ring.
9. Install 4th input gear.
GI
MA
EM
LC
EC
FE
CL
AT
AX
SU
BR
ST
RS
BT
HA
SC
EL
IDX
REPAIR FOR COMPONENT PARTSRS5F70A
Input Shaft and Gears (Cont’d)
MT-67
Page 1388 of 3189
SMT703D
10. Position 5th input gear as shown in the figure, and install it on
input shaft.
SMT702DB
11. Install 5th input gear.
CAUTION:
Do not reuse 5th input gear.
12. Install 5th gear rear C-ring onto input shaft.
SMT704DA
13. Measure the end play of 5th input gear, and check if it is within
the allowable specification below.
End play:
0 - 0.06 mm (0 - 0.0024 in)
14. If not within specification, adjust the end play by changing
thickness of the 5th input gear rear C-ring.
5th input gear rear C-ring:
Refer to SDS, MT-125.
SMT705DB
15. Install C-ring holder onto 5th gear rear C-ring.
CAUTION:
Do not reuse C-ring holder.
16. Install input shaft rear bearing.
CAUTION:
Install input shaft rear bearing with its brown surface facing
the input gear side.
SMT671D
17. Install oil channel onto input shaft.
18. Measure gear end play as a final check. Refer to, MT-64.
REPAIR FOR COMPONENT PARTSRS5F70A
Input Shaft and Gears (Cont’d)
MT-68
Page 1389 of 3189
SMT760D
Mainshaft and Gears
DISASSEMBLYNJMT00591. Before disassembly, measure gear end play.
Gear end play:
Refer to SDS, MT-124.
If end play is not within the specificed limit, disassemble and
check the parts.
SMT677D
2. Remove snap ring.
SMT678D
3. Remove C-ring holder and mainshaft C-ring.
SMT679DB
4. Press out mainshaft rear bearing from mainshaft.
SMT680D
5. Remove mainshaft thrust washer.
6. Remove snap ring from mainshaft. Then, remove reverse main
gear assembly, reverse gear needle bearing, and reverse gear
baulk ring.
GI
MA
EM
LC
EC
FE
CL
AT
AX
SU
BR
ST
RS
BT
HA
SC
EL
IDX
REPAIR FOR COMPONENT PARTSRS5F70A
Mainshaft and Gears
MT-69
Page 1390 of 3189

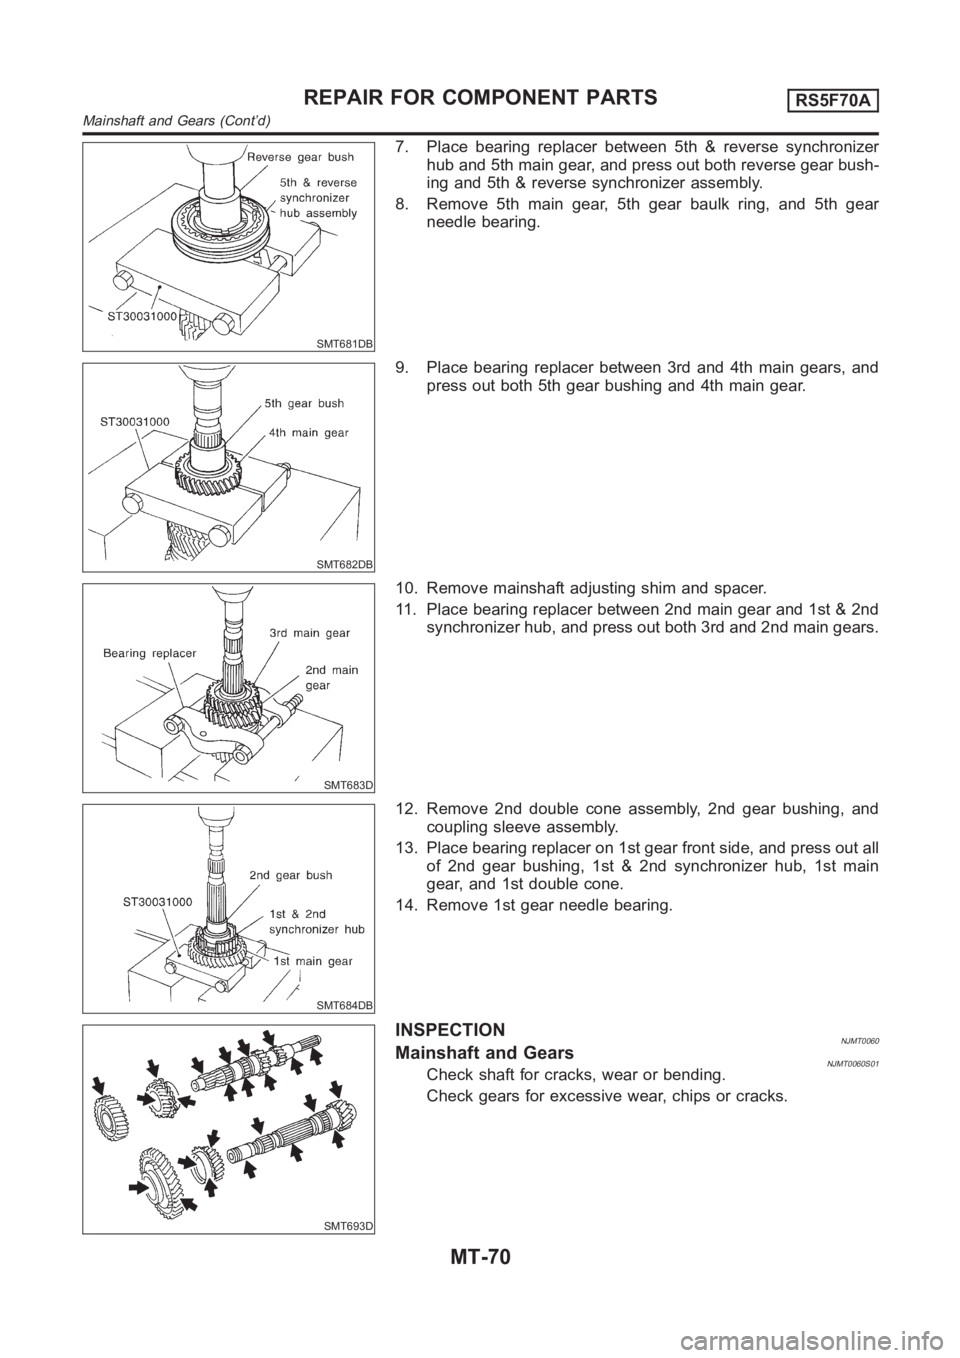
SMT681DB
7. Place bearing replacer between 5th & reverse synchronizer
hub and 5th main gear, and press out both reverse gear bush-
ing and 5th & reverse synchronizer assembly.
8. Remove 5th main gear, 5th gear baulk ring, and 5th gear
needle bearing.
SMT682DB
9. Place bearing replacer between 3rd and 4th main gears, and
press out both 5th gear bushing and 4th main gear.
SMT683D
10. Remove mainshaft adjusting shim and spacer.
11. Place bearing replacer between 2nd main gear and 1st & 2nd
synchronizer hub, and press out both 3rd and 2nd main gears.
SMT684DB
12. Remove 2nd double cone assembly, 2nd gear bushing, and
coupling sleeve assembly.
13. Place bearing replacer on 1st gear front side, and press out all
of 2nd gear bushing, 1st & 2nd synchronizer hub, 1st main
gear, and 1st double cone.
14. Remove 1st gear needle bearing.
SMT693D
INSPECTIONNJMT0060Mainshaft and GearsNJMT0060S01Check shaft for cracks, wear or bending.
Check gears for excessive wear, chips or cracks.
REPAIR FOR COMPONENT PARTSRS5F70A
Mainshaft and Gears (Cont’d)
MT-70
Page 1391 of 3189
SMT637A
SynchronizersNJMT0060S02Check spline area of coupling sleeves, hubs and gears for
wear or cracks.
Check baulk rings for cracks or deformation.
Check insert springs for wear or deformation.
SMT867D
If any crack, damage, or excessive wear is found on cam face
of baulk ring or working face of insert, replace it.
SMT868D
Measure the movement (play, dimension “L”) of 1st & 2nd
coupling sleeve and 5th & reverse coupling sleeve with their
end fixed and the other end lifted as shown in the figure. If the
movement exceeds specification, replace the sleeve.
Coupling sleeve length “L”:
Refer to SDS, MT-124.
SMT140
Measure clearance between baulk ring and gear.
Clearance between baulk ring and gear:
Refer to SDS, MT-124.
SMT714CD
GI
MA
EM
LC
EC
FE
CL
AT
AX
SU
BR
ST
RS
BT
HA
SC
EL
IDX
REPAIR FOR COMPONENT PARTSRS5F70A
Mainshaft and Gears (Cont’d)
MT-71
Page 1392 of 3189
Measure wear of 1st and 2nd baulk ring.
a) Place baulk rings in position on synchronizer cone.
b) While holding baulk ring against synchronizer cone as far as it
will go, measure dimensions “A” and “B”.
Standard:
A 0.6 - 0.8 mm (0.024 - 0.031 in)
B 0.6 - 1.1 mm (0.024 - 0.043 in)
Wear limit:
0.2mm(0.008in)
If dimension “A” or “B” is smaller than the wear limit,
replace outer baulk ring, inner baulk ring and synchro-
nizer cone as a set.
SMT148A
BearingNJMT0060S03Make sure bearings roll freely and are free from noise, cracks,
pitting or wear.
SMT706D
ASSEMBLYNJMT00611. Install 1st gear needle bearing and 1st main gear onto main-
shaft.
2. Install 1st double cone assembly onto mainshaft.
REPAIR FOR COMPONENT PARTSRS5F70A
Mainshaft and Gears (Cont’d)
MT-72
Page 1393 of 3189
SMT695D
3. Install 1st & 2nd synchronizer hub with its three grooves fac-
ing the front side (1st main gear side) onto mainshaft.
CAUTION:
Do not reuse 1st & 2nd synchronizer hub.
SMT707DB
4. Install 1st & 2nd synchronizer hub.
SMT994BB
5. Install insert spring onto 1st & 2nd coupling sleeve.
SMT708D
6. Install 1st & 2nd coupling sleeve with its chamfered surface
facing the 1st main gear side onto 1st & 2nd synchronizer hub.
SMT709DB
7. Install 2nd gear bushing with its flange surface facing 1st & 2nd
synchronizer hub side.
GI
MA
EM
LC
EC
FE
CL
AT
AX
SU
BR
ST
RS
BT
HA
SC
EL
IDX
REPAIR FOR COMPONENT PARTSRS5F70A
Mainshaft and Gears (Cont’d)
MT-73
Page 1394 of 3189
SMT710DB
8. Install 2nd needle bearing, 2nd double cone assembly, and
2nd main gear onto mainshaft.
9. Position 3rd main gear as shown in the figure, and install it.
CAUTION:
Do not reuse 3rd main gear.
SMT711D
10. Install spacer and mainshaft adjusting shim onto mainshaft.
11. Select a mainshaft adjusting shim suitable to satisfy the follow-
ing specification of dimension “L” and install it onto mainshaft.
Specification of dimension “L”:
151.35 - 151.45 mm (5.9586 - 5.9626 in)
Mainshaft adjusting shims:
Refer to SDS, MT-128.
SMT713D
12. Position 4th main gear as shown in the figure, and install it onto
mainshaft.
SMT712DB
13. Install 4th main gear onto mainshaft.
CAUTION:
Do not reuse 4th main gear.
REPAIR FOR COMPONENT PARTSRS5F70A
Mainshaft and Gears (Cont’d)
MT-74