2003 NISSAN 350Z lock
[x] Cancel search: lockPage 92 of 227
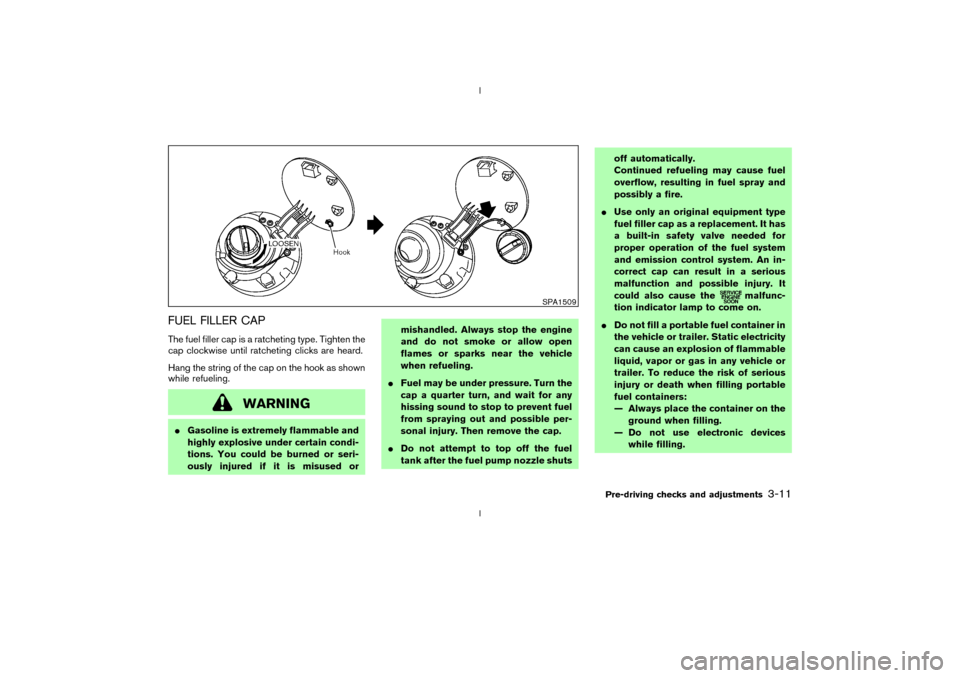
FUEL FILLER CAPThe fuel filler cap is a ratcheting type. Tighten the
cap clockwise until ratcheting clicks are heard.
Hang the string of the cap on the hook as shown
while refueling.
WARNING
IGasoline is extremely flammable and
highly explosive under certain condi-
tions. You could be burned or seri-
ously injured if it is misused ormishandled. Always stop the engine
and do not smoke or allow open
flames or sparks near the vehicle
when refueling.
IFuel may be under pressure. Turn the
cap a quarter turn, and wait for any
hissing sound to stop to prevent fuel
from spraying out and possible per-
sonal injury. Then remove the cap.
IDo not attempt to top off the fuel
tank after the fuel pump nozzle shutsoff automatically.
Continued refueling may cause fuel
overflow, resulting in fuel spray and
possibly a fire.
IUse only an original equipment type
fuel filler cap as a replacement. It has
a built-in safety valve needed for
proper operation of the fuel system
and emission control system. An in-
correct cap can result in a serious
malfunction and possible injury. It
could also cause the
malfunc-
tion indicator lamp to come on.
IDo not fill a portable fuel container in
the vehicle or trailer. Static electricity
can cause an explosion of flammable
liquid, vapor or gas in any vehicle or
trailer. To reduce the risk of serious
injury or death when filling portable
fuel containers:
Ð Always place the container on the
ground when filling.
Ð Do not use electronic devices
while filling.
SPA1509
Pre-driving checks and adjustments
3-11
Z
02.9.13/Z33-D/V5.0
X
Page 93 of 227
Ð Keep the pump nozzle in contact
with the container while you are
filling it.
Ð Use only approved portable fuel
containers for flammable liquid.
INever pour fuel into the throttle body
to attempt to start your vehicle.
CAUTION
IIf fuel is spilled on the car body, flush
it away with water to avoid paint
damage.
ITighten until the fuel filler cap clicks.
Failure to tighten the fuel filler cap
properly may cause the
mal-
function indicator lamp (MIL) to illu-
minate. If the
lamp illuminates
because the fuel filler cap is loose or
missing, tighten or install the cap and
continue to drive the vehicle. The
lamp should turn off after a few
driving trips. If the
lamp does
not turn off after a few driving trips,have the vehicle inspected by a
NISSAN dealer.
IFor additional information, see the
ªMalfunction indicator lamp (MIL)º in
the ª2. Instruments and controlsº sec-
tion.
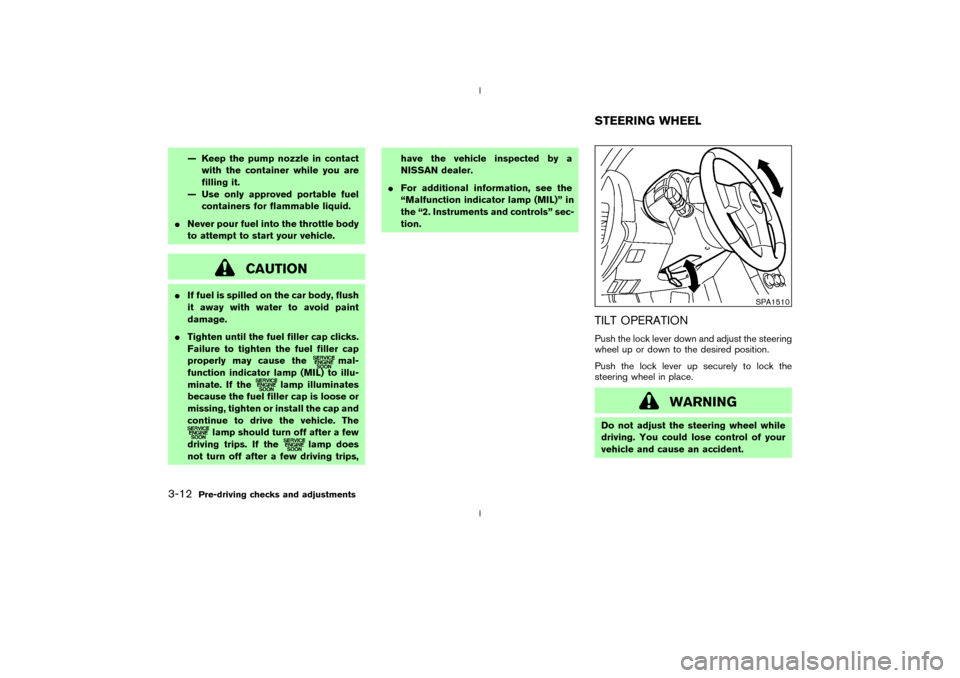
TILT OPERATIONPush the lock lever down and adjust the steering
wheel up or down to the desired position.
Push the lock lever up securely to lock the
steering wheel in place.
WARNING
Do not adjust the steering wheel while
driving. You could lose control of your
vehicle and cause an accident.
SPA1510
STEERING WHEEL
3-12
Pre-driving checks and adjustments
Z
02.9.13/Z33-D/V5.0
X
Page 104 of 227

FM RADIO RECEPTIONRange: FM range is normally limited to 25 to 30
miles (40 to 48 km), with monaural (single
channel) FM having slightly more range than
stereo FM. External influences may sometimes
interfere with FM station reception even if the FM
station is within 25 miles (40 km). The strength
of the FM signal is directly related to the distance
between the transmitter and receiver. FM signals
follow a line-of-sight path, exhibiting many of the
same characteristics as light. For example they
will reflect off objects.
Fade and drift: As your vehicle moves away froma station transmitter, the signals will tend to fade
and/or drift.
Static and flutter: During signal interference from
buildings, large hills or due to antenna position,
usually in conjunction with increased distance
from the station transmitter, static or flutter can
be heard. This can be reduced by adjusting the
treble control counterclockwise to reduce treble
response.
Multipath reception: Because of the reflective
characteristics of FM signals, direct and re-
flected signals reach the receiver at the same
time. The signals may cancel each other, result-
ing in momentary flutter or loss of sound.
AM RADIO RECEPTIONAM signals, because of their low frequency, can
bend around objects and skip along the ground.
In addition, the signals can be bounced off the
ionosphere and bent back to earth. Because of
these characteristics. AM signals are also sub-
ject to interference as they travel from transmitter
to receiver.
Fading: Occurs while the vehicle is passing
through freeway underpasses or in areas with
many tall buildings. It can also occur for several
seconds during ionospheric turbulence even in
areas where no obstacles exist.
Static: Caused by thunderstorms, electricalpower lines, electric signs and even traffic lights.
AUDIO OPERATION PRECAUTIONS
Cassette playerITo maintain good quality sound,
NISSAN recommends using cassette
tapes of 60 minutes or shorter in length.
ICassette tapes should be removed from
the player when not in use. Store cas-
settes in their protective cases and
away from direct sunlight, heat, dust,
moisture and magnetic sources.
IDirect sunlight can cause the cassette to
become deformed. The use of deformed
cassettes may cause the cassette to jam
in the player.
IDo not use cassettes with labels which
are peeling and loose. If used, the label
could jam in the player.
IIf a cassette has loose tape, insert a
pencil through one of the cassette hubs
and rewind the tape firmly around the
hubs. Loose tape may cause tape jam-
ming and wavering sound quality.
IOver a period of time, the playback
head, capstan and pinch roller may col-
lect a tape coating residue as the tape is
SAA0306
Heater, air conditioner and audio systems
4-7
Z
02.9.13/Z33-D/V5.0
X
Page 106 of 227
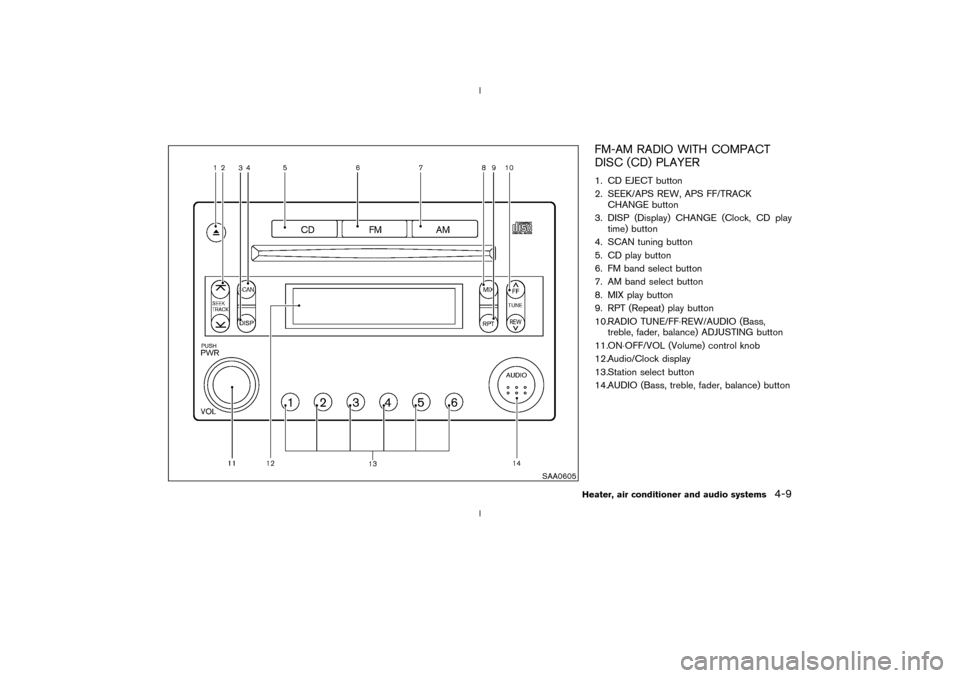
FM-AM RADIO WITH COMPACT
DISC (CD) PLAYER1. CD EJECT button
2. SEEK/APS REW, APS FF/TRACK
CHANGE button
3. DISP (Display) CHANGE (Clock, CD play
time) button
4. SCAN tuning button
5. CD play button
6. FM band select button
7. AM band select button
8. MIX play button
9. RPT (Repeat) play button
10.RADIO TUNE/FF×REW/AUDIO (Bass,
treble, fader, balance) ADJUSTING button
11.ON×OFF/VOL (Volume) control knob
12.Audio/Clock display
13.Station select button
14.AUDIO (Bass, treble, fader, balance) button
SAA0605
Heater, air conditioner and audio systems
4-9
Z
02.9.13/Z33-D/V5.0
X
Page 107 of 227
Audio main operationON×OFF/Volume control:
Turn the ignition key to ACC or ON, and then
push the ON×OFF/VOL (Volume) control knob
while the system is off to call up the mode (radio
or CD) which was playing immediately before
the system was turned off. When no CD is
loaded, the radio will come on. While the system
is on, pushing the ON×OFF/VOL control knob
turns the system off.
Turn the ON×OFF/VOL control knob to adjust
the volume.
AUDIO button (BASS, TREBLE, FADER,
BALANCE):
Press the AUDIO button to change the selecting
mode as follows.
BASS®TREBLE®FADER®BALANCE
To adjust Bass, Treble, Fader and Balance,
press the AUDIO button until the desired mode
(BASS, TREBLE, FADER or BALANCE) ap-
pears in the display. Press the TUNE
(
,
) or SEEK (
,
) button
to adjust Bass and Treble to the desired level.
Use the TUNE or SEEK button also to adjust
Fader or Balance modes. Fader adjusts the
sound level between the front and rear speakersand Balance adjusts the sound between the
right and left speakers.
After 10 seconds, the radio or CD display
reappears. Once the sound quality is set to the
desired level, press the AUDIO button repeat-
edly until the radio or CD display appears.
DISP DISPLAY CHANGE:
Push the DISP button for more than 1.5 seconds
to adjust the digital clock display. See ªClockº in
the ª2. Instruments and controlsº section for the
clock adjustment operation.
When the DISP button is pushed for less than
1.5 seconds while the compact disc is being
played, the display will show the CD play time.FM-AM radio operation
FM/AM band select:
Pushing the FM band select button will change
the band as follows:
FM1®FM2®FM1
To select the AM band, push the AM band select
button.
When FM or AM band select button is pushed
while the ignition switch is in the ACC or ON, the
radio will come on at the station last played.
The last station played will also come on whenthe power knob is turned to ON.
If a compact disc is playing when the FM or AM
band select button is turned to ON, the compact
disc will automatically be turned off and the last
radio station played will come on.
The FM stereo indicator ST will glow during FM
stereo reception. When the stereo broadcast
signal is weak, the radio will automatically
change from stereo to monaural reception.
TUNE (Tuning):WARNING
The radio should not be tuned while
driving so full attention may be given to
vehicle operation.
Use the TUNE button
or
for manual
tuning. To move quickly through the channels,
hold either side of the TUNE button down for
more than 0.5 seconds.
SEEK tuning:
Push the SEEK button
or
to tune
from high to low or low to high frequencies and
stops at the next broadcasting station.
4-10
Heater, air conditioner and audio systems
Z
02.9.13/Z33-D/V5.0
X
Page 110 of 227
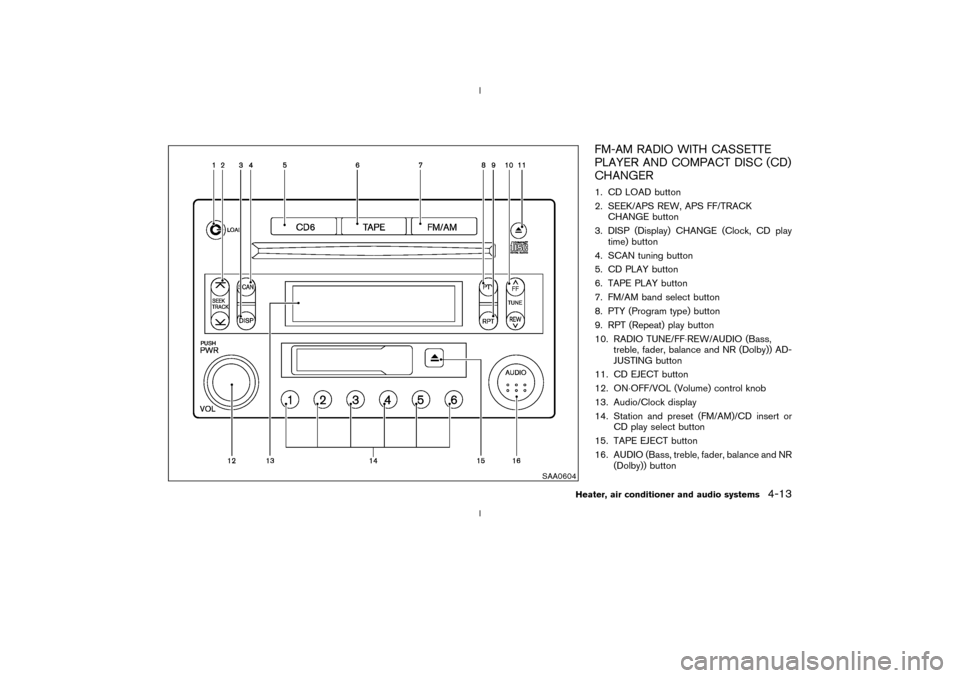
FM-AM RADIO WITH CASSETTE
PLAYER AND COMPACT DISC (CD)
CHANGER1. CD LOAD button
2. SEEK/APS REW, APS FF/TRACK
CHANGE button
3. DISP (Display) CHANGE (Clock, CD play
time) button
4. SCAN tuning button
5. CD PLAY button
6. TAPE PLAY button
7. FM/AM band select button
8. PTY (Program type) button
9. RPT (Repeat) play button
10. RADIO TUNE/FF×REW/AUDIO (Bass,
treble, fader, balance and NR (Dolby)) AD-
JUSTING button
11. CD EJECT button
12. ON×OFF/VOL (Volume) control knob
13. Audio/Clock display
14. Station and preset (FM/AM)/CD insert or
CD play select button
15. TAPE EJECT button
16. AUDIO (Bass, treble, fader, balance and NR
(Dolby)) button
SAA0604
Heater, air conditioner and audio systems
4-13
Z
02.9.13/Z33-D/V5.0
X
Page 111 of 227

Audio main operationHead unit:
The tape deck employs a permalloy head which
allows for improved reproduction of high fre-
quency ranges. Noise is also greatly reduced by
the combined use of the Dolby NR (Noise
Reduction) system. The auto loudness circuit
enhances the low frequency range automatically
in both radio reception and tape and CD play-
back.
ON×OFF/Volume control:
Turn the ignition key to ACC or ON, and then
push the ON×OFF/VOL (Volume) control knob
while the system is off to call up the mode (radio,
tape or CD) which was playing immediately
before the system was turned off. When no CD
or tape is loaded, the radio will come on. While
the system is on, pushing the ON×OFF/VOL
control knob turns the system off.
Turn the ON×OFF/VOL control knob to adjust
the volume.
AUDIO button (BASS, TREBLE, FADER,
BALANCE and NR (Dolby)):
Press the AUDIO button to change the selecting
mode as follows.
BASS®TREBLE®FADER®BALANCE®
NR (when cassette playing)To adjust Bass, Treble, Fader and Balance,
press the AUDIO button until the desired mode
(BASS, TREBLE, FADER or BALANCE) ap-
pears in the display. Press the TUNE
(
,
) or SEEK (
,
) button
to adjust Bass and Treble to the desired level.
Use the TUNE or SEEK button also to adjust
Fader or Balance modes. Fader adjusts the
sound level between the front and rear speakers
and Balance adjusts the sound between the
right and left speakers.
To change the NR (Dolby) mode to OFF or ON,
press the
or
(TUNE) button while
cassette tape is playing. When Dolby is ON, the
display indicates themark.
After 10 seconds, the radio, tape or CD display
reappears. Once the sound quality is set to the
desired level, press the AUDIO button repeat-
edly until the radio, tape or CD display appears.
Dolby noise reduction manufactured under li-
cense from Dolby Laboratories Licensing Cor-
poration. Dolby NR and the double-D symbol
are trademarks of Dolby Laboratories Li-
censing Corporation.
Metal or chrome tape usage:
The cassette player will be automatically set to
high performance play when playing a metal or
chrome cassette tape.
DISP DISPLAY CHANGE:
Push the DISP button for more than 1.5 seconds
to adjust the digital clock display. See ªClockº in
the ª2. Instruments and controlsº section for the
clock adjustment operation.
When the DISP button is pushed for less than
1.5 seconds while the compact disc is being
played, the display will show the CD play time.FM-AM radio operation
FM/AM band select:
Pushing the FM/AM band select button will
change the band as follows:
AM®FM1®FM2®AM
When FM/AM band select button is pushed
while the ignition switch is in the ACC or ON, the
radio will come on at the station last played.
The last station played will also come on when
the ON×OFF/VOL control knob is pushed to ON.
If a compact disc or tape is playing when the
FM/AM band select button is turned to ON, the
compact disc or tape will automatically be
turned off and the last radio station played will
come on.
The FM stereo indicator ST will glow during FM
stereo reception. When the stereo broadcast
signal is weak, the radio will automatically
4-14
Heater, air conditioner and audio systems
Z
02.9.13/Z33-D/V5.0
X
Page 116 of 227
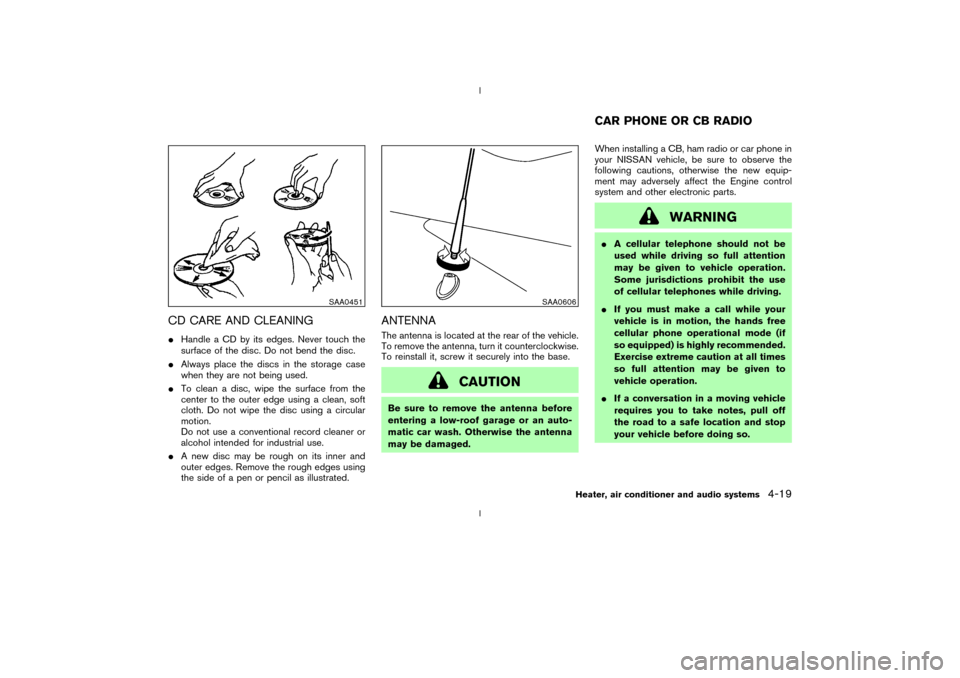
CD CARE AND CLEANINGIHandle a CD by its edges. Never touch the
surface of the disc. Do not bend the disc.
IAlways place the discs in the storage case
when they are not being used.
ITo clean a disc, wipe the surface from the
center to the outer edge using a clean, soft
cloth. Do not wipe the disc using a circular
motion.
Do not use a conventional record cleaner or
alcohol intended for industrial use.
IA new disc may be rough on its inner and
outer edges. Remove the rough edges using
the side of a pen or pencil as illustrated.
ANTENNAThe antenna is located at the rear of the vehicle.
To remove the antenna, turn it counterclockwise.
To reinstall it, screw it securely into the base.
CAUTION
Be sure to remove the antenna before
entering a low-roof garage or an auto-
matic car wash. Otherwise the antenna
may be damaged.When installing a CB, ham radio or car phone in
your NISSAN vehicle, be sure to observe the
following cautions, otherwise the new equip-
ment may adversely affect the Engine control
system and other electronic parts.
WARNING
IA cellular telephone should not be
used while driving so full attention
may be given to vehicle operation.
Some jurisdictions prohibit the use
of cellular telephones while driving.
IIf you must make a call while your
vehicle is in motion, the hands free
cellular phone operational mode (if
so equipped) is highly recommended.
Exercise extreme caution at all times
so full attention may be given to
vehicle operation.
IIf a conversation in a moving vehicle
requires you to take notes, pull off
the road to a safe location and stop
your vehicle before doing so.
SAA0451
SAA0606
CAR PHONE OR CB RADIO
Heater, air conditioner and audio systems
4-19
Z
02.9.13/Z33-D/V5.0
X