2003 NISSAN 350Z headlights
[x] Cancel search: headlightsPage 39 of 227

2 Instruments and controlsInstrument panel ..................................................................... 2-2
Meters and gauges ............................................................... 2-3
Speedometer and odometer ......................................... 2-4
Tachometer ........................................................................ 2-5
Engine coolant temperature gauge ............................. 2-5
Fuel gauge ......................................................................... 2-6
Engine oil pressure gauge ............................................. 2-6
Volt meter ......................................................................... 2-7
Trip computer .................................................................. 2-8
Warning/indicator lights and audible reminders ......... 2-11
Checking bulbs .............................................................. 2-11
Warning lights ................................................................ 2-11
Indicator lights ................................................................ 2-14
Audible reminders.......................................................... 2-16
Security systems.................................................................. 2-16
Vehicle security system................................................ 2-17
Nissan Vehicle Immobilizer System (NVIS) ............ 2-18
Windshield wiper and washer switch ............................ 2-19
Rear window wiper and washer switch ........................ 2-20
Rear window and outside mirror (if so equipped)
defroster switch ................................................................... 2-21
Headlight and turn signal switch..................................... 2-21
Xenon headlights (if so equipped) ............................ 2-21
Headlight switch ............................................................ 2-22Turn signal switch ......................................................... 2-23
Instrument brightness control ..................................... 2-23
Daytime running light system (Canada only) .......... 2-23
Hazard warning flasher switch ......................................... 2-24
Horn ........................................................................................ 2-24
Heated seats (if so equipped) ......................................... 2-25
Vehicle dynamic control (VDC) off switch
(if so equipped).................................................................... 2-26
Traction control system (TCS) off switch
(if so equipped).................................................................... 2-26
Clock ...................................................................................... 2-27
Adjusting the time ......................................................... 2-27
Power outlet.......................................................................... 2-27
Cigarette lighter and ashtray (accessory) .................... 2-28
Storage ................................................................................. 2-29
Instrument pocket (Except for Navigation system
equipped models) ........................................................ 2-29
Sunglasses holder ......................................................... 2-29
Tray.................................................................................... 2-30
Cup holders .................................................................... 2-30
Console box .................................................................... 2-31
Rear floor box ................................................................. 2-32
Rear parcel box .............................................................. 2-32
Windows................................................................................ 2-33
Z
02.9.13/Z33-D/V5.0
X
Page 56 of 227

The security condition will be shown by the
security indicator light.VEHICLE SECURITY SYSTEMThe vehicle security system provides visual and
audio alarm signals if parts of the vehicle are
disturbed.How to activate the vehicle security
system1. Close all windows.
The system can be activated even if the
windows are open.2. Remove the key from the ignition switch.
3. Close and lock all doors, hood and rear
hatch.
Lock all doors by pressing the LOCK button
on the keyfob. When using the keyfob, the
hazard indicators flash twice to indicate all
doors are locked.
4. Confirm that the security indicator light
comes on. The security indicator light glows
for about 30 seconds and then blinks. The
system is now activated. If, during this 30
second time period, the door is unlocked by
the key or the keyfob, or the ignition key is
turned to ACC or ON, the system will not
activate.
IIf the key is turned slowly toward the
rear of the vehicle when locking the
door, the system may not activate. If the
key is returned beyond the vertical po-
sition toward the front of the vehicle to
remove the key, the system may be
deactivated. If the indicator light fails to
glow for 30 seconds, unlock the door
once and lock it again.
IEven when the driver and/or passengers
are in the vehicle, the system will acti-
vate with all doors, hood and rear hatch
locked and ignition key off. Turn theignition key to ACC to turn the system
off.
Vehicle security system operationThe security system will give the following alarm:
IThe headlights blink and the horn sounds
intermittently.
IThe alarm automatically turns off after ap-
proximately 1 minute. However, the alarm
reactivates if the vehicle is tampered with
again. The alarm can be shut off by unlocking
a door with the key, or by pressing the
UNLOCK button on the keyfob.
The alarm is activated by:
IOpening the door without using the key or
keyfob.
IOpening the rear hatch without using the rear
hatch release switch or keyfob.
IOpening the hood.How to stop alarmThe alarm will stop only by unlocking a door with
the key, or by pressing the UNLOCK button on
keyfob. The alarm will not stop if the ignition
switch is turned to ACC or ON.
If the system does not operate as de-
SIC1699
Instruments and controls
2-17
Z
02.9.13/Z33-D/V5.0
X
Page 60 of 227

To defog/defrost the rear window glass and
outside mirrors (if so equipped), start the engine
and push the switch on. The indicator light will
come on. Push the switch again to turn the
defroster off.
It will automatically turn off in approximately 15
minutes.
CAUTION
When cleaning the inner side of the rear
window, be careful not to scratch or
damage the rear window defroster.
XENON HEADLIGHTS (if so
equipped)
WARNINGHIGH VOLTAGE
IWhen xenon headlights are on, they
produce a high voltage. To prevent an
electric shock, never attempt to
modify or disassemble. Always have
your xenon headlights replaced at a
NISSAN dealer.
IXenon headlights provide consider-
ably more light than conventional
headlights. If they are not correctly
aimed, they might temporarily blind
an oncoming driver or the driver
ahead of you and cause a serious
accident. If headlights are not aimed
correctly, immediately take your ve-
hicle to a NISSAN dealer and have
the headlights adjusted correctly.
When the xenon headlight is initially turned on,
its brightness or color varies slightly. However,
the color and brightness will soon stabilize.IThe life of xenon headlights will be
shortened by frequent on-off operation.
It is generally desirable not to turn off
the headlights for short intervals (for
example, when the vehicle stops at a
traffic signal). Even when the daytime
running lights are active (Canada only),
the xenon headlights do not turn on.
This way the life of the xenon headlights
is not reduced.
IIf the xenon headlight bulb is close to
burning out, the brightness will drasti-
cally decrease, the light will start blink-
ing, or the color of the light will become
reddish. If one or more of the above
signs appear, contact a NISSAN dealer.
SIC1960
REAR WINDOW AND OUTSIDE
MIRROR (if so equipped)
DEFROSTER SWITCHHEADLIGHT AND TURN SIGNAL
SWITCH
Instruments and controls
2-21
Z
02.9.13/Z33-D/V5.0
X
Page 61 of 227
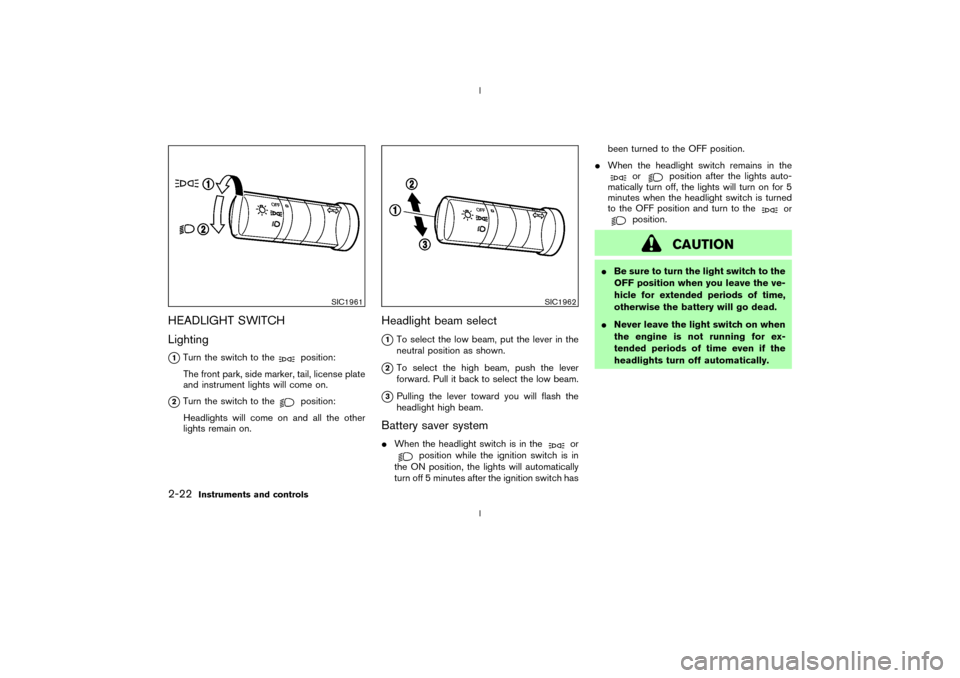
HEADLIGHT SWITCH
Lighting
q1Turn the switch to the
position:
The front park, side marker, tail, license plate
and instrument lights will come on.
q2Turn the switch to the
position:
Headlights will come on and all the other
lights remain on.
Headlight beam select
q1To select the low beam, put the lever in the
neutral position as shown.
q2To select the high beam, push the lever
forward. Pull it back to select the low beam.
q3Pulling the lever toward you will flash the
headlight high beam.
Battery saver systemIWhen the headlight switch is in the
or
position while the ignition switch is in
the ON position, the lights will automatically
turn off 5 minutes after the ignition switch hasbeen turned to the OFF position.
IWhen the headlight switch remains in the
or
position after the lights auto-
matically turn off, the lights will turn on for 5
minutes when the headlight switch is turned
to the OFF position and turn to the
or
position.
CAUTION
IBe sure to turn the light switch to the
OFF position when you leave the ve-
hicle for extended periods of time,
otherwise the battery will go dead.
INever leave the light switch on when
the engine is not running for ex-
tended periods of time even if the
headlights turn off automatically.
SIC1961
SIC1962
2-22
Instruments and controls
Z
02.9.13/Z33-D/V5.0
X
Page 62 of 227
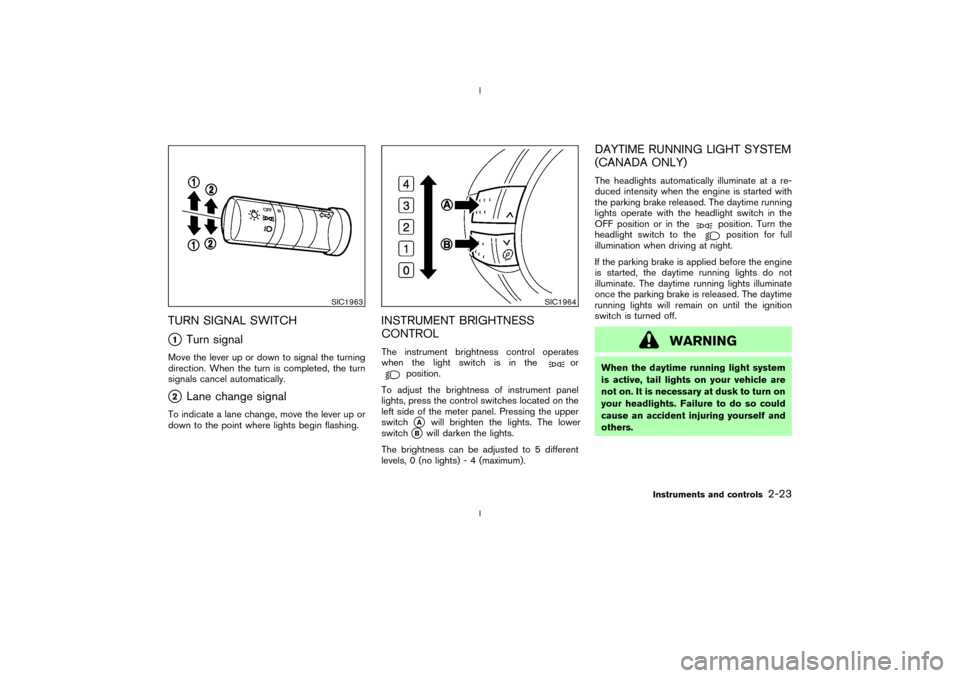
TURN SIGNAL SWITCHq1
Turn signal
Move the lever up or down to signal the turning
direction. When the turn is completed, the turn
signals cancel automatically.q2
Lane change signal
To indicate a lane change, move the lever up or
down to the point where lights begin flashing.
INSTRUMENT BRIGHTNESS
CONTROLThe instrument brightness control operates
when the light switch is in the
or
position.
To adjust the brightness of instrument panel
lights, press the control switches located on the
left side of the meter panel. Pressing the upper
switchqA
will brighten the lights. The lower
switch
qB
will darken the lights.
The brightness can be adjusted to 5 different
levels, 0 (no lights) - 4 (maximum).
DAYTIME RUNNING LIGHT SYSTEM
(CANADA ONLY)The headlights automatically illuminate at a re-
duced intensity when the engine is started with
the parking brake released. The daytime running
lights operate with the headlight switch in the
OFF position or in the
position. Turn the
headlight switch to theposition for full
illumination when driving at night.
If the parking brake is applied before the engine
is started, the daytime running lights do not
illuminate. The daytime running lights illuminate
once the parking brake is released. The daytime
running lights will remain on until the ignition
switch is turned off.
WARNING
When the daytime running light system
is active, tail lights on your vehicle are
not on. It is necessary at dusk to turn on
your headlights. Failure to do so could
cause an accident injuring yourself and
others.
SIC1963
SIC1964
Instruments and controls
2-23
Z
02.9.13/Z33-D/V5.0
X
Page 67 of 227
draw. Do not use double adapters or
more than one electrical accessory.
IUse this power outlet with the engine
running. (If the engine is stopped,
this could result in a discharged bat-
tery.)
IAvoid using when the air conditioner,
headlights or rear window defroster
is on.
IBefore inserting or disconnecting a
plug, be sure to turn off the power
switch of electrical accessory being
used or the ACC power of the vehicle.
IPush the plug in as far as it will go. If
good contact is not made, the plug
may overheat or the internal tem-
perature fuse may blow.
IWhen not in use, be sure to close the
cap. Do not allow water to contact
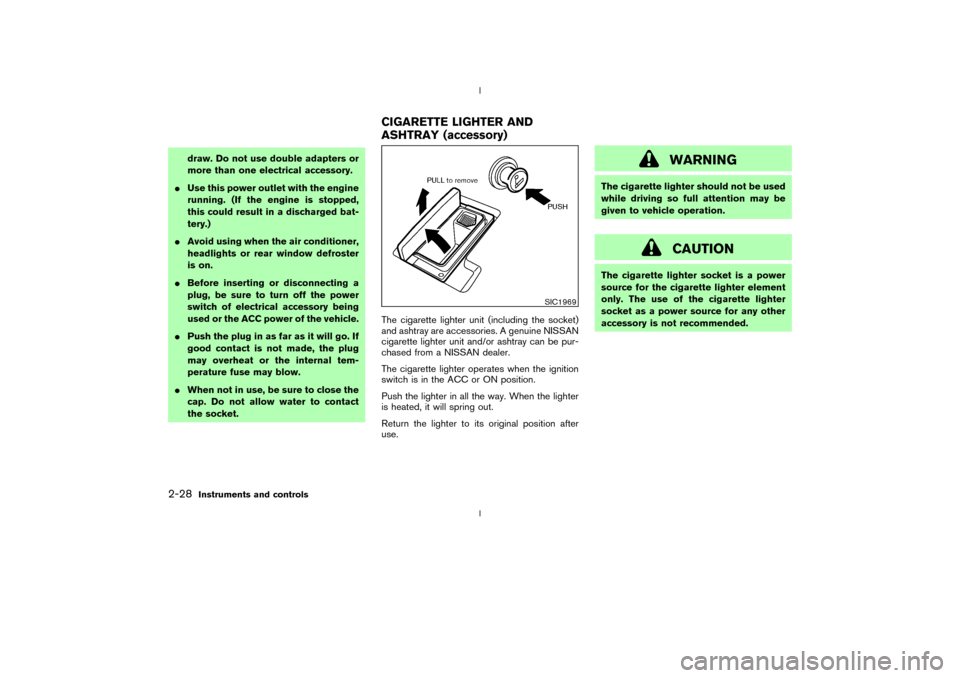
the socket.The cigarette lighter unit (including the socket)
and ashtray are accessories. A genuine NISSAN
cigarette lighter unit and/or ashtray can be pur-
chased from a NISSAN dealer.
The cigarette lighter operates when the ignition
switch is in the ACC or ON position.
Push the lighter in all the way. When the lighter
is heated, it will spring out.
Return the lighter to its original position after
use.
WARNING
The cigarette lighter should not be used
while driving so full attention may be
given to vehicle operation.
CAUTION
The cigarette lighter socket is a power
source for the cigarette lighter element
only. The use of the cigarette lighter
socket as a power source for any other
accessory is not recommended.
SIC1969
CIGARETTE LIGHTER AND
ASHTRAY (accessory)
2-28
Instruments and controls
Z
02.9.13/Z33-D/V5.0
X
Page 88 of 227
LOCK button again for 3 more seconds.Releasing the rear hatch1. Push the REAR HATCH button on the keyfob
for longer than 0.5 seconds with the key
removed from the ignition key cylinder.
2. The rear hatch opens.Using the panic alarmIf you are near your vehicle and feel threatened,
you may activate the alarm to call attention as
follows:
1. Push the PANIC button on the keyfob for
longer than 0.5 secondswith the key
removed from the ignition key cylinder.
2. The theft warning alarm and headlights will
stay on for 30 seconds.
3. The panic alarm stops when:
IIt has run for 30 seconds, or
IThe LOCK or the UNLOCK button is
pressed, or
IThe PANIC or the REAR HATCH button is
pushed on the keyfob for longer than 0.5
seconds.
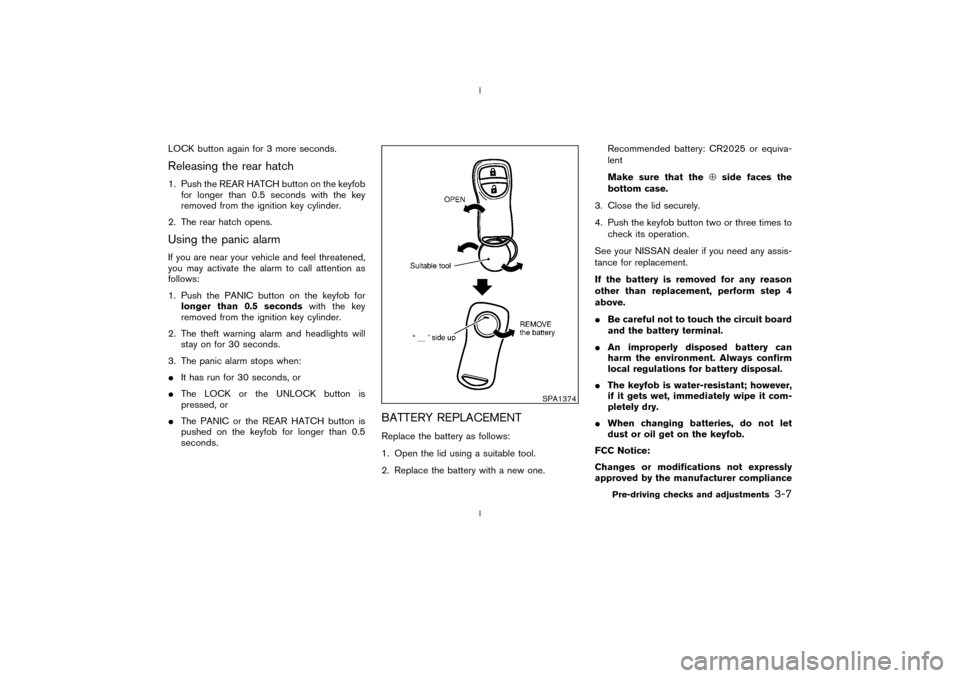
BATTERY REPLACEMENTReplace the battery as follows:
1. Open the lid using a suitable tool.
2. Replace the battery with a new one.Recommended battery: CR2025 or equiva-
lent
Make sure that theÅside faces the
bottom case.
3. Close the lid securely.
4. Push the keyfob button two or three times to
check its operation.
See your NISSAN dealer if you need any assis-
tance for replacement.
If the battery is removed for any reason
other than replacement, perform step 4
above.
IBe careful not to touch the circuit board
and the battery terminal.
IAn improperly disposed battery can
harm the environment. Always confirm
local regulations for battery disposal.
IThe keyfob is water-resistant; however,
if it gets wet, immediately wipe it com-
pletely dry.
IWhen changing batteries, do not let
dust or oil get on the keyfob.
FCC Notice:
Changes or modifications not expressly
approved by the manufacturer compliance
SPA1374
Pre-driving checks and adjustments
3-7
Z
02.9.13/Z33-D/V5.0
X
Page 94 of 227
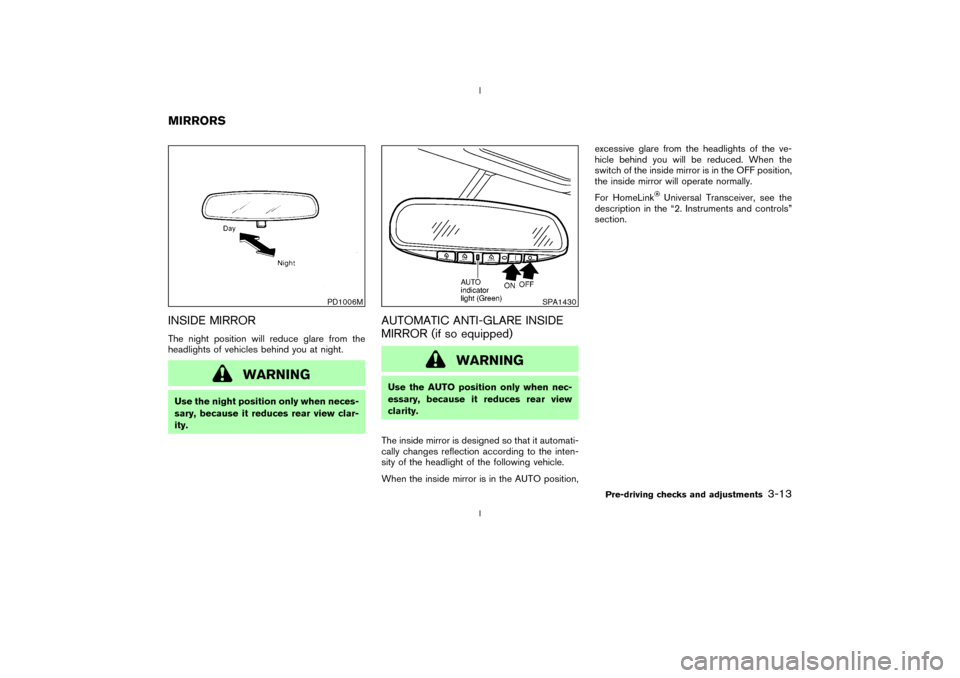
INSIDE MIRRORThe night position will reduce glare from the
headlights of vehicles behind you at night.
WARNING
Use the night position only when neces-
sary, because it reduces rear view clar-
ity.
AUTOMATIC ANTI-GLARE INSIDE
MIRROR (if so equipped)
WARNING
Use the AUTO position only when nec-
essary, because it reduces rear view
clarity.
The inside mirror is designed so that it automati-
cally changes reflection according to the inten-
sity of the headlight of the following vehicle.
When the inside mirror is in the AUTO position,excessive glare from the headlights of the ve-
hicle behind you will be reduced. When the
switch of the inside mirror is in the OFF position,
the inside mirror will operate normally.
For HomeLink
Universal Transceiver, see the
description in the ª2. Instruments and controlsº
section.
PD1006M
SPA1430
MIRRORS
Pre-driving checks and adjustments
3-13
Z
02.9.13/Z33-D/V5.0
X