2003 NISSAN 350Z ignition
[x] Cancel search: ignitionPage 87 of 227
*2: Doors lock with the keyfob while the ignition
switch is in the ON position. However, the
hazard indicator and horn will not function.
*3: Doors lock with the keyfob while any door is
open. However, the hazard indicator and
horn will not function.
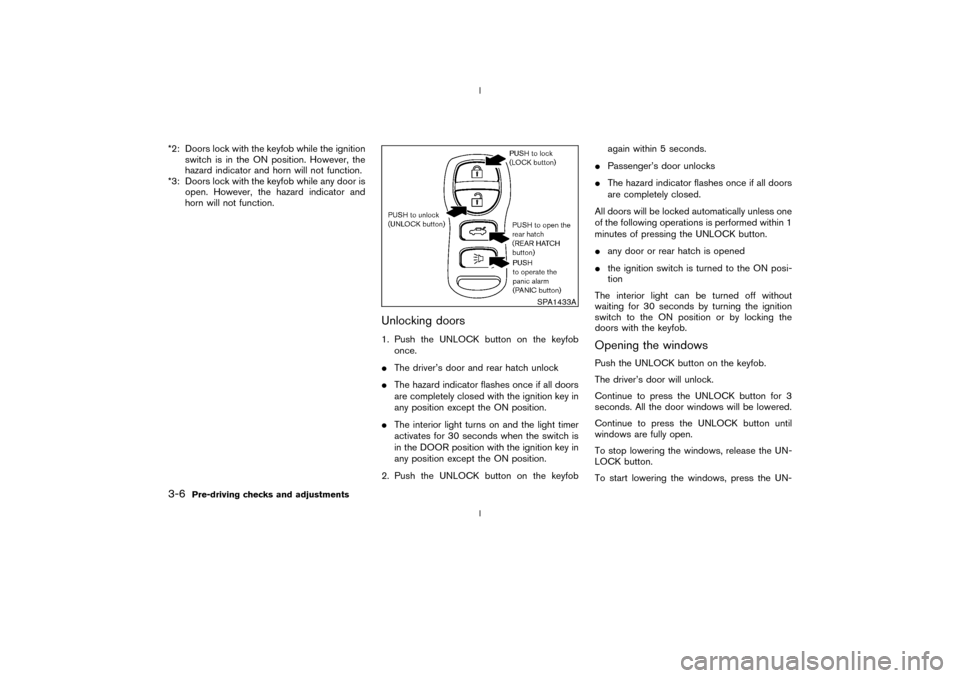
Unlocking doors1. Push the UNLOCK button on the keyfob
once.
IThe driver's door and rear hatch unlock
IThe hazard indicator flashes once if all doors
are completely closed with the ignition key in
any position except the ON position.
IThe interior light turns on and the light timer
activates for 30 seconds when the switch is
in the DOOR position with the ignition key in
any position except the ON position.
2. Push the UNLOCK button on the keyfobagain within 5 seconds.
IPassenger's door unlocks
IThe hazard indicator flashes once if all doors
are completely closed.
All doors will be locked automatically unless one
of the following operations is performed within 1
minutes of pressing the UNLOCK button.
Iany door or rear hatch is opened
Ithe ignition switch is turned to the ON posi-
tion
The interior light can be turned off without
waiting for 30 seconds by turning the ignition
switch to the ON position or by locking the
doors with the keyfob.
Opening the windowsPush the UNLOCK button on the keyfob.
The driver's door will unlock.
Continue to press the UNLOCK button for 3
seconds. All the door windows will be lowered.
Continue to press the UNLOCK button until
windows are fully open.
To stop lowering the windows, release the UN-
LOCK button.
To start lowering the windows, press the UN-
SPA1433A
3-6
Pre-driving checks and adjustments
Z
02.9.13/Z33-D/V5.0
X
Page 88 of 227
LOCK button again for 3 more seconds.Releasing the rear hatch1. Push the REAR HATCH button on the keyfob
for longer than 0.5 seconds with the key
removed from the ignition key cylinder.
2. The rear hatch opens.Using the panic alarmIf you are near your vehicle and feel threatened,
you may activate the alarm to call attention as
follows:
1. Push the PANIC button on the keyfob for
longer than 0.5 secondswith the key
removed from the ignition key cylinder.
2. The theft warning alarm and headlights will
stay on for 30 seconds.
3. The panic alarm stops when:
IIt has run for 30 seconds, or
IThe LOCK or the UNLOCK button is
pressed, or
IThe PANIC or the REAR HATCH button is
pushed on the keyfob for longer than 0.5
seconds.
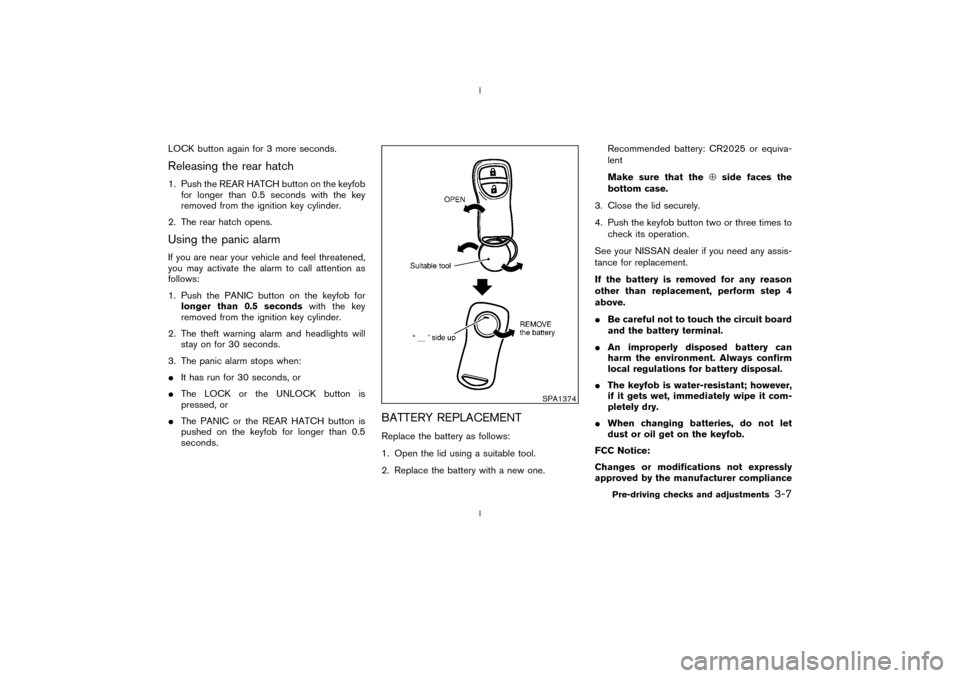
BATTERY REPLACEMENTReplace the battery as follows:
1. Open the lid using a suitable tool.
2. Replace the battery with a new one.Recommended battery: CR2025 or equiva-
lent
Make sure that theÅside faces the
bottom case.
3. Close the lid securely.
4. Push the keyfob button two or three times to
check its operation.
See your NISSAN dealer if you need any assis-
tance for replacement.
If the battery is removed for any reason
other than replacement, perform step 4
above.
IBe careful not to touch the circuit board
and the battery terminal.
IAn improperly disposed battery can
harm the environment. Always confirm
local regulations for battery disposal.
IThe keyfob is water-resistant; however,
if it gets wet, immediately wipe it com-
pletely dry.
IWhen changing batteries, do not let
dust or oil get on the keyfob.
FCC Notice:
Changes or modifications not expressly
approved by the manufacturer compliance
SPA1374
Pre-driving checks and adjustments
3-7
Z
02.9.13/Z33-D/V5.0
X
Page 95 of 227
OUTSIDE MIRRORS
WARNING
Objects viewed in the outside mirror on
the passenger side are closer than they
appear. Be careful when moving to the
right. Using only this mirror could cause
an accident. Use inside mirror or glance
over your shoulder to properly judge
distances to other objects.
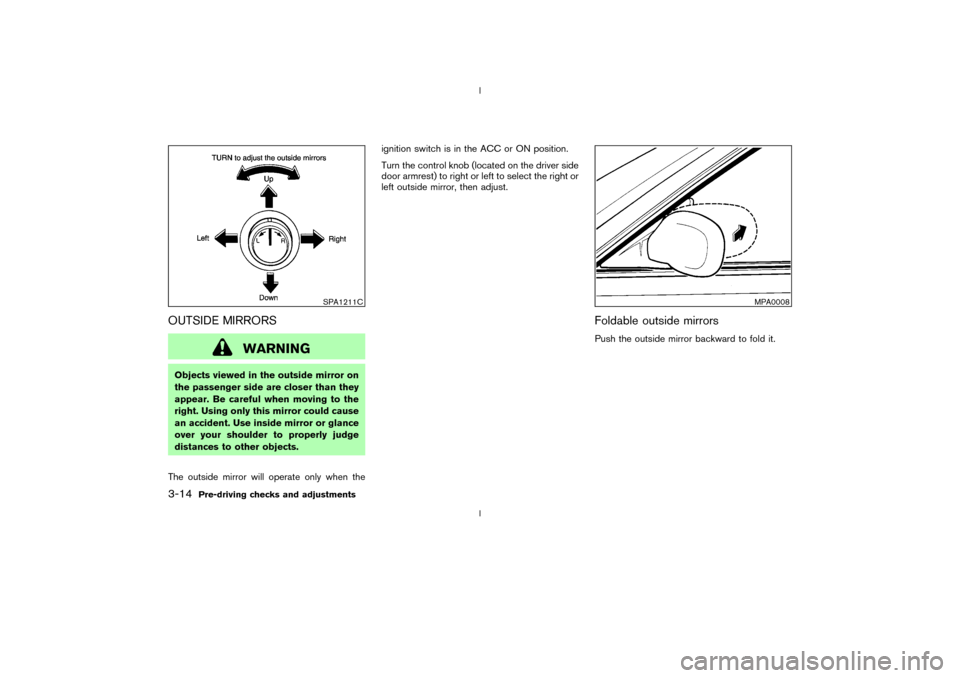
The outside mirror will operate only when theignition switch is in the ACC or ON position.
Turn the control knob (located on the driver side
door armrest) to right or left to select the right or
left outside mirror, then adjust.
Foldable outside mirrorsPush the outside mirror backward to fold it.
SPA1211C
MPA0008
3-14
Pre-driving checks and adjustments
Z
02.9.13/Z33-D/V5.0
X
Page 103 of 227
The air conditioning system in your NISSAN
vehicle is charged with a refrigerant designed
with the environment in mind.This refrigerant
will not harm the earth's ozone layer.How-
ever, special charging equipment and lubricant
are required when servicing your NISSAN air
conditioner. Using improper refrigerants or lubri-
cants will cause severe damage to your air
conditioning system. See ªCapacities and rec-
ommended fuel/lubricantsº in the ª9. Technical
and consumer informationº section for air con-
ditioning system refrigerant and lubricant recom-
mendations.
Your NISSAN dealer will be able to service your
environmentally friendly air conditioning system.
WARNING
The air conditioner system contains re-
frigerant under high pressure. To avoid
personal injury, any air conditioner ser-
vice should be done only by an experi-
enced technician with proper equip-
ment.Turn the ignition key to ACC or ON and press
the POWER, FM or AM button to turn on the
radio. If you listen to the radio with the engine not
running, the key should be turned to the ACC
position.
Radio reception is affected by station signal
strength, distance from radio transmitter, build-
ings, bridges, mountains and other external in-
fluences. Intermittent changes in reception qual-
ity normally are caused by these external
influences.
Using a cellular phone in or near the ve-
hicle may influence radio reception quality.
Radio receptionYour radio system is equipped with state-of-the-
art electronic circuits to enhance radio recep-
tion. These circuits are designed to extend re-
ception range, and to enhance the quality of that
reception.
However there are some general characteristics
of both FM and AM radio signals that can affect
radio reception quality in a moving vehicle, even
when the finest equipment is used. These char-
acteristics are completely normal in a given
reception area, and do not indicate any malfunc-
tion in your radio system.
Remember that a moving vehicle is not the ideal
place to listen to a radio. Because of the move-ment, reception conditions will constantly
change. Buildings, terrain, signal distance and
interference from other vehicles can work
against ideal reception. Described below are
some of the factors that can affect your radio
reception.
SERVICING AIR CONDITIONER AUDIO SYSTEM4-6
Heater, air conditioner and audio systems
Z
02.9.13/Z33-D/V5.0
X
Page 107 of 227
Audio main operationON×OFF/Volume control:
Turn the ignition key to ACC or ON, and then
push the ON×OFF/VOL (Volume) control knob
while the system is off to call up the mode (radio
or CD) which was playing immediately before
the system was turned off. When no CD is
loaded, the radio will come on. While the system
is on, pushing the ON×OFF/VOL control knob
turns the system off.
Turn the ON×OFF/VOL control knob to adjust
the volume.
AUDIO button (BASS, TREBLE, FADER,
BALANCE):
Press the AUDIO button to change the selecting
mode as follows.
BASS®TREBLE®FADER®BALANCE
To adjust Bass, Treble, Fader and Balance,
press the AUDIO button until the desired mode
(BASS, TREBLE, FADER or BALANCE) ap-
pears in the display. Press the TUNE
(
,
) or SEEK (
,
) button
to adjust Bass and Treble to the desired level.
Use the TUNE or SEEK button also to adjust
Fader or Balance modes. Fader adjusts the
sound level between the front and rear speakersand Balance adjusts the sound between the
right and left speakers.
After 10 seconds, the radio or CD display
reappears. Once the sound quality is set to the
desired level, press the AUDIO button repeat-
edly until the radio or CD display appears.
DISP DISPLAY CHANGE:
Push the DISP button for more than 1.5 seconds
to adjust the digital clock display. See ªClockº in
the ª2. Instruments and controlsº section for the
clock adjustment operation.
When the DISP button is pushed for less than
1.5 seconds while the compact disc is being
played, the display will show the CD play time.FM-AM radio operation
FM/AM band select:
Pushing the FM band select button will change
the band as follows:
FM1®FM2®FM1
To select the AM band, push the AM band select
button.
When FM or AM band select button is pushed
while the ignition switch is in the ACC or ON, the
radio will come on at the station last played.
The last station played will also come on whenthe power knob is turned to ON.
If a compact disc is playing when the FM or AM
band select button is turned to ON, the compact
disc will automatically be turned off and the last
radio station played will come on.
The FM stereo indicator ST will glow during FM
stereo reception. When the stereo broadcast
signal is weak, the radio will automatically
change from stereo to monaural reception.
TUNE (Tuning):WARNING
The radio should not be tuned while
driving so full attention may be given to
vehicle operation.
Use the TUNE button
or
for manual
tuning. To move quickly through the channels,
hold either side of the TUNE button down for
more than 0.5 seconds.
SEEK tuning:
Push the SEEK button
or
to tune
from high to low or low to high frequencies and
stops at the next broadcasting station.
4-10
Heater, air conditioner and audio systems
Z
02.9.13/Z33-D/V5.0
X
Page 108 of 227
SCAN tuning:
Push the SCAN tuning button to tune from low
to high frequencies and stops at each broad-
casting station for 5 seconds. Pushing the but-
ton again during this 5 second period will stop
SCAN tuning and the radio will remain tuned to
that station.
If the SCAN tuning button is not pushed within 5
seconds, SCAN tuning moves to the next sta-
tion.
Station memory operations:
Twelve stations can be set for the FM band (six
for FM1, six for FM2) and six stations can be set
for the AM band.
1. Tune to the desired station using the SEEK,
SCAN or TUNE button.
2. Select the desired station and keep pushing
any of the desired station select buttons (1 to
6) until a beep sound is heard. (The radio
mutes when the select button is pushed.)
3. The channel indicator will then come on and
the sound will resume. Memorizing is now
complete.
4. Other buttons can be set in the same manner.
If the battery cable is disconnected, or if the fuse
blows, the radio memory will be cancelled. Inthat case, reset the desired stations.
Compact disc (CD) player operationTurn the ignition key to the ACC or ON position
and insert the compact disc into the slot with the
label side facing up. The compact disc will be
guided automatically into the slot and start play-
ing.
After loading the disc, the number of tracks on
the disc will appear on the display.
If the radio is already operating, it will automati-
cally turn off and the compact disc will play.
CAUTION
Do not force the compact disc into the
slot. This could damage the player.
If the system has been turned off while the
compact disc was playing, pushing the
ON×OFF/VOL control knob will start the com-
pact disc.
8 cm diameter compact discs can also be used
without an adapter.
CD PLAY:
When the CD (CD play) button is pushed with
the system off and the compact disc loaded, thesystem will turn on and the compact disc will
start to play.
When the CD button is pushed with the com-
pact disc loaded but the radio playing, the radio
will automatically be turned off and the compact
disc will start to play.
DISP CD PLAY TIME:
Push the DISP button for less than 1.5 seconds
while the compact disc is being played to show
the play time on the display.
FF (Fast Forward), REW
(Rewind):
When the(fast forward) or
(rewind)
button is pushed while the compact disc is
being played, the compact disc will play while
fast forwarding or rewinding. When the button is
released, the compact disc will return to normal
play speed.
APS (Automatic Program
Search) FF, APS REW:
When the(APS FF) button is pushed
while the compact disc is being played, the
program next to the present one will start to play
from its beginning. Push several times to skip
through programs. The compact disc will ad-
vance the number of times the button is pushed.
(When the last program on the compact disc is
Heater, air conditioner and audio systems
4-11
Z
02.9.13/Z33-D/V5.0
X
Page 111 of 227

Audio main operationHead unit:
The tape deck employs a permalloy head which
allows for improved reproduction of high fre-
quency ranges. Noise is also greatly reduced by
the combined use of the Dolby NR (Noise
Reduction) system. The auto loudness circuit
enhances the low frequency range automatically
in both radio reception and tape and CD play-
back.
ON×OFF/Volume control:
Turn the ignition key to ACC or ON, and then
push the ON×OFF/VOL (Volume) control knob
while the system is off to call up the mode (radio,
tape or CD) which was playing immediately
before the system was turned off. When no CD
or tape is loaded, the radio will come on. While
the system is on, pushing the ON×OFF/VOL
control knob turns the system off.
Turn the ON×OFF/VOL control knob to adjust
the volume.
AUDIO button (BASS, TREBLE, FADER,
BALANCE and NR (Dolby)):
Press the AUDIO button to change the selecting
mode as follows.
BASS®TREBLE®FADER®BALANCE®
NR (when cassette playing)To adjust Bass, Treble, Fader and Balance,
press the AUDIO button until the desired mode
(BASS, TREBLE, FADER or BALANCE) ap-
pears in the display. Press the TUNE
(
,
) or SEEK (
,
) button
to adjust Bass and Treble to the desired level.
Use the TUNE or SEEK button also to adjust
Fader or Balance modes. Fader adjusts the
sound level between the front and rear speakers
and Balance adjusts the sound between the
right and left speakers.
To change the NR (Dolby) mode to OFF or ON,
press the
or
(TUNE) button while
cassette tape is playing. When Dolby is ON, the
display indicates themark.
After 10 seconds, the radio, tape or CD display
reappears. Once the sound quality is set to the
desired level, press the AUDIO button repeat-
edly until the radio, tape or CD display appears.
Dolby noise reduction manufactured under li-
cense from Dolby Laboratories Licensing Cor-
poration. Dolby NR and the double-D symbol
are trademarks of Dolby Laboratories Li-
censing Corporation.
Metal or chrome tape usage:
The cassette player will be automatically set to
high performance play when playing a metal or
chrome cassette tape.
DISP DISPLAY CHANGE:
Push the DISP button for more than 1.5 seconds
to adjust the digital clock display. See ªClockº in
the ª2. Instruments and controlsº section for the
clock adjustment operation.
When the DISP button is pushed for less than
1.5 seconds while the compact disc is being
played, the display will show the CD play time.FM-AM radio operation
FM/AM band select:
Pushing the FM/AM band select button will
change the band as follows:
AM®FM1®FM2®AM
When FM/AM band select button is pushed
while the ignition switch is in the ACC or ON, the
radio will come on at the station last played.
The last station played will also come on when
the ON×OFF/VOL control knob is pushed to ON.
If a compact disc or tape is playing when the
FM/AM band select button is turned to ON, the
compact disc or tape will automatically be
turned off and the last radio station played will
come on.
The FM stereo indicator ST will glow during FM
stereo reception. When the stereo broadcast
signal is weak, the radio will automatically
4-14
Heater, air conditioner and audio systems
Z
02.9.13/Z33-D/V5.0
X
Page 113 of 227
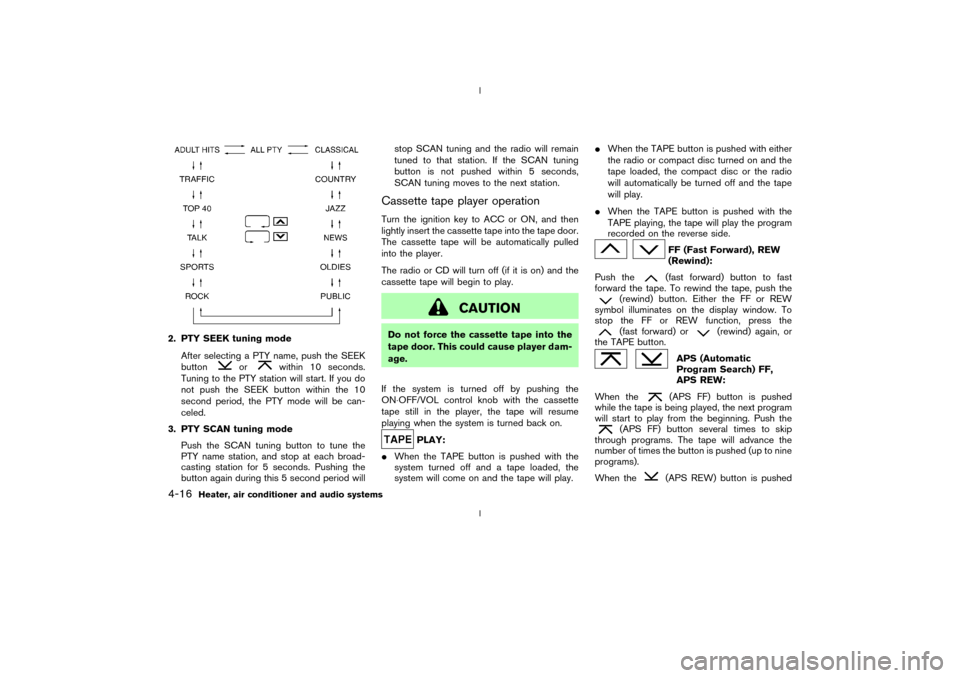
2. PTY SEEK tuning mode
After selecting a PTY name, push the SEEK
button
or
within 10 seconds.
Tuning to the PTY station will start. If you do
not push the SEEK button within the 10
second period, the PTY mode will be can-
celed.
3. PTY SCAN tuning mode
Push the SCAN tuning button to tune the
PTY name station, and stop at each broad-
casting station for 5 seconds. Pushing the
button again during this 5 second period willstop SCAN tuning and the radio will remain
tuned to that station. If the SCAN tuning
button is not pushed within 5 seconds,
SCAN tuning moves to the next station.
Cassette tape player operationTurn the ignition key to ACC or ON, and then
lightly insert the cassette tape into the tape door.
The cassette tape will be automatically pulled
into the player.
The radio or CD will turn off (if it is on) and the
cassette tape will begin to play.
CAUTION
Do not force the cassette tape into the
tape door. This could cause player dam-
age.
If the system is turned off by pushing the
ON×OFF/VOL control knob with the cassette
tape still in the player, the tape will resume
playing when the system is turned back on.
PLAY:
IWhen the TAPE button is pushed with the
system turned off and a tape loaded, the
system will come on and the tape will play.IWhen the TAPE button is pushed with either
the radio or compact disc turned on and the
tape loaded, the compact disc or the radio
will automatically be turned off and the tape
will play.
IWhen the TAPE button is pushed with the
TAPE playing, the tape will play the program
recorded on the reverse side.
FF (Fast Forward), REW
(Rewind):
Push the(fast forward) button to fast
forward the tape. To rewind the tape, push the
(rewind) button. Either the FF or REW
symbol illuminates on the display window. To
stop the FF or REW function, press the(fast forward) or
(rewind) again, or
the TAPE button.
APS (Automatic
Program Search) FF,
APS REW:
When the(APS FF) button is pushed
while the tape is being played, the next program
will start to play from the beginning. Push the
(APS FF) button several times to skip
through programs. The tape will advance the
number of times the button is pushed (up to nine
programs).
When the
(APS REW) button is pushed
4-16
Heater, air conditioner and audio systems
Z
02.9.13/Z33-D/V5.0
X