2003 NISSAN 350Z display
[x] Cancel search: displayPage 114 of 227
once, the program being played starts over from
the beginning. Push the
(APS REW) but-
ton several times to skip back several selections.
The tape will go back the number of times the
button is pushed. Either the FF or REW symbol
flashes on the display window while searching
for the selection.
This system searches for the blank intervals
between selections. If there is a blank interval
within one program or there is no interval be-
tween programs, the system may not stop in the
desired or expected location.
SCAN tuning:
Push the SCAN tuning button while playing
tape, and it stops at the next tape program for 5
seconds. Pushing the button again during this 5
second period will stop SCAN tuning and the
tape program is continued. If the SCAN tuning
button is not pushed within 5 seconds, SCAN
tuning moves to the next tape program.TAPE EJECT:
When this button is pushed with the tape
loaded, the tape will be ejected.
When the tape is ejected while it is being played,
the system will be turned off.
Compact disc (CD) changer
operationTurn the ignition key to the ACC or ON position,
push the LOAD button and insert the compact
disc into the slot with the label side facing up.
The compact disc will be guided automatically
into the slot and start playing.
After loading the disc, the number of tracks on
the disc will appear on the display.
If the radio or tape is already operating, it will
automatically turn off and the compact disc will
play.
CAUTION
IDo not force the compact disc into
the slot. This could damage the
player.
IDo not use 3.1 in (8 cm) discs.
If the system has been turned off while the
compact disc was playing, pushing the
ON×OFF/VOL control knob will start the com-
pact disc.
CD LOAD:
To insert a CD in the CD changer, push the
LOAD button for less than 1.5 seconds. Selectthe loading slot by pushing the CD insert select
button (1 to 6), then insert the CD.
To insert 6 CDs to the CD changer in succes-
sion, push the LOAD button for more than 1.5
seconds.
The inserted slot numbers will illuminate on the
display.
CD PLAY:
When the
(CD play) button is pushed with
the system off and the compact disc loaded, the
system will turn on and the compact disc will
start to play.
When thebutton is pushed with the com-
pact disc loaded but the tape or the radio
playing, the tape or radio will automatically be
turned off and the compact disc will start to play.
DISP CD PLAY TIME:
Push the DISP button for less than 1.5 seconds
while the compact disc is being played to show
the play time on the display.
FF (Fast Forward), REW
(Rewind):
When the(fast forward) or
(rewind)
button is pushed while the compact disc is
being played, the compact disc will play while
fast forwarding or rewinding. When the button is
Heater, air conditioner and audio systems
4-17
Z
02.9.13/Z33-D/V5.0
X
Page 115 of 227

released, the compact disc will return to normal
play speed.
APS (Automatic Program
Search) FF, APS REW:
When the(APS FF) button is pushed
while the compact disc is being played, the
program next to the present one will start to play
from its beginning. Push several times to skip
through programs. The compact disc will ad-
vance the number of times the button is pushed.
(When the last program on the compact disc is
skipped through, the first program will be
played.) When the
(APS REW) button is
pushed, the program being played returns to its
beginning. Push several times to skip back
through programs. The compact disc will go
back the number of times the button is pushed.
CD PLAY select button:
To change CD, push the CD play select button
(1 to 6).
SCAN tuning:
When the SCAN tuning button is pushed for
less than 1.5 seconds while the CD is being
played, the beginning of all the tracks of CDs will
be played for 10 seconds in sequence.
When the SCAN tuning button is pushed for
more than 1.5 seconds while the CD is beingplayed, the first program in all the CDs will be
played for 10 seconds.
Pushing the button again during this 10 second
period will stop SCAN tuning.
If the SCAN tuning button is not pushed within
10 seconds, SCAN tuning moves to the next
disc program.
REPEAT (RPT):
When the RPT play button is pushed while the
compact disc is played, the play pattern can be
changed as follows:
The display shows the following symbols.
(no mark): ALL CD RPT (Repeat)
1DISC: 1 CD RPT
1: 1 TR (Track) RPT
MIX: ALL CD MIX
1DISC MIX: 1 CD MIX
CD EJECT:
When the CD EJECT button is pushed with the
compact disc loaded, the compact disc will be
ejected.To eject the discs selected by the CD select
button, push the EJECT button for less than 1.5
seconds.
To eject all the discs in succession, push the
EJECT button for more than 1.5 seconds.
When this button is pushed while the compact
disc is being played, the compact disc will come
out and the system will turn off.
If the compact disc comes out and is not
removed, it will be pulled back into the slot
to protect it.
CD IN indicator:
CD IN indicator (inserted slot number) appears
on the display when the CD is loaded with the
system on.
4-18
Heater, air conditioner and audio systems
Z
02.9.13/Z33-D/V5.0
X
Page 120 of 227
d. You have had an accident involv-
ing damage to the exhaust system,
underbody, or rear of the vehicle.
THREE WAY CATALYSTThe three way catalyst is an emission control
device installed in the exhaust system. Exhaust
gases in the converter are burned at high tem-
peratures to help reduce pollutants.
WARNING
IThe exhaust gas and the exhaust sys-
tem are very hot. Keep people, ani-
mals or flammable materials away
from the exhaust system compo-
nents.
IDo not stop or park the vehicle over
flammable materials such as dry
grass, waste paper or rags. They may
ignite and cause a fire.
CAUTION
IDo not use leaded gasoline. Deposits
from leaded gasoline seriously re-
duce the three way catalyst's ability
to help reduce exhaust pollutants.
IKeep your engine tuned up. Malfunc-
tions in the ignition, fuel injection, or
electrical systems can cause overrich
fuel flow into the three way catalyst,
causing it to overheat. Do not keep
driving if the engine misfires, or if
noticeable loss of performance or
other unusual operating conditions
are detected. Have the vehicle in-
spected promptly by a NISSAN
dealer.
IAvoid driving with an extremely low
fuel level. Running out of fuel could
cause the engine to misfire, damag-
ing the three way catalyst.
IDo not race the engine while warm-
ing it up.
IDo not push or tow your vehicle to
start the engine.
LOW TIRE PRESSURE WARNING
SYSTEM (if so equipped)The low tire pressure warning system displays
pressure of all tires (except the spare tire) on the
trip computer by sending a signal from a sensor
that is installed in each wheel.
The low tire pressure warning system will acti-
vate only when the vehicle is driven at speeds
above 20 MPH (32 km/h). Also, this system may
not detect a sudden drop in tire pressure (for
example, a flat tire by catching something while
driving).
Frequently check the tire pressure indicator on
the trip computer and adjust pressure of each
tire properly. See ªTrip computerº in the ª2.
Instruments and controlsº section for the tire
pressure indicator.Flat tire warningIf the vehicle is being driven with a flat tire or
extremely low tire pressure (lower than 28 psi),
the low tire pressure warning light comes on,
and the chime sounds for about 10 seconds. On
the trip computer, the PSI indicator starts flash-
ing and the current display switches to the tire
pressure indicator.
For additional information regarding the above
warning, see ªTrip computerº and
Starting and driving
5-3
Z
02.9.13/Z33-D/V5.0
X
Page 128 of 227

shift mode. Shift range can be selected manu-
ally.
In the manual shift mode, the shift range is
displayed on the position indicator in the meter.
Shift ranges up or down one by one as follows:M1®
¬
M2®
¬
M3®
¬
M4®
¬
M5
M5 (5th):
Use this position for all normal forward driving.M4 (4th):
For driving up or down long slopes where engine
braking would be advantageous.M3 (3rd) and
M2 (2nd):
Use for hill climbing or engine braking on down-
hill grades.
M1 (1st):
Use this position when climbing steep hills
slowly or driving slowly through deep snow,
sand or mud, or for maximum engine braking on
steep downhill grades.
IRemember not to drive at high speeds for
extended periods of time in lower than
M4
range. This reduces the fuel economy.
IWhen shifting up, move the selector lever to
the + (up) side. (Shifts to higher range.)IWhen shifting down, move the selector lever
to the þ (down) side. (Shifts to lower range.)
IMoving the selector lever to the same side
twice will shift the ranges in succession.
However, if this motion is rapidly done, the
second shifting may not be completed prop-
erly.
IIn the manual shift mode, the transmis-
sion automatically shifts down to 1st
gear before the vehicle comes to a stop.
When accelerating again, it is necessary
to shift up to the desired range.
IWhen canceling the manual shift mode, re-
turn the selector lever to the D position. The
transmission returns to the normal driving
mode.
IIn the manual shift mode, the transmis-
sion may not shift to the selected gear.
This helps maintain driving performance
and reduces the chance of vehicle dam-
age or loss of control.
Accelerator downshift
Ð In D position ÐFor passing or hill climbing, fully depress the
accelerator pedal to the floor. This shifts the
transmission down into the lower gear, depend-
ing on the vehicle speed.
Fail-safeWhen the fail-safe operation occurs, the next
time the key is turned to the ON position, the
warning light will blink for approximately 8
seconds after coming on for 2 seconds. While
the vehicle can be driven under these circum-
stances please note that the gears in the auto-
matic transmission will be locked in 4th gear.
If the vehicle is driven under extreme con-
ditions, such as excessive wheel spinning
and subsequent hard braking, the fail-safe
system may be activated. This will occur
even if all electrical circuits are functioning
properly. In this case, turn the ignition key
OFF and wait for 3 seconds. Then turn the
key back to the ON position. The vehicle
should return to its normal operating con-
dition. If it does not return to its normal
operating condition, have your NISSAN
dealer check the transmission and repair if
necessary.
Starting and driving
5-11
Z
02.9.13/Z33-D/V5.0
X
Page 130 of 227
light, shift to N (Neutral) and release
the clutch pedal with the foot brake
applied.
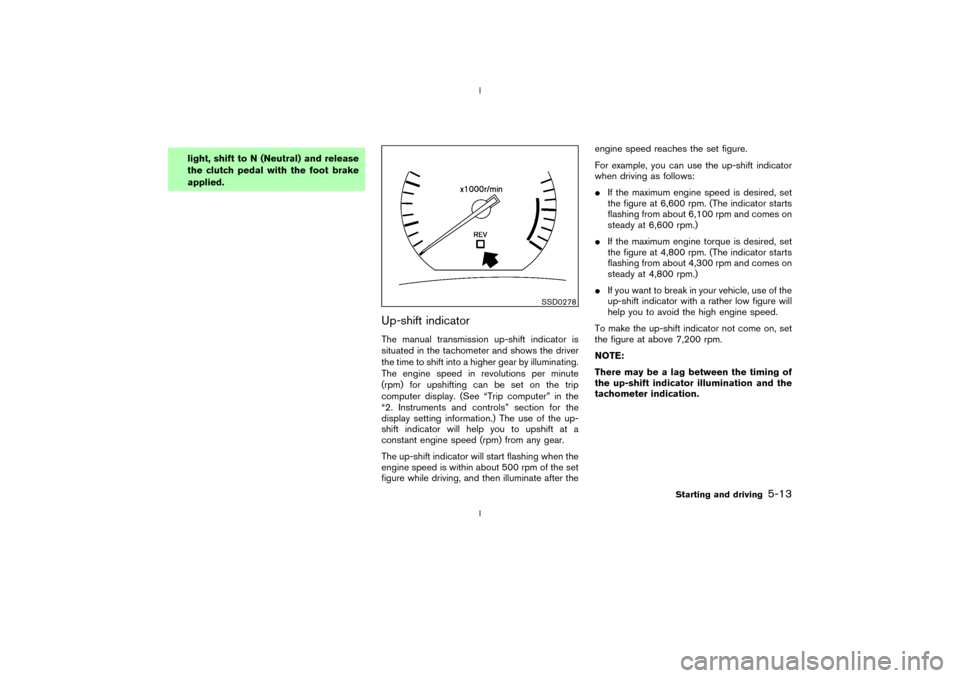
Up-shift indicatorThe manual transmission up-shift indicator is
situated in the tachometer and shows the driver
the time to shift into a higher gear by illuminating.
The engine speed in revolutions per minute
(rpm) for upshifting can be set on the trip
computer display. (See ªTrip computerº in the
ª2. Instruments and controlsº section for the
display setting information.) The use of the up-
shift indicator will help you to upshift at a
constant engine speed (rpm) from any gear.
The up-shift indicator will start flashing when the
engine speed is within about 500 rpm of the set
figure while driving, and then illuminate after theengine speed reaches the set figure.
For example, you can use the up-shift indicator
when driving as follows:
IIf the maximum engine speed is desired, set
the figure at 6,600 rpm. (The indicator starts
flashing from about 6,100 rpm and comes on
steady at 6,600 rpm.)
IIf the maximum engine torque is desired, set
the figure at 4,800 rpm. (The indicator starts
flashing from about 4,300 rpm and comes on
steady at 4,800 rpm.)
IIf you want to break in your vehicle, use of the
up-shift indicator with a rather low figure will
help you to avoid the high engine speed.
To make the up-shift indicator not come on, set
the figure at above 7,200 rpm.
NOTE:
There may be a lag between the timing of
the up-shift indicator illumination and the
tachometer indication.
SSD0278
Starting and driving
5-13
Z
02.9.13/Z33-D/V5.0
X
Page 145 of 227
LOW TIRE PRESSURE WARNING
SYSTEM (if so equipped)The low tire pressure warning system which
displays pressure of all tires (except the spare
tire) on the trip computer by sending a signal
from a sensor that is installed in each wheel. If
the vehicle is being driven with a flat tire or very
low tire pressure (lower than 28 psi), the low tire
pressure warning system will activate and warn
you of it by the low tire pressure warning light (in
the meter panel) or the PSI indicator (on the trip
computer). This system will activate only when
the vehicle is driven at speeds above 20 MPH
(32 km/h). For more details, refer to ªTrip com-
puterº and ªWarning/indicator lights and audible
remindersº in the ª2. Instruments and controlsº
section and ªLow tire pressure warning systemº
in the ª5. Starting and drivingº section.
WARNING
IIf the low tire pressure warning light
comes on and/or the PSI indicator
flashes while driving, avoid sudden
steering maneuvers or abrupt brak-
ing, reduce vehicle speed, pull off the
road to a safe location and stop thevehicle as soon as possible. Serious
vehicle damage could occur and may
lead to an accident and could result
in serious personal injury. Check the
pressure for all four tires and adjust
the pressure to the COLD tire pres-
sure shown on the tire placard. If you
have a flat tire, replace it with a spare
tire as soon as possible.
IWhen a spare tire is mounted or a
wheel is replaced, tire pressure will
not be indicated and the low tire
pressure warning system will not
function. Contact your NISSAN
dealer as soon as possible for tire
replacement and/or system reset-
ting.
IDo not inject any tire liquid or aerosol
tire sealant into the tires, as this may
cause a malfunction of the tire pres-
sure sensors.
CHANGING A FLAT TIREIf you have a flat tire, follow the instructions
below.Stopping the vehicle1. Safely move the vehicle off the road away
from traffic.
2. Turn on the hazard warning flashers.
3. Park on a level surface and apply the parking
brake. Shift the manual transmission into R
(Reverse) position (automatic transmission in
P (Park) position).
4. Turn off the engine.
5. Raise the hood to warn other traffic, and to
signal professional road assistance person-
nel that you need assistance.
6. Have all passengers get out of the vehicle
and stand in a safe place, away from traffic
and clear of the vehicle.
WARNING
IMake sure that the parking brake is
securely applied and the manual
transmission is shifted into R (Re-
FLAT TIRE6-2
In case of emergency
Z
02.9.13/Z33-D/V5.0
X
Page 149 of 227
For models equipped with the low tire
pressure warning system:
After adjusting tire pressure to the COLD tire
pressure, the display of the tire pressure infor-
mation may show higher pressure than the
COLD tire pressure after the vehicle has been
driven more than 1 mile (1.6 km). This is because
the tire pressurizes as the tire temperature rises.
This does not indicate a system malfunction.
WARNING
Retighten the wheel nuts when the ve-
hicle has been driven for 600 miles
(1,000 km) (also in cases of a flat tire,
etc.).Stowing the tire and toolsSecurely store the spare tire and jacking equip-
ment in the vehicle.
WARNING
IAlways make sure that the spare tire
and jacking equipment are properly
secured after use. Such items canbecome dangerous projectiles in an
accident or sudden stop.
IThe T-type spare tire and small size
spare tire are designed for emer-
gency use. See ªWheels and tiresº in
the ª8. Maintenance and do-it-
yourselfº section.To start your engine with a booster battery, the
instructions and precautions below must be
followed.
WARNING
IIf done incorrectly, jump starting can
lead to a battery explosion, resulting
in severe injury or death. It could also
damage your vehicle.
IExplosive hydrogen gas is always
present in the vicinity of the battery.
Keep all sparks and flames away
from the battery.
IDo not allow battery fluid to come
into contact with eyes, skin, cloth or
painted surfaces. Battery fluid is a
corrosive sulphuric acid solution
which can cause severe burns. If the
fluid should come into contact with
anything, immediately flush the con-
tacted area with water.
IKeep battery out of the reach of chil-
dren.
IThe booster battery must be rated atJUMP STARTING
6-6
In case of emergency
Z
02.9.13/Z33-D/V5.0
X
Page 191 of 227
parked for 3 or more hours, or driven less than 1
mile (1.6 km) at moderate speeds. COLD tire
pressures are shown on the tire placard affixed
to the inside of the console box lid.Low tire pressure warning system (if
so equipped)The low tire pressure warning system displays
the tire pressure of all tires (except the spare tire)
on the trip computer by sending a signal from a
sensor that is installed in each wheel. For more
details, refer to ªTrip computerº and ªLow tire
pressure warning lightº in the ª2. Instruments
and controlsº section, ªLow tire pressure warn-
ing systemº in the ª5. Starting and drivingº
section, and ªFlat tireº in the ª6. In case of
emergencyº section. If the tire pressure dis-
played on the trip computer is lower than the
COLD tire pressure shown on the tire placard,
check the pressure of all four tires and adjust
them to the COLD tire pressure as indicated
above. The low tire pressure warning system will
activate only when the vehicle is driven at
speeds above 20 MPH (32 km/h).
WARNING
IImproperly inflated tires can fail sud-
denly and cause an accident.IThe vehicle capacity weight is indi-
cated on the tire placard. Do not load
your vehicle beyond this capacity.
Overloading your vehicle may result
in reduced tire life, unsafe operating
conditions due to premature tire fail-
ure, or unfavorable handling charac-
teristics and could also lead to a
serious accident. Loading beyond the
specified capacity may also result in
failure of other vehicle components.
IBefore taking a long trip, or when-
ever you have loaded your vehicle
heavily, use a tire pressure gauge to
ensure that the tire pressure is at the
specified level.
IDo not drive your vehicle over 85
MPH (140 km/h) unless it is equipped
with high speed capability tires. Driv-
ing faster than 85 MPH (140 km/h)
may result in tire failure, loss of con-
trol and possible injury.
IFor additional information regarding
tires, refer to ªImportant Tire Safety
Informationº (US) or ªTire Safety In-formationº (Canada) in the Warranty
Information booklet.
TYPES OF TIRES
WARNING
IWhen changing or replacing tires, be
sure all four tires are of the same
type (for example, summer, all sea-
son or snow) and construction. Your
NISSAN dealer may be able to help
you with information about tire type,
size, speed rating and availability.
Replacement tires may have a lower
speed rating than the factory
equipped tires, and may not match
the potential maximum vehicle
speed. Never exceed the maximum
speed rating of the tire.
IFor additional information regarding
tires, refer to ªImportant Tire Safety
Informationº (US) or ªTire Safety In-
formationº (Canada) in the Warranty
Information booklet.
8-30
Maintenance and do-it-yourself
Z
02.9.13/Z33-D/V5.0
X