2003 NISSAN 350Z check oil
[x] Cancel search: check oilPage 162 of 227

8 Maintenance and do-it-yourselfMaintenance requirements .................................................. 8-2
General maintenance ............................................................ 8-2
Explanation of general maintenance items ................ 8-2
Maintenance precautions ..................................................... 8-5
Engine compartment check locations .............................. 8-7
Engine cooling system.......................................................... 8-8
Checking engine coolant level...................................... 8-8
Changing engine coolant ............................................... 8-9
Engine oil ............................................................................... 8-10
Checking engine oil level ............................................ 8-10
Changing engine oil and filter .................................... 8-10
Automatic transmission fluid ............................................. 8-12
Power steering fluid ............................................................ 8-13
Brake and clutch fluid ........................................................ 8-13
Brake fluid ....................................................................... 8-13
Clutch fluid ...................................................................... 8-14
Window washer fluid.......................................................... 8-14
Battery .................................................................................... 8-15
Jump starting .................................................................. 8-16
Drive belts ............................................................................. 8-17
Spark plugs ........................................................................... 8-17Replacing spark plugs.................................................. 8-17
Air cleaner ............................................................................. 8-18
Windshield wiper blades ................................................... 8-19
Cleaning ........................................................................... 8-19
Replacing ......................................................................... 8-20
Parking brake and brake pedal ........................................ 8-21
Checking parking brake ............................................... 8-21
Checking brake pedal .................................................. 8-21
Brake booster ................................................................. 8-22
Fuses ...................................................................................... 8-22
Engine compartment ..................................................... 8-22
Passenger compartment .............................................. 8-23
Keyfob battery replacement .............................................. 8-24
Lights ...................................................................................... 8-25
Headlights ....................................................................... 8-26
Exterior and interior lights............................................ 8-27
Wheels and tires ................................................................. 8-29
Tire pressure ................................................................... 8-29
Types of tires .................................................................. 8-30
Tire chains ....................................................................... 8-31
Changing wheels and tires ......................................... 8-31
Z
02.9.13/Z33-D/V5.0
X
Page 165 of 227

Automatic transmission P (Park) position
mechanism:On a fairly steep hill check that the
vehicle is held securely with the selector lever in
the P (Park) position without applying any
brakes.Under the hood and the vehicleThe maintenance items listed here should be
checked periodically (for example, each time you
check the engine oil or refuel).
Windshield washer fluid*:Check that there is
adequate fluid in the tank.
Engine coolant level*:Check the coolant level
when the engine is cold.
Radiator and hoses:Check the front of the
radiator and clean off any dirt, insects, leaves,
etc., that may have accumulated. Make sure the
hoses have no cracks, deformation, deterioration
or loose connections.
Brake and clutch fluid levels*:Make sure that
the brake and clutch fluid levels are between the
MAX and MIN lines on the reservoir.
Battery*:Check the fluid level in each cell. It
should be between the MAX and MIN lines.
Vehicles operated in high temperatures or under
severe conditions require frequent checks of the
battery fluid level.
Engine drive belts*:Make sure that no belt isfrayed, worn, cracked or oily.
Engine oil level*:Check the level on the
dipstick after parking the vehicle on a level spot,
turning off the engine and waiting 10 minutes.
Power steering fluid level* and lines:Check
the level in the reservoir tank with the engine off.
Check the lines for proper attachment, leaks,
cracks, etc.
Exhaust system:Make sure there are no loose
supports, cracks or holes. If the sound of the
exhaust seems unusual or there is a smell of
exhaust fumes, immediately locate the trouble
and correct it. (See ªPrecautions when starting
and drivingº in the ª5. Starting and drivingº
section for exhaust gas (carbon monoxide).)
Underbody:The underbody is frequently ex-
posed to corrosive substances such as those
used on icy roads or to control dust. It is very
important to remove these substances, other-
wise rust will form on the floor pan, frame, fuel
lines and around the exhaust system. At the end
of winter, the underbody should be thoroughly
flushed with plain water, being careful to clean
those areas where mud and dirt may accumu-
late. For additional information, see ªCleaning
exteriorº in the ª7. Appearance and careº sec-
tion.
Fluid leaks:Check under the vehicle for fuel,oil, water or other fluid leaks after the vehicle has
been parked for a while. Water dripping from the
air conditioner after use is normal. If you should
notice any leaks or if gasoline fumes are evident,
check for the cause and have it corrected imme-
diately.8-4
Maintenance and do-it-yourself
Z
02.9.13/Z33-D/V5.0
X
Page 168 of 227
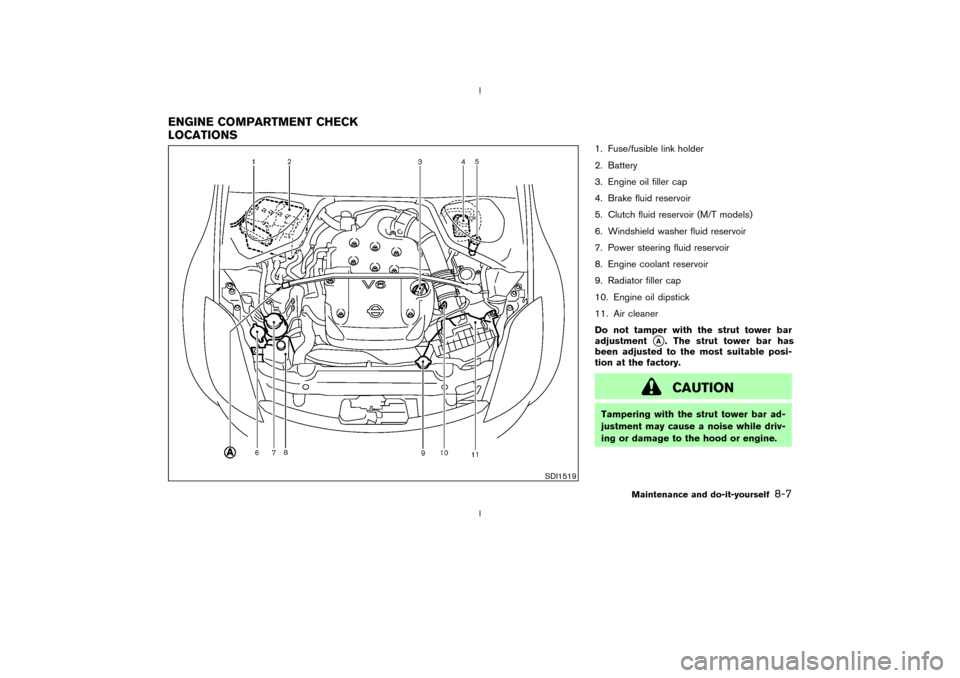
1. Fuse/fusible link holder
2. Battery
3. Engine oil filler cap
4. Brake fluid reservoir
5. Clutch fluid reservoir (M/T models)
6. Windshield washer fluid reservoir
7. Power steering fluid reservoir
8. Engine coolant reservoir
9. Radiator filler cap
10. Engine oil dipstick
11. Air cleaner
Do not tamper with the strut tower bar
adjustment
qA. The strut tower bar has
been adjusted to the most suitable posi-
tion at the factory.CAUTION
Tampering with the strut tower bar ad-
justment may cause a noise while driv-
ing or damage to the hood or engine.
SDI1519
ENGINE COMPARTMENT CHECK
LOCATIONS
Maintenance and do-it-yourself
8-7
Z
02.9.13/Z33-D/V5.0
X
Page 171 of 227
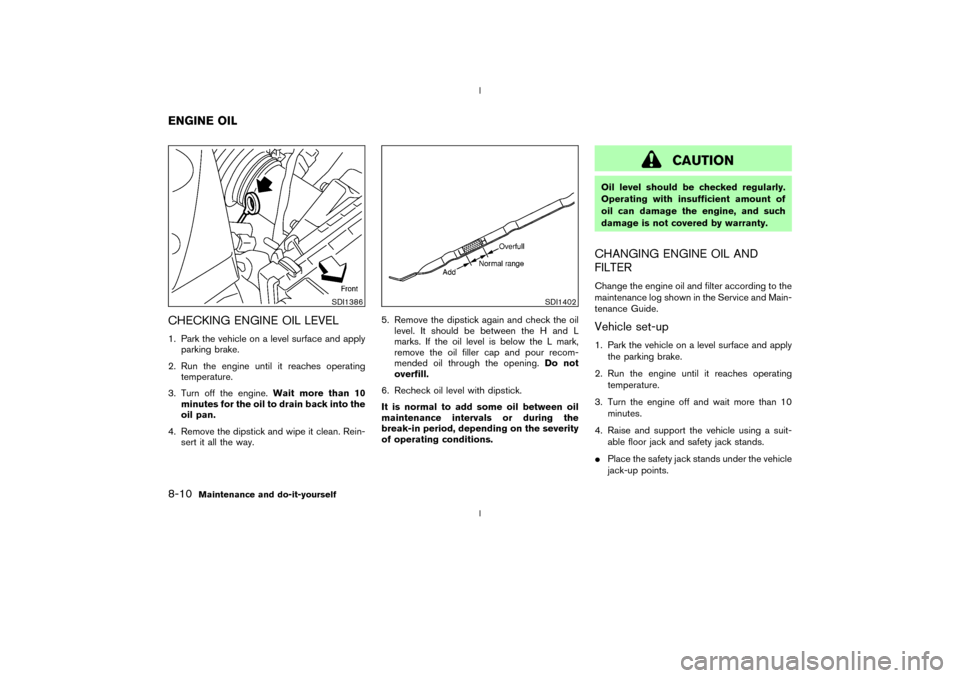
CHECKING ENGINE OIL LEVEL1. Park the vehicle on a level surface and apply
parking brake.
2. Run the engine until it reaches operating
temperature.
3. Turn off the engine.Wait more than 10
minutes for the oil to drain back into the
oil pan.
4. Remove the dipstick and wipe it clean. Rein-
sert it all the way.5. Remove the dipstick again and check the oil
level. It should be between the H and L
marks. If the oil level is below the L mark,
remove the oil filler cap and pour recom-
mended oil through the opening.Do not
overfill.
6. Recheck oil level with dipstick.
It is normal to add some oil between oil
maintenance intervals or during the
break-in period, depending on the severity
of operating conditions.
CAUTION
Oil level should be checked regularly.
Operating with insufficient amount of
oil can damage the engine, and such
damage is not covered by warranty.CHANGING ENGINE OIL AND
FILTERChange the engine oil and filter according to the
maintenance log shown in the Service and Main-
tenance Guide.Vehicle set-up1. Park the vehicle on a level surface and apply
the parking brake.
2. Run the engine until it reaches operating
temperature.
3. Turn the engine off and wait more than 10
minutes.
4. Raise and support the vehicle using a suit-
able floor jack and safety jack stands.
IPlace the safety jack stands under the vehicle
jack-up points.
SDI1386
SDI1402
ENGINE OIL8-10
Maintenance and do-it-yourself
Z
02.9.13/Z33-D/V5.0
X
Page 172 of 227
IA suitable adapter should be attached to the
jack stand saddle.
5. Remove the plastic engine undercover.
a. Remove the small plastic clip at the center
point of the undercover.
b. Then remove the other bolts that hold the
undercover in place.
CAUTION
Make sure the correct lifting and sup-
port points are used to avoid vehicle
damage.
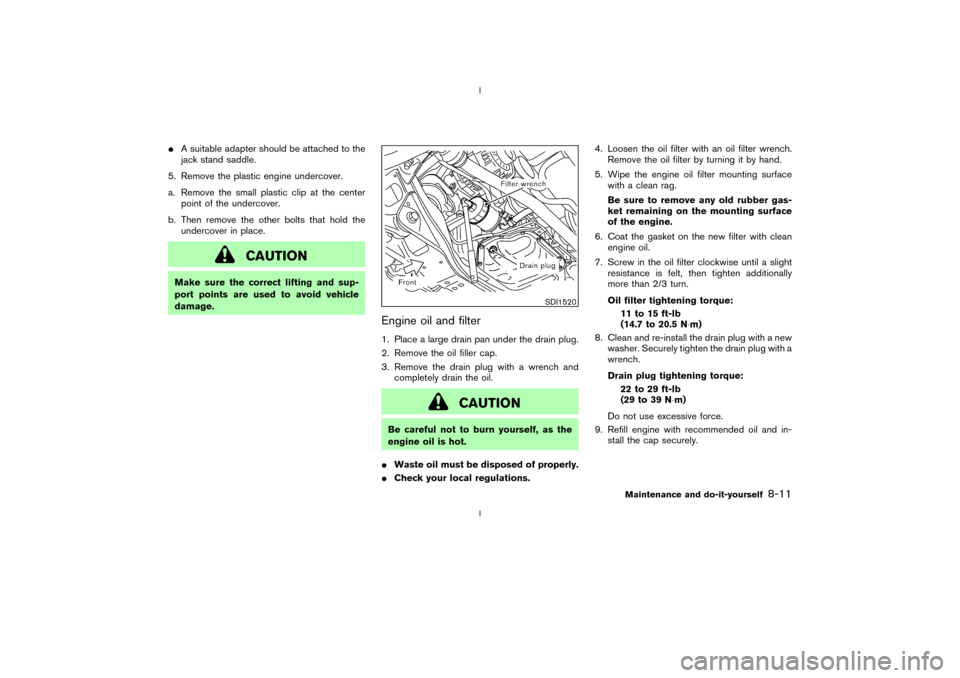
Engine oil and filter1. Place a large drain pan under the drain plug.
2. Remove the oil filler cap.
3. Remove the drain plug with a wrench and
completely drain the oil.
CAUTION
Be careful not to burn yourself, as the
engine oil is hot.
IWaste oil must be disposed of properly.
ICheck your local regulations.4. Loosen the oil filter with an oil filter wrench.
Remove the oil filter by turning it by hand.
5. Wipe the engine oil filter mounting surface
with a clean rag.
Be sure to remove any old rubber gas-
ket remaining on the mounting surface
of the engine.
6. Coat the gasket on the new filter with clean
engine oil.
7. Screw in the oil filter clockwise until a slight
resistance is felt, then tighten additionally
more than 2/3 turn.
Oil filter tightening torque:
11 to 15 ft-lb
(14.7 to 20.5 N×m)
8. Clean and re-install the drain plug with a new
washer. Securely tighten the drain plug with a
wrench.
Drain plug tightening torque:
22 to 29 ft-lb
(29 to 39 N×m)
Do not use excessive force.
9. Refill engine with recommended oil and in-
stall the cap securely.
SDI1520
Maintenance and do-it-yourself
8-11
Z
02.9.13/Z33-D/V5.0
X
Page 173 of 227
CAUTION
The dipstick must be inserted in place to
prevent oil spillage from the dipstick
hole while filling the engine with oil.
See ªCapacities and recommended fuel/
lubricantsº in the ª9. Technical and consumer
informationº section for drain and refill capac-
ity. The drain and refill capacity depends on
the oil temperature and drain time. Use these
specifications for reference only. Always use
the dipstick to determine the proper amount
of oil in the engine.
10.Start the engine and check for leakage
around the drain plug and the oil filter. Cor-
rect as required.
11.Turn the engine off and wait more than 10
minutes. Check the oil level with the dipstick.
Add engine oil if necessary.After the operation1. Install the engine undercover into position as
the following steps.
a. Pull the center of the small plastic clip out.
b. Hold the engine undercover into position.
c. Insert the clip through the undercover into thehole in the frame, then push the center of the
clip in to lock the clip in place.
d. Install the other bolts that hold the under-
cover in place. Be careful not to strip the
bolts or over-tighten them.
2. Lower the vehicle carefully to the ground.
3. Dispose of waste oil and filter properly.
WARNING
IProlonged and repeated contact with
used engine oil may cause skin can-
cer.
ITry to avoid direct skin contact with
used oil. If skin contact is made,
wash thoroughly with soap or hand
cleaner as soon as possible.
IKeep used engine oil out of reach of
children.When checking or replacement is required, we
recommend your NISSAN dealer for servicing.
CAUTION
IUse only Genuine Nissan ATF Matic
Fluid J. Do not mix with other fluids.
IUsing automatic transmission fluid
other than Genuine Nissan ATF Matic
Fluid J will cause deterioration in
driveability and automatic transmis-
sion durability, and may damage the
automatic transmission, which is not
covered by the NISSAN new vehicle
limited warranty.
The specified automatic transmission fluid is
also described on caution labels located in the
engine compartment.AUTOMATIC TRANSMISSION
FLUID
8-12
Maintenance and do-it-yourself
Z
02.9.13/Z33-D/V5.0
X
Page 178 of 227
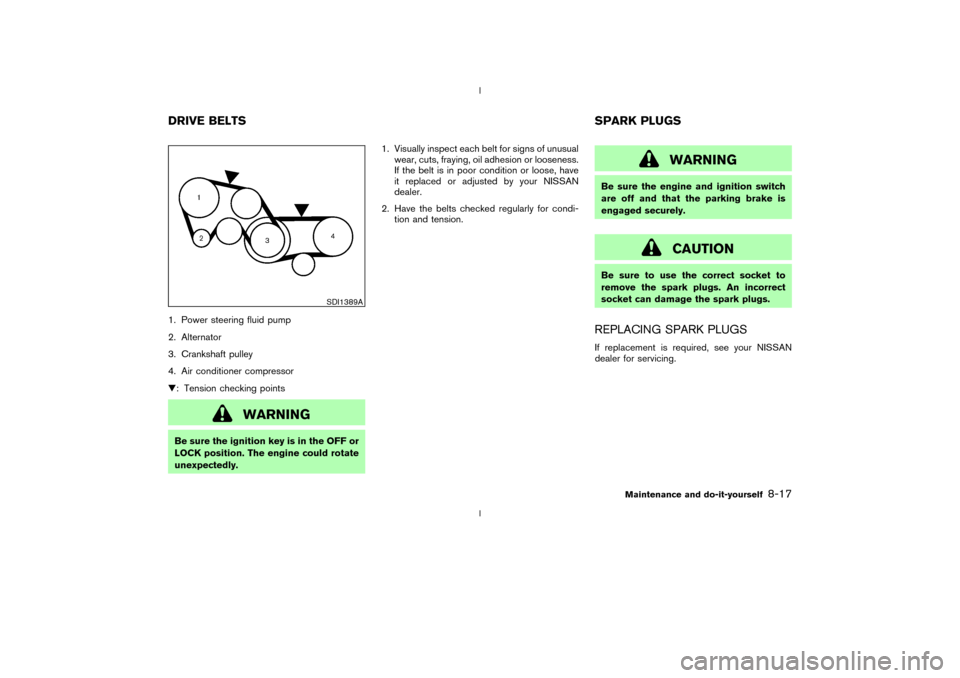
1. Power steering fluid pump
2. Alternator
3. Crankshaft pulley
4. Air conditioner compressor
H: Tension checking points
WARNING
Be sure the ignition key is in the OFF or
LOCK position. The engine could rotate
unexpectedly.1. Visually inspect each belt for signs of unusual
wear, cuts, fraying, oil adhesion or looseness.
If the belt is in poor condition or loose, have
it replaced or adjusted by your NISSAN
dealer.
2. Have the belts checked regularly for condi-
tion and tension.
WARNING
Be sure the engine and ignition switch
are off and that the parking brake is
engaged securely.
CAUTION
Be sure to use the correct socket to
remove the spark plugs. An incorrect
socket can damage the spark plugs.REPLACING SPARK PLUGSIf replacement is required, see your NISSAN
dealer for servicing.
SDI1389A
DRIVE BELTS SPARK PLUGS
Maintenance and do-it-yourself
8-17
Z
02.9.13/Z33-D/V5.0
X
Page 185 of 227
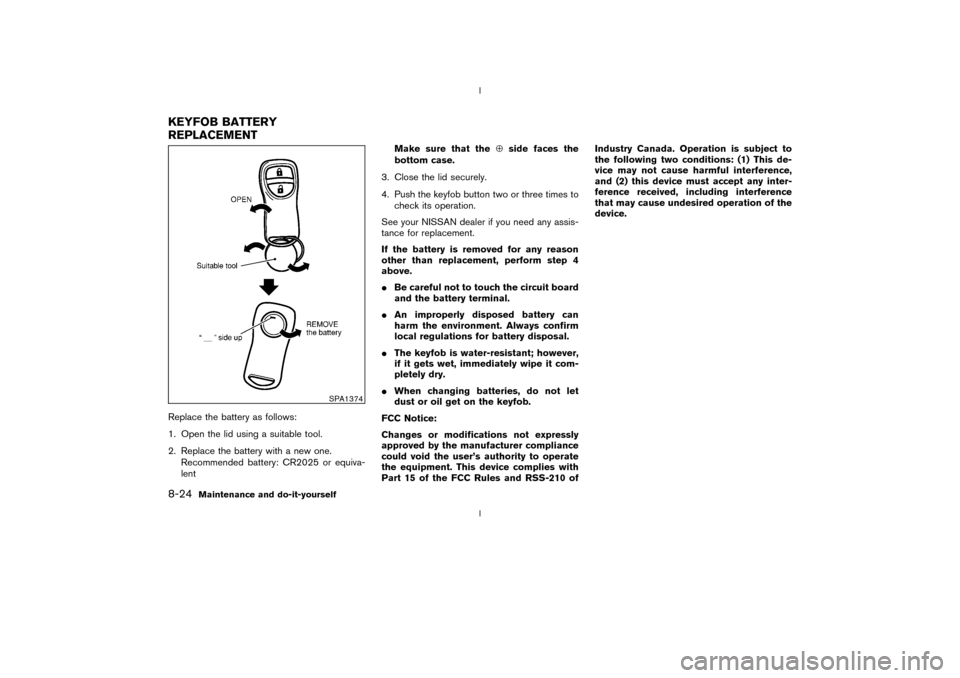
Replace the battery as follows:
1. Open the lid using a suitable tool.
2. Replace the battery with a new one.
Recommended battery: CR2025 or equiva-
lentMake sure that theÅside faces the
bottom case.
3. Close the lid securely.
4. Push the keyfob button two or three times to
check its operation.
See your NISSAN dealer if you need any assis-
tance for replacement.
If the battery is removed for any reason
other than replacement, perform step 4
above.
IBe careful not to touch the circuit board
and the battery terminal.
IAn improperly disposed battery can
harm the environment. Always confirm
local regulations for battery disposal.
IThe keyfob is water-resistant; however,
if it gets wet, immediately wipe it com-
pletely dry.
IWhen changing batteries, do not let
dust or oil get on the keyfob.
FCC Notice:
Changes or modifications not expressly
approved by the manufacturer compliance
could void the user's authority to operate
the equipment. This device complies with
Part 15 of the FCC Rules and RSS-210 ofIndustry Canada. Operation is subject to
the following two conditions: (1) This de-
vice may not cause harmful interference,
and (2) this device must accept any inter-
ference received, including interference
that may cause undesired operation of the
device.
SPA1374
KEYFOB BATTERY
REPLACEMENT8-24
Maintenance and do-it-yourself
Z
02.9.13/Z33-D/V5.0
X